


![[The AI Show Episode 147]: OpenAI Abandons For-Profit Plan, AI College Cheating Epidemic, Apple Says AI Will Replace Search Engines & HubSpot’s AI-First Scorecard](https://www.marketingaiinstitute.com/hubfs/ep%20147%20cover.png)


_Gang_Liu_Alamy.jpg?width=1280&auto=webp&quality=80&disable=upscale#)


![Apple's 20th Anniversary iPhone May Feature Bezel-Free Display, AI Memory, Silicon Anode Battery [Report]](https://www.iclarified.com/images/news/97323/97323/97323-640.jpg)

![Apple Planning Bezel-Free iPhone With 'Four-Sided Bending' Display [Report]](https://www.iclarified.com/images/news/97321/97321/97321-640.jpg)


Monorepos!! Nx vs Turborepo vs Lerna – Part 1: Turborepo
As a developer, choosing the right tooling is critical when adopting a monorepo structure especially when aiming for scalability, efficiency, and code sharing. I recently went through this decision making process at Yosemite Crew, where we are building an Open Source Operating System for Animal Health. This post is the first in a series where we'll walk through setting up a React website, an Express API, and a React Native app using three different monorepo tools. At the end of the series, we'll compare the pros and cons of each approach, and I’ll explain why Turborepo was ultimately the best fit for our use case. Getting Started with the Monorepo We are going to use pnpm(follow the official documentation to install pnpm) as our package manager and vercel's turborepo to handle the monorepo. To begin, we'll follow the official Turborepo documentation. Start by creating your monorepo using pnpm and the Turborepo vite-react template. pnpm dlx create-turbo@latest -e with-vite-react Paste the above command in any terminal and then it will prompt you two questions: Where would you like to create your Turborepo? react-node-native Which package manager do you want to use? npm ❯ pnpm - yarn (not installed) - Bun (beta) (not installed) Enter the project name in the first prompt and select pnpm as the package manager in the second. After you answer the two setup questions, the installation process will begin. This may take a few minutes, depending on your internet speed. Once the setup is complete, open your code editor. You should see the boilerplate structure, which includes one app(web) and three packages(eslint-config, typescript-config, and ui). We can use the web app which comes with the template but i prefer building all my apps from scratch so we will delete the web and create one of our own. Setting Up the React Web App We are going to use the Vite Starter for this Web App. pnpm create vite Use any package name you want just remember to add /apps/ before it. Then select React and Typescript. ◇ Project name: │ /apps/website │ ◇ Select a framework: │ React │ ◇ Select a variant: │ TypeScript You can check out the new React app in the apps folder. From the root folder run: pnpm install pnpm dev This command will start the website and serve it on port 5173. website:dev: VITE v6.3.5 ready in 1607 ms website:dev: website:dev: ➜ Local: http://localhost:5173/ website:dev: ➜ Network: use --host to expose website:dev: ➜ press h + enter to show help You can see the Vite + React on your https://localhost:5173. Setting Up the Node Backend Inside your monorepo root, run these commands. mkdir apps/api cd apps/api pnpm init cd ../../ Install the express and nodemon package to build a basic backend. pnpm add express --filter api pnpm add nodemon -D --filter api Create a new file in the apps/api folder named index.js and paste the following code in it. This is a basic express server. import express from 'express'; const app = express(); const PORT = 3001; app.get('/', (_req, res) => { res.send('Hello from the API!'); }); app.listen(PORT, () => { console.log(`API listening on port ${PORT}`); }); Now add scripts in the package.json file to run the project. The final package.json file will look like this. { "name": "api", "version": "1.0.0", "description": "", "main": "index.js", "scripts": { "dev": "nodemon index.js", "test": "echo \"Error: no test specified\" && exit 1" }, "keywords": [], "author": "", "license": "ISC", "dependencies": { "express": "^5.1.0" }, "devDependencies": { "nodemon": "^3.1.10" } } Now from the root folder run: pnpm dev This command will start both the react website and node api on ports 5173 and 3001 respectively. api:dev: api:dev: > api@1.0.0 dev /Users/suryansh/Projects/react-node-native/apps/api api:dev: > nodemon index.js api:dev: website:dev: website:dev: > website@0.0.0 dev /Users/suryansh/Projects/react-node-native/apps/website website:dev: > vite website:dev: api:dev: [nodemon] 3.1.10 api:dev: [nodemon] to restart at any time, enter `rs` api:dev: [nodemon] watching path(s): *.* api:dev: [nodemon] watching extensions: js,mjs,cjs,json api:dev: [nodemon] starting `node index.js` api:dev: (node:36402) [MODULE_TYPELESS_PACKAGE_JSON] Warning: Module type of file:///Users/suryansh/Projects/react-node-native/apps/api/index.js is not specified and it doesn't parse as CommonJS. api:dev: Reparsing as ES module because module syntax was detected. This incurs a performance overhead. api:dev: To eliminate this warning, add "type": "module" to /Users/suryansh/Projects/react-node-native/apps/api/package.json. api:dev: (Use `node --trace-warnings ...` to show where the warning was created) api:dev: API listening on port 3001 website:dev: 8:19:28 pm [vite] (client) Re-optimizing dependencies

As a developer, choosing the right tooling is critical when adopting a monorepo structure especially when aiming for scalability, efficiency, and code sharing. I recently went through this decision making process at Yosemite Crew, where we are building an Open Source Operating System for Animal Health.
This post is the first in a series where we'll walk through setting up a React website, an Express API, and a React Native app using three different monorepo tools. At the end of the series, we'll compare the pros and cons of each approach, and I’ll explain why Turborepo was ultimately the best fit for our use case.
Getting Started with the Monorepo
We are going to use pnpm(follow the official documentation to install pnpm) as our package manager and vercel's turborepo to handle the monorepo.
To begin, we'll follow the official Turborepo documentation. Start by creating your monorepo using pnpm and the Turborepo vite-react template.
pnpm dlx create-turbo@latest -e with-vite-react
Paste the above command in any terminal and then it will prompt you two questions:
Where would you like to create your Turborepo? react-node-native
Which package manager do you want to use?
npm
❯ pnpm
  - yarn (not installed)
  - Bun (beta) (not installed)
Enter the project name in the first prompt and select pnpm as the package manager in the second.
After you answer the two setup questions, the installation process will begin. This may take a few minutes, depending on your internet speed.
Once the setup is complete, open your code editor. You should see the boilerplate structure, which includes one app(web) and three packages(eslint-config, typescript-config, and ui).
We can use the web app which comes with the template but i prefer building all my apps from scratch so we will delete the web and create one of our own.
Setting Up the React Web App
We are going to use the Vite Starter for this Web App.
pnpm create vite
Use any package name you want just remember to add /apps/ before it. Then select React and Typescript.
◇  Project name:
│  /apps/website
│
◇  Select a framework:
│  React
│
◇  Select a variant:
│  TypeScript
You can check out the new React app in the apps folder. From the root folder run:
pnpm install
pnpm dev
This command will start the website and serve it on port 5173.
website:dev:   VITE v6.3.5  ready in 1607 ms
website:dev:
website:dev:   ➜  Local:   http://localhost:5173/
website:dev:   ➜  Network: use --host to expose
website:dev:   ➜  press h + enter to show help
You can see the Vite + React on your https://localhost:5173.

Setting Up the Node Backend
Inside your monorepo root, run these commands.
mkdir apps/api
cd apps/api
pnpm init
cd ../../
Install the express and nodemon package to build a basic backend.
pnpm add express --filter api
pnpm add nodemon -D --filter api
Create a new file in the apps/api folder named index.js and paste the following code in it. This is a basic express server.
import express from 'express';

const app = express();
const PORT = 3001;

app.get('/', (_req, res) => {
  res.send('Hello from the API!');
});

app.listen(PORT, () => {
  console.log(`API listening on port ${PORT}`);
});
Now add scripts in the package.json file to run the project. The final package.json file will look like this.
{
  "name": "api",
  "version": "1.0.0",
  "description": "",
  "main": "index.js",
  "scripts": {
    "dev": "nodemon index.js",
    "test": "echo \"Error: no test specified\" && exit 1"
  },
  "keywords": [],
  "author": "",
  "license": "ISC",
  "dependencies": {
    "express": "^5.1.0"
  },
  "devDependencies": {
    "nodemon": "^3.1.10"
  }
}
Now from the root folder run:
pnpm dev
This command will start both the react website and node api on ports 5173 and 3001 respectively.
api:dev:
api:dev: > api@1.0.0 dev /Users/suryansh/Projects/react-node-native/apps/api
api:dev: > nodemon index.js
api:dev:
website:dev:
website:dev: > website@0.0.0 dev /Users/suryansh/Projects/react-node-native/apps/website
website:dev: > vite
website:dev:
api:dev: [nodemon] 3.1.10
api:dev: [nodemon] to restart at any time, enter `rs`
api:dev: [nodemon] watching path(s): *.*
api:dev: [nodemon] watching extensions: js,mjs,cjs,json
api:dev: [nodemon] starting `node index.js`
api:dev: (node:36402) [MODULE_TYPELESS_PACKAGE_JSON] Warning: Module type of file:///Users/suryansh/Projects/react-node-native/apps/api/index.js is not specified and it doesn't parse as CommonJS.
api:dev: Reparsing as ES module because module syntax was detected. This incurs a performance overhead.
api:dev: To eliminate this warning, add "type": "module" to /Users/suryansh/Projects/react-node-native/apps/api/package.json.
api:dev: (Use `node --trace-warnings ...` to show where the warning was created)
api:dev: API listening on port 3001
website:dev: 8:19:28 pm [vite] (client) Re-optimizing dependencies because lockfile has changed
website:dev:
website:dev:   VITE v6.3.5  ready in 139 ms
website:dev:
website:dev:   ➜  Local:   http://localhost:5173/
website:dev:   ➜  Network: use --host to expose
website:dev:   ➜  press h + enter to show help
You can also run the api or website only using the filter flag.
pnpm dev --filter api
Setting Up the Bare React Native App
For this section, we’re going with the standard React Native starter, without any framework integrations.
Run the following command in the apps folder:
cd apps
pnpm dlx @react-native-community/cli@latest init mobileApp
Choose y at the question to install CocoaPods now.
✔ Downloading template
✔ Copying template
✔ Processing template
✔ Installing dependencies
✔ Do you want to install CocoaPods now? Needed for running iOS project … yes
The react native starter will then install all the required files and dependencies.
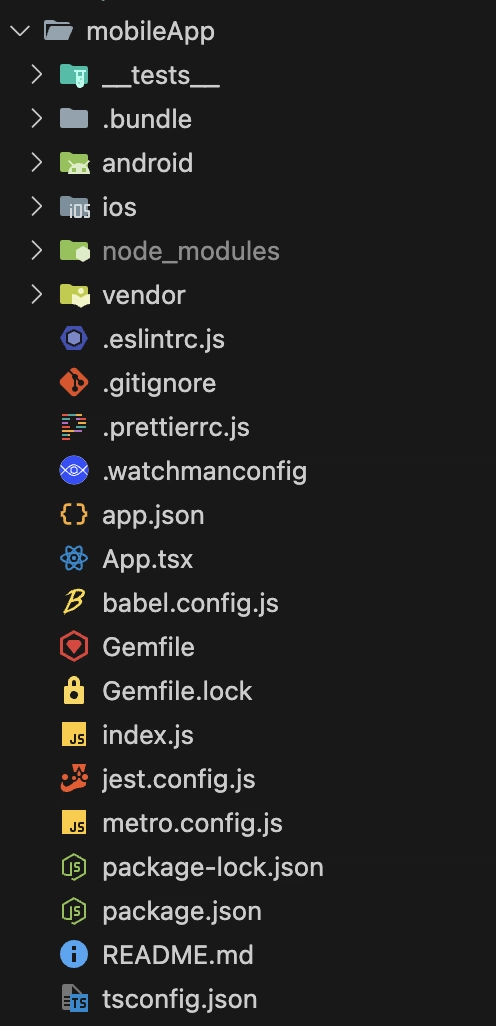
At this stage, all of our mobile app files are located in apps/mobileApp.
However, there's a small issue: since we used @react-native-community/cli@latest to initialize the project, it defaulted to using npm instead of pnpm. To fix this, we need to clean up a few files:
- In apps/mobileApp, delete the package-lock.json file and the node_modules folder.
- Then, navigate to apps/mobileApp/ios and remove the Podfile.lock file and the entire Pods directory.
Once everything has been cleared, you can reinstall the dependencies using pnpm in the root folder:
pnpm install
Then re-install the Pods
cd appd/mobileApp/ios
pod install
At this point, you have a fresh React Native mobile app set up with pnpm. To start the app, open two separate terminal windows and run the following from the /apps/mobileApp folder:
pnpm start
pnpm ios
This should install the app on the iOS simulator, but you'll likely see a blank screen along with an error message in the Metro server console:

This error occurs because we're using pnpm to manage our dependencies. Unlike npm, pnpm uses symlinks in its node_modules, which Metro doesn't support out of the box. As a result, Metro fails to resolve the modules correctly.
To fix this, you need to enable symlink support in Metro. The solution depends on the version of React Native you're using.
For React Native versions≥0.72, update your metro.config.js file to this:
const {getDefaultConfig, mergeConfig} = require('@react-native/metro-config');
const path = require('path');

/**
 * Metro configuration
 *
 *
 * @type {import('metro-config').MetroConfig}
 */
const config = {
  resolver: {
    unstable_enableSymlinks: true, // this enable the use of Symlinks
  },
  // this specifies the folder where are located the node_modules for the project
  watchFolders: [path.join(__dirname, '..', '..')],
};
module.exports = mergeConfig(getDefaultConfig(__dirname), config);
For older React Native versions, the Symlinks option does not exist on Metro itself. We will need some external packages to the rescue.
Install the two packages @rnx-kit/metro-config and @rnx-kit/metro-resolver-symlinks and update your metro.config.js file as follow:
const path = require('path');
const {makeMetroConfig} = require('@rnx-kit/metro-config');
const MetroSymlinksResolver = require('@rnx-kit/metro-resolver-symlinks');

module.exports = makeMetroConfig({
  projectRoot: __dirname,
  resolver: MetroSymlinksResolver(),
  watchFolders: [path.join(__dirname, '..', '..')],
});
After applying the necessary changes, close the app and restart the Metro server using the --reset-cache flag. Then, reopen the app. You should now see the default React Native starter screen.

Resolving Git Submodule Errors
Now that the app is up and running, it's time to commit your changes.
However, there's a small issue with the starter template—it initializes a Git repository inside the newly created apps/mobileApp folder. To get ride of that git submodule, from the root folder:
rm -rf apps/mobileApp/.git
git add .
git commit -m "create mobileApp"
We now have a working mobile app located in the apps folder, fully integrated into the monorepo with a clean Git setup.
Conclusion
With the initial setup complete, we now have a fully functional monorepo that brings together our React (web), React Native (mobile), and Node.js (API) applications. This structure enables us to share configurations, JavaScript utilities, and React hooks across platforms, greatly enhancing development efficiency and ensuring consistent code quality throughout the project.
You can find all the code in the Github Repo.