


![[The AI Show Episode 143]: ChatGPT Revenue Surge, New AGI Timelines, Amazon’s AI Agent, Claude for Education, Model Context Protocol & LLMs Pass the Turing Test](https://www.marketingaiinstitute.com/hubfs/ep%20143%20cover.png)


_Muhammad_R._Fakhrurrozi_Alamy.jpg?width=1280&auto=webp&quality=80&disable=upscale#)
_NicoElNino_Alamy.jpg?width=1280&auto=webp&quality=80&disable=upscale#)


![macOS 15.5 beta 4 now available for download [U]](https://i0.wp.com/9to5mac.com/wp-content/uploads/sites/6/2025/04/macOS-Sequoia-15.5-b4.jpg?resize=1200%2C628&quality=82&strip=all&ssl=1)


![What’s new in Android’s April 2025 Google System Updates [U: 4/28]](https://i0.wp.com/9to5google.com/wp-content/uploads/sites/4/2025/01/google-play-services-3.jpg?resize=1200%2C628&quality=82&strip=all&ssl=1)


![AirPods Pro 2 With USB-C Back On Sale for Just $169! [Deal]](https://www.iclarified.com/images/news/96315/96315/96315-640.jpg)
![Apple Releases iOS 18.5 Beta 4 and iPadOS 18.5 Beta 4 [Download]](https://www.iclarified.com/images/news/97145/97145/97145-640.jpg)
![Apple Seeds watchOS 11.5 Beta 4 to Developers [Download]](https://www.iclarified.com/images/news/97147/97147/97147-640.jpg)
![Apple Seeds visionOS 2.5 Beta 4 to Developers [Download]](https://www.iclarified.com/images/news/97150/97150/97150-640.jpg)


![Apple Seeds Fourth Beta of iOS 18.5 to Developers [Update: Public Beta Available]](https://images.macrumors.com/t/uSxxRefnKz3z3MK1y_CnFxSg8Ak=/2500x/article-new/2025/04/iOS-18.5-Feature-Real-Mock.jpg)
![Apple Seeds Fourth Beta of macOS Sequoia 15.5 [Update: Public Beta Available]](https://images.macrumors.com/t/ne62qbjm_V5f4GG9UND3WyOAxE8=/2500x/article-new/2024/08/macOS-Sequoia-Night-Feature.jpg)


macOS Apps With Embedded Daemons
I recently worked on a prototype for an assistive tool that requires root permissions for some of the tasks it would perform. Instead of writing something that would require being launched using sudo from a script or the command line, I wanted to explore what I consider to be the "most Apple" approach using modern APIs. To me, the modern and Apple way involves: A single app bundle - no actual need for an installer package or anything more complex to uninstall than dragging into the trash. Using the SMAppService framework to handle registering and managing the daemon. This replaces older, more complicated methods like SMJobBless you can still find references to when searching. Calling the daemon from the main app using secure, native interprocess communications over XPC services. When you need a Daemon over a Agent There are a lot of examples out there, and great ones from Apple's own developer docs, on doing what I set out to do with launch agents. Agents (and login items) run as the logged in user. Launch daemons are system level processes that run as the root user. My entire use case is niche as my tool needs to interact with subprocesses that require root. I believe that the majority of the time we should all be fine using agents for this kind of background or async processing in our apps. Embedded agents are also much simpler to get up and running than embedded daemons. To put it succinctly: ask if you truly need elevated permissions for what you want to accomplish. If you don't, don't use a daemon. It's important to call out that agents and daemons cannot just register themselves. It is expected that users will be prompted to approve the background process or login item, and in the case of a daemon they need to authenticate as an admin. The tool I was working on would have been distributed by our MDM solution and I would have automatically allowed the daemon to run via an MDM configuration profile. Know that if you don't have these mechanisms available you will have to manage user approval and navigate scenarios where you don't have it. Create the Project in Xcode As with all things, the only way to begin is by beginning. You don't need an Apple Developer Account for this barebones example, but it is recommended. Open Xcode. Create a new macOS "App" project. Product Name: DaemonExample Team: Select your team, or leave as None Organization Identifier: Use com.example or set your own Interface: SwiftUI Language: Swift Testing System: None Storage: None Create a new "Target" that is a macOS "Command Line Tool" (binary) Product Name: Helper Team: Select your team, or leave as None Organization Identifier: Update to match the parent app's Bundle Identifier will display as: com.example.DaemonExample.Helper Language: Swift Project: DaemonExample Create the Helper The code used in this sample app is directly taken from the XPC project template using High Level - NSXPCConnection API. You can create one in a separate project as a reference to copy from, but don't add an XPC target in this project. Embedded XPC services like this are configured as and meant to be run as agents, not daemons. LaunchDaemon Plist Create a new empty file under the Helper directory called com.example.DaemonExample.Helper. Edit using the plist form view or the raw file. BundleProgram Contents/Resources/Helper Label com.example.DaemonExample.Helper MachServices com.example.DaemonExample.Helper RunAtLoad BundleProgram points to the relative location in our app bundle for the helper's binary. MachServices is an older API we have to drop down to in order to register our helper with XPC. RunAtLoad will ensure this daemon loads during boot time (for agents this runs it at user login). Now ensure this plist is included with the build. Go to the Project > DaemonExample target > Build Phases. Click the + button and select New Copy Files Phase. In the new Copy Files section set the following on the new blank item: Destination: Wrapper Subpath: Contents/Library/LaunchDaemons Click the + button and add the plist file Check Code Sign On Copy for the file Helper Protocol The protocol is the contract (or rather, the API) for client-service communications. When the app connects to make a request it will use this protocol to perform the desired task. The HelperProtocol file needs to be added to the app's target so it is included during the build. Create a new Swift file in the Helper called HelperProtocol. import Foundation /// The protocol that this service will vend as its API. This protocol will also need to be visible to the process hosting the service. protocol HelperProtocol { /// Replace the API of this protocol with an API appropriate to the service you are vending. @objc func performCalculation(firstNumber: Int, secondNumber: Int, with
I recently worked on a prototype for an assistive tool that requires root permissions for some of the tasks it would perform. Instead of writing something that would require being launched using sudo from a script or the command line, I wanted to explore what I consider to be the "most Apple" approach using modern APIs.
To me, the modern and Apple way involves:
- A single app bundle - no actual need for an installer package or anything more complex to uninstall than dragging into the trash.
- Using the
SMAppServiceframework to handle registering and managing the daemon. This replaces older, more complicated methods likeSMJobBlessyou can still find references to when searching. - Calling the daemon from the main app using secure, native interprocess communications over
XPCservices.
When you need a Daemon over a Agent
There are a lot of examples out there, and great ones from Apple's own developer docs, on doing what I set out to do with launch agents. Agents (and login items) run as the logged in user. Launch daemons are system level processes that run as the root user.
My entire use case is niche as my tool needs to interact with subprocesses that require root. I believe that the majority of the time we should all be fine using agents for this kind of background or async processing in our apps. Embedded agents are also much simpler to get up and running than embedded daemons.
To put it succinctly: ask if you truly need elevated permissions for what you want to accomplish. If you don't, don't use a daemon.
It's important to call out that agents and daemons cannot just register themselves. It is expected that users will be prompted to approve the background process or login item, and in the case of a daemon they need to authenticate as an admin.
The tool I was working on would have been distributed by our MDM solution and I would have automatically allowed the daemon to run via an MDM configuration profile. Know that if you don't have these mechanisms available you will have to manage user approval and navigate scenarios where you don't have it.
Create the Project in Xcode
As with all things, the only way to begin is by beginning. You don't need an Apple Developer Account for this barebones example, but it is recommended.
- Open Xcode.
- Create a new macOS "App" project.
- Product Name: DaemonExample
- Team: Select your team, or leave as None
- Organization Identifier: Use com.example or set your own
- Interface: SwiftUI
- Language: Swift
- Testing System: None
- Storage: None
- Create a new "Target" that is a macOS "Command Line Tool" (binary)
- Product Name: Helper
- Team: Select your team, or leave as None
- Organization Identifier: Update to match the parent app's
- Bundle Identifier will display as: com.example.DaemonExample.Helper
- Language: Swift
- Project: DaemonExample
Create the Helper
The code used in this sample app is directly taken from the XPC project template using High Level - NSXPCConnection API. You can create one in a separate project as a reference to copy from, but don't add an XPC target in this project. Embedded XPC services like this are configured as and meant to be run as agents, not daemons.
LaunchDaemon Plist
- Create a new empty file under the
Helperdirectory calledcom.example.DaemonExample.Helper. - Edit using the plist form view or the raw file.
version="1.0">
BundleProgram points to the relative location in our app bundle for the helper's binary. MachServices is an older API we have to drop down to in order to register our helper with XPC. RunAtLoad will ensure this daemon loads during boot time (for agents this runs it at user login).
Now ensure this plist is included with the build.
- Go to the
Project>DaemonExampletarget >Build Phases. - Click the
+button and selectNew Copy Files Phase. - In the new
Copy Filessection set the following on the new blank item:- Destination: Wrapper
- Subpath: Contents/Library/LaunchDaemons
- Click the
+button and add the plist file - Check
Code Sign On Copyfor the file
Helper Protocol
The protocol is the contract (or rather, the API) for client-service communications. When the app connects to make a request it will use this protocol to perform the desired task. The HelperProtocol file needs to be added to the app's target so it is included during the build.
- Create a new Swift file in the
HelpercalledHelperProtocol.
import Foundation

/// The protocol that this service will vend as its API. This protocol will also need to be visible to the process hosting the service.
protocol HelperProtocol {

    /// Replace the API of this protocol with an API appropriate to the service you are vending.
    @objc func performCalculation(firstNumber: Int, secondNumber: Int, with reply: @escaping (Int) -> Void)
}
If you want, you can move this protocol file out of the
Helperdirectory and into another directory that clearly shows it is shared code. The only requirement is that it is included in both targets
- Create a new Swift file in the
HelpercalledHelper(not confusing, I know).
import Foundation

/// This object implements the protocol which we have defined. It provides the actual behavior for the service. It is 'exported' by the service to make it available to the process hosting the service over an NSXPCConnection.
class Helper: NSObject, HelperProtocol {

    /// This implements the example protocol. Replace the body of this class with the implementation of this service's protocol.
    @objc func performCalculation(firstNumber: Int, secondNumber: Int, with reply: @escaping (Int) -> Void) {
        let response = firstNumber + secondNumber
        reply(response)
    }
}
This is the code that performs the actual work. It is only included with the Helper target. When we want to add new functionality to the Helper we add it to this class and add a corresponding entry to the protocol.
main
Update the main file with the code below. Again, this is take directly from Apple's template code for an XPC service but with logging added.
import Foundation
import os

let logger = Logger(subsystem: "com.example.DaemonExample.Helper", category: "Default")

class ServiceDelegate: NSObject, NSXPCListenerDelegate {

    /// This method is where the NSXPCListener configures, accepts, and resumes a new incoming NSXPCConnection.
    func listener(_ listener: NSXPCListener, shouldAcceptNewConnection newConnection: NSXPCConnection) -> Bool {
        logger.info("Received new connection request")

        newConnection.interruptionHandler = {
            // Handle interrupted connections here
            logger.error("Connection interrupted")
        }

        newConnection.invalidationHandler = {
            // Handle invalidated connections here
            logger.error("Connection invalidated")
        }

        // Configure the connection.
        // First, set the interface that the exported object implements.
        newConnection.exportedInterface = NSXPCInterface(with: HelperProtocol.self)

        // Next, set the object that the connection exports. All messages sent on the connection to this service will be sent to the exported object to handle. The connection retains the exported object.
        let exportedObject = Helper()
        newConnection.exportedObject = exportedObject

        // Resuming the connection allows the system to deliver more incoming messages.
        newConnection.resume()

        // Returning true from this method tells the system that you have accepted this connection. If you want to reject the connection for some reason, call invalidate() on the connection and return false.
        logger.info("Connection configured and resumed")
        return true
    }
}

// Create the delegate for the service.
let delegate = ServiceDelegate()
logger.info("Delegate created")

// Create and start the listener
let listener = NSXPCListener(machServiceName: "com.example.DaemonExample.Helper")
logger.info("Listener created")
listener.delegate = delegate

// Resuming the serviceListener starts this service. This method does not return.
listener.resume()
logger.info("Listener resumed")

// Keep the main run loop running
RunLoop.current.run()
Info.plist and Signing
- Go to the
Project>Helperbinary target >Signing & Capabilities. - In the top section set
Bundle Identifierto com.example.DaemonExample.Helper
The macOS section will change removing its Bundle Identifier field.
- Go to
Build Settings - Scroll to the
Packagingsection. - Update the following values.
- Create Info.plist Section in Binary: Yes
- Generate Info.plist File: Yes
- Info.plist Output Encoding: binary
Embedding the Helper
- Go to the
Project>DaemonExampleapp target >Build Phases.
First add the Helper as a dependency in the build.
- In the
Target Dependenciessection click the+button. - Select
DaemonExample/Helperand clickAdd.
Now include the resulting build of the Helper in the app's bundle resources.
- In the
Copy Bundle Resourcessection click the+button. - Select
Products/Helperand clickAdd.
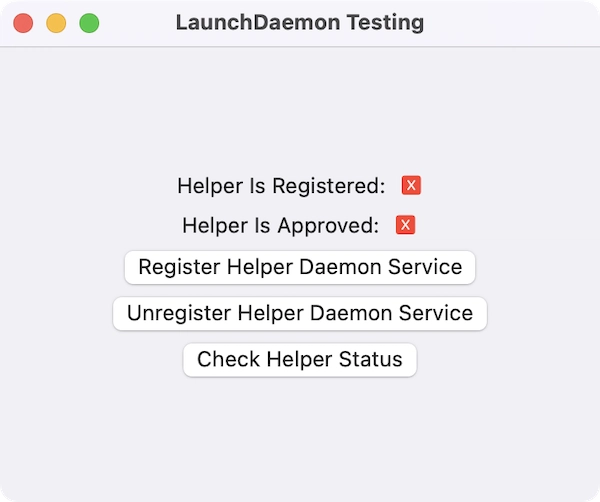
The App
Most of the code below is defining the user interface of the app - which runs as the user. There are a couple lines to show the status of the Helper and some controls to manage it and check the state (which outputs into the log stream).
Once the Helper is registered and loaded additional inputs will be revealed for the addition operation it performs. The result will be output at the bottom of the window.
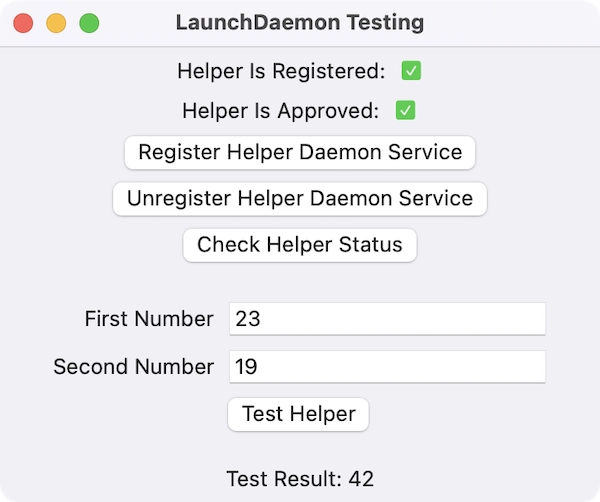
Remember this will require the user granting permission for it to run in the background.

Replace the contents of the ContentView file with the following.
import ServiceManagement
import SwiftUI

struct ContentView: View {
    let helperServiceName = "com.example.DaemonExample.Helper"
    var helperServicePlist: String {
        helperServiceName + ".plist"
    }

    @State private var helperRegistered: Bool = false
    @State private var helperApproved: Bool = false

    @State private var testResult: Int?

    var body: some View {
        VStack {
            HStack {
                Text("Helper Is Registered:")
                Image(systemName: helperRegistered ? "checkmark.square.fill" : "x.square.fill")
                    .foregroundColor(helperRegistered ? Color.green : Color.red)
            }

            HStack {
                Text("Helper Is Approved:")
                Image(systemName: helperApproved ? "checkmark.square.fill" : "x.square.fill")
                    .foregroundColor(helperApproved ? Color.green : Color.red)
            }

            Button("Register Helper Daemon Service") {
                print("Registering \(helperServicePlist)")
                let service = SMAppService.daemon(plistName: helperServicePlist)

                do {
                    try service.register()
                    print("Successfully registered \(service)")
                    checkHelperStatus()
                } catch {
                    print("Unable to register \(error)")
                }
            }

            Button("Unregister Helper Daemon Service") {
                print("Unregistering \(helperServicePlist)")
                let service = SMAppService.daemon(plistName: helperServicePlist)

                do {
                    try service.unregister()
                    print("Successfully unregistered \(service)")
                    helperRegistered = false
                    helperApproved = false
                    testResult = nil
                } catch {
                    print("Unable to unregister \(error)")
                }
            }

            Button("Check Helper Status") {
                checkHelperStatus()
            }

            if helperRegistered && helperApproved {
                Button("Test Helper") {
                    print("TEST: Sending Helper Request")

                    let connection = NSXPCConnection(machServiceName: helperServiceName)
                    print("TEST: Connection: \(connection)")

                    connection.remoteObjectInterface = NSXPCInterface(with: HelperProtocol.self)
                    connection.interruptionHandler = {
                        print("TEST: XPC connection interrupted")
                    }
                    connection.invalidationHandler = {
                        print("TEST: XPC connection invalidated")
                    }
                    connection.resume()
                    print("TEST: Connection resumed")

                    if let proxy = connection.remoteObjectProxy as? HelperProtocol {
                        print("TEST: Proxy: \(proxy)")
                        proxy.performCalculation(firstNumber: 23, secondNumber: 19) { result in
                            print("Result of calculation is: \(result)")
                            testResult = result
                        }
                        print("TEST: Done")
                    }

                    // connection.invalidate()
                }
            }

            if testResult != nil {
                Text("Test Result: \(testResult!)")
            }
        }
        .padding()
        .navigationTitle("LaunchDaemon Testing")
        .onAppear() {
            checkHelperStatus()
        }
    }

    func checkHelperStatus() {
        print("Checking Helper Daemon Service Status")
        let service = SMAppService.daemon(plistName: helperServicePlist)
        print("Helper Daemon Service Status: \(service.status)")

        if service.status == .enabled {
            print("Helper Daemon Service is enabled")
            helperRegistered = true

            if service.status == .requiresApproval {
                print("Helper Daemon Service requires approval")
                SMAppService.openSystemSettingsLoginItems()
            } else {
                print("Helper Daemon Service is approved")
                helperApproved = true
            }
        }
    }
}
The Test Helper button contains all of the code to connect to the daemon over XPC and then invoke it via the protocol defined before. The key line is here:
if let proxy = connection.remoteObjectProxy as? HelperProtocol {
The HelperProtocol is being used for the proxy object and all of the methods our daemon accepts are exposed for use in a type safe manner.
Remember, this code is directly taken from the
XPCproject template usingHigh Level - NSXPCConnectionAPI. Check out Apple's docs for a deep dive into this.
Securing the Helper
Not covered in the example above is locking down communication to our Helper to only the app. In some cases you might want to design a background tool in this way so it is usable across many apps, but I do not recommend leaving it completely open.
As this example is a daemon running with root permissions you should never allow just any process to call it.
In the main file for the Helper we can add code that will perform a codesigning check on the caller and reject mismatches. The ellipsis (...) indicate skipped code from the full example earlier in this post.
class ServiceDelegate: ...
func listener(_ listener: ...
...
let exportedObject = Helper()
newConnection.exportedObject = exportedObject
// Only allow connections from the main app
let requirement = "identifier \"com.example.DaemonExample\" and anchor apple generic and certificate leaf[subject.CN] = \"Apple Development: me@mac.com () \""
newConnection.setCodeSigningRequirement(requirement)
newConnection.resume()
...
}
}
This anchor string can be made as loose or as specific as you need for your goals. This code requirement string represents basic check against an individual Apple Developer account.
On the Hardened Runtime & App Sandbox
For most apps you should always have the hardened runtime and app sandboxes enabled in your projects. These are platform security features and are good things.
For my tool, which I stated is a niche case, my daemon would have been running shell commands as root which means I would need to remove the app sandbox as sandboxed apps are not allowed to do this.
These two capabilities are set for each target in Xcode. If the app is sandboxed the helper must also be sandboxed. If your helper isn't sandboxed your app can't be sandboxed.
If the app is sandboxed it must also have the App Groups capability for XPC communication to ensure the app and the Helper are using the same container and are allowed to communicate.
| App Sandboxed | Helper Sandboxed | App Group Required? |
|---|---|---|
| Yes | Yes | Yes |
| No | No | No |
- Go to the
Project>DaemonExampleapp target >Signing & Capabilities. - Click the
+ Capabilitybutton. - In the new
App Groupssection click the+button. - Change the ${TeamIdentifierPrefix} value to com.example.DaemonExample
Troubleshooting
Troubles do arise, and with background services it becomes trickier because their output will not appear in Xcode. Only the main app's logs will.
The below log commands will help you debug issues registering and running your background service. This is one of the times where I will whole heartedly endorse the use of an LLM: they are great and taking verbose log output and telling you what you're looking at and possible causes.
SMAppService
Stream logs relevant to service registration.
sudo log stream --debug --info --predicate "process in { '', 'smd', 'backgroundtaskmanagementd'} and sender in {'ServiceManagement', 'BackgroundTaskManagement', 'smd', 'backgroundtaskmanagementd'}"
Taken from an Apple Framework Engineer's post on the Developer Forums.
Helper Logs
sudo log show --debug --predicate 'eventMessage CONTAINS "com.example.DaemonExample.Helper"' --last 30s
Links
- Updating your app package installer to use the new Service Management API (Apple Service Management docs) https://developer.apple.com/documentation/servicemanagement/updating-your-app-package-installer-to-use-the-new-service-management-api