


![[The AI Show Episode 144]: ChatGPT’s New Memory, Shopify CEO’s Leaked “AI First” Memo, Google Cloud Next Releases, o3 and o4-mini Coming Soon & Llama 4’s Rocky Launch](https://www.marketingaiinstitute.com/hubfs/ep%20144%20cover.png)


![GrandChase tier list of the best characters available [April 2025]](https://media.pocketgamer.com/artwork/na-33057-1637756796/grandchase-ios-android-3rd-anniversary.jpg?#)


.png?width=1920&height=1920&fit=bounds&quality=70&format=jpg&auto=webp#)


![Global security vulnerability database gets 11 more months of funding [u]](https://photos5.appleinsider.com/gallery/63338-131616-62453-129471-61060-125967-51013-100774-49862-97722-Malware-Image-xl-xl-xl-(1)-xl-xl.jpg)


![Apple Releases tvOS 18.4.1 for Apple TV [Download]](https://www.iclarified.com/images/news/97047/97047/97047-640.jpg)
![Apple Releases macOS Sequoia 15.4.1 [Download]](https://www.iclarified.com/images/news/97049/97049/97049-640.jpg)
![Apple Releases iOS 18.4.1 and iPadOS 18.4.1 [Download]](https://www.iclarified.com/images/news/97043/97043/97043-640.jpg)


Interesting CSS features that reduce the need for javascript
This article is all about reducing the need of JavaScript and keeping things simple using pure css. I have curated a list for you with examples. As we know, more and more interesting CSS features are introduced in CSS. These features make our lives easier and also allow us to write code with some good practices. We used JavaScript to do most of our work, even for simple interactions. But now, CSS takes care of most of the things. 1) Validating Number Range Input Let’s say we want to add validation styling for the Input type number field between 0 (min) & 50 (max) values. In the old days, this kind of interaction could only be added using JavaScript. But now, it can be achieved simply using CSS pseudo-class :in-range & :out-of-range. Here is a simplified example: I’ve defined an HTML input of type number and set the range using min/max attributes: Using CSS pseudo-class :in-range & :out-of-range to achieve conditional styling: // number is in-range input:in-range { border: 1px solid green; } // number is out-of-range input:out-of-range { border: 1px solid red; } 2) Input Validation Error Indicator We can also style invalid input, where the condition is not fulfilled. It can be achieved using CSS Pseudo-class :invalid . Define an input with the required attribute to tell the user this field is required, To give a proper indication we need to style the input element. This is how we define the input element: Style invalid input Using CSS pseudo-class :invlaid . input:invalid { border: 3px solid red; } 3) Paragraph Styling & Control Imagine, you are building a blog post page, and you have to dynamically set the text size of the first letter of the first word to bigger than other letters, or you want to style the first line, or maybe you want to add extra content of your choice before or after the element. It all can be achieved using CSS. See the below with the example code: Take the blog post example and let’s define the HTML: This is the first paragraphy of blog post. Lorem, ipsum dolor sit amet consectetur adipisicing elit. Dolorem dolorum fugiat explicabo ad eveniet minus nostrum eum distinctio quidem pariatur velit obcaecati, ea, perferendis laudantium tenetur necessitatibus, vel eos ipsum. Now, we can achive many things from CSS That's all This is how our output looks right now, 1) Now, taking our first example, style the first letter of our blog post using :first-letter pseudo-class. p:first-of-type:first-letter { font-size: 2rem; color: red; } As you can see, we can easily style the first letter of the paragraph using CSS. 2) Our Second challenge is to style the first line of the paragraph, by making italic text and increasing the font size to make it unique than other elements. p:first-of-type:first-line { font-style: italic; font-size: 1.2rem; } Here is an output: 3) Move forward to step three, this time we style our alert section and add extra content at the start dynamically. div.note-alert { border: 1px solid blue; padding: 10px; } div.note-alert::before { content: "Notice: "; color: blue; font-size: 1.2rem; font-weight: 800; text-transform: uppercase; } So, here is the output of where we have added “Notice” an extra element at the start, and also style it using only CSS. 4) at the end, let’s add a goodbye message at the end of our blog post after the last paragraph, which can also be achieved using CSS. p:last-of-type::after { content: "Thanks for Reading, Please Like, share and comment"; display: block; margin-top: 20px; font-style: italic; font-weight: bold; } Here is the output of our last challenge, see how we have added the goodbye message at the end of the paragraph. 4) Styling the Editable Content on Webpage Do you know, you can also edit content in HTML? In case you don’t, just add the contenteditable the attribute in any HTML tag so you can easily edit the content on the webpage like Input Element. You can easily do many things with it, but in this article, I’m going to show one example. Let’s see an example of how to identify editable content on the webpage and style it using CSS. This paragraph can be read-only This paragraph can be editable Now, take the above code, and we’ll style editable content with a green color and others with red. p:read-only { color: red; } p:read-write { color: green; } 5) Allow/Disallow User Selection Sometimes, based on requirements we don’t allow users to select text on the webpage. This can be easily achieved by using CSS. We can also disable selection for the whole webpage to a single paragraph using user-select property. You'll learn m
This article is all about reducing the need of JavaScript and keeping things simple using pure css. I have curated a list for you with examples.
As we know, more and more interesting CSS features are introduced in CSS. These features make our lives easier and also allow us to write code with some good practices. We used JavaScript to do most of our work, even for simple interactions. But now, CSS takes care of most of the things.
1) Validating Number Range Input
Let’s say we want to add validation styling for the Input type number field between 0 (min) & 50 (max) values. In the old days, this kind of interaction could only be added using JavaScript. But now, it can be achieved simply using CSS pseudo-class :in-range & :out-of-range.
Here is a simplified example:
I’ve defined an HTML input of type number and set the range using min/max attributes:
type="number" min="0" max="50" />
Using CSS pseudo-class :in-range & :out-of-range to achieve conditional styling:
    // number is in-range
    input:in-range {
     border: 1px solid green;
    }

    // number is out-of-range
    input:out-of-range {
     border: 1px solid red;
    }
2) Input Validation Error Indicator
We can also style invalid input, where the condition is not fulfilled. It can be achieved using CSS Pseudo-class :invalid .
Define an input with the required attribute to tell the user this field is required, To give a proper indication we need to style the input element.
This is how we define the input element:
type="text" required />
Style invalid input Using CSS pseudo-class :invlaid .
    input:invalid {
     border: 3px solid red;
    }
3) Paragraph Styling & Control
Imagine, you are building a blog post page, and you have to dynamically set the text size of the first letter of the first word to bigger than other letters, or you want to style the first line, or maybe you want to add extra content of your choice before or after the element. It all can be achieved using CSS.
See the below with the example code:
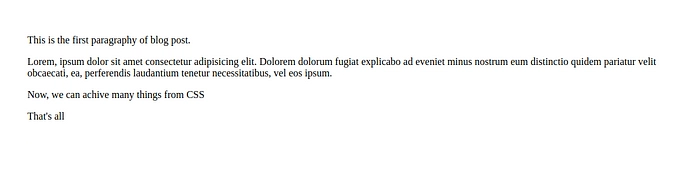
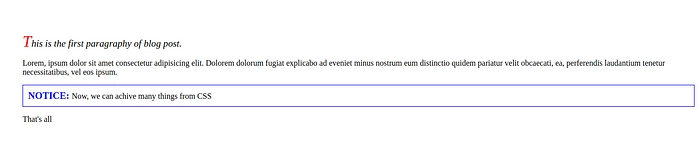
Take the blog post example and let’s define the HTML:
     class="blog-container">
     This is the first paragraphy of blog post.
     Lorem, ipsum dolor sit amet consectetur adipisicing elit. Dolorem dolorum fugiat explicabo ad eveniet minus nostrum eum distinctio quidem pariatur velit obcaecati, ea, perferendis laudantium tenetur necessitatibus, vel eos ipsum.
class="note-alert">Now, we can achive many things from CSS This is how our output looks right now,
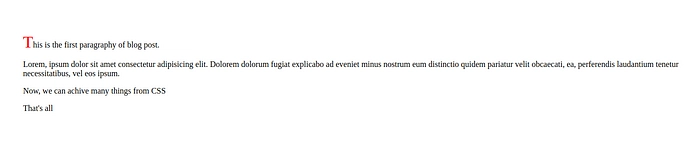
1) Now, taking our first example, style the first letter of our blog post using :first-letter pseudo-class.
    p:first-of-type:first-letter {
     font-size: 2rem;
     color: red;
    }
As you can see, we can easily style the first letter of the paragraph using CSS.
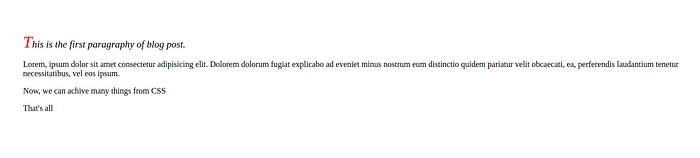
2) Our Second challenge is to style the first line of the paragraph, by making italic text and increasing the font size to make it unique than other elements.
    p:first-of-type:first-line {
     font-style: italic;
     font-size: 1.2rem;
    }
Here is an output:
3) Move forward to step three, this time we style our alert section and add extra content at the start dynamically.
    div.note-alert {
     border: 1px solid blue;
     padding: 10px;
    }
    div.note-alert::before {
     content: "Notice: ";
     color: blue;
     font-size: 1.2rem;
     font-weight: 800;
     text-transform: uppercase;
    }
So, here is the output of where we have added “Notice” an extra element at the start, and also style it using only CSS.
4) at the end, let’s add a goodbye message at the end of our blog post after the last paragraph, which can also be achieved using CSS.
    p:last-of-type::after {
     content: "Thanks for Reading, Please Like, share and comment";
     display: block;
     margin-top: 20px;
     font-style: italic;
     font-weight: bold;
    }
Here is the output of our last challenge, see how we have added the goodbye message at the end of the paragraph.

4) Styling the Editable Content on Webpage
Do you know, you can also edit content in HTML? In case you don’t, just add the contenteditable the attribute in any HTML tag so you can easily edit the content on the webpage like Input Element.
You can easily do many things with it, but in this article, I’m going to show one example.
Let’s see an example of how to identify editable content on the webpage and style it using CSS.
    This paragraph can be read-only
     contenteditable="true">This paragraph can be editable
Now, take the above code, and we’ll style editable content with a green color and others with red.
    p:read-only {
      color: red;
    }

    p:read-write {
      color: green;
    }
5) Allow/Disallow User Selection
Sometimes, based on requirements we don’t allow users to select text on the webpage. This can be easily achieved by using CSS. We can also disable selection for the whole webpage to a single paragraph using user-select property. You'll learn more about at MDN docs.
See the example given below to understand how it works:
    p {
     user-select: none;
    }
In the above, I showed you how to disallow user selection for all paragraphs on the webpage.
Many websites provide multiple theming options, most of them in dark or light mode. Now, we can able to create multiple themes using CSS prefers-color-scheme media query. Using this we can easily detect and set styling without the need for javascript.
Many websites provide multiple theming options, most of them in dark or light mode. Now, we can able to create multiple themes using CSS prefers-color-scheme media query. Using this we can easily detect and set styling without the need for javascript.
Let’s see the below example:
    /* Default Light Mode */
    body {
      background-color: white;
      color: black;
    }

    /* Dark Mode */
    @media (prefers-color-scheme: dark) {
      body {
        background-color: black;
        color: white;
      }
    }
This Blog Originally Posted at Programmingly.dev. Understand & Learn Web by Joining our Newsletter for Web development & Design Articles