


![[The AI Show Episode 145]: OpenAI Releases o3 and o4-mini, AI Is Causing “Quiet Layoffs,” Executive Order on Youth AI Education & GPT-4o’s Controversial Update](https://www.marketingaiinstitute.com/hubfs/ep%20145%20cover.png)


_Andreas_Prott_Alamy.jpg?width=1280&auto=webp&quality=80&disable=upscale#)


![Apple Ships 55 Million iPhones, Claims Second Place in Q1 2025 Smartphone Market [Report]](https://www.iclarified.com/images/news/97185/97185/97185-640.jpg)


How to Design Among Us Characters Using 3D CAD Software
How to Design Among Us Characters Using 3D CAD Software One particularly fun and educational project for beginners is creating characters from Among Us, the viral social deduction game recognized for its simple yet iconic crewmates. These characters, with their rounded bodies, stubby limbs, and distinctive visors, offer an excellent opportunity to learn fundamental 3D modeling skills such as extrusion, scaling, and mirroring. SelfCAD’s features; like its 3D shapes, sculpting tools, and rendering options—make it especially suitable for recreating these stylized forms. In this article, we will walk through the process of designing an Among Us character from scratch using SelfCAD. We’ll begin by building the base body using 3D shapes, then add details and finally apply color to the final model. Each step will demonstrate how SelfCAD’s tools can be used efficiently to model, refine, and finish a character design. Whether you’re a student, a beginner in 3D modeling, or simply a fan of the game, this project will help develop a deeper understanding of both character design principles and digital modeling techniques. To access the interactive tutorial to this article, check out; https://www.selfcad.com/tutorials/336664465e1du2o15105v4j1fy3j6313m4s1 Once you’ve launched the editor; From the 3D Shapes category on the toolbar choose capsule; Set position y to 20 Tick the checkmark to finalize capsule Click scale on the toolbar; Set x to 40, y to 80 Click ‘x’ to close transformation panel From the 3D Shapes category on the toolbar choose capsule; Set top radius to 12, bottom radius to 12, height to 50, position y to 10, position z to 13 Tick the checkmark to finalize capsule From the utilities category on the toolbar choose mirror; Set create copy to true, direction to back, offset to 1 Tick the checkmark to finalize mirror From the 3D Shapes category on the toolbar choose capsule; Set top radius to 10, bottom radius to 10, height to 33, position x to -18, position y to 50 Tick the checkmark to finalize capsule Click scale on the toolbar; Set z to 25 Click ‘x’ to close transformation panel From the 3D Shapes category on the toolbar choose capsule; Set top radius to 8, bottom radius to 8, height to 25, position x to 18, position y to 75 Tick the checkmark to finalize capsule Click scale on the toolbar; Set z to 30 Click ‘x’ to close transformation panel Click color picker button to change color of object; Click white Click ok Click on mesh 8, mesh 8(1), mesh 4 to select Click stitch & scoop on the toolbar; From the tool panel choose union. Tick the checkmark to finalize union Click on mesh 12 to select it Click stitch & scoop on the toolbar; from the tool panel choose difference, Choose mesh 12 to subtract, and set keep subtracted objects to true Tick the checkmark to finalize difference Click copy button to copy selected objects Click move on the toolbar; Set z to 100. Click ‘x’ to close transformation panel From the 3D Shapes category on the toolbar choose capsule; Set top radius to 7, bottom radius to 7, position y to 60, position z to 80, rotation z to 90 Tick the checkmark to finalize capsule From the tools category on the toolbar choose copy offsets; Set z to 13, amount of copies to 3, Click copy button to create copies. Click ‘x’ to close copy offsets panel From the edit menu on the top toolbar click group From the 3D Shapes category on the toolbar choose cube; Set position y to 67, position z to 80 Tick the checkmark finalize cube Click on group 1, difference 1(1), to select; From the edit menu on the top toolbar click ungroup Click stitch & scoop on the toolbar; from the tool panel choose difference, choose mesh 24, 20, 20(1), 20(2), 20(3) to subtract, Tick the checkmark to finalize difference From the 3D Shapes category on the toolbar choose capsule; Set top radius to 6, bottom radius to 6, height to 40, position x to 4, position y to 50, position z to 100 Tick the checkmark to finalize capsule From the 3D Shapes category on the toolbar choose sphere; Set radius to 8, position x to 4, position y to 82, position z to 93 Tick the checkmark to finalize sphere From the utilities category on the toolbar choose mirror; Set create copy to true, offset to -1 Tick the checkmark to finalize mirror Click on mesh 32(1), mesh 28 to select it Click stitch & scoop on the toolbar; From the tool panel choose union. Tick the checkmark to finalize union Click on difference 2 to select it Click stitch & scoop on the toolbar; from the tool panel choose difference,Choose union 2 to subtract, and set keep subtracted object to true Tick the checkmark to finalize difference Click on difference 3 to deselect Click color picker button to change color of object; Click white Click ok As you continue honing your design skills, remember that SelfCAD offers a wealth of resources to support your learning journey. To deepen your understanding and explore more advanced features, consider chec
How to Design Among Us Characters Using 3D CAD Software
One particularly fun and educational project for beginners is creating characters from Among Us, the viral social deduction game recognized for its simple yet iconic crewmates. These characters, with their rounded bodies, stubby limbs, and distinctive visors, offer an excellent opportunity to learn fundamental 3D modeling skills such as extrusion, scaling, and mirroring. SelfCAD’s features; like its 3D shapes, sculpting tools, and rendering options—make it especially suitable for recreating these stylized forms.
In this article, we will walk through the process of designing an Among Us character from scratch using SelfCAD. We’ll begin by building the base body using 3D shapes, then add details and finally apply color to the final model. Each step will demonstrate how SelfCAD’s tools can be used efficiently to model, refine, and finish a character design. Whether you’re a student, a beginner in 3D modeling, or simply a fan of the game, this project will help develop a deeper understanding of both character design principles and digital modeling techniques.
To access the interactive tutorial to this article, check out; https://www.selfcad.com/tutorials/336664465e1du2o15105v4j1fy3j6313m4s1
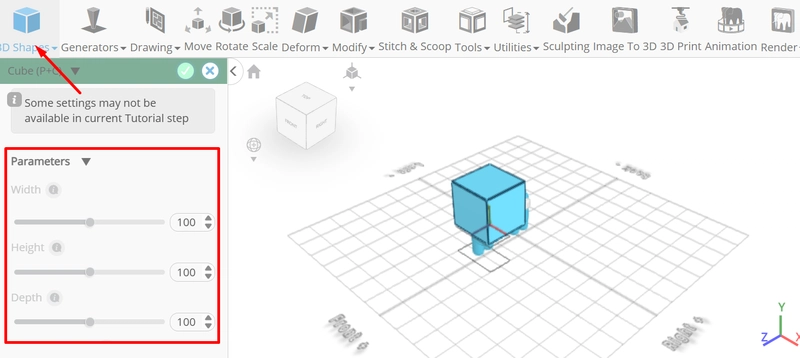
Once you’ve launched the editor;
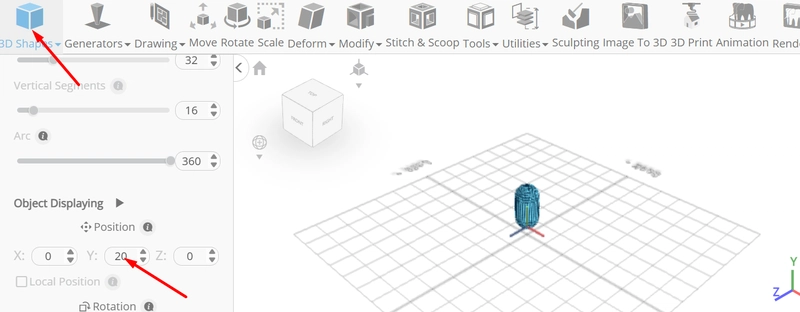
From the 3D Shapes category on the toolbar choose capsule; Set position y to 20
Tick the checkmark to finalize capsule
Click scale on the toolbar; Set x to 40, y to 80

Click ‘x’ to close transformation panel
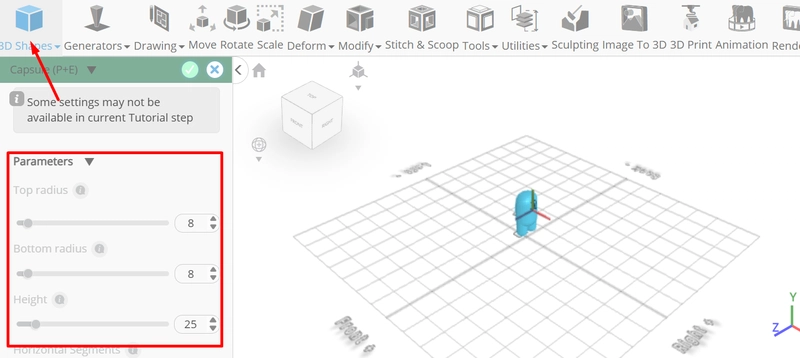
From the 3D Shapes category on the toolbar choose capsule; Set top radius to 12, bottom radius to 12, height to 50, position y to 10, position z to 13

Tick the checkmark to finalize capsule
From the utilities category on the toolbar choose mirror; Set create copy to true, direction to back, offset to 1

Tick the checkmark to finalize mirror
From the 3D Shapes category on the toolbar choose capsule; Set top radius to 10, bottom radius to 10, height to 33, position x to -18, position y to 50

Tick the checkmark to finalize capsule
Click scale on the toolbar; Set z to 25

Click ‘x’ to close transformation panel
From the 3D Shapes category on the toolbar choose capsule; Set top radius to 8, bottom radius to 8, height to 25, position x to 18, position y to 75
Tick the checkmark to finalize capsule
Click scale on the toolbar; Set z to 30

Click ‘x’ to close transformation panel
Click color picker button to change color of object; Click white

Click ok
Click on mesh 8, mesh 8(1), mesh 4 to select
Click stitch & scoop on the toolbar; From the tool panel choose union.
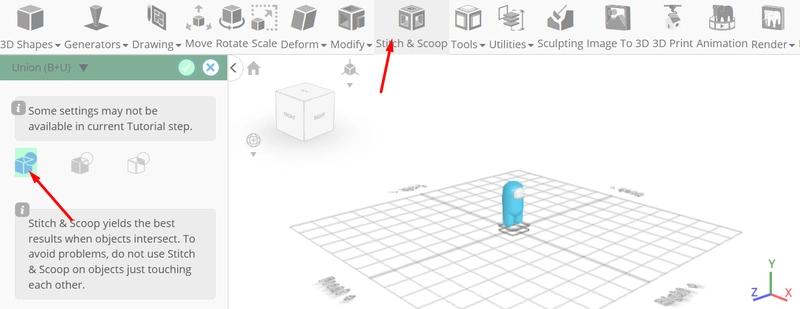
Tick the checkmark to finalize union
Click on mesh 12 to select it
Click stitch & scoop on the toolbar; from the tool panel choose difference, Choose mesh 12 to subtract, and set keep subtracted objects to true

Tick the checkmark to finalize difference
Click copy button to copy selected objects
Click move on the toolbar; Set z to 100.

Click ‘x’ to close transformation panel
From the 3D Shapes category on the toolbar choose capsule; Set top radius to 7, bottom radius to 7, position y to 60, position z to 80, rotation z to 90

Tick the checkmark to finalize capsule
From the tools category on the toolbar choose copy offsets; Set z to 13, amount of copies to 3, Click copy button to create copies.
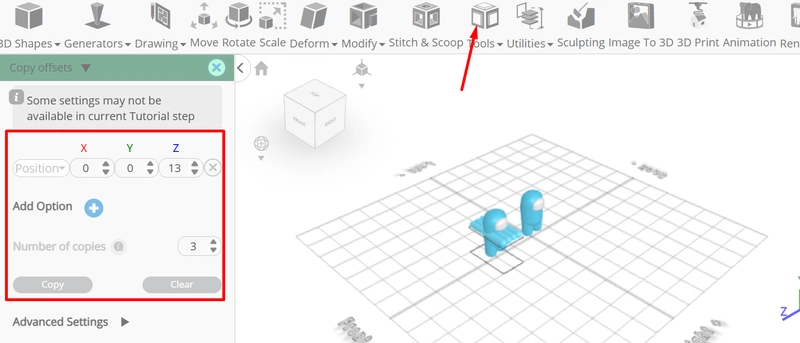
Click ‘x’ to close copy offsets panel
From the edit menu on the top toolbar click group
From the 3D Shapes category on the toolbar choose cube; Set position y to 67, position z to 80
Tick the checkmark finalize cube
Click on group 1, difference 1(1), to select; From the edit menu on the top toolbar click ungroup
Click stitch & scoop on the toolbar; from the tool panel choose difference, choose mesh 24, 20, 20(1), 20(2), 20(3) to subtract,

Tick the checkmark to finalize difference
From the 3D Shapes category on the toolbar choose capsule; Set top radius to 6, bottom radius to 6, height to 40, position x to 4, position y to 50, position z to 100

Tick the checkmark to finalize capsule
From the 3D Shapes category on the toolbar choose sphere; Set radius to 8, position x to 4, position y to 82, position z to 93

Tick the checkmark to finalize sphere
From the utilities category on the toolbar choose mirror; Set create copy to true, offset to -1

Tick the checkmark to finalize mirror
Click on mesh 32(1), mesh 28 to select it
Click stitch & scoop on the toolbar; From the tool panel choose union.

Tick the checkmark to finalize union
Click on difference 2 to select it
Click stitch & scoop on the toolbar; from the tool panel choose difference,Choose union 2 to subtract, and set keep subtracted object to true

Tick the checkmark to finalize difference
Click on difference 3 to deselect
Click color picker button to change color of object; Click white

Click ok
As you continue honing your design skills, remember that SelfCAD offers a wealth of resources to support your learning journey. To deepen your understanding and explore more advanced features, consider checking out the interactive tutorials (https://www.selfcad.com/tutorials) available on the SelfCAD website. The tutorials page provides a treasure trove of guides, tips, and tricks that cater to designers of all levels.
More structured learning experience can also be accessed at the SelfCAD Academy (https://www.selfcad.com/academy/curriculum/), https://www.youtube.com/@3dmodeling101, and 3D Modeling 101 series (https://www.youtube.com/playlist?list=PL74nFNT8yS9DcE1UlUUdiR1wFGv9DDfTB). This comprehensive resource offers in-depth courses taught by industry experts, allowing you to master the intricacies of SelfCAD at your own pace