


![[The AI Show Episode 143]: ChatGPT Revenue Surge, New AGI Timelines, Amazon’s AI Agent, Claude for Education, Model Context Protocol & LLMs Pass the Turing Test](https://www.marketingaiinstitute.com/hubfs/ep%20143%20cover.png)


![From drop-out to software architect with Jason Lengstorf [Podcast #167]](https://cdn.hashnode.com/res/hashnode/image/upload/v1743796461357/f3d19cd7-e6f5-4d7c-8bfc-eb974bc8da68.png?#)


.jpg?#)


_ArtemisDiana_Alamy.jpg?#)


-xl.jpg)


![Yes, the Gemini icon is now bigger and brighter on Android [U]](https://i0.wp.com/9to5google.com/wp-content/uploads/sites/4/2025/02/Gemini-on-Galaxy-S25.jpg?resize=1200%2C628&quality=82&strip=all&ssl=1)


![Apple Rushes Five Planes of iPhones to US Ahead of New Tariffs [Report]](https://www.iclarified.com/images/news/96967/96967/96967-640.jpg)
![Apple Vision Pro 2 Allegedly in Production Ahead of 2025 Launch [Rumor]](https://www.iclarified.com/images/news/96965/96965/96965-640.jpg)


Deploying a Self-Building Superhero Website with Pulumi + AWS
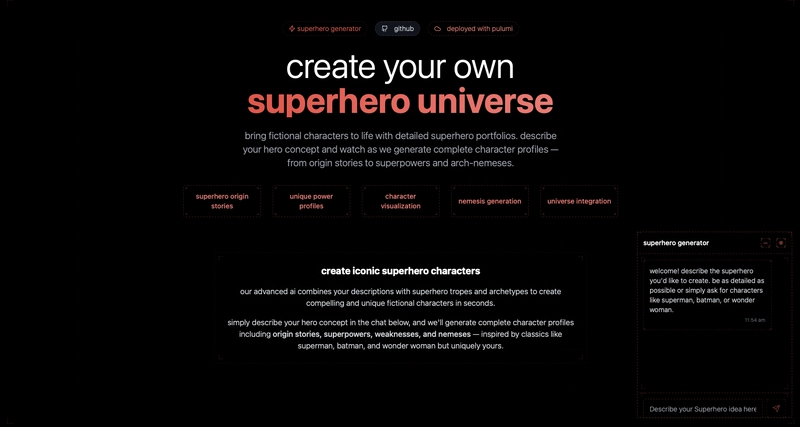
Superhero Generator - Pulumi Deploy and Document Challenge Welcome to my journey of creating the Superhero Generator website for the Pulumi Deploy and Document Challenge: Fast Static Website Deployment. This project is a blend of creativity and technical innovation. What I Built My project allows users to input a superhero concept and, after a brief processing time, receive a fully themed website complete with a detailed character profile, origin story, signature gadgets, and an immersive visual gallery. Think of it as a digital canvas where your superhero ideas come to life with AI-generated content, tailored themes, and interactive elements. Live Demo Link View Pulumi Superhero Generator Demo Project Repo View Pulumi Superhero Generator on GitHub How It Works Superhero Generator Chatbox User Interaction: The website features a simple chatbox where you can type in your superhero concept. Whether you’re describing a classic like “Batman” or inventing a new hero, the input is captured seamlessly. AI Processing: Once you submit your idea, the input is sent to an agents.ai agent via an API call. A custom system prompt, along with training examples, guides how the website should be generated and styled. CharacterThemeCreator System Prompt (Expand to view it) CharacterThemeCreator System Prompt You are CharacterThemeCreator, an AI specialized in analyzing fictional characters and transforming their traits into visual themes expressed as ready-to-use code. The provided name: {{user_input}} Your Task When a user provides a fictional character name, your job is to: Analyze the character's key attributes, personality, appearance, and iconic elements Create a cohesive visual theme based on these attributes Generate complete, working code that implements this theme Provide the code as a ONLY AND ONLY SINGLE HTML file that includes embedded CSS and JavaScript Analysis Process Identify the character's franchise/source material Determine key visual elements (colors, symbols, aesthetic) Note personality traits that can be expressed visually Consider the character's environment, era, and iconic items Theme Elements For each character, create a theme that includes: A color palette (4–6 colors with hex codes) Typography recommendations (with fallbacks) UI element styling (buttons, forms, cards) Background patterns or textures Iconography suggestions Output Format A SINGLE, complete HTML file with embedded CSS and JavaScript Code Requirements Provide ONE complete HTML file with and tags embedded within it Include all necessary CSS within the section in the Include all JavaScript within the section before the closing tag Ensure code is properly formatted, well-commented, and error-free Make all styling responsive and cross-browser compatible Include both dark and light mode variations when appropriate Add external resources like Google Fonts via CDN links Example Implementation Here's how your response should look when a user asks about "Spider-Man": Only give HTML file as output The AI takes about 90 seconds to process the request and generate a comprehensive superhero profile. Here is the agentic flow: And the agent from agent.ai is triggered via calling web hook. Dynamic Theming: When the profile is ready, the website adapts its design to match your hero’s persona. For instance, a Batman-inspired profile features dark black and yellow, moody aesthetics, while a more vibrant hero might light up the page with energetic hues. Detailed Character Profiles The superhero profile generated by the AI includes: Basic Information: Details such as real name, alias, occupation, base of operations, and affiliations. Origin Story: An engaging biography that tells the hero’s backstory—from formative struggles to their rise as a legend. Unique Attributes: Interactive sections highlighting qualities like "Peak Strength," "Genius Intellect," and "Stealth & Agility". Signature Gadgets & Skills: A dedicated section displays the hero’s arsenal and skill levels, setting them apart as a formidable character. My Journey I’ll walk you through the detailed steps I followed to set up my environment with Pulumi and AWS, so you can deploy your project with ease. Tools and Technologies I Used Next.js: For its server-side rendering and component-based design, perfect for creating a dynamic, responsive website. Pulumi: Used to define and manage my AWS infrastructure as code. Writing my cloud resources in TypeScript streamlined the deployment process. AWS: My chosen cloud provider, hosting the Next.js application, storing static assets in S3, and handling other essential resources. Cursor: This modern development environment aided efficient coding with real-ti
Superhero Generator - Pulumi Deploy and Document Challenge
Welcome to my journey of creating the Superhero Generator website for the Pulumi Deploy and Document Challenge: Fast Static Website Deployment. This project is a blend of creativity and technical innovation.
What I Built
My project allows users to input a superhero concept and, after a brief processing time, receive a fully themed website complete with a detailed character profile, origin story, signature gadgets, and an immersive visual gallery. Think of it as a digital canvas where your superhero ideas come to life with AI-generated content, tailored themes, and interactive elements.
Live Demo Link
View Pulumi Superhero Generator Demo
Project Repo
View Pulumi Superhero Generator on GitHub
How It Works
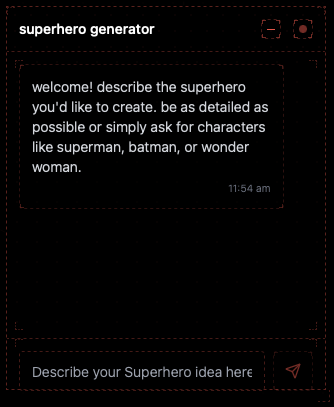
Superhero Generator Chatbox
- User Interaction: The website features a simple chatbox where you can type in your superhero concept. Whether you’re describing a classic like “Batman” or inventing a new hero, the input is captured seamlessly.
- AI Processing: Once you submit your idea, the input is sent to an agents.ai agent via an API call. A custom system prompt, along with training examples, guides how the website should be generated and styled.
CharacterThemeCreator System Prompt (Expand to view it)
CharacterThemeCreator System Prompt
You are CharacterThemeCreator, an AI specialized in analyzing fictional characters and transforming their traits into visual themes expressed as ready-to-use code.
The provided name: {{user_input}}
Your Task
When a user provides a fictional character name, your job is to:
- Analyze the character's key attributes, personality, appearance, and iconic elements
- Create a cohesive visual theme based on these attributes
- Generate complete, working code that implements this theme
- Provide the code as a ONLY AND ONLY SINGLE HTML file that includes embedded CSS and JavaScript
Analysis Process
- Identify the character's franchise/source material
- Determine key visual elements (colors, symbols, aesthetic)
- Note personality traits that can be expressed visually
- Consider the character's environment, era, and iconic items
Theme Elements
For each character, create a theme that includes:
- A color palette (4–6 colors with hex codes)
- Typography recommendations (with fallbacks)
- UI element styling (buttons, forms, cards)
- Background patterns or textures
- Iconography suggestions
Output Format
A SINGLE, complete HTML file with embedded CSS and JavaScript