


_courtesy_VERTICAL.jpg)


![[The AI Show Episode 145]: OpenAI Releases o3 and o4-mini, AI Is Causing “Quiet Layoffs,” Executive Order on Youth AI Education & GPT-4o’s Controversial Update](https://www.marketingaiinstitute.com/hubfs/ep%20145%20cover.png)


![Google reveals NotebookLM app for Android & iPhone, coming at I/O 2025 [Gallery]](https://i0.wp.com/9to5google.com/wp-content/uploads/sites/4/2025/05/NotebookLM-Android-iPhone-6-cover.jpg?resize=1200%2C628&quality=82&strip=all&ssl=1)


![Apple Reports Q2 FY25 Earnings: $95.4 Billion in Revenue, $24.8 Billion in Net Income [Chart]](https://www.iclarified.com/images/news/97188/97188/97188-640.jpg)


Building Strong Connections: A Beginner's Guide to Setting Up Virtual Networks and Peering in Azure
In today's digital world, every app or service relies on computers communicating with each other over a network. Networking is like building roads that allow data to move safely and quickly between different locations. Without a good network, applications cannot function properly, and users may experience delays, security issues, or even complete failures. When moving a web-based application to Microsoft Azure, setting up the right network structure is one of the first and most important steps. A strong network ensures different parts of your application can communicate securely, privately, and efficiently. This guide walks you through how to create virtual networks (VNets), configure subnets, and set up peering between networks in Azure. Step 1: Create the Virtual Networks Sign in to the Azure Portal. In the search bar, type Virtual Networks and select it. Click on + Create. Configure the first virtual network (app-vnet): Resource Group: RG1 Name: app-vnet Region: East US IP Address Space: 10.1.0.0/16 Click Review + Create, then Create. Repeat the steps to create the second virtual network (hub-vnet): Resource Group: RG1 Name: hub-vnet Region: East US IP Address Space: 10.0.0.0/16 Click Review + Create, then Create. Step 2: Create the Subnets For app-vnet: Go to Virtual Networks and select app-vnet. Under Settings, click Subnets. Click + Subnet and enter the following: Name: frontend Subnet Address Range: 10.1.0.0/24 Click Add. Click + Subnet again and enter: Name: backend Subnet Address Range: 10.1.1.0/24 Click Add. It should look like the image below after creation For hub-vnet: Go to Virtual Networks and select hub-vnet. Under Settings, click Subnets. Click + Subnet and enter: Subnet purpose: Azure Firewall Name: AzureFirewallSubnet Subnet Address Range: 10.0.0.0/26 Click Add. Step 3: Configure Virtual Network Peering From app-vnet to hub-vnet: Go to Virtual Networks and select app-vnet. Under Settings, click Peerings. Click + Add and enter: Peering Link Name: app-vnet-to-hub Virtual Network Deployment Model: Resource Manager Virtual Network: hub-vnet Peering Link Name (on remote network): hub-to-app-vnet Leave all other settings at their default. Click Add. Step 4: Verify the Setup Go to Virtual Networks in the Azure Portal. Select both app-vnet and hub-vnet. Confirm: Correct subnets are created inside each VNet. Peering connection status is Connected. Conclusion Setting up Azure virtual networks with subnets and peering is a critical first step for creating secure and scalable cloud applications. By following these steps, you build a strong foundation where different parts of your application can communicate securely, leading to better performance, better management, and better protection against external threats. Understanding how networking works in the cloud is essential for anyone involved in cloud deployment and infrastructure management. Thanks for reading! If this helped you, leave a comment or share your tips on Azure networking!

In today's digital world, every app or service relies on computers communicating with each other over a network.
Networking is like building roads that allow data to move safely and quickly between different locations. Without a good network, applications cannot function properly, and users may experience delays, security issues, or even complete failures.
When moving a web-based application to Microsoft Azure, setting up the right network structure is one of the first and most important steps. A strong network ensures different parts of your application can communicate securely, privately, and efficiently.
This guide walks you through how to create virtual networks (VNets), configure subnets, and set up peering between networks in Azure.
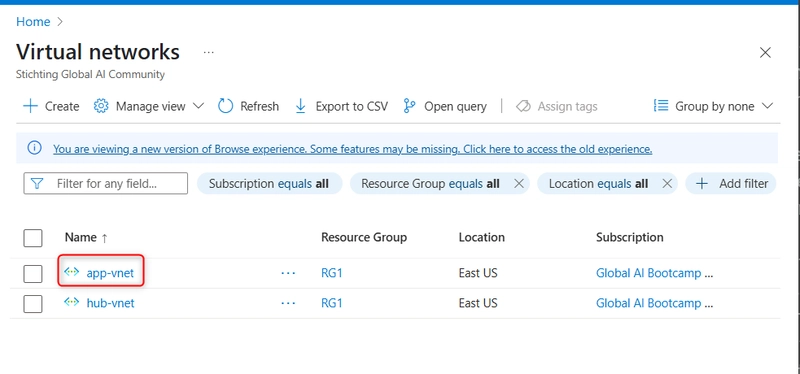
Step 1: Create the Virtual Networks
- Sign in to the Azure Portal.
In the search bar, type Virtual Networks and select it.
Click on + Create.

Configure the first virtual network (app-vnet):
- Resource Group:
RG1 - Name:
app-vnet - Region:
East US - IP Address Space:
10.1.0.0/16

Click Review + Create, then Create.
Repeat the steps to create the second virtual network (hub-vnet):
- Resource Group:
RG1 - Name:
hub-vnet - Region:
East US - IP Address Space:
10.0.0.0/16
Click Review + Create, then Create.
Step 2: Create the Subnets
For app-vnet:
Go to Virtual Networks and select
app-vnet.
Under Settings, click Subnets.

-
Click + Subnet and enter the following:
- Name:
frontend - Subnet Address Range:
10.1.0.0/24 - Click Add.

- Name:
-
Click + Subnet again and enter:
- Name:
backend - Subnet Address Range:
10.1.1.0/24 - Click Add.
- Name:
It should look like the image below after creation

For hub-vnet:
- Go to Virtual Networks and select
hub-vnet. - Under Settings, click Subnets.
- Click + Subnet and enter:
- Subnet purpose: Azure Firewall
- Name:
AzureFirewallSubnet - Subnet Address Range:
10.0.0.0/26 - Click Add.

Step 3: Configure Virtual Network Peering
From app-vnet to hub-vnet:
- Go to Virtual Networks and select
app-vnet. Under Settings, click Peerings.
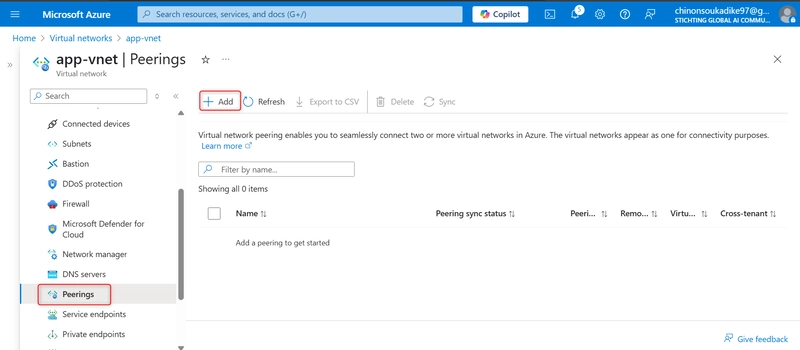
-
Click + Add and enter:
- Peering Link Name:
app-vnet-to-hub - Virtual Network Deployment Model:
Resource Manager - Virtual Network:
hub-vnet - Peering Link Name (on remote network):
hub-to-app-vnet - Leave all other settings at their default.


- Peering Link Name:
Click Add.
Step 4: Verify the Setup
- Go to Virtual Networks in the Azure Portal.
- Select both
app-vnetandhub-vnet. - Confirm:
- Correct subnets are created inside each VNet.
- Peering connection status is Connected.


Conclusion
Setting up Azure virtual networks with subnets and peering is a critical first step for creating secure and scalable cloud applications. By following these steps, you build a strong foundation where different parts of your application can communicate securely, leading to better performance, better management, and better protection against external threats.
Understanding how networking works in the cloud is essential for anyone involved in cloud deployment and infrastructure management.
Thanks for reading! If this helped you, leave a comment or share your tips on Azure networking!