


![[The AI Show Episode 145]: OpenAI Releases o3 and o4-mini, AI Is Causing “Quiet Layoffs,” Executive Order on Youth AI Education & GPT-4o’s Controversial Update](https://www.marketingaiinstitute.com/hubfs/ep%20145%20cover.png)


![Google reveals NotebookLM app for Android & iPhone, coming at I/O 2025 [Gallery]](https://i0.wp.com/9to5google.com/wp-content/uploads/sites/4/2025/05/NotebookLM-Android-iPhone-6-cover.jpg?resize=1200%2C628&quality=82&strip=all&ssl=1)


![Apple Reports Q2 FY25 Earnings: $95.4 Billion in Revenue, $24.8 Billion in Net Income [Chart]](https://www.iclarified.com/images/news/97188/97188/97188-640.jpg)


A Step-By-Step Guide to Install DeepSeek-Prover-V2 Locally
DeepSeek-Prover-V2 is a powerful new AI model lanuched by DeepSeek which is designed to solve complex math problems by writing formal proofs in Lean 4. It uses a smart training method that starts by breaking big problems into smaller steps, then solves each step using DeepSeek-V3’s reasoning abilities. These step-by-step solutions are turned into detailed examples that help the model learn how to combine informal explanations with formal math. This unique process makes DeepSeek-Prover-V2 highly skilled at understanding and proving a wide range of mathematical theorems, from high school competition problems to advanced university-level concepts. With strong results like an 88.9% pass rate on the MiniF2F test and support for a wide range of topics, DeepSeek-Prover-V2 is a valuable tool for anyone working on formal reasoning or math automation. This model is available in two model sizes (7B and 671B) and in this article we'll simply breakdown the step-by-step process to install and run this model locally or on cloud in any of the above available parameter versions. Performance Prerequisites The minimum system requirements for running this model are: GPU: RTX A6000 Storage: 100GB (preferable) Jupyter Notebook installed. VRAM: 32GB Step-by-step process to install and run DeepSeek Prover V2 For the purpose of this tutorial, we’ll use a GPU-powered Virtual Machine by NodeShift since it provides high compute Virtual Machines at a very affordable cost on a scale that meets GDPR, SOC2, and ISO27001 requirements. Also, it offers an intuitive and user-friendly interface, making it easier for beginners to get started with Cloud deployments. However, feel free to use any cloud provider of your choice and follow the same steps for the rest of the tutorial. Step 1: Setting up a NodeShift Account Visit app.nodeshift.com and create an account by filling in basic details, or continue signing up with your Google/GitHub account. If you already have an account, login straight to your dashboard. Step 2: Create a GPU Node After accessing your account, you should see a dashboard (see image), now: 1) Navigate to the menu on the left side. 2) Click on the GPU Nodes option. 3) Click on Start to start creating your very first GPU node. These GPU nodes are GPU-powered virtual machines by NodeShift. These nodes are highly customizable and let you control different environmental configurations for GPUs ranging from H100s to A100s, CPUs, RAM, and storage, according to your needs. Step 3: Selecting configuration for GPU (model, region, storage) 1) For this tutorial, we’ll be using 1x RTX A6000 GPU, however, you can choose any GPU as per the prerequisites. 2) Similarly, we’ll opt for 200GB storage by sliding the bar. You can also select the region where you want your GPU to reside from the available ones. Step 4: Choose GPU Configuration and Authentication method 1) After selecting your required configuration options, you'll see the available GPU nodes in your region and according to (or very close to) your configuration. In our case, we'll choose a 1x RTX A6000 48GB GPU node with 64vCPUs/63GB RAM/200GB SSD. 2) Next, you'll need to select an authentication method. Two methods are available: Password and SSH Key. We recommend using SSH keys, as they are a more secure option. To create one, head over to our official documentation. Step 5: Choose an Image The final step is to choose an image for the VM, which in our case is Jupyter, where we’ll deploy and run the inference of our model using Diffusers. That's it! You are now ready to deploy the node. Finalize the configuration summary, and if it looks good, click Create to deploy the node. Step 6: Connect to active Compute Node using SSH 1) As soon as you create the node, it will be deployed in a few seconds or a minute. Once deployed, you will see a status Running in green, meaning that our Compute node is ready to use! 2) Once your GPU shows this status, navigate to the three dots on the right, click on Connect with SSH, and copy the SSH details that appear. Step 7: Set up the project environment with dependencies 1) Create a virtual environment using Anaconda. conda create -n deepseek python=3.11 && conda activate deepseek Output: 2) Once you're inside the environment, install dependencies to run the model. pip install torch torchvision torchaudio pip install transformers>=4.38.0 pip install accelerate>=0.25.0 pip install bitsandbytes>=0.41.0 pip install einops Output: 3) Install and run jupyter notebook. conda install -c conda-forge --override-channels notebook -y conda install -c conda-forge --override-channels ipywidgets -y jupyter notebook --allow-root Output: 4) If you're on a remote machine (e.g., NodeShift GPU), you'll need to do SSH port forwarding in order to access the jupyter notebook session o

DeepSeek-Prover-V2 is a powerful new AI model lanuched by DeepSeek which is designed to solve complex math problems by writing formal proofs in Lean 4. It uses a smart training method that starts by breaking big problems into smaller steps, then solves each step using DeepSeek-V3’s reasoning abilities. These step-by-step solutions are turned into detailed examples that help the model learn how to combine informal explanations with formal math. This unique process makes DeepSeek-Prover-V2 highly skilled at understanding and proving a wide range of mathematical theorems, from high school competition problems to advanced university-level concepts. With strong results like an 88.9% pass rate on the MiniF2F test and support for a wide range of topics, DeepSeek-Prover-V2 is a valuable tool for anyone working on formal reasoning or math automation.
This model is available in two model sizes (7B and 671B) and in this article we'll simply breakdown the step-by-step process to install and run this model locally or on cloud in any of the above available parameter versions.
Performance
Prerequisites
The minimum system requirements for running this model are:
GPU: RTX A6000
Storage: 100GB (preferable)
Jupyter Notebook installed.
VRAM: 32GB
Step-by-step process to install and run DeepSeek Prover V2
For the purpose of this tutorial, we’ll use a GPU-powered Virtual Machine by NodeShift since it provides high compute Virtual Machines at a very affordable cost on a scale that meets GDPR, SOC2, and ISO27001 requirements. Also, it offers an intuitive and user-friendly interface, making it easier for beginners to get started with Cloud deployments. However, feel free to use any cloud provider of your choice and follow the same steps for the rest of the tutorial.
Step 1: Setting up a NodeShift Account
Visit app.nodeshift.com and create an account by filling in basic details, or continue signing up with your Google/GitHub account.
If you already have an account, login straight to your dashboard.

Step 2: Create a GPU Node
After accessing your account, you should see a dashboard (see image), now:
1) Navigate to the menu on the left side.
2) Click on the GPU Nodes option.

3) Click on Start to start creating your very first GPU node.

These GPU nodes are GPU-powered virtual machines by NodeShift. These nodes are highly customizable and let you control different environmental configurations for GPUs ranging from H100s to A100s, CPUs, RAM, and storage, according to your needs.
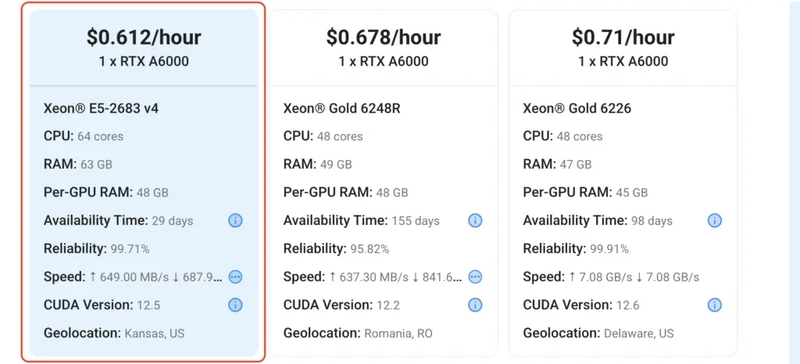
Step 3: Selecting configuration for GPU (model, region, storage)
1) For this tutorial, we’ll be using 1x RTX A6000 GPU, however, you can choose any GPU as per the prerequisites.
2) Similarly, we’ll opt for 200GB storage by sliding the bar. You can also select the region where you want your GPU to reside from the available ones.

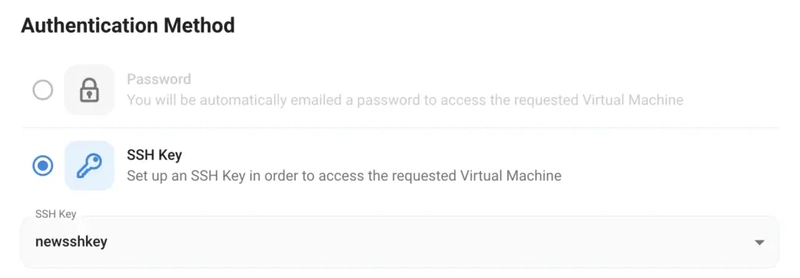
Step 4: Choose GPU Configuration and Authentication method
1) After selecting your required configuration options, you'll see the available GPU nodes in your region and according to (or very close to) your configuration. In our case, we'll choose a 1x RTX A6000 48GB GPU node with 64vCPUs/63GB RAM/200GB SSD.
2) Next, you'll need to select an authentication method. Two methods are available: Password and SSH Key. We recommend using SSH keys, as they are a more secure option. To create one, head over to our official documentation.
Step 5: Choose an Image
The final step is to choose an image for the VM, which in our case is Jupyter, where we’ll deploy and run the inference of our model using Diffusers.

That's it! You are now ready to deploy the node. Finalize the configuration summary, and if it looks good, click Create to deploy the node.


Step 6: Connect to active Compute Node using SSH
1) As soon as you create the node, it will be deployed in a few seconds or a minute. Once deployed, you will see a status Running in green, meaning that our Compute node is ready to use!
2) Once your GPU shows this status, navigate to the three dots on the right, click on Connect with SSH, and copy the SSH details that appear.

Step 7: Set up the project environment with dependencies
1) Create a virtual environment using Anaconda.
conda create -n deepseek python=3.11 && conda activate deepseek
Output:

2) Once you're inside the environment, install dependencies to run the model.
pip install torch torchvision torchaudio
pip install transformers>=4.38.0
pip install accelerate>=0.25.0
pip install bitsandbytes>=0.41.0
pip install einops
Output:

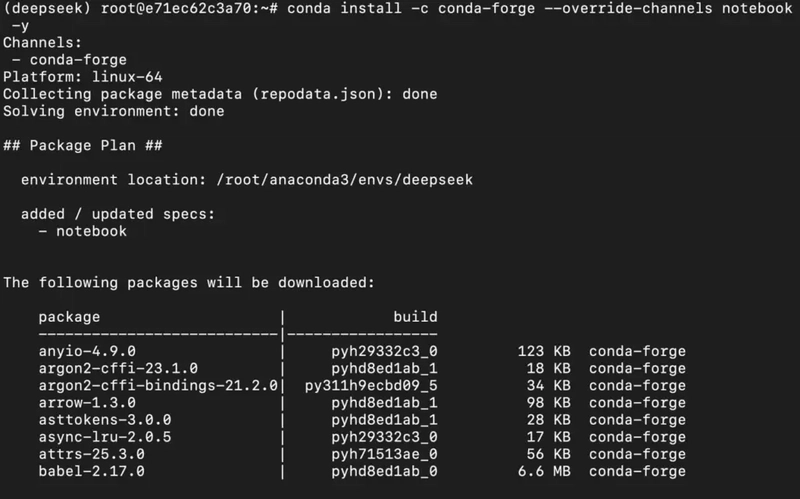
3) Install and run jupyter notebook.
conda install -c conda-forge --override-channels notebook -y
conda install -c conda-forge --override-channels ipywidgets -y
jupyter notebook --allow-root
Output:
4) If you're on a remote machine (e.g., NodeShift GPU), you'll need to do SSH port forwarding in order to access the jupyter notebook session on your local browser.
Run the following command in your local terminal after replacing:
PORT allotted to your remote server (For the NodeShift server - you can find it in the deployed GPU details on the dashboard).
ssh -L 8888:localhost:8888 -p -i root@
Output:

After this copy the URL you received in your remote server:

And paste this on your local browser to access the Jupyter Notebook session.
Step 8: Download and Run the model
1) Open a Python notebook inside Jupyter.

2) Download model checkpoints.
If you're downloading 671B parameter model, replace model_id with DeepSeek-Prover-V2-671B.
from transformers import AutoModelForCausalLM, AutoTokenizer
import torch

# This will download the model files automatically
model_id = "deepseek-ai/DeepSeek-Prover-V2-7B"
tokenizer = AutoTokenizer.from_pretrained(model_id)

model = AutoModelForCausalLM.from_pretrained(
    model_id,
    device_map="auto",
    torch_dtype=torch.bfloat16,
    trust_remote_code=True
)
Output:

4) Finally, run the model with your desired prompt.


Output:


Conclusion
In this guide, we explored the core concepts behind DeepSeek-Prover-V2, how it combines informal reasoning with formal proof construction using a recursive, step-by-step training pipeline powered by DeepSeek-V3. If you're experimenting with the 7B version or deploying the more powerful 671B variant, NodeShift Cloud provides a reliable, high-performance environment to run these models seamlessly. With NodeShift's easy setup, GPU-ready infrastructure, and scalable resources, users can focus on leveraging DeepSeek-Prover-V2’s capabilities without worrying about backend complexity, making advanced formal reasoning accessible to all.
For more information about NodeShift: