.jpg)


![[The AI Show Episode 144]: ChatGPT’s New Memory, Shopify CEO’s Leaked “AI First” Memo, Google Cloud Next Releases, o3 and o4-mini Coming Soon & Llama 4’s Rocky Launch](https://www.marketingaiinstitute.com/hubfs/ep%20144%20cover.png)


![BPMN-procesmodellering [closed]](https://i.sstatic.net/l7l8q49F.png)


-All-will-be-revealed-00-35-05.png?width=1920&height=1920&fit=bounds&quality=70&format=jpg&auto=webp#)
-All-will-be-revealed-00-17-36.png?width=1920&height=1920&fit=bounds&quality=70&format=jpg&auto=webp#)
-Jack-Black---Steve's-Lava-Chicken-(Official-Music-Video)-A-Minecraft-Movie-Soundtrack-WaterTower-00-00-32_lMoQ1fI.png?width=1920&height=1920&fit=bounds&quality=70&format=jpg&auto=webp#)


_Weyo_alamy.png?width=1280&auto=webp&quality=80&disable=upscale#)
_Brain_light_Alamy.jpg?width=1280&auto=webp&quality=80&disable=upscale#)


![New M4 MacBook Air On Sale for $929 [Lowest Price Ever]](https://www.iclarified.com/images/news/97090/97090/97090-1280.jpg)
![Apple iPhone 17 Pro May Come in 'Sky Blue' Color [Rumor]](https://www.iclarified.com/images/news/97088/97088/97088-640.jpg)
![Mac Shipments Up 17% in Q1 2025 Fueled by New M4 MacBook Air [Chart]](https://www.iclarified.com/images/news/97086/97086/97086-640.jpg)
![Next Generation iPhone 17e Nears Trial Production [Rumor]](https://www.iclarified.com/images/news/97083/97083/97083-640.jpg)


11 Interview Questions You Should Know as a React Native Developer in 2025
Originally published on Medium This is the second part of the interview questions series. If you are looking for React Developer interview questions, check out my previous article here. Here are the 11 React Native Interview Questions you should know in 2025. 1. How does React Native achieve native-like performance? React Native achieves native-like performance through several key features. Direct native rendering React Native components map directly to native UI components, allowing the app to render UI elements using the platform's native APIs. This results in a UI that's indistinguishable from one built using native code. Native threads There are 3 threads commonly used in React Native: UI thread: This is the main thread responsible for initializing the app, rendering the UI, managing touch events, and invoking the JavaScript thread. The biggest advantage of this thread is that it can run in parallel with the JavaScript thread, enabling smooth UX even when an intensive computation is running on the JavaScript thread. JavaScript thread: This thread runs the JavaScript code, including the React Native app logic. It communicates with the UI thread to update the UI based on user interactions and app state changes. Shadow thread: This thread is responsible for performing UI layout and measurements. Before its introduction, the UI thread was responsible for layout and measurements. Due to the segregation of responsibilities between the UI and shadow threads, React Native can now deliver a much smoother experience, especially when dealing with complex layouts. Optimized UI updates By using React under the hood, React Native's reconciliation process (read: a fancy term for detecting the minimum changes to the actual DOM to sync it with the Virtual DOM) intelligently updates only the necessary parts of the UI, reducing unnecessary rendering and enhancing performance. If you want to dive deeper into the differences between Virtual DOM, real DOM & the Shadow DOM, check out this article 2. What is the role of the bridge in React Native? The bridge in React Native is a crucial component that facilitates communication between the JavaScript code and the native modules. It acts as a two-way communication channel, allowing JavaScript to call native APIs and vice versa. When JavaScript code needs to access a native module, it sends a message to the bridge, which then forwards the request to the appropriate native code. The native code processes the request and sends the result back through the bridge to the JavaScript side. The communication through the bridge is asynchronous and batched. The data is serialized and deserialized into a JSON-like format as it passes through the bridge. The huge advantage is that the two sides can communicate effectively despite being written in different languages (JavaScript and native code). One of the major challenges of the bridge is that it can introduce latency, due to the additional overhead of serialization and deserialization, especially when dealing with huge amounts of data, frequent communication, and complex objects. PS: The bridge primarily runs on the Main/UI thread and doesn't have its own thread. 3. What is the new architecture in React native? The new architecture in React Native is a complete rewrite of the major systems such as rendering, communication between native & Javascript code, etc. It is aimed at improving performance, flexibility, and developer experience. The biggest change is the removal of the bridge - previously, the bridge was a major bottleneck, leading to performance issues and laggy experiences. The new architecture drastically improves JavaScript abstractions and communicates with native code using JavaScript Interface (JSI), which allows for direct access to native APIs without the need for serialization and deserialization. So now it's possible to call native code synchronously from JavaScript. One of the most common issues developers can recreate due to this infamous bridge overhead is typing fast in a controlled input field. The bridge is unable to keep up with the rapid changes, leading to a buggy experience, where the cursor lags behind what the user is typing. The source of the issue is that after each keystroke the data had to be sent over the bridge to that native side requesting the value to be updated to the new state value. Fast typing in a controlled input using the new architecture Fast typing in a controlled input using the old architecture 4. What are the differences between using React Native CLI vs Expo? To create a React Native app, you have two options: Use the React Native CLI (Command Line Interface) to set up a project from scratch. This comes with full control and flexibility over project setup & native code integration. Use Expo, a framework built on top of React Native that provides a streamlined e
Originally published on Medium
This is the second part of the interview questions series. If you are looking for React Developer interview questions, check out my previous article here.
Here are the 11 React Native Interview Questions you should know in 2025.
1. How does React Native achieve native-like performance?
React Native achieves native-like performance through several key features.
Direct native rendering
React Native components map directly to native UI components, allowing the app to render UI elements using the platform's native APIs. This results in a UI that's indistinguishable from one built using native code.
Native threads
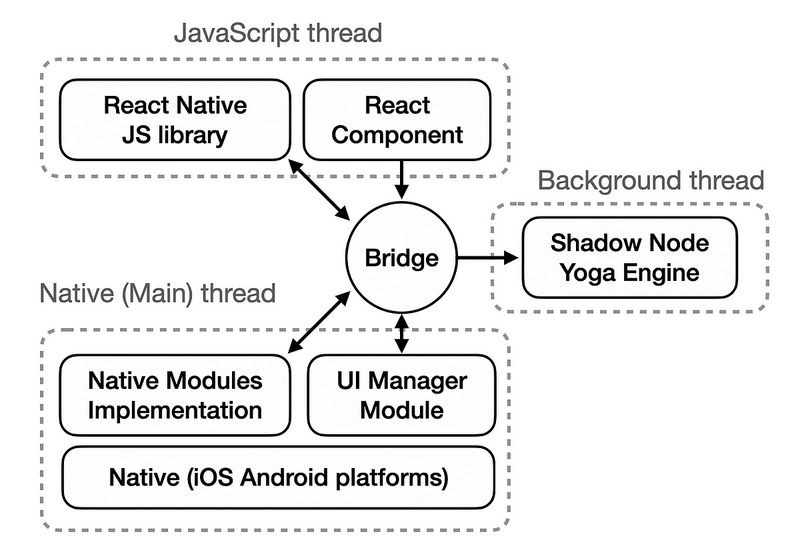
There are 3 threads commonly used in React Native:
- UI thread: This is the main thread responsible for initializing the app, rendering the UI, managing touch events, and invoking the JavaScript thread. The biggest advantage of this thread is that it can run in parallel with the JavaScript thread, enabling smooth UX even when an intensive computation is running on the JavaScript thread.
- JavaScript thread: This thread runs the JavaScript code, including the React Native app logic. It communicates with the UI thread to update the UI based on user interactions and app state changes.
- Shadow thread: This thread is responsible for performing UI layout and measurements. Before its introduction, the UI thread was responsible for layout and measurements. Due to the segregation of responsibilities between the UI and shadow threads, React Native can now deliver a much smoother experience, especially when dealing with complex layouts.
Optimized UI updates
By using React under the hood, React Native's reconciliation process (read: a fancy term for detecting the minimum changes to the actual DOM to sync it with the Virtual DOM) intelligently updates only the necessary parts of the UI, reducing unnecessary rendering and enhancing performance.
If you want to dive deeper into the differences between Virtual DOM, real DOM & the Shadow DOM, check out this article
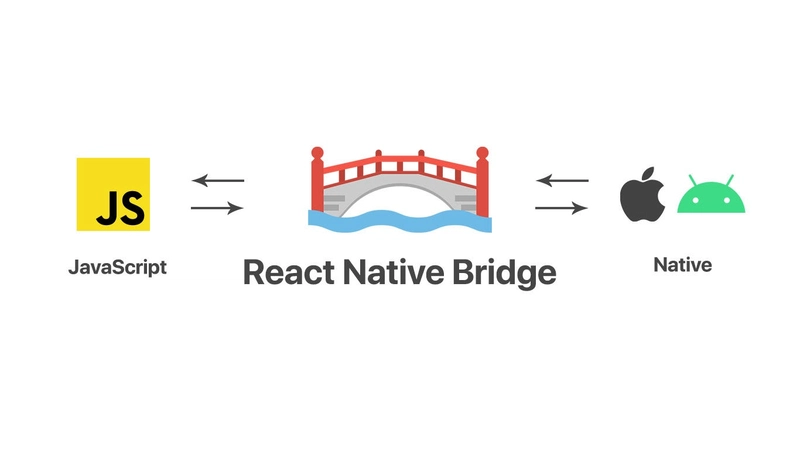
2. What is the role of the bridge in React Native?
The bridge in React Native is a crucial component that facilitates communication between the JavaScript code and the native modules. It acts as a two-way communication channel, allowing JavaScript to call native APIs and vice versa.
When JavaScript code needs to access a native module, it sends a message to the bridge, which then forwards the request to the appropriate native code. The native code processes the request and sends the result back through the bridge to the JavaScript side. The communication through the bridge is asynchronous and batched.
The data is serialized and deserialized into a JSON-like format as it passes through the bridge. The huge advantage is that the two sides can communicate effectively despite being written in different languages (JavaScript and native code). One of the major challenges of the bridge is that it can introduce latency, due to the additional overhead of serialization and deserialization, especially when dealing with huge amounts of data, frequent communication, and complex objects.
PS: The bridge primarily runs on the Main/UI thread and doesn't have its own thread.
3. What is the new architecture in React native?
The new architecture in React Native is a complete rewrite of the major systems such as rendering, communication between native & Javascript code, etc. It is aimed at improving performance, flexibility, and developer experience.
The biggest change is the removal of the bridge - previously, the bridge was a major bottleneck, leading to performance issues and laggy experiences. The new architecture drastically improves JavaScript abstractions and communicates with native code using JavaScript Interface (JSI), which allows for direct access to native APIs without the need for serialization and deserialization. So now it's possible to call native code synchronously from JavaScript.
One of the most common issues developers can recreate due to this infamous bridge overhead is typing fast in a controlled input field. The bridge is unable to keep up with the rapid changes, leading to a buggy experience, where the cursor lags behind what the user is typing. The source of the issue is that after each keystroke the data had to be sent over the bridge to that native side requesting the value to be updated to the new state value.
Fast typing in a controlled input using the new architecture

Fast typing in a controlled input using the old architecture

4. What are the differences between using React Native CLI vs Expo?
To create a React Native app, you have two options:
- Use the React Native CLI (Command Line Interface) to set up a project from scratch. This comes with full control and flexibility over project setup & native code integration.
- Use Expo, a framework built on top of React Native that provides a streamlined experience for building and deploying apps, but comes with limited access to native modules and APIs.
Here are the key differences:
| Feature | React Native CLI | Expo |
|---|---|---|
| Development Workflow | More flexible and customizable, but requires more setup | Streamlined and managed, simplifies development |
| Native Access | Full access to native code and modules | Limited access to native modules - requires prebuild for full control |
| Build Process | Developers manage the build process | Expo handles the build process (via EAS - Expo Application Services) |
| Learning Curve | Difficult to pick up for beginners | Easier for beginners |
| Ideal Use Cases | Complex applications which require extensive customization | Quick prototyping and smaller projects, for rapid development |
NOTE: Even though to use Expo for complex apps you require additional workarounds, it is possible to develop complicated apps with Expo. I personally have used Expo to build apps with App Clips & Widgets, by combining React Native with native code in Swift.
5. Explain the role of managed and bare workflows in Expo.
As mentioned above, Expo makes it easy for developers to build and deploy React Native apps but comes with limited access to native modules and APIs. To get full access to Native modules, you need to "eject" from the managed Expo workflow and use the bare workflow. This can be done using a single command:
expo prebuild
The prebuild command would generate the necessary files, and convert the managed workflow into a bare workflow where you have access to the android & ios folders, allowing you to write custom native code.
The managed workflow is easier to use as Expo handles the native code for you, but it has limited customization options for the native code. The bare workflow gives you full control over the native code, allowing you to write your native functionalities (eg: App Clips, Widgets, custom logic) but it requires more setup and maintenance.
6. How to style a component in React Native?
Similar to React, React Native provides a bunch of methods to style components.
Inline styles
Similar to React, this is the quickest (& dirtiest) way to style a component. You can pass a style object directly to the style prop of a component.
<h1 style={{ textAlign: "center", color: "#F43596" }}>Helloh1>
CSS-in-JS Modules (Styled Components)
Using the same CSS-in-JS approach as React, you can use libraries like Styled Components to style your components. This allows you to write CSS directly in your JavaScript files (personally not a fan of using these).
const StyledText = styled.Text`
  color: #bf4f74;
`;

const App = () => {
  return <StyledText>Hello World!StyledText>;
};
React Native StyleSheet
This is the suggested way to style components in React Native. The StyleSheet API allows you to create a stylesheet object that can be reused across multiple components.
import { StyleSheet, Text } from "react-native";

const styles = StyleSheet.create({
  text: {
    color: "#F43596",
    fontSize: 20,
    textAlign: "center",
  },
});

const App = () => {
  return <Text style={styles.text}>Hello World!Text>;
};
Suggestion: keep the styles in a separate file and import them into the component file. This keeps the code clean and easy to maintain.
NOTE: React Native uses Yoga for layout, which has access to a smaller subset of the CSS properties.
7. How do you handle platform-specific code in React Native?
React Native provides a few ways to handle platform-specific code.
Platform.OS
The Platform.OS API allows you to check the current platform (iOS, Android, or web) and is commonly used to conditionally render components or styles based on the platform.
import { Platform, Text } from "react-native";

const App = () => {
  return <Text>Hello {Platform.OS === "ios" ? "iOS" : "Android"} userText>;
};
Platform.select
If you plan on supporting multiple platforms, the Platform.select method might be easier to use - create a single object that contains conditional code for each platform, and React Native will automatically select the correct one based on the current platform.
import { Platform, Text } from "react-native";

const App = () => {
  return (
    <>
      <Text style={styles}>
        {Platform.select({
          ios: "Hello iOS user",
          android: "Hello Android user",
          default: "Hello user",
        })}
      Text>
      <Text style={styles}>
        {Platform.select({
          native: "You are on native",
          web: "You are on web",
        })}
      Text>

  );
};
Platform-specific file extensions
React Native allows you to create platform-specific files by using file extensions. For example, if you have a component that needs to behave differently on iOS and Android, you can create two separate files with the same name but different extensions:
// Component.js
import { Text } from "react-native";

export const Component = () => {
  return <Text>Hello userText>;
};

// Component.web.js
import { Text } from "react-native";

export const Component = () => {
  return <Text>Hello Web userText>;
};
When you import the Component, React Native will automatically select the correct file based on the current platform. Other extensions include .ios.js, .android.js, and .native.js (or .jsx & .tsx equivalents).
This approach is most useful for handling a codebase that targets both native & web - quite often trying to use components with underlying native modules can lead to crashes on the web, which can be bypassed by using the platform-specific file extensions.
8. What is the difference between Flatlist and Scrollview when would you use one over the other?
Both FlatList and ScrollView are used to render lists of items in React Native, but they have different use cases and performance characteristics.
-
ScrollViewis a simple component that renders its children in a scrollable view. It is best suited for small lists of items - it renders all its children at once, which can lead to performance issues when dealing with large lists. -
FlatListis a more advanced component that is optimized for rendering large lists of items. It only renders a set number of items on the screen & loads more items as the user scrolls through the list, which improves performance and reduces memory usage.
// ScrollView
<ScrollView>
  <Text>Item 1Text>
  <Text>Item 2Text>
  <Text>Item 3Text>
ScrollView>

// FlatList
<FlatList
   data={data}
   renderItem={({ item }) => <Text>{item}Text>}
   keyExtractor={(item) => item.id}
/>
For any real-world use case, most people find that even FlatList is not performant enough. So the folks at Shopify created a new component called FlashList which is almost a drop-in replacement for FlatList and is much more performant.
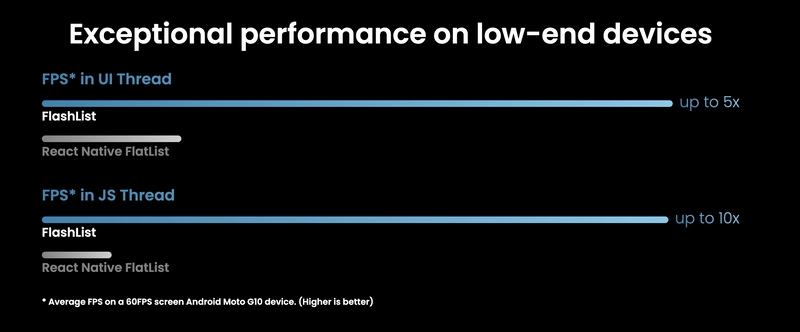
FlashList uses a different technique called "cell recycling" that only renders the visible portion of a list and reuses those views as the user scrolls, reducing memory usage and improving performance. It takes in a few additional props such as estimatedItemSize and estimatedListSize to efficiently generate the UI.
<FlashList
  data={data}
  renderItem={({ item }) => <Text>{item}Text>}
  keyExtractor={(item) => item.id}
  estimatedItemSize={100}
  estimatedListSize={{ height: 600; width: 200 }}
/>
9. What is the use of Native modules in React Native?
React Native allows developers to use platform-specific APIs, libraries, and native features written in the platform's native language (eg: Java/Swift/Objective-C) to add custom functionality to their apps in case the existing React Native modules do not support them out of the box. The NativeModule system exposes instances of native classes to JavaScript as JS objects, thereby allowing you to execute arbitrary native code from within JS.
The communication between JavaScript and native code is done through the bridge.
The new architecture introduces Turbo Native Module, which is similar to how React Native uses Native Modules but uses JSI for direct synchronous calls between JavaScript and native code, resulting in much-improved performance.
10. What are the benefits of React Native?
React Native is one of the most popular cross-platform frameworks. There are massive benefits of using React Native:
- Cross-platform development: React Native is extremely adept at the write once, run everywhere philosophy, it allows developers to write code that can be used on both iOS and Android platforms, reducing development time and effort.
- Community: React Native has the largest active community, which means there are plenty of resources, libraries, and third-party plugins available to reduce development time. If you run into any issues, chances are, you will find a solution for the problem on Stack Overflow
- Builds upon existing React knowledge: If you are already familiar with React, you can easily pick up React Native and start building mobile apps. The component-based architecture and the use of JavaScript make it easy to transition from web development to mobile development.
- Native-like performance and UX: It goes without saying, that unless React Native can deliver native-like performance and UX, it would not be as popular as it is today. Innumerable apps like WhatsApp, Instagram, Facebook, etc. are built using React Native.
11. What are the limitations of React Native?
Just like everything in the universe, React Native has its cons too.
- Native-LIKE performance: Though React Native does provide close to native performance, especially after the introduction of the new architecture, it is still not as performant as fully native apps (or even Flutter). This is especially true for complex animations and heavy computations.
- Dependency hell: Managing dependencies for React Native projects is something every developer dreams of, the dream just happens to be a nightmare! When you are upgrading to a new version of React Native (or potentially Expo), you need to ensure that all your dependencies are compatible with the new version. This can be a tedious and time-consuming process, and can occasionally result in days' worth of work adding patches.
- Native knowledge is still required: This is highly dependent on what you are building, but if you need some native features such as App Clips, Widgets, etc. you will need to write native code - there's no way around it.
Even though React Native is a cross-platform framework, it is not a silver bullet for all mobile development needs. It is best suited for teams who are already familiar with React and for projects that require a quick turnaround time. For complex applications that require extensive customization or native features, there might be better development alternatives available.
That's all folks!
![[UA] Прототипи (JS)](https://media2.dev.to/dynamic/image/width%3D1000,height%3D500,fit%3Dcover,gravity%3Dauto,format%3Dauto/https:%2F%2Fdev-to-uploads.s3.amazonaws.com%2Fuploads%2Farticles%2Fu5vxxx106bljfvui93jy.png)