


![[Free Webinar] Guide to Securing Your Entire Identity Lifecycle Against AI-Powered Threats](https://blogger.googleusercontent.com/img/b/R29vZ2xl/AVvXsEjqbZf4bsDp6ei3fmQ8swm7GB5XoRrhZSFE7ZNhRLFO49KlmdgpIDCZWMSv7rydpEShIrNb9crnH5p6mFZbURzO5HC9I4RlzJazBBw5aHOTmI38sqiZIWPldRqut4bTgegipjOk5VgktVOwCKF_ncLeBX-pMTO_GMVMfbzZbf8eAj21V04y_NiOaSApGkM/s1600/webinar-play.jpg?#)


![[The AI Show Episode 145]: OpenAI Releases o3 and o4-mini, AI Is Causing “Quiet Layoffs,” Executive Order on Youth AI Education & GPT-4o’s Controversial Update](https://www.marketingaiinstitute.com/hubfs/ep%20145%20cover.png)


![Google Home app fixes bug that repeatedly asked to ‘Set up Nest Cam features’ for Nest Hub Max [U]](https://i0.wp.com/9to5google.com/wp-content/uploads/sites/4/2022/08/youtube-premium-music-nest-hub-max.jpg?resize=1200%2C628&quality=82&strip=all&ssl=1)


![Epic Games Wins Major Victory as Apple is Ordered to Comply With App Store Anti-Steering Injunction [Updated]](https://images.macrumors.com/t/Z4nU2dRocDnr4NPvf-sGNedmPGA=/2250x/article-new/2022/01/iOS-App-Store-General-Feature-JoeBlue.jpg)


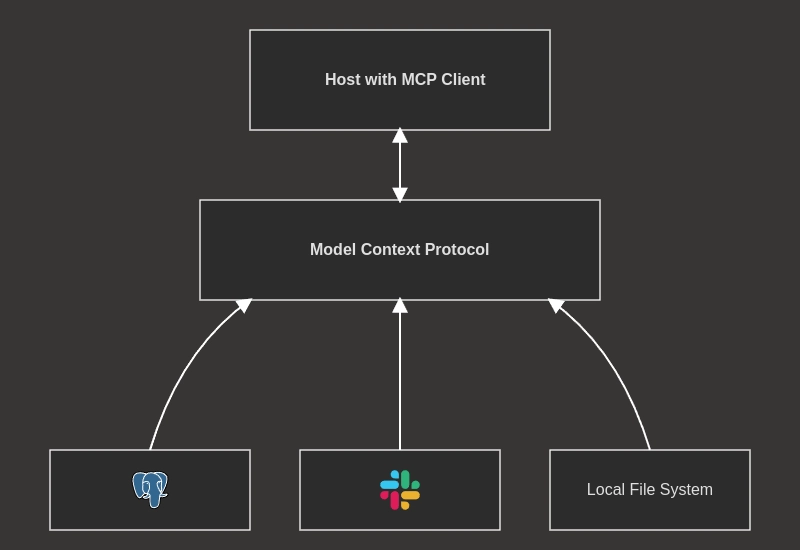
PermitBlog: Headless Blog with Built-in Access Control
What I Built Current Implementation for RBAC and ABAC Tech Stack Key Features Post Workflow Publishing Cycle Authorization Flow Admin Editor Author Viewer Roles Definition in code DTO Schema Enum Roles Definition in Permit.io Resources Definition in code Resources Definition in Permit.io Soft Delete Demo Project Repo My Journey Challenge 1: Permit.io Service in Nest.js Challenge 2: Creating Users and Synchronizing with Permit.io Challenge 3: Role Management via API Challenge 4: Authorization Checks API-First Authorization API Endpoints Authentication User Management Posts This is a submission for the Permit.io Authorization Challenge: API-First Authorization Reimagined What I Built There are many headless blog systems out there but most of them are commercial products or paid solutions with free-tier having very limited functionalities. I wanted my team to have a blog system with our own subdomain. We could only find couple of solutions like that, but they had very limited features. To address this, I started building an open-source headless blog system — with Permit.io authorization at its core — to offer fine-grained access control based on RBAC (Role-Based Access Control) and soon ABAC (Attribute-Based Access Control) principles. This project aims to make it easier for developers to: Launch their own customizable blog backend. Manage users and posts securely with role-based permissions. Achieve granular control over content access and management. Current Implementation for RBAC and ABAC Currently, it only utilizes RBAC from permit.io to manage user roles like admin, editor, author, viewer In future, ABAC will also be incorporated to enable more dynamic permissions (e.g., co-authoring, content-level editing permissions). Tech Stack Backend: Nest.js Database: Mongoose (MongoDB) Authorization: Permit.io (RBAC, soon ABAC) Key Features Advanced Authorization: Role-based access control (RBAC) using Permit.io User Management: Registration, authentication, and role assignment Content Workflow: Complete post lifecycle including drafting, co-authoring, review, and publishing RESTful API: Well-structured endpoints for all operations MongoDB Integration: Flexible document storage for your content Soft Delete: Mark records as deleted without permanently removing them from the database Post Workflow The PermitBlog system implements a complete post workflow: Creation: Authors create draft posts Collaboration: Authors can add co-authors to their posts Review Process: Posts are submitted for review by editors Publishing: Approved posts can be published Archiving: Published posts can be archived Publishing Cycle Following status fields define the entire publishing cycle for post flow for the blog posts: @Prop({ type: String, enum: [ 'draft', 'pending_review', 'approved', 'published', 'rejected', 'archived', ], default: 'draft', }) status: string; The status field can take one of the following values, representing different stages in the publishing cycle: draft: This is the initial status of a newly created blog post. It is not yet submitted for review and is only visible to the author(s). pending_review: Once an author finishes writing, they can submit the post for review. At this stage, the status is updated to pending_review, and it becomes visible to editors or administrators who have the permission to review content. approved: An editor or administrator reviews a post in the pending_review state. If the content meets the editorial standards, they can approve it, changing the status to approved. This signifies that the post is ready for publishing. published: A post in the approved state can be published, making it publicly visible on the blog. The status is updated to published, and the publishedAt timestamp is recorded. rejected: If an editor or administrator finds issues with a post in the pending_review state, they can reject it. The status is updated to rejected, and a rejectedReason can be provided to the author for necessary revisions. Rejected posts are typically not publicly visible. archived: Published posts can be moved to an archived state. This removes them from the main blog feed. Authorization Flow PermitBlog uses Permit.io to implement the following permission model with respect to the roles: Admin Full access to all resources and actions Editor Can review and approve/reject posts Can publish approved posts Author Can create, edit and submit their own posts Can add co-authors to their posts Viewer Can view published posts Roles Definition in code These roles are well defined in the code (DTO, Schema and Enum). DTO @IsIn(['admin', 'editor', 'author', 'viewer'])

-
What I Built
- Current Implementation for RBAC and ABAC
- Tech Stack
- Key Features
-
Post Workflow
- Publishing Cycle
-
Authorization Flow
- Admin
- Editor
- Author
- Viewer
-
Roles Definition in code
- DTO
- Schema
- Enum
- Roles Definition in Permit.io
- Resources Definition in code
- Resources Definition in Permit.io
- Soft Delete
- Demo
- Project Repo
-
My Journey
- Challenge 1: Permit.io Service in Nest.js
- Challenge 2: Creating Users and Synchronizing with Permit.io
- Challenge 3: Role Management via API
- Challenge 4: Authorization Checks
-
API-First Authorization
-
API Endpoints
- Authentication
- User Management
- Posts
-
API Endpoints
This is a submission for the Permit.io Authorization Challenge: API-First Authorization Reimagined
What I Built
There are many headless blog systems out there but most of them are commercial products or paid solutions with free-tier having very limited functionalities.
I wanted my team to have a blog system with our own subdomain. We could only find couple of solutions like that, but they had very limited features.
To address this, I started building an open-source headless blog system — with Permit.io authorization at its core — to offer fine-grained access control based on RBAC (Role-Based Access Control) and soon ABAC (Attribute-Based Access Control) principles.
This project aims to make it easier for developers to:
- Launch their own customizable blog backend.
- Manage users and posts securely with role-based permissions.
- Achieve granular control over content access and management.
Current Implementation for RBAC and ABAC
Currently, it only utilizes RBAC from permit.io to manage user roles like admin, editor, author, viewer
In future, ABAC will also be incorporated to enable more dynamic permissions (e.g., co-authoring, content-level editing permissions).
Tech Stack
- Backend: Nest.js
- Database: Mongoose (MongoDB)
- Authorization: Permit.io (RBAC, soon ABAC)
Key Features
- Advanced Authorization: Role-based access control (RBAC) using Permit.io
- User Management: Registration, authentication, and role assignment
- Content Workflow: Complete post lifecycle including drafting, co-authoring, review, and publishing
- RESTful API: Well-structured endpoints for all operations
- MongoDB Integration: Flexible document storage for your content
- Soft Delete: Mark records as deleted without permanently removing them from the database
Post Workflow
The PermitBlog system implements a complete post workflow:
- Creation: Authors create draft posts
- Collaboration: Authors can add co-authors to their posts
- Review Process: Posts are submitted for review by editors
- Publishing: Approved posts can be published
- Archiving: Published posts can be archived
Publishing Cycle
Following status fields define the entire publishing cycle for post flow for the blog posts:
@Prop({
    type: String,
    enum: [
      'draft',
      'pending_review',
      'approved',
      'published',
      'rejected',
      'archived',
    ],
    default: 'draft',
  })
  status: string;
The status field can take one of the following values, representing different stages in the publishing cycle:
draft: This is the initial status of a newly created blog post. It is not yet submitted for review and is only visible to the author(s).
pending_review: Once an author finishes writing, they can submit the post for review. At this stage, the status is updated to pending_review, and it becomes visible to editors or administrators who have the permission to review content.
approved: An editor or administrator reviews a post in the pending_review state. If the content meets the editorial standards, they can approve it, changing the status to approved. This signifies that the post is ready for publishing.
published: A post in the approved state can be published, making it publicly visible on the blog. The status is updated to published, and the publishedAt timestamp is recorded.
rejected: If an editor or administrator finds issues with a post in the pending_review state, they can reject it. The status is updated to rejected, and a rejectedReason can be provided to the author for necessary revisions. Rejected posts are typically not publicly visible.
archived: Published posts can be moved to an archived state. This removes them from the main blog feed.
Authorization Flow
PermitBlog uses Permit.io to implement the following permission model with respect to the roles:
Admin
- Full access to all resources and actions
Editor
- Can review and approve/reject posts
- Can publish approved posts
Author
- Can create, edit and submit their own posts
- Can add co-authors to their posts
Viewer
- Can view published posts
Roles Definition in code
These roles are well defined in the code (DTO, Schema and Enum).
DTO
@IsIn(['admin', 'editor', 'author', 'viewer'])
  role = 'viewer';
Schema
@Prop({
    type: String,
    required: true,
    enum: ['admin', 'editor', 'author', 'viewer'],
    default: 'viewer',
  })
  role: string;
Enum
export enum ROLES {
  ADMIN = 'admin',
  EDITOR = 'editor',
  VIEWER = 'viewer',
  AUTHOR = 'author',
}
Roles Definition in Permit.io
These roles are defined in Permit.io:
Resources Definition in code
These resources are well defined in the code as well:
export enum PERMIT_IO_RESOURCES {
  USER = 'user',
  POST = 'post',
}
Resources Definition in Permit.io
There are 2 resources currently:
- User
- Post
This is also well defined in Permit.io:

In the future, we can add Comments as a resource, along with other features as the project evolves into a full open-source platform
Soft Delete
Soft delete is currently already implemented with isDelete field.
Queries to fetch the result are written like this:
const query = { isDeleted: false };
This ensures that all read operations by default only fetch posts that have not been soft-deleted.
Demo
Video demo for working application is uploaded on YouTube:
Project Repo
https://github.com/Shameel123/PermitBlog
My Journey
I started learning about permit.io when I decided to take part in this challenge. Initially, the docs available at Permit.io mainly include Node.js examples however I wanted to go with Nest.js so that I can have all of its benefits out of the box.
Challenge 1: Permit.io Service in Nest.js
First challenge that I faced was to have Permit.io properly integrated.
Official docs mainly included Node.js examples. There were few blogs for Nest.js but they were not what I needed. I wanted to have a dependency injection solution. So I worked my way towards it, which took me a little time to make it work. Details are as follows:
I created Permitio service which is initialized as server starts so that we can allow it with dependency injection anwywhere we require, like in User module or Post module:
import { Injectable } from '@nestjs/common';
import { Permit } from 'permitio';

@Injectable()
export class PermitService {
  private permit: Permit;

  constructor() {
    this.permit = new Permit({
      pdp: process.env.PERMIT_IO_PDP,
      token: process.env.PERMIT_IO_TOKEN,
    });
  }

  getPermitInstance(): Permit {
    return this.permit;
  }
}
This implementation requires two essential environment variables:
PERMIT_IO_PDP='https://cloudpdp.api.permit.io'
PERMIT_IO_TOKEN='permit_key_your_api_key_here'
Please refer to README.md file in repository to understand and set all required env variables
You can get API key like this:

Note: Permit.io provides a managed Cloud PDP at https://cloudpdp.api.permit.io that is globally available. See the official PDP documentation for more details: https://docs.permit.io/concepts/pdp/overview/.
I have also defined the resources in same module for permitio like this:
export enum PERMIT_IO_RESOURCES {
  USER = 'user',
  POST = 'post',
}

In order to register this service in Nest.js app, go to app.module and then have it imported and registered like this:
// other imports
import { PermitService } from './permitio/permitio.service';

@Module({
  imports: [
    //other imports
  ],
  controllers: [AppController],
  providers: [AppService, PermitService],
})
export class AppModule {}
PS. Find full code attached in the repo.
Challenge 2: Creating Users and Synchronizing with Permit.io
Next challenge I faced was when I was making user sign-up and sign-in flow work in User module.
In my constructor, I had to define Mongoose Model and PermitService like this:
constructor(
    @InjectModel(User.name) private userModel: Model<userDocument>,
    private permitService: PermitService,
  ) {}
Signing up user and storing in MongoDB is out of topic for this blog so I will focus on the challenge I faced with permit.io.
The main challenge is this: Created user in MongoDB should also be created in Permit.io
In order to do that, I had to use syncUser api like this:
const permitioUser = await this.permitService
      .getPermitInstance()
      .api.syncUser({
        key: createUser._id.toString(),
        email: createUser.email,
        attributes: {
          id: createUser._id.toString(),
          first_name: createUser.firstName,
          last_name: createUser.lastName,
        },
        role_assignments: [
          { role: 'viewer', tenant: process.env.PERMIT_IO_TENANT || 'default' },
        ],
      });
This approach:
- Uses the MongoDB document ID as the user key in Permit.io
- Stores email and user attributes
- Assigns a default 'viewer' role (which must be pre-configured in Permit.io)
For future reference and to avoid additional API calls, I store the Permit.io user data in MongoDB:
createUser.permitioUser = {
      key: permitioUser.key,
      id: permitioUser.id,
      organization_id: permitioUser.organization_id,
      project_id: permitioUser.project_id,
      environment_id: permitioUser.environment_id,
      associated_tenants: permitioUser.associated_tenants || [],
      roles: permitioUser.roles || [],
      created_at: permitioUser.created_at,
      updated_at: permitioUser.updated_at,
      email: permitioUser.email || '',
      first_name: permitioUser.first_name || '',
      last_name: permitioUser.last_name || '',
      attributes: permitioUser.attributes,
    };
Challenge 3: Role Management via API
The third challenge was implementing programmatic role management rather than relying on the Permit.io dashboard or Permit.io CLI.
I created an endpoint protected by an API key (not JWT):
@Post('/assign-role')
  @UseGuards(ApiKeyAuthGuard)
  async assignRole(@Body() body: AssignRoleDto): Promise<any> {
    return await this.UserService.assignRole(body);
  }
@UseGuards(ApiKeyAuthGuard) checks for BackendApiKey in header before proceeding forward.
This is the snippet to add another role in permit.io:
const permitioUser = await this.permitService
      .getPermitInstance()
      .api.assignRole({
        user: user.permitioUser.key,
        role,
        tenant: process.env.PERMIT_IO_TENANT || 'default',
      });
I read the docs and faced a little difficulty because I wanted to use a different tenant (however, in code, I made it error free by adding default as well).
Challenge 4: Authorization Checks
Fourth challenge was to create and assign correct permissions in Permit.io and then check them properly in different endpoints.
In general, I get the instance like this:
const permit = this.permitService.getPermitInstance();
And then put on a check like this:
const permitted = await permit.check(user.permitioUser.key, 'delete', {
        type: PERMIT_IO_RESOURCES.POST,
        tenant: process.env.PERMIT_IO_TENANT || 'default',
      });
This pattern verifies if a user has permission to perform an action (e.g., 'delete') on a specific resource (e.g., 'post') within the defined tenant.
Please note that, resource e.g., post and action e.g., delete must be present in permit.io:

And it should be assigned to correct role:

And the role should be assigned to user who is performing this action on the resource:

Similar to above, I have added authorization layer in each API endpoint.
API-First Authorization
This headless blog system deeply integrates Permit.io's API-first authorization to manage access control for both users and blog posts.
All authorization decisions are externalized through Permit.io's APIs.
This means:
- Nest.js application contains minimal authorization code
- Permission rules are defined and managed in Permit.io's dashboard
- Application simply makes API calls to verify permissions before performing actions
- Roles have explicit permissions (admin, editor, author, viewer)
- Changes to permission rules don't require application redeployment
- Authorization decisions are consistent across all API endpoints
- The permission model can evolve independently of the application logic
Aforementioned points shows that using external authorization service like Permit.io helps lift a huge burden that we as developer face when we get into complicated authorization layers when keeping security within API in-check.
The core principle is that Nest.js API interacts with Permit.io's APIs to make authorization decisions before allowing users to perform any sensitive actions.
This is a service to create a post as an example:
async createPost(
    createPostDto: CreatePostDto,
    user: UserType,
  ): Promise<Post> {


    const permit = this.permitService.getPermitInstance();
    const permitted = await permit.check(user.permitioUser.key, 'create',{
      type: PERMIT_IO_RESOURCES.POST,
      tenant: process.env.PERMIT_IO_TENANT || 'default',
    });


    if (!permitted) {
      throw new HttpException(
        'You are not permitted to create posts',
        HttpStatus.FORBIDDEN,
      );
    }

    const post = new this.postModel({
      ...createPostDto,
      createdBy: user._id,
      authors: [
        user._id,
        ...(createPostDto.authors?.map((id) => new Types.ObjectId(id)) || []),
      ],
      status: PostStatus.DRAFT,
    });

    return await post.save();
  }
This snippet is used to check the permission:
const permitted = await permit.check(user.permitioUser.key, 'create', {
      type: PERMIT_IO_RESOURCES.POST,
      tenant: process.env.PERMIT_IO_TENANT || 'default',
    });
As mentioned earlier in last challenge of my journey, this is how nest.js application applies API-first approach and uses Permit.io at its core as authorization layer.
API Endpoints
Authentication
| Method | Endpoint | Description | Request Body | Authorization |
|---|---|---|---|---|
| POST | /auth/register |
Register a new user | { "email": "user@example.com", "password": "password" } |
None |
| POST | /auth/login |
Login and get JWT token | { "email": "user@example.com", "password": "password" } |
None |
User Management
| Method | Endpoint | Description | Request Body | Authorization |
|---|---|---|---|---|
| GET | /user/all |
Get all users | None | JWT Token |
| POST | /user/assign-role |
Assign role to user | { "email": "user@example.com", "role": "editor" } |
Backend API Key |
Posts
| Method | Endpoint | Description | Request Body | Authorization |
|---|---|---|---|---|
| POST | /post |
Create a new post | Post object (title, content, tags, etc.) | JWT Token |
| POST | /post/:id/co-author |
Add co-author to post | { "userId": "user_id" } |
JWT Token |
| DELETE | /post/:id/co-author/:userId |
Remove co-author | None | JWT Token |
| PATCH | /post/:id/submit-for-review |
Submit post for review | Post object | JWT Token |
| PATCH | /post/:id/review |
Approve/reject post |
{ "status": "approved" } or { "status": "rejected", "rejectedReason": "reason" }
|
JWT Token |
| PATCH | /post/:id/publish |
Publish a post | None | JWT Token |
| DELETE | /post/:id |
Deletes a post | None | JWT Token |