


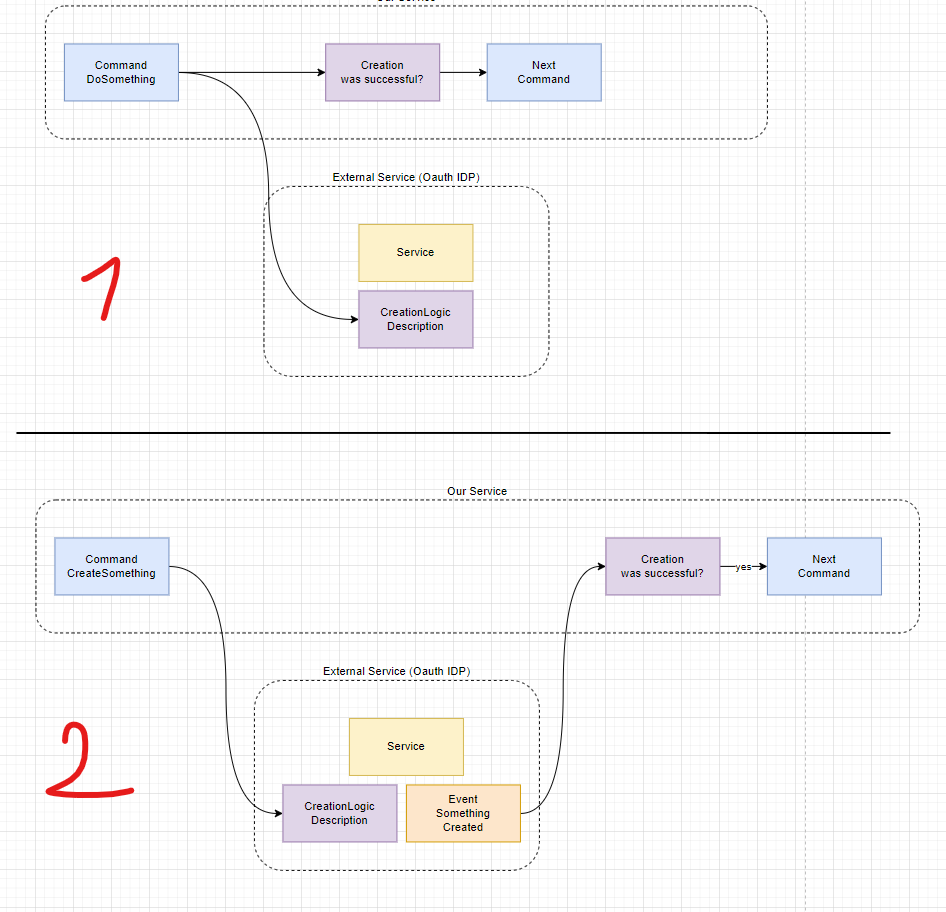
![[The AI Show Episode 145]: OpenAI Releases o3 and o4-mini, AI Is Causing “Quiet Layoffs,” Executive Order on Youth AI Education & GPT-4o’s Controversial Update](https://www.marketingaiinstitute.com/hubfs/ep%20145%20cover.png)


![Ditching a Microsoft Job to Enter Startup Purgatory with Lonewolf Engineer Sam Crombie [Podcast #171]](https://cdn.hashnode.com/res/hashnode/image/upload/v1746753508177/0cd57f66-fdb0-4972-b285-1443a7db39fc.png?#)


_Piotr_Adamowicz_Alamy.jpg?width=1280&auto=webp&quality=80&disable=upscale#)

_designer491_Alamy.jpg?width=1280&auto=webp&quality=80&disable=upscale#)


-xl-xl-xl.jpg)


![Apple Officially Releases macOS Sequoia 15.5 [Download]](https://www.iclarified.com/images/news/97308/97308/97308-640.jpg)


Mastering Go Slices: A Deep Dive from Zero to Hero
Go’s slices are a cornerstone of the language, offering a flexible way to work with sequences of data. They’re not arrays, but they’re built on top of them, and understanding how they work under the hood can level up your Go programming. This post breaks down slices from the basics to advanced use cases, with clear examples and practical tips. Let’s dive in. What Are Slices, Really? A slice in Go is a lightweight structure that provides a window into an underlying array. Unlike arrays, which have a fixed length, slices are dynamic, meaning you can grow or shrink them (within limits). A slice is defined by three components: a pointer to the array, a length (number of elements accessible), and a capacity (total elements in the underlying array). Here’s a simple example to show a slice in action: package main import "fmt" func main() { // Create a slice directly numbers := []int{1, 2, 3, 4, 5} fmt.Println("Slice:", numbers) fmt.Println("Length:", len(numbers)) fmt.Println("Capacity:", cap(numbers)) } // Output: // Slice: [1 2 3 4 5] // Length: 5 // Capacity: 5 Slices are declared with []type, and you can create them using literals (like above) or the make function. The Go blog has a great deep dive on slice internals if you want more. Creating Slices: The Many Ways You can create slices in several ways, each with its own use case. Here’s a breakdown: Method Syntax When to Use Slice Literal s := []int{1, 2, 3} Quick setup with known values make s := make([]int, len, cap) Pre-allocate length and capacity From Array s := arr[start:end] Work with part of an existing array Nil Slice var s []int Initialize an empty slice (no allocation) Here’s a complete example showing different creation methods: package main import "fmt" func main() { // Slice literal literal := []int{10, 20, 30} fmt.Println("Literal slice:", literal) // Using make made := make([]int, 2, 5) made[0], made[1] = 1, 2 fmt.Println("Made slice:", made, "Len:", len(made), "Cap:", cap(made)) // From array array := [5]int{100, 200, 300, 400, 500} fromArray := array[1:4] fmt.Println("From array:", fromArray) // Nil slice var nilSlice []int fmt.Println("Nil slice:", nilSlice, "Is nil?", nilSlice == nil) } // Output: // Literal slice: [10 20 30] // Made slice: [1 2] Len: 2 Cap: 5 // From array: [200 300 400] // Nil slice: [] Is nil? true Key point: Use make when you know the size upfront to avoid reallocations. Slicing Syntax: Cutting Arrays Like a Pro The slicing syntax s[start:end] lets you create a new slice from an array or another slice. The start index is inclusive, and end is exclusive. You can also use a third index, s[start:end:max], to control the capacity. Here’s an example: package main import "fmt" func main() { array := [6]int{0, 1, 2, 3, 4, 5} // Basic slicing s1 := array[1:4] fmt.Println("s1:", s1, "Len:", len(s1), "Cap:", cap(s1)) // Slice with max capacity s2 := array[1:4:5] fmt.Println("s2:", s2, "Len:", len(s2), "Cap:", cap(s2)) // Full slice s3 := array[:] fmt.Println("s3:", s3, "Len:", len(s3), "Cap:", cap(s3)) } // Output: // s1: [1 2 3] Len: 3 Cap: 5 // s2: [1 2 3] Len: 3 Cap: 4 // s3: [0 1 2 3 4 5] Len: 6 Cap: 6 Key point: The capacity of a slice is determined by the underlying array’s length from the start index to either the array’s end or the max index. Appending to Slices: Growing with append The append function is how you add elements to a slice. If the underlying array has enough capacity, append uses it. Otherwise, Go allocates a new, larger array. This can impact performance, so pre-allocating with make is often better for large slices. Example: package main import "fmt" func main() { s := []int{1, 2} fmt.Println("Before:", s, "Len:", len(s), "Cap:", cap(s)) // Append one element s = append(s, 3) fmt.Println("After one:", s, "Len:", len(s), "Cap:", cap(s)) // Append multiple elements s = append(s, 4, 5, 6) fmt.Println("After many:", s, "Len:", len(s), "Cap:", cap(s)) } // Output: // Before: [1 2] Len: 2 Cap: 2 // After one: [1 2 3] Len: 3 Cap: 4 // After many: [1 2 3 4 5 6] Len: 6 Cap: 8 Notice how the capacity doubles (2 → 4 → 8) when the slice grows. The Go spec explains this behavior. Key point: Always assign the result of append back to the slice, as it may return a new slice. Copying Slices: Avoiding Shared Data Pitfalls Slices share their underlying array, which can lead to unexpected behavior. The copy function creates a new slice with its own array, copying elements from the source. Here’s an example showing the difference: package main import "fmt" func main() { src := []int{1, 2, 3, 4} dst := make([]int, 2) // Copy first two elements n := copy(dst, src) fmt.Println("Copied:", dst, "Elements copied:", n) /

Go’s slices are a cornerstone of the language, offering a flexible way to work with sequences of data. They’re not arrays, but they’re built on top of them, and understanding how they work under the hood can level up your Go programming. This post breaks down slices from the basics to advanced use cases, with clear examples and practical tips. Let’s dive in.
What Are Slices, Really?
A slice in Go is a lightweight structure that provides a window into an underlying array. Unlike arrays, which have a fixed length, slices are dynamic, meaning you can grow or shrink them (within limits). A slice is defined by three components: a pointer to the array, a length (number of elements accessible), and a capacity (total elements in the underlying array).
Here’s a simple example to show a slice in action:
package main

import "fmt"

func main() {
    // Create a slice directly
    numbers := []int{1, 2, 3, 4, 5}
    fmt.Println("Slice:", numbers)
    fmt.Println("Length:", len(numbers))
    fmt.Println("Capacity:", cap(numbers))
}

// Output:
// Slice: [1 2 3 4 5]
// Length: 5
// Capacity: 5
Slices are declared with []type, and you can create them using literals (like above) or the make function. The Go blog has a great deep dive on slice internals if you want more.
Creating Slices: The Many Ways
You can create slices in several ways, each with its own use case. Here’s a breakdown:
| Method | Syntax | When to Use |
|---|---|---|
| Slice Literal | s := []int{1, 2, 3} |
Quick setup with known values |
make |
s := make([]int, len, cap) |
Pre-allocate length and capacity |
| From Array | s := arr[start:end] |
Work with part of an existing array |
| Nil Slice | var s []int |
Initialize an empty slice (no allocation) |
Here’s a complete example showing different creation methods:
package main

import "fmt"

func main() {
    // Slice literal
    literal := []int{10, 20, 30}
    fmt.Println("Literal slice:", literal)

    // Using make
    made := make([]int, 2, 5)
    made[0], made[1] = 1, 2
    fmt.Println("Made slice:", made, "Len:", len(made), "Cap:", cap(made))

    // From array
    array := [5]int{100, 200, 300, 400, 500}
    fromArray := array[1:4]
    fmt.Println("From array:", fromArray)

    // Nil slice
    var nilSlice []int
    fmt.Println("Nil slice:", nilSlice, "Is nil?", nilSlice == nil)
}

// Output:
// Literal slice: [10 20 30]
// Made slice: [1 2] Len: 2 Cap: 5
// From array: [200 300 400]
// Nil slice: [] Is nil? true
Key point: Use make when you know the size upfront to avoid reallocations.
Slicing Syntax: Cutting Arrays Like a Pro
The slicing syntax s[start:end] lets you create a new slice from an array or another slice. The start index is inclusive, and end is exclusive. You can also use a third index, s[start:end:max], to control the capacity.
Here’s an example:
package main

import "fmt"

func main() {
    array := [6]int{0, 1, 2, 3, 4, 5}

    // Basic slicing
    s1 := array[1:4]
    fmt.Println("s1:", s1, "Len:", len(s1), "Cap:", cap(s1))

    // Slice with max capacity
    s2 := array[1:4:5]
    fmt.Println("s2:", s2, "Len:", len(s2), "Cap:", cap(s2))

    // Full slice
    s3 := array[:]
    fmt.Println("s3:", s3, "Len:", len(s3), "Cap:", cap(s3))
}

// Output:
// s1: [1 2 3] Len: 3 Cap: 5
// s2: [1 2 3] Len: 3 Cap: 4
// s3: [0 1 2 3 4 5] Len: 6 Cap: 6
Key point: The capacity of a slice is determined by the underlying array’s length from the start index to either the array’s end or the max index.
Appending to Slices: Growing with append
The append function is how you add elements to a slice. If the underlying array has enough capacity, append uses it. Otherwise, Go allocates a new, larger array. This can impact performance, so pre-allocating with make is often better for large slices.
Example:
package main

import "fmt"

func main() {
    s := []int{1, 2}
    fmt.Println("Before:", s, "Len:", len(s), "Cap:", cap(s))

    // Append one element
    s = append(s, 3)
    fmt.Println("After one:", s, "Len:", len(s), "Cap:", cap(s))

    // Append multiple elements
    s = append(s, 4, 5, 6)
    fmt.Println("After many:", s, "Len:", len(s), "Cap:", cap(s))
}

// Output:
// Before: [1 2] Len: 2 Cap: 2
// After one: [1 2 3] Len: 3 Cap: 4
// After many: [1 2 3 4 5 6] Len: 6 Cap: 8
Notice how the capacity doubles (2 → 4 → 8) when the slice grows. The Go spec explains this behavior.
Key point: Always assign the result of append back to the slice, as it may return a new slice.
Copying Slices: Avoiding Shared Data Pitfalls
Slices share their underlying array, which can lead to unexpected behavior. The copy function creates a new slice with its own array, copying elements from the source.
Here’s an example showing the difference:
package main

import "fmt"

func main() {
    src := []int{1, 2, 3, 4}
    dst := make([]int, 2)

    // Copy first two elements
    n := copy(dst, src)
    fmt.Println("Copied:", dst, "Elements copied:", n)

    // Modify source
    src[0] = 99
    fmt.Println("Source after mod:", src)
    fmt.Println("Dest after mod:", dst)
}

// Output:
// Copied: [1 2] Elements copied: 2
// Source after mod: [99 2 3 4]
// Dest after mod: [1 2]
Key point: Use copy when you need an independent slice to avoid modifying the original data.
Slice Gotchas: Common Mistakes to Avoid
Slices are powerful but can trip you up. Here are common pitfalls:
| Mistake | Problem | Fix |
|---|---|---|
| Modifying shared arrays | Changes in one slice affect others | Use copy or create a new slice |
| Nil slice panic | Accessing elements in a nil slice | Check for nil or initialize |
| Out-of-bounds | Accessing beyond length | Use len to check bounds |
Example of a shared array issue:
package main

import "fmt"

func main() {
    array := [4]int{1, 2, 3, 4}
    s1 := array[:2]
    s2 := array[1:3]

    s1[1] = 99
    fmt.Println("s1:", s1)
    fmt.Println("s2:", s2) // s2 is affected!
}

// Output:
// s1: [1 99]
// s2: [99 3]
Key point: Always be aware of the underlying array when working with multiple slices.
Performance Tips: Making Slices Efficient
Slices are fast, but misuse can slow your program. Here are tips to optimize:
-
Pre-allocate with
make: Set length and capacity to avoid reallocations. -
Minimize
appendcalls: Batch appends to reduce array copying. -
Use
copywisely: Only copy what you need to avoid unnecessary overhead.
Example of pre-allocation vs. dynamic growth:
package main

import "fmt"

func main() {
    // Pre-allocated
    s1 := make([]int, 0, 100)
    for i := 0; i < 100; i++ {
        s1 = append(s1, i)
    }
    fmt.Println("Pre-allocated len:", len(s1), "cap:", cap(s1))

    // Dynamic growth
    s2 := []int{}
    for i := 0; i < 100; i++ {
        s2 = append(s2, i)
    }
    fmt.Println("Dynamic len:", len(s2), "cap:", cap(s2))
}

// Output:
// Pre-allocated len: 100 cap: 100
// Dynamic len: 100 cap: 128
Key point: Pre-allocation reduces memory allocations and improves performance.
Practical Slice Patterns: Real-World Uses
Slices shine in real-world scenarios. Here are two common patterns:
- Filtering: Create a new slice with elements matching a condition.
- Chunking: Split a slice into smaller slices.
Example of filtering:
package main

import "fmt"

func main() {
    numbers := []int{1, 2, 3, 4, 5, 6}
    evens := []int{}

    for _, n := range numbers {
        if n%2 == 0 {
            evens = append(evens, n)
        }
    }

    fmt.Println("Evens:", evens)
}

// Output:
// Evens: [2 4 6]
For chunking or other patterns, check the Effective Go guide.
Where to Go Next with Slices
Slices are a fundamental part of Go, and mastering them opens up efficient, idiomatic coding. To deepen your understanding, try these steps:
- Experiment: Write small programs to test slice behavior, like resizing or sharing arrays.
-
Read the source: The Go runtime’s slice implementation (in
runtime/slice.go) reveals howappendand growth work. -
Profile your code: Use Go’s
pproftool to spot slice-related performance issues. -
Explore libraries: Look at how packages like
sortorcontaineruse slices.
Slices may seem simple, but their flexibility and performance make them a powerful tool in every Go developer’s toolkit. Keep practicing, and you’ll be slicing like a pro.