


![[The AI Show Episode 145]: OpenAI Releases o3 and o4-mini, AI Is Causing “Quiet Layoffs,” Executive Order on Youth AI Education & GPT-4o’s Controversial Update](https://www.marketingaiinstitute.com/hubfs/ep%20145%20cover.png)


![From Art School Drop-out to Microsoft Engineer with Shashi Lo [Podcast #170]](https://cdn.hashnode.com/res/hashnode/image/upload/v1746203291209/439bf16b-c820-4fe8-b69e-94d80533b2df.png?#)


![Re-designing a Git/development workflow with best practices [closed]](https://i.postimg.cc/tRvBYcrt/branching-example.jpg)


(1).jpg?#)


_Inge_Johnsson-Alamy.jpg?width=1280&auto=webp&quality=80&disable=upscale#)


![What Google Messages features are rolling out [May 2025]](https://i0.wp.com/9to5google.com/wp-content/uploads/sites/4/2023/12/google-messages-name-cover.png?resize=1200%2C628&quality=82&strip=all&ssl=1)


![New Apple iPad mini 7 On Sale for $399! [Lowest Price Ever]](https://www.iclarified.com/images/news/96096/96096/96096-640.jpg)
![Apple to Split iPhone Launches Across Fall and Spring in Major Shakeup [Report]](https://www.iclarified.com/images/news/97211/97211/97211-640.jpg)
![Apple to Move Camera to Top Left, Hide Face ID Under Display in iPhone 18 Pro Redesign [Report]](https://www.iclarified.com/images/news/97212/97212/97212-640.jpg)
![Apple Developing Battery Case for iPhone 17 Air Amid Battery Life Concerns [Report]](https://www.iclarified.com/images/news/97208/97208/97208-640.jpg)


How I Built My First VPC with 6 Subnets (And Only Mildly Panicked)
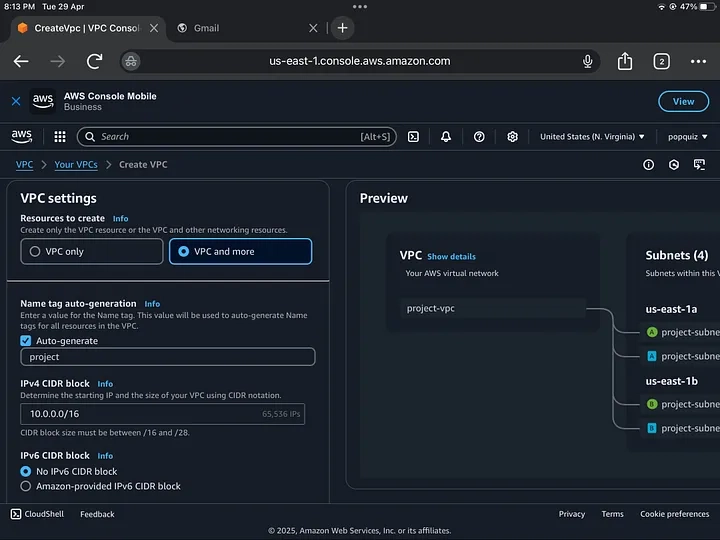
Real talk: When I first started poking around in AWS, I wasn’t trying to build anything fancy. I just wanted to run a small app and maybe learn a thing or two along the way. But as I clicked through the endless maze of services, acronyms, and dropdown menus, one word kept showing up: VPC. At first, I ignored it. It sounded complicated. Scary, even. Then I ran into issues — couldn’t access my instance, secure my database, or figure out where my traffic was going. That’s when I realized: I needed to understand how the networking stuff works. So I decided to build my own Virtual Private Cloud — fully from scratch, with six subnets (yep, six), even though I had no clue what I was doing at the start. If you’re new to AWS and feeling overwhelmed, trust me: I’ve been there. Here’s exactly how I figured it out — and what I wish someone had told me before I started. Why Even Build a Custom VPC? Like a lot of folks, I started with AWS’s default VPC. It was fine — until it wasn’t. I thought of a setup with more structure: Public subnets for web-facing services Private subnets for databases and internal logic Multiple Availability Zones for high availability So I said screw it — time to build a custom VPC with 6 subnets: 3 public, 3 private, spread across 3 Availability Zones (AZs). Step 1: VPC Basics (Without Falling Asleep) I created a new VPC with the CIDR block 10.0.0.0/16—plenty of room for subnets. The plan: Subnet Type CIDR Block AZ Public A 10.0.1.0/24 us-east-1a Public B 10.0.2.0/24 us-east-1b Public C 10.0.3.0/24 us-east-1c Private A 10.0.101.0/24 us-east-1a Private B 10.0.102.0/24 us-east-1b Private C 10.0.103.0/24 us-east-1c I wanted each pair of public/private subnets to live in its own AZ, so if one zone went down, things would still hum along elsewhere. Step 2: Routing Headaches Once I had the subnets created, the real fun began: route tables. Public Route Table (1): Shared across all public subnets. It included a route to the Internet Gateway (IGW). Private Route Table (1): Shared across all private subnets. Lessons From the Trenches This build took me longer than I’d care to admit. But here’s what I took away:
Real talk: When I first started poking around in AWS, I wasn’t trying to build anything fancy. I just wanted to run a small app and maybe learn a thing or two along the way. But as I clicked through the endless maze of services, acronyms, and dropdown menus, one word kept showing up: VPC.
At first, I ignored it. It sounded complicated. Scary, even. Then I ran into issues — couldn’t access my instance, secure my database, or figure out where my traffic was going. That’s when I realized: I needed to understand how the networking stuff works.
So I decided to build my own Virtual Private Cloud — fully from scratch, with six subnets (yep, six), even though I had no clue what I was doing at the start. If you’re new to AWS and feeling overwhelmed, trust me: I’ve been there. Here’s exactly how I figured it out — and what I wish someone had told me before I started.
Why Even Build a Custom VPC?
Like a lot of folks, I started with AWS’s default VPC. It was fine — until it wasn’t. I thought of a setup with more structure:
Public subnets for web-facing services
Private subnets for databases and internal logic
Multiple Availability Zones for high availability
So I said screw it — time to build a custom VPC with 6 subnets: 3 public, 3 private, spread across 3 Availability Zones (AZs).
Step 1: VPC Basics (Without Falling Asleep)
I created a new VPC with the CIDR block 10.0.0.0/16—plenty of room for subnets. The plan:
Subnet Type CIDR Block AZ Public A 10.0.1.0/24 us-east-1a Public B 10.0.2.0/24 us-east-1b Public C 10.0.3.0/24 us-east-1c Private A 10.0.101.0/24 us-east-1a Private B 10.0.102.0/24 us-east-1b Private C 10.0.103.0/24 us-east-1c
I wanted each pair of public/private subnets to live in its own AZ, so if one zone went down, things would still hum along elsewhere.
Step 2: Routing Headaches
Once I had the subnets created, the real fun began: route tables.
Public Route Table (1): Shared across all public subnets. It included a route to the Internet Gateway (IGW).
Private Route Table (1): Shared across all private subnets.

Lessons From the Trenches
This build took me longer than I’d care to admit. But here’s what I took away: