


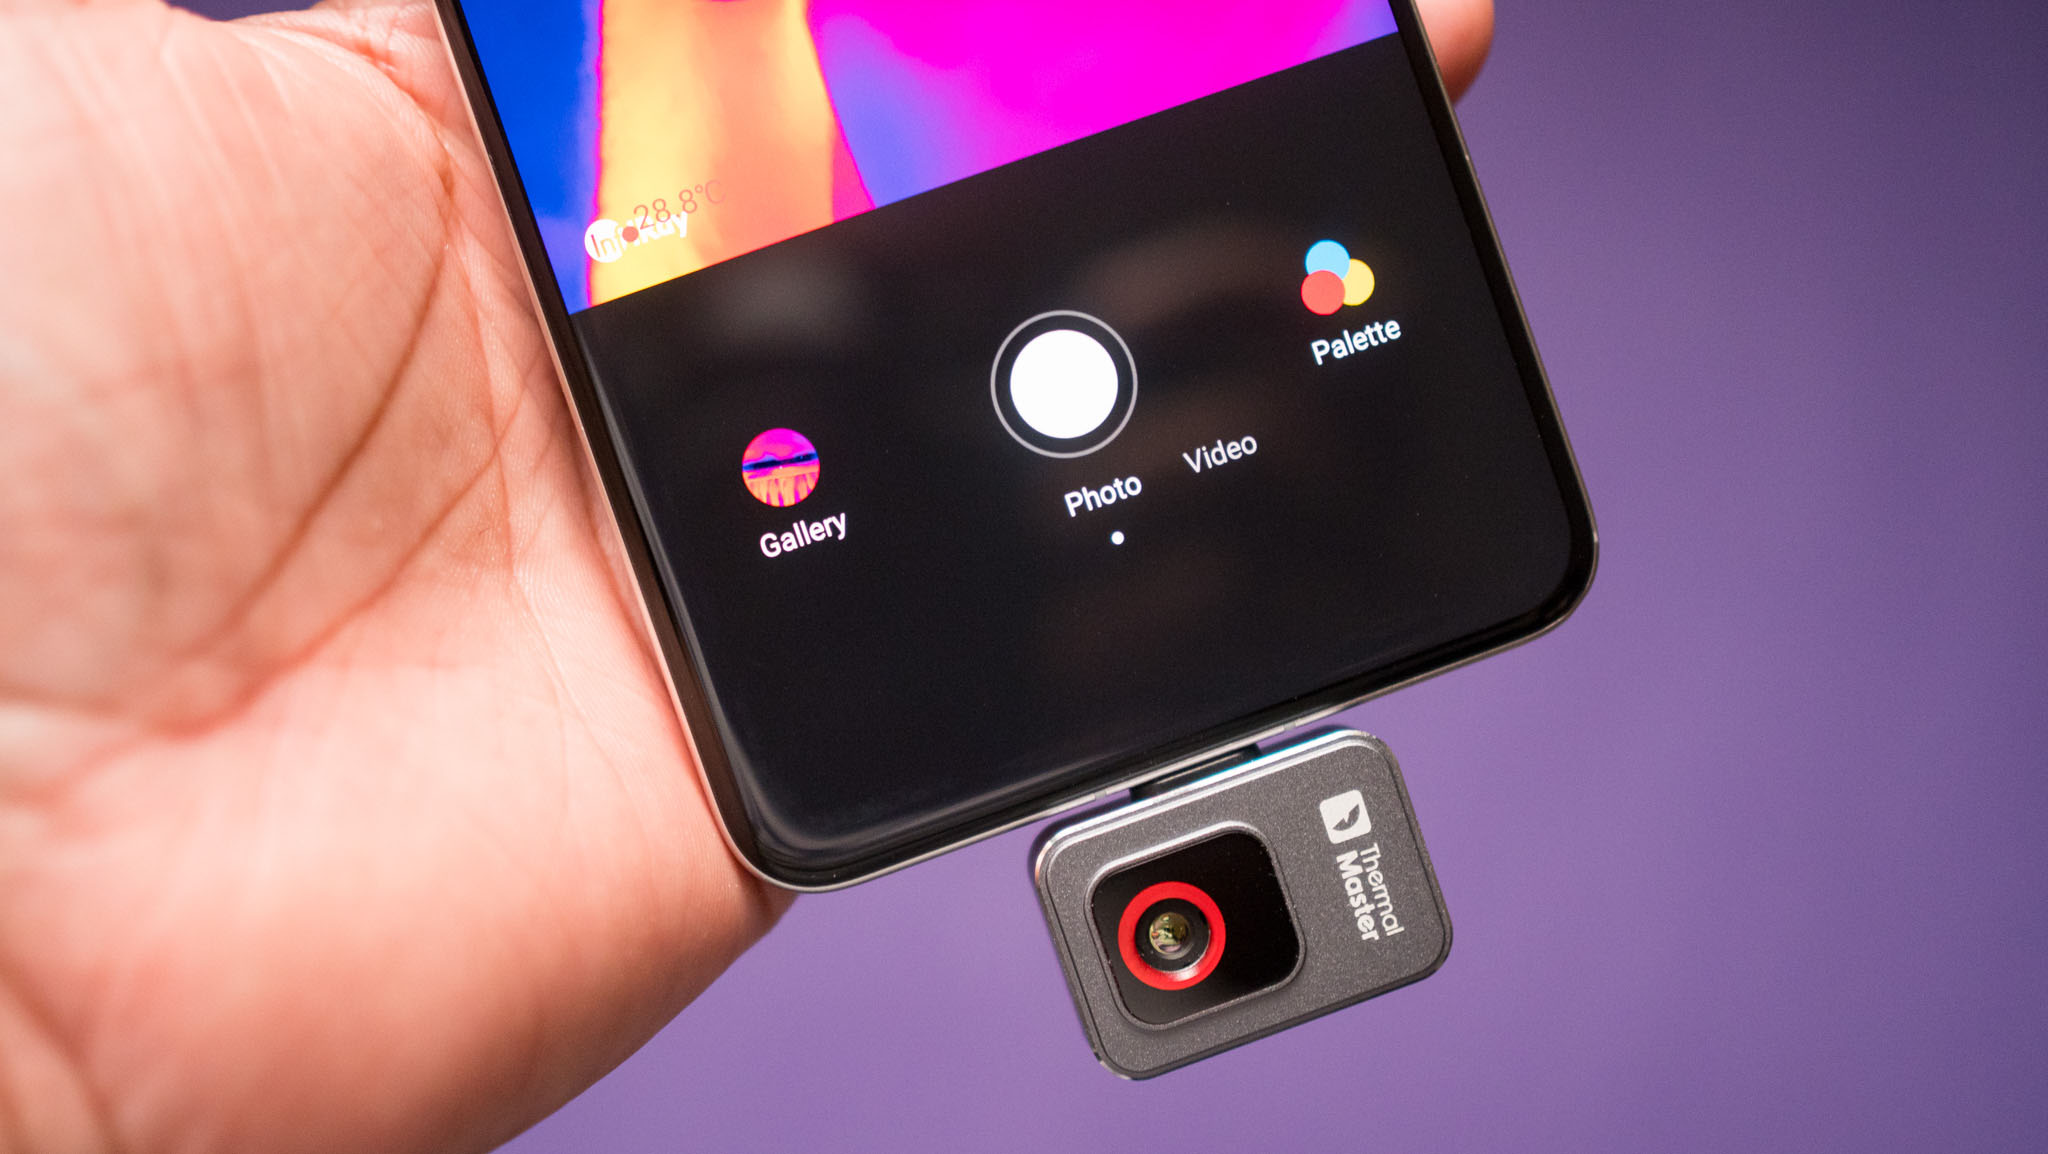
![[The AI Show Episode 145]: OpenAI Releases o3 and o4-mini, AI Is Causing “Quiet Layoffs,” Executive Order on Youth AI Education & GPT-4o’s Controversial Update](https://www.marketingaiinstitute.com/hubfs/ep%20145%20cover.png)


_NicoElNino_Alamy.jpg?width=1280&auto=webp&quality=80&disable=upscale#)


![Craft adds Readwise integration for working with book notes and highlights [50% off]](https://i0.wp.com/9to5mac.com/wp-content/uploads/sites/6/2025/04/craft3.jpg.png?resize=1200%2C628&quality=82&strip=all&ssl=1)


![Apple Restructures Global Affairs and Apple Music Teams [Report]](https://www.iclarified.com/images/news/97162/97162/97162-640.jpg)
![New iPhone Factory Goes Live in India, Another Just Days Away [Report]](https://www.iclarified.com/images/news/97165/97165/97165-640.jpg)


From Zero to Cloud Hero: My First AWS EC2 & S3 Web Project
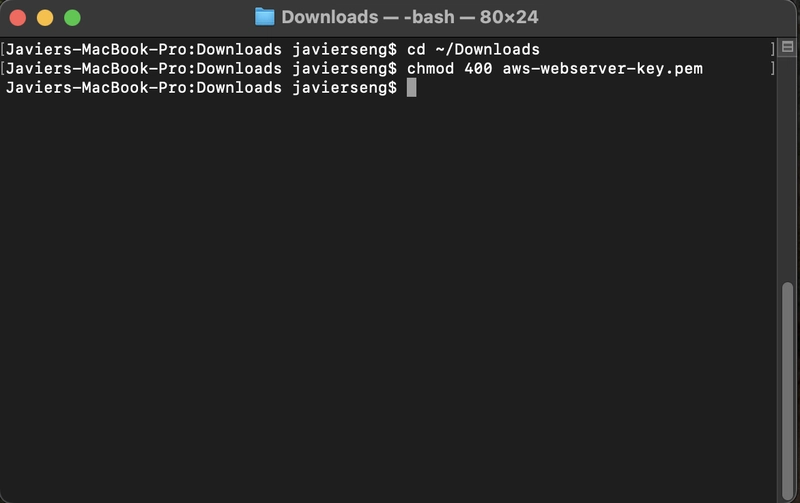
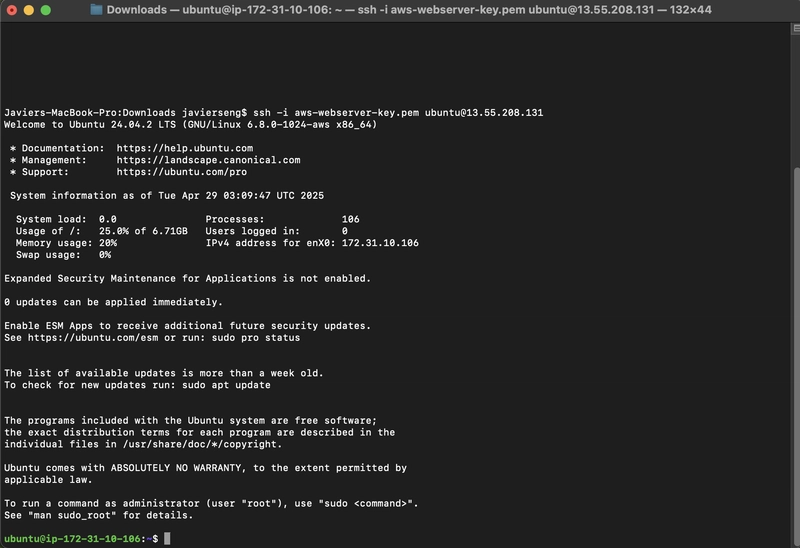
As someone pivoting into cloud security, I wanted to get hands-on with AWS. This blog documents how I built a basic web server on EC2, hosted an image on S3, and embedded that image in a live Apache-hosted web page — all secured and scalable. If you're starting your cloud journey, this is the post I wish I had. The goal: Launch an EC2 instance (Ubuntu) Host a simple webpage using Apache Embed an image stored in an S3 bucket Apply basic security best practices Power it all from scratch with my own hands This post is a walkthrough — not just of what I did, but what I learned. Spinning Up an EC2 Instance The first step was to launch a virtual server (EC2 instance) on AWS. Here's how I did it: 1. Choose the AMI (Amazon Machine Image) I picked the Ubuntu Server 24.04 LTS (HVM) image — a lightweight, stable OS that's commonly used in web hosting setups. 2. Select Instance Type For this simple project, I went with a t2.micro instance — free tier eligible and perfectly sufficient for lightweight workloads. 3. Create a Key Pair To securely SSH into the instance, I generated a key pair named aws-webserver-key and downloaded the .pem file. Make sure to store the .pem file securely and restrict permissions with: chmod 400 aws-webserver-key.pem 4. Configure Network Settings I created a new security group with the following inbound rules: SSH access from my IP only HTTP access from anywhere (to serve the webpage) With the instance up and running, I connected via SSH: ssh -i aws-webserver-key.pem ubuntu@ Installing Apache and Hosting the Webpage Once connected to the EC2 instance via SSH, I set up a simple web server using Apache. 1. Update the System After logging in, I made sure the system packages were up to date: sudo apt update 2. Install Apache Next, I installed the Apache2 package: sudo apt install apache2 -y 3. Enable the Apache Firewall Rule Although not strictly necessary for this setup, I ran the following to allow Apache through the firewall: sudo ufw allow 'Apache' sudo ufw reload Then I checked the service status to confirm that Apache was running: sudo systemctl status apache2 4. Test the Web Server Opening the EC2 instance’s public IP address in a browser confirmed Apache was serving the default web page. 5. Customize the Web Page I replaced the default /var/www/html/index.html with a simple HTML file using nano: cd /var/www/html sudo rm index.html sudo nano index.html I inserted a basic HTML page: Hello Cloud Security Hello, Cloud Security! Powered by AWS EC2 and Apache This immediately reflected in the browser when visiting the instance’s IP: Hosting an Image in S3 and Embedding It in the Web Page To take the project a step further, I created an Amazon S3 bucket to host a public image and then embedded that image into my EC2-hosted web page. 1. Create the S3 Bucket In the S3 dashboard, I created a new bucket with a globally unique name. I kept the default settings, including blocking public access, which is AWS’s secure-by-default posture. 2. Adjust Bucket Permissions To allow public read access to the image, I edited the bucket's permissions and added a Bucket Policy manually. Here's the policy I applied: { "Version": "2012-10-17", "Statement": [ { "Sid": "PublicReadForObjects", "Effect": "Allow", "Principal": "*", "Action": "s3:GetObject", "Resource": "arn:aws:s3:::javier-cloud-project-2025/*" } ] } This allows only read access to objects inside the bucket — not the bucket itself, and not any write access. 3. Upload the Image I uploaded a simple image file named green_apples.jpg to the bucket. 4. Confirm Public Access After uploading, I verified the public URL for the image: https://javier-cloud-project-2025.s3.amazonaws.com/green_apples.jpg 5. Embed Image in the Web Page To finish the integration, I edited index.html on the EC2 server and added an img tag to load the image from S3. After refreshing the page in the browser, the image appeared successfully, loaded directly from the S3 bucket. Reflections and Takeaways This was my first real AWS project. It may look simple, but it taught me a lot: How to launch and configure EC2 instances from scratch SSH access, key pair security, and managing Linux servers Installing and configuring Apache to host a live web page The principles of least privilege and public access control with S3 Writing and applying secure S3 bucket policies manually Connecting cloud services (EC2 and S3) in a practical way One of the most valuable takeaways was understanding AWS’s security-first design. From blocked public access by default, to strict key permissions, to required manual policy writing — this project forced me to think about security as part of every step. It also reminded me that doing is better than reading. A basic EC2 + S3 integration might seem trivial
As someone pivoting into cloud security, I wanted to get hands-on with AWS. This blog documents how I built a basic web server on EC2, hosted an image on S3, and embedded that image in a live Apache-hosted web page — all secured and scalable. If you're starting your cloud journey, this is the post I wish I had.
The goal:
- Launch an EC2 instance (Ubuntu)
- Host a simple webpage using Apache
- Embed an image stored in an S3 bucket
- Apply basic security best practices
- Power it all from scratch with my own hands
This post is a walkthrough — not just of what I did, but what I learned.
Spinning Up an EC2 Instance
The first step was to launch a virtual server (EC2 instance) on AWS. Here's how I did it:
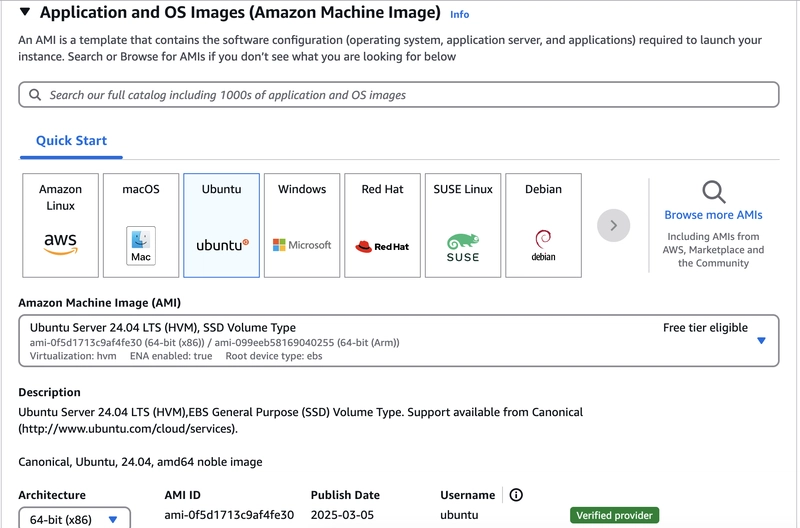
1. Choose the AMI (Amazon Machine Image)
I picked the Ubuntu Server 24.04 LTS (HVM) image — a lightweight, stable OS that's commonly used in web hosting setups.
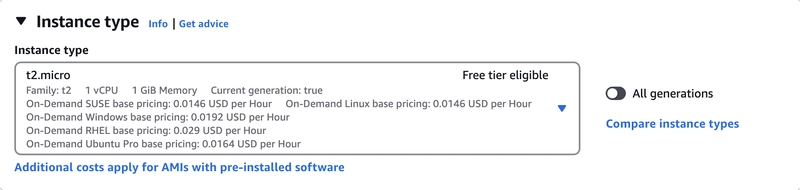
2. Select Instance Type
For this simple project, I went with a t2.micro instance — free tier eligible and perfectly sufficient for lightweight workloads.
3. Create a Key Pair
To securely SSH into the instance, I generated a key pair named aws-webserver-key and downloaded the .pem file.

Make sure to store the .pem file securely and restrict permissions with:
chmod 400 aws-webserver-key.pem
4. Configure Network Settings
I created a new security group with the following inbound rules:
SSH access from my IP only
HTTP access from anywhere (to serve the webpage)

With the instance up and running, I connected via SSH:
ssh -i aws-webserver-key.pem ubuntu@
Installing Apache and Hosting the Webpage
Once connected to the EC2 instance via SSH, I set up a simple web server using Apache.
1. Update the System
After logging in, I made sure the system packages were up to date:
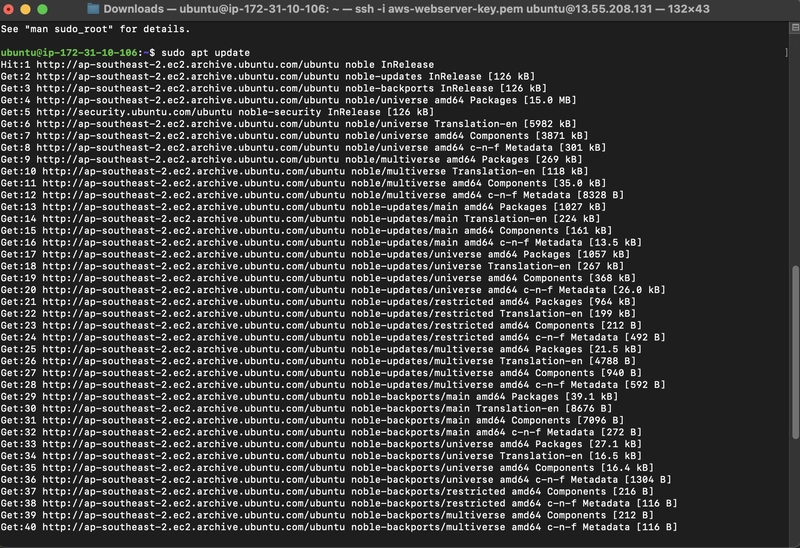
sudo apt update
2. Install Apache
Next, I installed the Apache2 package:
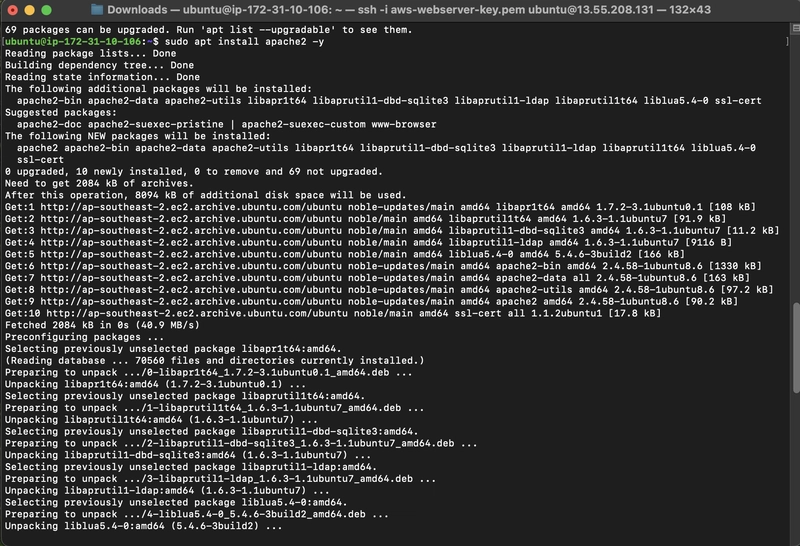
sudo apt install apache2 -y
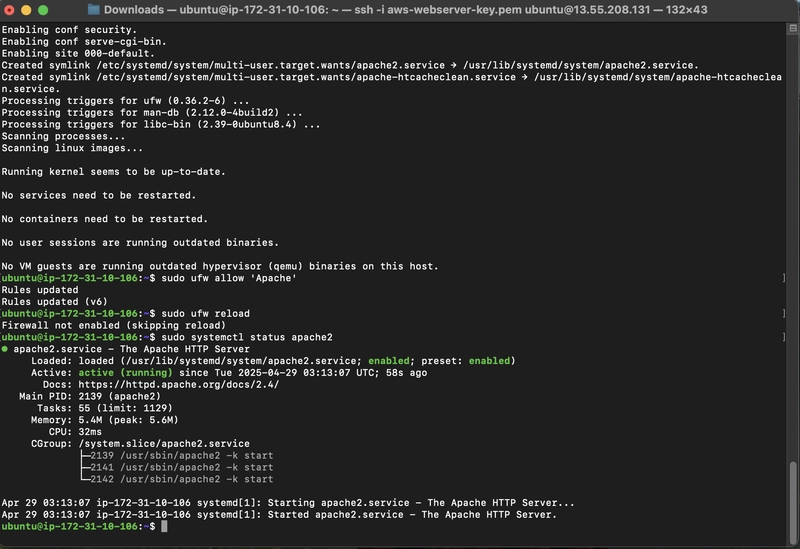
3. Enable the Apache Firewall Rule
Although not strictly necessary for this setup, I ran the following to allow Apache through the firewall:
sudo ufw allow 'Apache'
sudo ufw reload
Then I checked the service status to confirm that Apache was running:
sudo systemctl status apache2
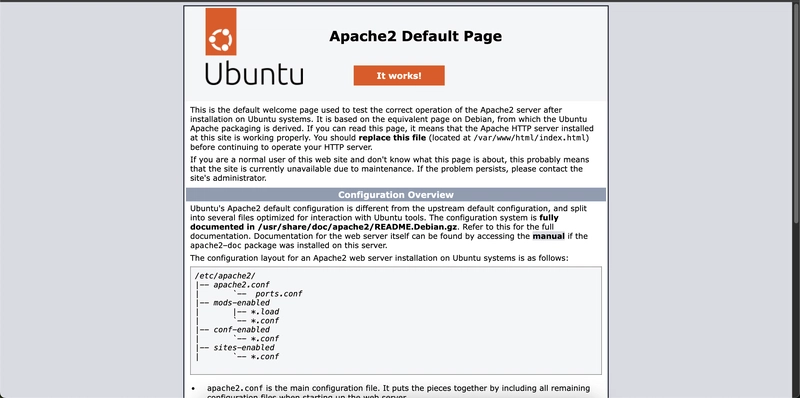
4. Test the Web Server
Opening the EC2 instance’s public IP address in a browser confirmed Apache was serving the default web page.
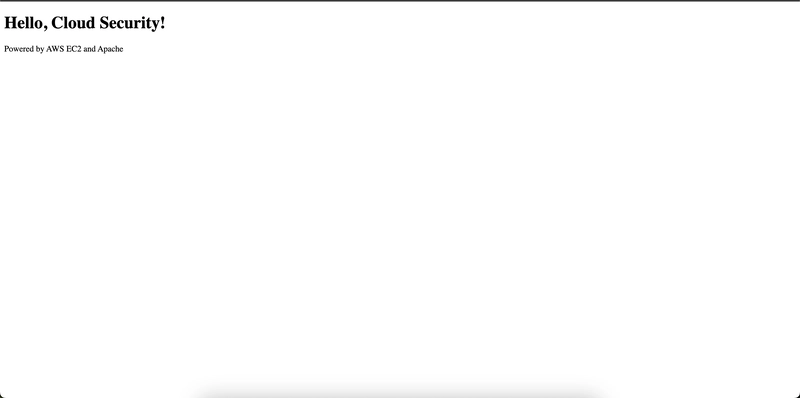
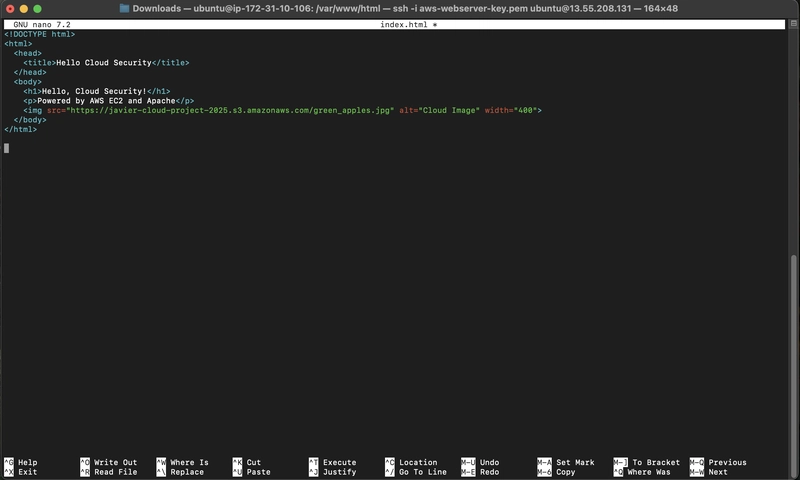
5. Customize the Web Page
I replaced the default /var/www/html/index.html with a simple HTML file using nano:
cd /var/www/html
sudo rm index.html
sudo nano index.html
I inserted a basic HTML page:
    Hello Cloud Security


    Hello, Cloud Security!
    Powered by AWS EC2 and Apache
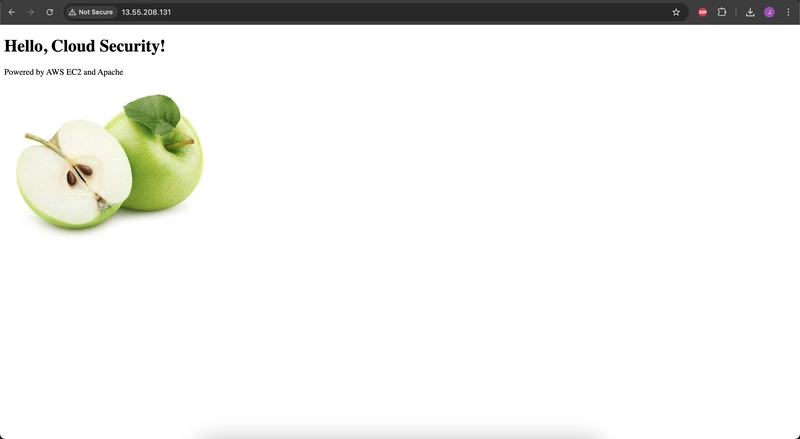
This immediately reflected in the browser when visiting the instance’s IP:
Hosting an Image in S3 and Embedding It in the Web Page
To take the project a step further, I created an Amazon S3 bucket to host a public image and then embedded that image into my EC2-hosted web page.
1. Create the S3 Bucket
In the S3 dashboard, I created a new bucket with a globally unique name.
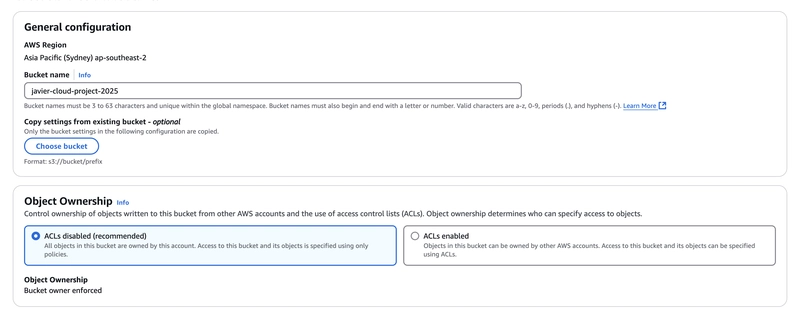
I kept the default settings, including blocking public access, which is AWS’s secure-by-default posture.
2. Adjust Bucket Permissions
To allow public read access to the image, I edited the bucket's permissions and added a Bucket Policy manually.
Here's the policy I applied:
{
  "Version": "2012-10-17",
  "Statement": [
    {
      "Sid": "PublicReadForObjects",
      "Effect": "Allow",
      "Principal": "*",
      "Action": "s3:GetObject",
      "Resource": "arn:aws:s3:::javier-cloud-project-2025/*"
    }
  ]
}
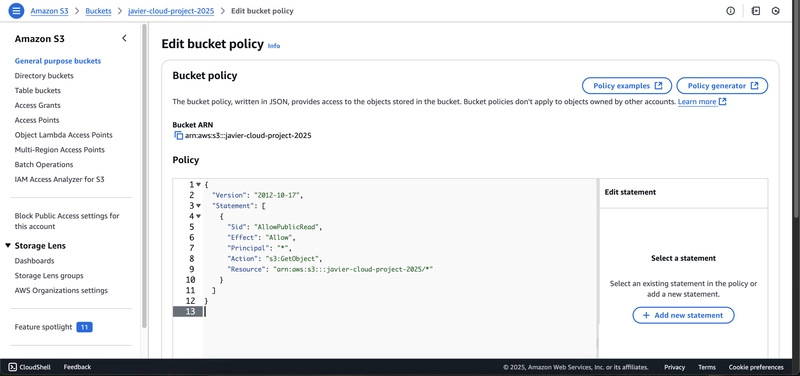
This allows only read access to objects inside the bucket — not the bucket itself, and not any write access.
3. Upload the Image
I uploaded a simple image file named green_apples.jpg to the bucket.
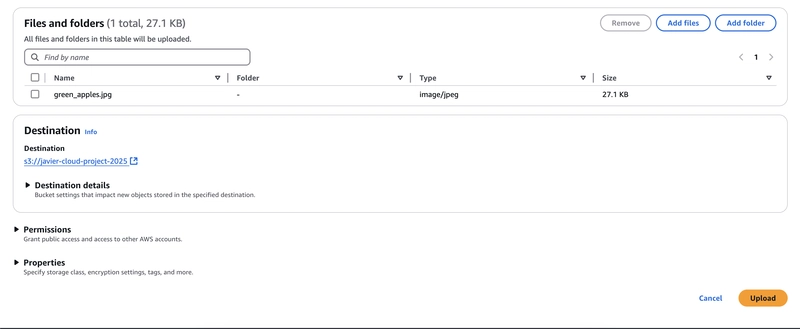
4. Confirm Public Access
After uploading, I verified the public URL for the image:
https://javier-cloud-project-2025.s3.amazonaws.com/green_apples.jpg

5. Embed Image in the Web Page
To finish the integration, I edited index.html on the EC2 server and added an img tag to load the image from S3.

After refreshing the page in the browser, the image appeared successfully, loaded directly from the S3 bucket.
Reflections and Takeaways
This was my first real AWS project. It may look simple, but it taught me a lot:
- How to launch and configure EC2 instances from scratch
- SSH access, key pair security, and managing Linux servers
- Installing and configuring Apache to host a live web page
- The principles of least privilege and public access control with S3
- Writing and applying secure S3 bucket policies manually
- Connecting cloud services (EC2 and S3) in a practical way
One of the most valuable takeaways was understanding AWS’s security-first design. From blocked public access by default, to strict key permissions, to required manual policy writing — this project forced me to think about security as part of every step.
It also reminded me that doing is better than reading. A basic EC2 + S3 integration might seem trivial on paper, but doing it from scratch — and hitting permission issues along the way — made the knowledge stick.
What’s Next?
Now that I’ve completed this foundational project, I plan to:
- Set up HTTPS using Let’s Encrypt and custom domains
- Explore infrastructure-as-code using Terraform or CloudFormation
- Dive deeper into IAM roles and access control models
- Build more offensive-security inspired labs on AWS as part of my cloud security journey
Thanks for reading. If you're also learning AWS, feel free to connect with me — happy to share resources or ideas.