


![[The AI Show Episode 144]: ChatGPT’s New Memory, Shopify CEO’s Leaked “AI First” Memo, Google Cloud Next Releases, o3 and o4-mini Coming Soon & Llama 4’s Rocky Launch](https://www.marketingaiinstitute.com/hubfs/ep%20144%20cover.png)


![Architecture for TypeScript backend with multiple entry points or apps [closed]](https://cdn.sstatic.net/Sites/softwareengineering/Img/apple-touch-icon@2.png?v=1ef7363febba)
![Is This Programming Paradigm New? [closed]](https://miro.medium.com/v2/resize:fit:1200/format:webp/1*nKR2930riHA4VC7dLwIuxA.gif)


-Classic-Nintendo-GameCube-games-are-coming-to-Nintendo-Switch-2!-00-00-13.png?width=1920&height=1920&fit=bounds&quality=70&format=jpg&auto=webp#)


![M4 MacBook Air Drops to New All-Time Low of $912 [Deal]](https://www.iclarified.com/images/news/97108/97108/97108-640.jpg)
![New iPhone 17 Dummy Models Surface in Black and White [Images]](https://www.iclarified.com/images/news/97106/97106/97106-640.jpg)


Expose local dev server with SSH tunnel and Docker
Introduction Most consumer-grade internet connections are hidden behind CG-NAT and are not reachable from the internet. This is done to save IP addresses, as IPv4 has a limited range. If you have a static public IPv4 or any IPv6 address, you won’t need the setup from this tutorial. There are already services like localtunnel or ngrok for this purpose, but when you actually start using them, you will often find out that they have limitations on their free plans. So, we will configure our own custom setup once and have it always available for convenient and practical usage which will save a lot of time and nerves in the long run. Why is this useful This is useful whenever you need to share your local project with others or provide a publicly accessible URL for your service so that external systems can reach it. This is often the case if you work remotely. Yes, you can use test deployments, but having a tunnel setup configured and being able to run it with a single terminal command saves a lot of time and energy. Possible use cases: Sharing work in progress with clients or teammates Remote debugging or pair programming Demos for presentations or team meetings Testing the frontend on different devices (mobile, different resolution, OS, browser) Testing webhooks from external services (Stripe, GitHub, Oauth, Slack, Contentful, Twilio, etc.) Prerequisites A VPS server with a public IP and Docker A local machine with a working SSH and dev server that you want to expose A domain name (optional) Demo video Architecture overview Without going too deep into computer networking theory, let's explain port forwarding in simplified terms. Port forwarding is a mapping (binding) between two points (services) on a private network (or even on the same machine) that would otherwise be unreachable. You can think of it as a VPN for a single service (port). So it's exactly what we need: we want to bind (redirect traffic from) a public port (1081 in our case) on the VPS, which acts as a gateway, to port 3000 on our local dev server that is not directly reachable from the internet. That’s it for the tunneling part, this setup is sufficient for serving HTTP traffic. Additionally, to support HTTPS and provide a user-friendly URL, we will add Traefik, which will handle HTTPS certificates and route traffic from port 443 to port 1081 of the tunnel. Running the SSH server in Docker We already use SSH to access our VPS, but we prefer to keep that configuration untouched. So, we will run a separate SSH server inside a Docker container specifically for tunneling. For this, we will use linuxserver/openssh-server image. Linuxserver is an organization that maintains very stable Dokcer images for all kinds of purposes. By default, the SSH server doesn’t allow tunneling, so we need to modify the config in /etc/ssh/sshd_config and enable it. # /etc/ssh/sshd_config AllowTcpForwarding yes GatewayPorts yes sudo nano /etc/ssh/sshd_config # edit config... sudo systemctl restart sshd But since we are using a Docker container, we will do it differently. We will use openssh-server-ssh-tunnel mod, which enables tunnelling in the linuxserver/openssh-server image. You can think of mods as presets (additional layers and configurations) for these images. Here is docker-compose.yml for the SSH tunnel container: # docker-compose.yml version: '3.8' services: openssh-server: image: linuxserver/openssh-server container_name: openssh-server restart: unless-stopped hostname: openssh-server #optional expose: - 1081 # tunneled service port, for Traefik ports: - 1080:2222 # 1080 is the main SSH connection port environment: # https://github.com/linuxserver/docker-mods/tree/openssh-server-ssh-tunnel - DOCKER_MODS=linuxserver/mods:openssh-server-ssh-tunnel - SHELL_NOLOGIN=false # set correct for current host user - PUID=1001 - PGID=1001 - TZ=Etc/UTC # important - PUBLIC_KEY # optional env vars bellow - SUDO_ACCESS=true - USER_NAME=username - PASSWORD_ACCESS=false volumes: - ./config:/config # Traefik configuration bellow labels: - 'traefik.enable=true' - 'traefik.docker.network=proxy' - 'traefik.http.routers.ssh-tunnel.rule=Host(`preview.${SITE_HOSTNAME}`)' - 'traefik.http.routers.ssh-tunnel.entrypoints=websecure' - 'traefik.http.routers.ssh-tunnel.service=ssh-tunnel' - 'traefik.http.services.ssh-tunnel.loadbalancer.server.port=1081' # matches exposed port networks: - proxy networks: proxy: external: true Lets explain the code above: services: openssh-server: image: linuxserver/openssh-server # ... ports: - 1080:2222 # 1080 is the main SSH connection port By default, linuxserver/docker-openssh-server runs the SSH service on port 2222, t
Introduction
Most consumer-grade internet connections are hidden behind CG-NAT and are not reachable from the internet. This is done to save IP addresses, as IPv4 has a limited range. If you have a static public IPv4 or any IPv6 address, you won’t need the setup from this tutorial.
There are already services like localtunnel or ngrok for this purpose, but when you actually start using them, you will often find out that they have limitations on their free plans. So, we will configure our own custom setup once and have it always available for convenient and practical usage which will save a lot of time and nerves in the long run.
Why is this useful
This is useful whenever you need to share your local project with others or provide a publicly accessible URL for your service so that external systems can reach it. This is often the case if you work remotely.
Yes, you can use test deployments, but having a tunnel setup configured and being able to run it with a single terminal command saves a lot of time and energy.
Possible use cases:
- Sharing work in progress with clients or teammates
- Remote debugging or pair programming
- Demos for presentations or team meetings
- Testing the frontend on different devices (mobile, different resolution, OS, browser)
- Testing webhooks from external services (Stripe, GitHub, Oauth, Slack, Contentful, Twilio, etc.)
Prerequisites
- A VPS server with a public IP and Docker
- A local machine with a working SSH and dev server that you want to expose
- A domain name (optional)
Demo video
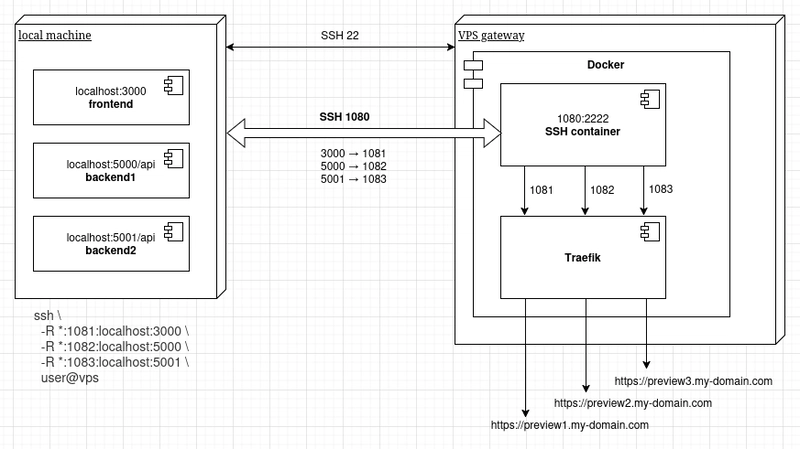
Architecture overview
Without going too deep into computer networking theory, let's explain port forwarding in simplified terms. Port forwarding is a mapping (binding) between two points (services) on a private network (or even on the same machine) that would otherwise be unreachable. You can think of it as a VPN for a single service (port).
So it's exactly what we need: we want to bind (redirect traffic from) a public port (1081 in our case) on the VPS, which acts as a gateway, to port 3000 on our local dev server that is not directly reachable from the internet. That’s it for the tunneling part, this setup is sufficient for serving HTTP traffic.
Additionally, to support HTTPS and provide a user-friendly URL, we will add Traefik, which will handle HTTPS certificates and route traffic from port 443 to port 1081 of the tunnel.
Running the SSH server in Docker
We already use SSH to access our VPS, but we prefer to keep that configuration untouched. So, we will run a separate SSH server inside a Docker container specifically for tunneling.
For this, we will use linuxserver/openssh-server image. Linuxserver is an organization that maintains very stable Dokcer images for all kinds of purposes.
By default, the SSH server doesn’t allow tunneling, so we need to modify the config in /etc/ssh/sshd_config and enable it.
# /etc/ssh/sshd_config

AllowTcpForwarding yes
GatewayPorts yes
sudo nano /etc/ssh/sshd_config

# edit config...

sudo systemctl restart sshd
But since we are using a Docker container, we will do it differently.
We will use openssh-server-ssh-tunnel mod, which enables tunnelling in the linuxserver/openssh-server image. You can think of mods as presets (additional layers and configurations) for these images.
Here is docker-compose.yml for the SSH tunnel container:
# docker-compose.yml

version: '3.8'

services:
  openssh-server:
    image: linuxserver/openssh-server
    container_name: openssh-server
    restart: unless-stopped
    hostname: openssh-server #optional
    expose:
      - 1081 # tunneled service port, for Traefik
    ports:
      - 1080:2222 # 1080 is the main SSH connection port
    environment:
      # https://github.com/linuxserver/docker-mods/tree/openssh-server-ssh-tunnel
      - DOCKER_MODS=linuxserver/mods:openssh-server-ssh-tunnel
      - SHELL_NOLOGIN=false
      # set correct for current host user
      - PUID=1001
      - PGID=1001
      - TZ=Etc/UTC
      # important
      - PUBLIC_KEY
      # optional env vars bellow
      - SUDO_ACCESS=true
      - USER_NAME=username
      - PASSWORD_ACCESS=false
    volumes:
      - ./config:/config
    # Traefik configuration bellow
    labels:
      - 'traefik.enable=true'
      - 'traefik.docker.network=proxy'
      - 'traefik.http.routers.ssh-tunnel.rule=Host(`preview.${SITE_HOSTNAME}`)'
      - 'traefik.http.routers.ssh-tunnel.entrypoints=websecure'
      - 'traefik.http.routers.ssh-tunnel.service=ssh-tunnel'
      - 'traefik.http.services.ssh-tunnel.loadbalancer.server.port=1081' # matches exposed port
    networks:
      - proxy

networks:
  proxy:
    external: true
Lets explain the code above:
services:
  openssh-server:
    image: linuxserver/openssh-server
    # ...
    ports:
      - 1080:2222 # 1080 is the main SSH connection port
By default, linuxserver/docker-openssh-server runs the SSH service on port 2222, to avoid conflicting with the usual port 22 that is used for host's SSH service and it's hardcoded in the Dockerfile. We will choose port 1080 for the main SSH connection, so we need to map it to port 2222 with SSH in the container. Port 1080 is used for the actual connection over the internet, and it is required to allow that port in VPS firewall.
So, let's establish clear and precise naming from the beginning:
- Port
1080- the main SSH connection port - Ports
1081, 1082, 1083, ...- tunneled services remote ports
Additionally, you need to configure the SSH client on your dev machine to use port 1080 for SSH when connecting to this container. In this example I have named VPS host amd1 and SSH container host amd1c, you can use your own naming logic.
# ~/.ssh/config

# ssh amd1 ssh container
Host amd1c 123.123.123.123 # VPS IP
    HostName 123.123.123.123
    IdentityFile ~/.ssh/my-keys/amd1_ssh_container__id_ed25519 # private key file name
    User username
    Port 1080
In the client SSH config above, you will notice the private key file amd1_ssh_container__id_ed25519. The public key is passed to the SSH container as an environment variable:
services:
  openssh-server:
    image: linuxserver/openssh-server
    # ...
    environment:
      - PUBLIC_KEY # important
You generate SSH key pairs as usual, e.g.:
ssh-keygen -t ed25519 -C "myemail@gmail.com" -f ~/.ssh/my-keys/amd1_ssh_container__id_ed25519
Now, we choose which remote port we will use to expose our local dev server. If you're using Traefik and don’t access this port directly via the browser, you don’t need to allow it in the VPS's firewall.
services:
  openssh-server:
    image: linuxserver/openssh-server
    # ...
    expose:
      - 1081 # tunneled service remote port
The other environment variables worth mentioning are the following:
services:
  openssh-server:
    image: linuxserver/openssh-server
    # ...
    environment:
      # https://github.com/linuxserver/docker-mods/tree/openssh-server-ssh-tunnel
      - DOCKER_MODS=linuxserver/mods:openssh-server-ssh-tunnel
      - PUID=1001
      - PGID=1001
We use DOCKER_MODS variable to specify openssh-server-ssh-tunnel mod. PUID and PGID are user and group IDs used to handle permissions between the host and the container. You get their values by running id -u && id -g on the VPS host. It is also a good idea to export them as global environment variables in ~/.bashrc file to make them available for all containers:
# ~/.bashrc

export MY_UID=$(id -u)
export MY_GID=$(id -g)
Then you can pass them like this:
# docker-compose.yml

# ...
environment:
  - PUID=$MY_UID
  - PGID=$MY_GID
The SSH tunnel is now configured. Now you can access your local dev server by HTTP via the your VPS IP e.g. http://123.123.123.123:1081 or domain http://my-domain.com:1081.
Configuring HTTPS with Traefik
Some browsers disallow insecure HTTP traffic by default, and you need to tweak the browser settings to allow it explicitly. This can be inconvenient when sending a demo link to a non-technical person. Additionally, some OAuth providers require HTTPS even for testing (e.g. Facebook). So let's make an extra effort to do things properly and configure a HTTPS with a subdomain using Traefik.
If you are running a VPS, chances are you already use a reverse proxy for handling certificates and subdomain routing. This example shows how to do it with Traefik.
# docker-compose.yml

services:
  openssh-server:
    image: linuxserver/openssh-server
    container_name: openssh-server
    # ...
    expose:
      - 1081 # tunneled service remote port
    ports:
      - 1080:2222 # 1080 is the main SSH connection port

    # Traefik configuration bellow
    labels:
      - 'traefik.enable=true'
      - 'traefik.docker.network=proxy'
      - 'traefik.http.routers.ssh-tunnel.rule=Host(`preview.${SITE_HOSTNAME}`)'
      - 'traefik.http.routers.ssh-tunnel.entrypoints=websecure'
      - 'traefik.http.routers.ssh-tunnel.service=ssh-tunnel'
      - 'traefik.http.services.ssh-tunnel.loadbalancer.server.port=1081' # matches exposed port
    networks:
      - proxy

networks:
  proxy:
    external: true
The truth is, there is not much work to do here. All you need to do is to map the remote port of the tunnel 1081 to Traefik and define the URL on which you want to expose your local dev server via the environment variable e.g. SITE_HOSTNAME=preview.my-domain.com.
Everything else is just generic Traefik configuration. Also, don't forget to add the wildcard A record for your subdomains (e.g., you might add a *.tunnels "namespace") in your DNS provider's dashboard and point it to your VPS IP. Additionally, create an external Docker network, e.g. named proxy as shown in the example above.
services:
  openssh-server:
    image: linuxserver/openssh-server
    container_name: openssh-server
    # ...
    expose:
      - 1081 # tunneled service remote port, passed to Traefik

    # ...
    # Traefik configuration bellow
    labels:
      # ...
      - 'traefik.http.routers.ssh-tunnel.rule=Host(`preview.${SITE_HOSTNAME}`)' # in .env file: SITE_HOSTNAME=my-domain.com
      - 'traefik.http.services.ssh-tunnel.loadbalancer.server.port=1081' # matches the exposed port
In the end, you just need to define 2 environment variables for your docker-compose.yml inside the .env file:
# .env

# full with subdomain, without 'https://'
SITE_HOSTNAME=my-domain.com # or e.g. preview.my-domain.com

# public ssh key
PUBLIC_KEY=my-public-ssh-key
Above is shown only the relevant Traefik configuration for the SSH tunnel container. A complete Traefik reverse proxy configuration requires additional static and dynamic configurations for the Traefik container, but that is outside the scope of this tutorial. You can search for examples of Traefik configurations or reuse mine, which is available in this repository: nemanjam/traefik-proxy.
Tunneling multiple services
Sometimes your app runs more than a single service, e.g. frontend and backend. If you expose just the frontend from port 3000, note that localhost from, e.g. localhost:5000 won't be resolved. Therefore, you need to tunnel all services and set the tunneled URLs in your .env files.
How to have more than one tunnel? Your first thought might be to run multiple SSH server containers, but fortunately, that is not necessary. You can tunnel as many services as you want through a single SSH connection. You just need to expose multiple ports on the SSH container and map them to multiple Traefik hosts with labels, as shown below:
# docker-compose.yml

version: '3.8'

services:
  openssh-server:
    image: linuxserver/openssh-server
    container_name: openssh-server
    restart: unless-stopped
    hostname: openssh-server #optional
    # tunneled services, remote ports
    expose:
      - 1081 # tunnel1
      - 1082 # tunnel2
      - 1083 # tunnel3
    ports:
      - 1080:2222 # 1080 is the main SSH connection port
    environment:
      # https://github.com/linuxserver/docker-mods/tree/openssh-server-ssh-tunnel
      - DOCKER_MODS=linuxserver/mods:openssh-server-ssh-tunnel
      - SHELL_NOLOGIN=false
      # set correct for current host user
      - PUID=1001
      - PGID=1001
      - TZ=Etc/UTC
      # important
      - PUBLIC_KEY
      # optional env vars bellow
      - SUDO_ACCESS=true
      - USER_NAME=username
      - PASSWORD_ACCESS=false
    volumes:
      - ./config:/config
    # Traefik configuration bellow
    labels:
      # common config
      - 'traefik.enable=true'
      - 'traefik.docker.network=proxy'

      # tunnel1 (port 3000 -> 1081)
      - 'traefik.http.routers.ssh-tunnel1.rule=Host(`preview1.${SITE_HOSTNAME}`)'
      - 'traefik.http.routers.ssh-tunnel1.entrypoints=websecure'
      - 'traefik.http.routers.ssh-tunnel1.service=ssh-tunnel1'
      - 'traefik.http.services.ssh-tunnel1.loadbalancer.server.port=1081'

      # tunnel2 (port 5000 -> 1082)
      - 'traefik.http.routers.ssh-tunnel2.rule=Host(`preview2.${SITE_HOSTNAME}`)'
      - 'traefik.http.routers.ssh-tunnel2.entrypoints=websecure'
      - 'traefik.http.routers.ssh-tunnel2.service=ssh-tunnel2'
      - 'traefik.http.services.ssh-tunnel2.loadbalancer.server.port=1082'

      # tunnel3 (port 5001 -> 1083)
      - 'traefik.http.routers.ssh-tunnel3.rule=Host(`preview3.${SITE_HOSTNAME}`)'
      - 'traefik.http.routers.ssh-tunnel3.entrypoints=websecure'
      - 'traefik.http.routers.ssh-tunnel3.service=ssh-tunnel3'
      - 'traefik.http.services.ssh-tunnel3.loadbalancer.server.port=1083'

    networks:
      - proxy

networks:
  proxy:
    external: true
If you have a large number of services to tunnel, you might want to use a VPN to access all ports by default, but that's rarely the case.
Another point to make is that the SSH tunnel technique is most suitable for temporarily exposing services for demo purposes. For permanent tunnels, you would need to add autossh to keep the connection alive, but there are better tools for permanent tunnels, such as rapiz1/rathole or fatedier/frp.
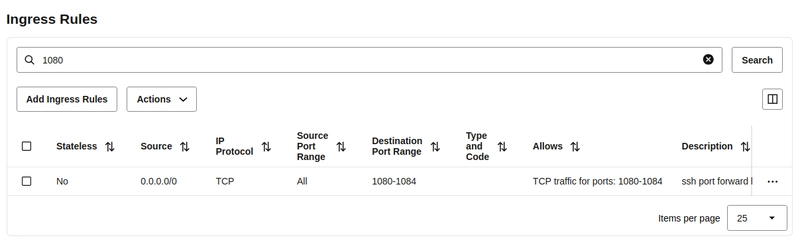
Open the firewall on the VPS
For the main SSH connection, you will need to open a port in your VPS firewall, port 1080 in this example. Additionally, if you want to access tunnels directly via a port in the browser without Traefik, you will need to open those ports as well. Be mindful not to open too many unnecessary ports, as every newly opened port increases the attack surface.
Running the tunnel
You start the tunnel with a single command like below. The -R option means remote port forwarding, followed by two IP:port pairs. The first pair is remote, and the second is local. At the end, you have the VPS host.
# command format
ssh -R [remote_addr:]remote_port:local_addr:local_port [user@]gateway_addr

# example:
# amd1c host is defined in ~/.ssh/config
ssh -R *:1081:localhost:3000 amd1c

# access the url, e.g.
https://preview1.my-domain.com

# terminate tunnel, like any ssh connection
exit
You can open multiple tunnels with a single command. Just specify the tunnels one after another before the host. Note that you must have these tunnels defined in your docker-compose.yml for the SSH server (exposed ports and Traefik host labels).
# tunnel frontend at port 3000 and backend at port 5000
ssh \
  -R *:1081:localhost:3000 \
  -R *:1082:localhost:5000 \
  amd1c

# access the urls, e.g.
https://preview1.my-domain.com
https://preview2.my-domain.com/api
Completed code
- SSH tunnel configuration: https://github.com/nemanjam/traefik-proxy/tree/main/apps/ssh-server
- Traefik configuration: https://github.com/nemanjam/traefik-proxy/tree/main/core
Conclusion
Port forwarding is a basic networking technique that is very familiar to network engineers, but perhaps not often utilized by developers. It can be very useful and practical, especially in a remote work setting. As described in this tutorial, you just need to run a single container, configure the client and firewall, and once you have it set up, it can save you a lot of time and energy in the long run.
SSH remote port forwarding is just one of the many useful and cool SSH networking tricks. There are many others like dynamic port forwarding, SSH agent forwarding, X11 forwarding, SSH file system, etc. Do you use some of them? Please share in the comments bellow.
References
- Local and remote port forwarding tutorial https://iximiuz.com/en/posts/ssh-tunnels
-
linuxserver/docker-openssh-serverimage repository https://github.com/linuxserver/docker-openssh-server -
openssh-server-ssh-tunnelmod repository https://github.com/linuxserver/docker-mods/tree/openssh-server-ssh-tunnel - Useful discussion that suggests to use the existing tunnel mod https://github.com/linuxserver/docker-openssh-server/issues/22
- The list of all available Linuxserver mods https://github.com/linuxserver/docker-mods, https://mods.linuxserver.io
- The list of all available Linuxserver images https://www.linuxserver.io/our-images