


![[The AI Show Episode 144]: ChatGPT’s New Memory, Shopify CEO’s Leaked “AI First” Memo, Google Cloud Next Releases, o3 and o4-mini Coming Soon & Llama 4’s Rocky Launch](https://www.marketingaiinstitute.com/hubfs/ep%20144%20cover.png)


.jpg?width=1920&height=1920&fit=bounds&quality=70&format=jpg&auto=webp#)


_Olekcii_Mach_Alamy.jpg?width=1280&auto=webp&quality=80&disable=upscale#)


![Apple Drops New Immersive Adventure Episode for Vision Pro: 'Hill Climb' [Video]](https://www.iclarified.com/images/news/97133/97133/97133-640.jpg)

![Most iPhones Sold in the U.S. Will Be Made in India by 2026 [Report]](https://www.iclarified.com/images/news/97130/97130/97130-640.jpg)
![Apple to Shift Robotics Unit From AI Division to Hardware Engineering [Report]](https://www.iclarified.com/images/news/97128/97128/97128-640.jpg)


Building a RAG Chatbot with VoltAgent
Introduction Chatbots have become incredibly useful, haven't they? From customer support to personal assistants, they handle conversations pretty well. But sometimes, standard chatbots hit a wall – their knowledge is limited to what they were trained on. What if you want your chatbot to answer questions based on specific documents, recent data, or a private knowledge base? That's where Retrieval-Augmented Generation (RAG) comes in. Steps we'll cover: What RAG (Retrieval-Augmented Generation) is and why it's useful. How VoltAgent's Retriever system facilitates RAG. Setting up a VoltAgent project. Implementing a custom BaseRetriever with a simple knowledge base. Creating a VoltAgent Agent that uses the retriever directly. Running and testing the RAG chatbot using the VoltAgent Console. What is RAG, and Why Use It? At its core, RAG is a technique that helps Large Language Models (LLMs) like the ones powering chatbots become smarter by giving them access to external information before they generate a response. Think of it like this: Retrieval: When you ask a RAG-enabled chatbot a question, it first retrieves relevant snippets of information from a predefined data source (like documents, databases, or websites). Augmentation: This retrieved information (the "context") is then added to your original question. Generation: Finally, the LLM receives the combined prompt (your question + the retrieved context) and generates an answer that's grounded in that specific information. The result? Chatbots that can provide more accurate, up-to-date, and contextually relevant answers, going beyond their built-in knowledge. I find this incredibly powerful for building bots that need to know about specific product documentation, internal company policies, or recent news. Introducing VoltAgent Before we dive into building, let me briefly mention VoltAgent. It's a TypeScript framework I've been working with that makes building sophisticated AI agents (like our RAG chatbot) much simpler. It handles a lot of the boilerplate, letting me focus on the core logic of my agents, including how they retrieve and use information. VoltAgent's Retriever System VoltAgent provides a streamlined way to implement RAG through its Retriever system. The key component is the BaseRetriever abstract class (you can find it in @voltagent/core). To add RAG capabilities to your agent, you essentially need to: Create a Custom Retriever: Extend BaseRetriever and implement the retrieve method. This method contains your logic for fetching relevant data from your chosen source based on the user's input. Connect it to an Agent: VoltAgent offers two main ways to do this, as detailed in the Retriever documentation: Direct Attachment (agent.retriever): The retriever runs automatically before every LLM call for that agent. Simple, ensures context is always fetched. As a Tool (agent.tools): The LLM decides when to call the retriever tool based on the conversation. More efficient and flexible, especially if retrieval isn't always needed. For this tutorial, we'll use the direct attachment method for simplicity. Our agent will always try to fetch context from its small knowledge base before answering. Let's Build a Simple RAG Chatbot Okay, theory's great, but let's get hands-on. I'll show you how I built a basic RAG chatbot using VoltAgent that answers questions based on a small, hardcoded set of facts about VoltAgent itself. Setting Up the Project The easiest way to start a new VoltAgent project is using the create-voltagent-app CLI tool. For this example, let's name our project with-rag-chatbot. Open your terminal and run: npm create voltagent-app@latest with-rag-chatbot This command will guide you through the setup process. (For more details on using the CLI or setting up manually, check the Quick Start guide). After the setup, navigate into your new project directory: cd with-rag-chatbot The CLI sets up a standard project structure for you: with-rag-chatbot/ ├── src/ │ └── index.ts # Our main agent logic will go here ├── package.json # Project dependencies ├── tsconfig.json # TypeScript config ├── .gitignore # Git ignore rules └── .env # API keys (important!) - created automatically or you add it The generated package.json will be similar to these (though versions might differ slightly): package.json (Example) // ... (scripts, name: "with-rag-chatbot", etc.) "dependencies": { "@ai-sdk/openai": "...", // Or your chosen LLM SDK "@voltagent/core": "...", "@voltagent/vercel-ai": "...", // Or your chosen provider "zod": "..." }, // ... (devDependencies) Now, let's focus on the code inside src/index.ts. Implementing the Retriever and Agent This is where the magic happens. In src/index.ts, I defined a simple retriever and an agent that uses it. //src/index.ts import { Vol

Introduction
Chatbots have become incredibly useful, haven't they? From customer support to personal assistants, they handle conversations pretty well. But sometimes, standard chatbots hit a wall – their knowledge is limited to what they were trained on.
What if you want your chatbot to answer questions based on specific documents, recent data, or a private knowledge base?
That's where Retrieval-Augmented Generation (RAG) comes in.
Steps we'll cover:
- What RAG (Retrieval-Augmented Generation) is and why it's useful.
- How VoltAgent's Retriever system facilitates RAG.
- Setting up a VoltAgent project.
- Implementing a custom
BaseRetrieverwith a simple knowledge base. - Creating a VoltAgent
Agentthat uses the retriever directly. - Running and testing the RAG chatbot using the VoltAgent Console.
What is RAG, and Why Use It?
At its core, RAG is a technique that helps Large Language Models (LLMs) like the ones powering chatbots become smarter by giving them access to external information before they generate a response.
Think of it like this:
- Retrieval: When you ask a RAG-enabled chatbot a question, it first retrieves relevant snippets of information from a predefined data source (like documents, databases, or websites).
- Augmentation: This retrieved information (the "context") is then added to your original question.
- Generation: Finally, the LLM receives the combined prompt (your question + the retrieved context) and generates an answer that's grounded in that specific information.
The result? Chatbots that can provide more accurate, up-to-date, and contextually relevant answers, going beyond their built-in knowledge. I find this incredibly powerful for building bots that need to know about specific product documentation, internal company policies, or recent news.
Introducing VoltAgent
Before we dive into building, let me briefly mention VoltAgent. It's a TypeScript framework I've been working with that makes building sophisticated AI agents (like our RAG chatbot) much simpler. It handles a lot of the boilerplate, letting me focus on the core logic of my agents, including how they retrieve and use information.
VoltAgent's Retriever System
VoltAgent provides a streamlined way to implement RAG through its Retriever system. The key component is the BaseRetriever abstract class (you can find it in @voltagent/core).
To add RAG capabilities to your agent, you essentially need to:
- Create a Custom Retriever: Extend
BaseRetrieverand implement theretrievemethod. This method contains your logic for fetching relevant data from your chosen source based on the user's input. - Connect it to an Agent: VoltAgent offers two main ways to do this, as detailed in the Retriever documentation:
-
Direct Attachment (
agent.retriever): The retriever runs automatically before every LLM call for that agent. Simple, ensures context is always fetched. -
As a Tool (
agent.tools): The LLM decides when to call the retriever tool based on the conversation. More efficient and flexible, especially if retrieval isn't always needed.
-
Direct Attachment (
For this tutorial, we'll use the direct attachment method for simplicity. Our agent will always try to fetch context from its small knowledge base before answering.
Let's Build a Simple RAG Chatbot
Okay, theory's great, but let's get hands-on. I'll show you how I built a basic RAG chatbot using VoltAgent that answers questions based on a small, hardcoded set of facts about VoltAgent itself.
Setting Up the Project
The easiest way to start a new VoltAgent project is using the create-voltagent-app CLI tool. For this example, let's name our project with-rag-chatbot. Open your terminal and run:
npm create voltagent-app@latest with-rag-chatbot
This command will guide you through the setup process. (For more details on using the CLI or setting up manually, check the Quick Start guide).
After the setup, navigate into your new project directory:
cd with-rag-chatbot
The CLI sets up a standard project structure for you:
with-rag-chatbot/
├── src/
│   └── index.ts     # Our main agent logic will go here
├── package.json     # Project dependencies
├── tsconfig.json    # TypeScript config
├── .gitignore       # Git ignore rules
└── .env             # API keys (important!) - created automatically or you add it
The generated package.json will be similar to these (though versions might differ slightly):
package.json (Example)

// ... (scripts, name: "with-rag-chatbot", etc.)
  "dependencies": {
    "@ai-sdk/openai": "...", // Or your chosen LLM SDK
    "@voltagent/core": "...",
    "@voltagent/vercel-ai": "...", // Or your chosen provider
    "zod": "..."
  },
// ... (devDependencies)
Now, let's focus on the code inside src/index.ts.
Implementing the Retriever and Agent
This is where the magic happens. In src/index.ts, I defined a simple retriever and an agent that uses it.
//src/index.ts

import { VoltAgent, Agent, BaseRetriever, type BaseMessage } from "@voltagent/core";
import { VercelAIProvider } from "@voltagent/vercel-ai";
import { openai } from "@ai-sdk/openai";

// --- Simple Knowledge Base Retriever ---

class KnowledgeBaseRetriever extends BaseRetriever {
  // Our tiny "knowledge base"
  private documents = [
    {
      id: "doc1",
      content: "What is VoltAgent? VoltAgent is a TypeScript framework for building AI agents.",
    },
    {
      id: "doc2",
      content:
        "What features does VoltAgent support? VoltAgent supports tools, memory, sub-agents, and retrievers for RAG.",
    },
    { id: "doc3", content: "What is RAG? RAG stands for Retrieval-Augmented Generation." },
    {
      id: "doc4",
      content:
        "How can I test my agent? You can test VoltAgent agents using the VoltAgent Console.",
    },
  ];

  // Reverting to simple retrieve logic
  async retrieve(input: string | BaseMessage[]): Promise {
    const query = typeof input === "string" ? input : (input[input.length - 1].content as string);
    const queryLower = query.toLowerCase();
    console.log(`[KnowledgeBaseRetriever] Searching for context related to: "${query}"`);

    // Simple includes check
    const relevantDocs = this.documents.filter((doc) =>
      doc.content.toLowerCase().includes(queryLower)
    );

    if (relevantDocs.length > 0) {
      const contextString = relevantDocs.map((doc) => `- ${doc.content}`).join("\n");
      console.log(`[KnowledgeBaseRetriever] Found context:\n${contextString}`);
      return `Relevant Information Found:\n${contextString}`;
    }

    console.log("[KnowledgeBaseRetriever] No relevant context found.");
    return "No relevant information found in the knowledge base.";
  }
}

// --- Agent Definition ---

// Instantiate the retriever
const knowledgeRetriever = new KnowledgeBaseRetriever();

// Define the agent that uses the retriever directly
const ragAgent = new Agent({
  name: "RAG Chatbot",
  description: "A chatbot that answers questions based on its internal knowledge base.",
  llm: new VercelAIProvider(), // Using Vercel AI SDK Provider
  model: openai("gpt-4o-mini"), // Using OpenAI model via Vercel
  // Attach the retriever directly
  retriever: knowledgeRetriever,
});

// --- VoltAgent Initialization ---

new VoltAgent({
  agents: {
    // Make the agent available under the key 'ragAgent'
    ragAgent,
  },
});
Code Breakdown:
-
KnowledgeBaseRetriever: ExtendsBaseRetriever. It holds a small array ofdocuments. Theretrievemethod performs a simple case-insensitive search. If it finds matches, it formats them into a string prefixed with "Relevant Information Found:"; otherwise, it returns a "not found" message. -
ragAgent: AnAgentinstance.- We give it a name and description.
- We configure the
llmprovider andmodel. - Crucially, we set
retriever: knowledgeRetriever. This tells VoltAgent to automatically run our retriever before calling the LLM. - The
systemPromptis important here. It explicitly tells the LLM to base its answers only on the "Relevant Information Found" (which our retriever provides) and what to do if no information is found. This helps prevent the LLM from falling back on its general knowledge.
-
new VoltAgent(...): Initializes the VoltAgent server and registers ourragAgent.
Running the Agent
Before running, you need an API key for your chosen LLM provider (like OpenAI).
Create
.envfile: In the root of yourwith-rag-chatbotproject folder, create a file named.env.Add API Key: Add your key like this:
bash title=".env"

OPENAI_API_KEY=your_openai_api_key_here
(Replaceyour_openai_api_key_herewith your actual key).Install Dependencies: Open your terminal inside the
with-rag-chatbotdirectory and run:
npm install
- Start the Agent: Run the development server:
npm run dev
You should see the VoltAgent server startup message, including a link to the Developer Console:
══════════════════════════════════════════════════
  VOLTAGENT SERVER STARTED SUCCESSFULLY
══════════════════════════════════════════════════
  ✓ HTTP Server: http://localhost:3141

  Developer Console:    https://console.voltagent.dev
══════════════════════════════════════════════════
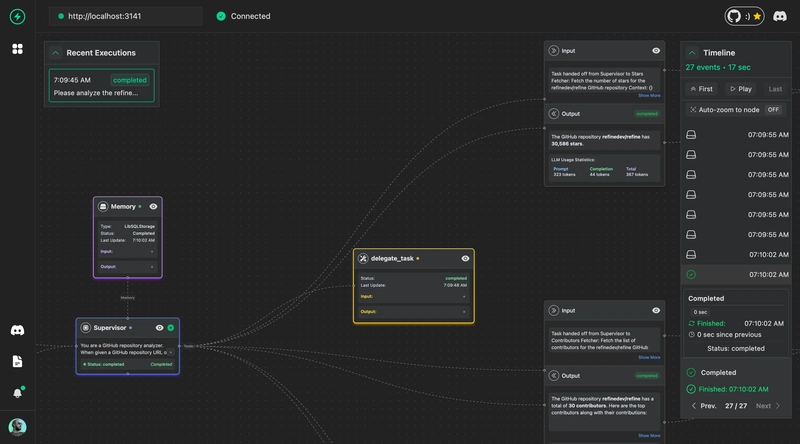
Testing in the Console
Now for the fun part!
- Open Console: Go to
https://console.voltagent.devin your browser. - Find Agent: You should see your "RAG Chatbot" listed. Click on it.
- Chat: Click the chat icon (usually bottom-right) to open the chat window.
- Ask Questions: Try asking questions related to the
documentsin our retriever:-
What is VoltAgent?(Should use doc1) -
What features does VoltAgent support?(Should use doc2) -
How can I test my agent?(Should use doc4) -
What is the capital of France?(Should state it can't answer based on its knowledge base, because of our system prompt and lack of relevant documents).
-
Observe the responses. They should be directly based on the content from the documents array we provided! You can also check your terminal where you ran npm run dev - you'll see the logs from the KnowledgeBaseRetriever showing what context (if any) was found for each query.
Conclusion
As you can see, implementing a basic RAG system with VoltAgent is quite straightforward. By creating a custom BaseRetriever and attaching it to an Agent, I could quickly build a chatbot grounded in specific external knowledge.
This simple example uses hardcoded data, but you could easily adapt the KnowledgeBaseRetriever to fetch data from a real database, API, or vector store for much more powerful applications. RAG opens up a lot of possibilities for creating smarter, more knowledgeable AI agents, and I think VoltAgent makes it significantly easier to get started.