


.jpg?width=1920&height=1920&fit=bounds&quality=70&format=jpg&auto=webp#)


_Olekcii_Mach_Alamy.jpg?width=1280&auto=webp&quality=80&disable=upscale#)


![Apple Drops New Immersive Adventure Episode for Vision Pro: 'Hill Climb' [Video]](https://www.iclarified.com/images/news/97133/97133/97133-640.jpg)

![Most iPhones Sold in the U.S. Will Be Made in India by 2026 [Report]](https://www.iclarified.com/images/news/97130/97130/97130-640.jpg)
![Apple to Shift Robotics Unit From AI Division to Hardware Engineering [Report]](https://www.iclarified.com/images/news/97128/97128/97128-640.jpg)


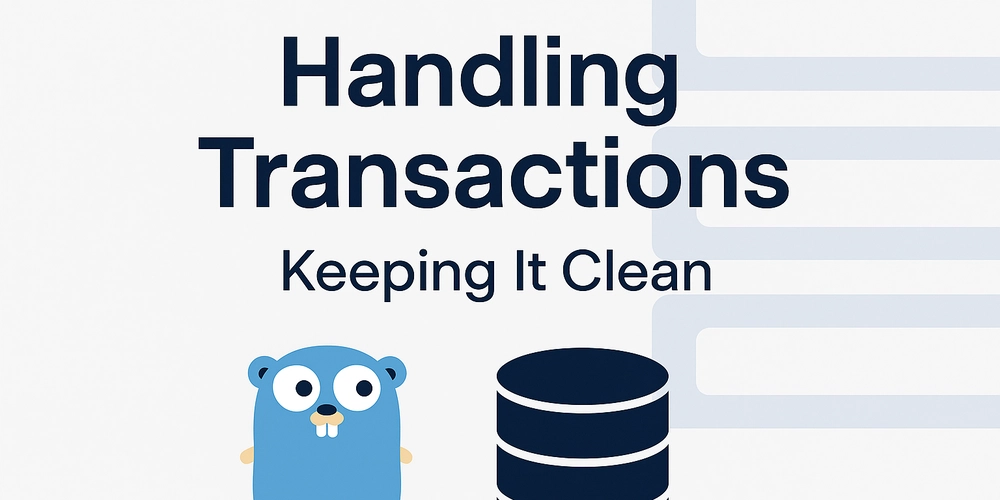
From Source to Blockchain: How Smart Contracts Go Live with Remix and MetaMask
Writing a smart contract is only the beginning. What happens between your source code and a live contract on the blockchain? In this article, we walk through the process with a clear road map. Source // SPDX-License-Identifier: MIT pragma solidity ^0.8.0; contract Counter { uint256 public count; function increment() public { count += 1; } } Use Remix to compile If you are not familiar with Remix, please read Remix Walk Through . After compilation, you can access the ABI and bytecode of the contract from ABI (Application Binary Interface) [ { "inputs": [], "name": "count", "outputs": [ { "internalType": "uint256", "name": "", "type": "uint256" } ], "stateMutability": "view", "type": "function" }, { "inputs": [], "name": "increment", "outputs": [], "stateMutability": "nonpayable", "type": "function" } ] The ABI tells the outside world how to interact with your smart contract. It’s basically a contract blueprint in JSON format. It lists: The functions your contract exposes The input and output types Whether a function is view, pure, or payable Event declarations Bytecode 6080604052348015600e575f80fd5b506101468061001c5f395ff3fe608060405 234801561000f575f80fd5b5060043610610034575f3560e01c806306661abd14 610038578063d09de08a14610056575b5f80fd5b610040610060565b604051610 04d9190610097565b60405180910390f35b61005e610065565b005b5f5481565b 60015f8082825461007691906100dd565b92505081905550565b5f81905091905 0565b6100918161007f565b82525050565b5f6020820190506100aa5f83018461 0088565b92915050565b7f4e487b7100000000000000000000000000000000000 0000000000000000000005f52601160045260245ffd5b5f6100e78261007f565b 91506100f28361007f565b925082820190508082111561010a576101096100b05 65b5b9291505056fea26469706673582212201920942fd6ffcf09c56617da5862 83bff44d1d3907bbd711959cae8b1b26947164736f6c634300081a0033 The Bytecode is the raw machine-level code that the EVM (Ethereum Virtual Machine) understands — the actual executable logic of the contract. Use Remix to deploy and run transactions Change the ENVIRONMENT to "Injected Provider - MetaMask" . (Please install Metamask if you have not done so.) The default MetaMask network is "Ethereum Mainnet", i.e. real ETH. In order to switch the network, you can click on the down arrow on the top left corn, and pop up a dialog like this Scroll all the way down, and turn on "Show test networks", and add "Sepolia", You can see the account has a balance of 0.05 SepoliaETH, (Not ETH). As the cryptocurrency always lives in a blockchain, even the pro must double check to make sure the wallet software (in this case MetaMask) uses the right "network". Now you can click on "Deploy" button in remix.ethereum.org. Your browser will pop up a MetaMask dialog asking you to confirm the transaction. . When you enters the crypto world, you must be careful about what you confirms. If you have any doubt, it's safer to click "Cancel" instead of "Confirm". After your confirmation and a couple of minutes, the bytecode of the contract will be deployed to the Sepolia Testnet FOREVER, available for anyone to view and interact with. You can view the transaction I approved at https://sepolia.etherscan.io/tx/0xe654e53a0661218cfc11528702e74e4df660b26a9fbc60445706f5b47a945887. The transaction created a contract https://sepolia.etherscan.io/address/0xce66d154524a190c48d879038deea2a6cf04a315 Interact with the contract using Remix Reload Remix Compile Counter.sol Deploy & Run Transactions Use Injected Provider - MetaMask Paste the contract address on the right "At Address" button 0xce66d154524a190c48d879038deea2a6cf04a315 Click "At Address" button Scroll all the way down, you can see two buttons: "count" and "increment" Click on "count", you get 0: uint256: 0, we know the live contract 0xce66d154524a190c48d879038deea2a6cf04a315 has a count 0 as its attribute. Because the count is "public", there will be no cost to access it. Click on "increment", this button is orange, so it triggers MetaMask confirmation dialog because this method call will change the "count" attribute of the contract live in the Sepolia Testnet, so you have to pay the cost to initiate the "state" change. After confirmation and a couple of minutes, the count will be changed to 1. Click on "count" again, you get 0: uint256: 1

Writing a smart contract is only the beginning. What happens between your source code and a live contract on the blockchain? In this article, we walk through the process with a clear road map.
Source
// SPDX-License-Identifier: MIT
pragma solidity ^0.8.0;

contract Counter {
    uint256 public count;

    function increment() public {
        count += 1;
    }
}
Use Remix to compile
If you are not familiar with Remix, please read Remix Walk Through .
After compilation, you can access the ABI and bytecode of the contract from
![]()
ABI (Application Binary Interface)
[
    {
        "inputs": [],
        "name": "count",
        "outputs": [
            {
                "internalType": "uint256",
                "name": "",
                "type": "uint256"
            }
        ],
        "stateMutability": "view",
        "type": "function"
    },
    {
        "inputs": [],
        "name": "increment",
        "outputs": [],
        "stateMutability": "nonpayable",
        "type": "function"
    }
]
The ABI tells the outside world how to interact with your smart contract.
It’s basically a contract blueprint in JSON format. It lists:
- The functions your contract exposes
- The input and output types
- Whether a function is
view,pure, or payable - Event declarations
Bytecode
6080604052348015600e575f80fd5b506101468061001c5f395ff3fe608060405
234801561000f575f80fd5b5060043610610034575f3560e01c806306661abd14
610038578063d09de08a14610056575b5f80fd5b610040610060565b604051610
04d9190610097565b60405180910390f35b61005e610065565b005b5f5481565b
60015f8082825461007691906100dd565b92505081905550565b5f81905091905
0565b6100918161007f565b82525050565b5f6020820190506100aa5f83018461
0088565b92915050565b7f4e487b7100000000000000000000000000000000000
0000000000000000000005f52601160045260245ffd5b5f6100e78261007f565b
91506100f28361007f565b925082820190508082111561010a576101096100b05
65b5b9291505056fea26469706673582212201920942fd6ffcf09c56617da5862
83bff44d1d3907bbd711959cae8b1b26947164736f6c634300081a0033
The Bytecode is the raw machine-level code that the EVM (Ethereum Virtual Machine) understands — the actual executable logic of the contract.
Use Remix to deploy and run transactions
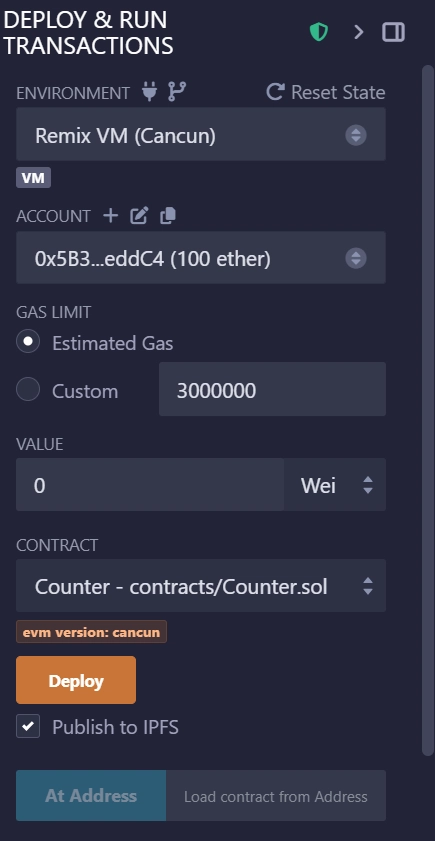
Change the ENVIRONMENT to "Injected Provider - MetaMask" . (Please install Metamask if you have not done so.) The default MetaMask network is "Ethereum Mainnet", i.e. real ETH. In order to switch the network, you can click on the down arrow on the top left corn, and pop up a dialog like this
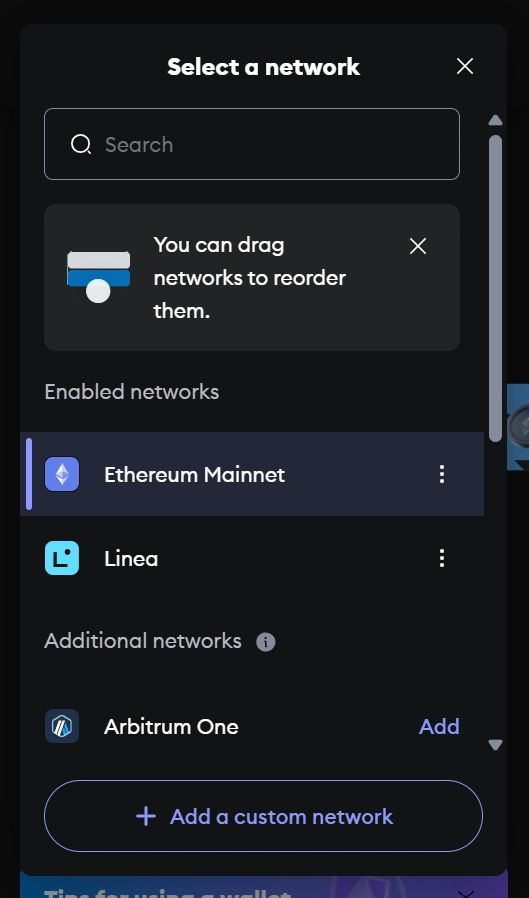
Scroll all the way down, and turn on "Show test networks", and add "Sepolia",
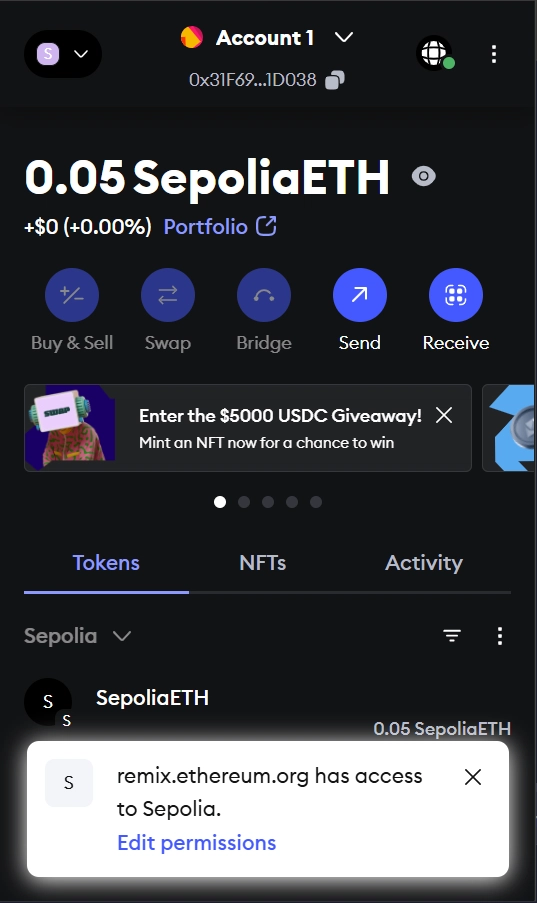
You can see the account has a balance of 0.05 SepoliaETH, (Not ETH). As the cryptocurrency always lives in a blockchain, even the pro must double check to make sure the wallet software (in this case MetaMask) uses the right "network".
Now you can click on "Deploy" button in remix.ethereum.org.
Your browser will pop up a MetaMask dialog asking you to confirm the transaction.
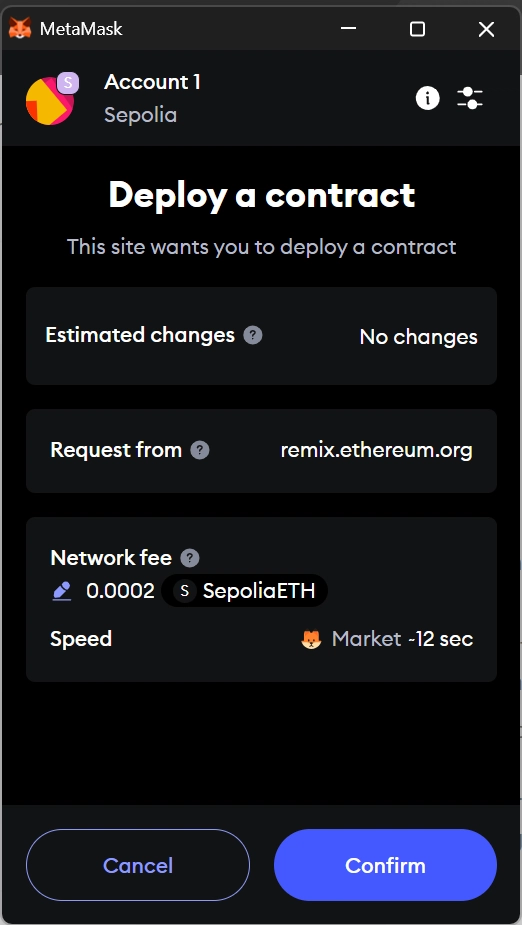 . When you enters the crypto world, you must be careful about what you confirms. If you have any doubt, it's safer to click "Cancel" instead of "Confirm".
After your confirmation and a couple of minutes, the bytecode of the contract will be deployed to the Sepolia Testnet FOREVER, available for anyone to view and interact with.
You can view the transaction I approved at https://sepolia.etherscan.io/tx/0xe654e53a0661218cfc11528702e74e4df660b26a9fbc60445706f5b47a945887. The transaction created a contract https://sepolia.etherscan.io/address/0xce66d154524a190c48d879038deea2a6cf04a315
Interact with the contract using Remix
- Reload Remix
- Compile Counter.sol
- Deploy & Run Transactions
- Use Injected Provider - MetaMask
- Paste the contract address on the right "At Address" button 0xce66d154524a190c48d879038deea2a6cf04a315
- Click "At Address" button
- Scroll all the way down, you can see two buttons: "count" and "increment"
- Click on "count", you get 0: uint256: 0, we know the live contract 0xce66d154524a190c48d879038deea2a6cf04a315 has a count 0 as its attribute. Because the count is "public", there will be no cost to access it.
- Click on "increment", this button is orange, so it triggers MetaMask confirmation dialog because this method call will change the "count" attribute of the contract live in the Sepolia Testnet, so you have to pay the cost to initiate the "state" change. After confirmation and a couple of minutes, the count will be changed to 1.
- Click on "count" again, you get 0: uint256: 1