


![[The AI Show Episode 145]: OpenAI Releases o3 and o4-mini, AI Is Causing “Quiet Layoffs,” Executive Order on Youth AI Education & GPT-4o’s Controversial Update](https://www.marketingaiinstitute.com/hubfs/ep%20145%20cover.png)


![Apple's New Ads Spotlight Apple Watch for Kids [Video]](https://www.iclarified.com/images/news/97197/97197/97197-640.jpg)


_Andy_Dean_Photography_Alamy.jpg?width=1280&auto=webp&quality=80&disable=upscale#)


![Here’s the Pebble smartwatch reboot in action, and how much tariffs might cost you [Video]](https://i0.wp.com/9to5google.com/wp-content/uploads/sites/4/2025/03/core-2-duo-smartwatch-3.jpg?resize=1200%2C628&quality=82&strip=all&ssl=1)


![[Weekly funding roundup April 26-May 2] VC inflow continues to remain downcast](https://images.yourstory.com/cs/2/220356402d6d11e9aa979329348d4c3e/WeeklyFundingRoundupNewLogo1-1739546168054.jpg)


Running a MongoDB Replica Set Locally: Docker Desktop & Native Windows Setup
When developing modern applications, a replica set configuration is essential to simulate production environments that leverage MongoDB’s high availability and redundancy. In this article, I’ll share two approaches: Deploying a MongoDB Replica Set Using Docker Desktop Running a MongoDB Replica Set Natively on Windows Without Docker Desktop Each method has its merits depending on your environment and constraints. Deploying a MongoDB Replica Set with Docker Desktop Docker is a great way to quickly spin up isolated environments. In this section, we’ll create a replica set using a custom Docker network and a Docker Compose file. Step 1: Create a Docker Network First, create an external Docker network that all MongoDB containers will share. Open your terminal and run: docker network create mongo-cluster Step 2: Prepare the docker-compose.yml File Create a docker-compose.yml file with the following configuration. This file defines three services — one primary and two secondaries. Each service is configured to run with the replica set parameter ( — replSet rs0) and bind to all IP addresses: version: ‘3.8’ services: mongo-primary: image: mongo:latest container_name: mongo-primary restart: always command: mongod — replSet rs0 — bind_ip_all ports: - 27017:27017 volumes: - E:/Program Files/MongoDB/primary/data:/data/db networks: - mongo-cluster mongo-secondary1: image: mongo:latest container_name: mongo-secondary1 restart: always command: mongod — replSet rs0 — bind_ip_all ports: - 27018:27017 volumes: - E:/Program Files/MongoDB/secondary1/data:/data/db networks: - mongo-cluster mongo-secondary2: image: mongo:latest container_name: mongo-secondary2 restart: always command: mongod — replSet rs0 — bind_ip_all ports: - 27019:27017 volumes: - E:/Program Files/MongoDB/secondary2/data:/data/db networks: - mongo-cluster networks: mongo-cluster: external: true Note: Adjust the volume paths (E:/Program Files/MongoDB/…) to your local directories as needed. Step 3: Start the Containers In the directory containing your docker-compose.yml file, execute: docker-compose up -d This command starts the three containers in detached mode. Step 4: Initialize the Replica Set Connect to the Primary Container: Run the following command to open an interactive Mongo shell (mongosh) session inside the primary container: docker exec -it mongo-primary mongosh Initiate the Replica Set: Within the shell, execute: rs.initiate({_id: “rs0”,members: [{ _id: 0, host: “host.docker.internal:27017”},{ _id: 1, host: “host.docker.internal:27018” },{ _id: 2, host: “host.docker.internal:27019” }]}); Verify the Setup: Run: rs.status(); This command shows the status of your replica set. After the verification Run: Exit And go to step 5. Step 5: Verify Data Persistence Check your Docker volumes to ensure data is being persisted: docker volume ls Connection String Connect your application using the following connection string: mongodb://host.docker.internal:27017,host.docker.internal:27018,host.docker.internal:27019/?replicaSet=rs0 Tip: If host.docker.internal fails to resolve on Windows, add the following entry to your hosts file: 127.0.0.1 host.docker.internal Running a MongoDB Replica Set Natively on Windows (Without Docker Desktop) If you prefer or need to run MongoDB directly on Windows without containerization, follow these steps. Step 1: Download and Install mongosh Make sure you have mongosh installed. This shell will help you manage and interact with your replica set. Step 2: Configure MongoDB via mongod.cfg Prepare separate configuration files for each MongoDB instance. Below is an example configuration (mongod.cfg) for one node: ` ` mongod.conf Where and how to store data. storage: dbPath: C:\Program Files\MongoDB\Server\7.0\data Where to write logging data. systemLog: destination: file logAppend: true path: C:\Program Files\MongoDB\Server\7.0\log\mongod.log Network interfaces net: port: 27017 bindIp: 127.0.0.1 Replica set configuration replication: replSetName: “rs0”` ` Note: Create a similar configuration file for each MongoDB instance, ensuring that the port numbers and data directories are unique (e.g., 27017, 27018, 27019). Step 3: Start the MongoDB Instances Run each MongoDB server instance as an administrator. You can launch them manually using a command prompt or create a batch file. For example, to run the instance on port 27017, execute: “C:\Program Files\MongoDB\Server\7.1\bin\mongod” — config “C:\Program Files\MongoDB\Server\7.1\bin\mongod.cfg” For convenience, you can create a .bat file with the following content: ` @echo off start “MongoDB 7.1” “C:\Program Files\MongoDB\Server\7.1\bin\mongod” — config “C:\Program Files\MongoDB\Server\7.1\bin\mongod.cfg” start “MongoDB 7.2” “C:\Program Files\MongoDB\Server\7.2\bin\mongod” — config
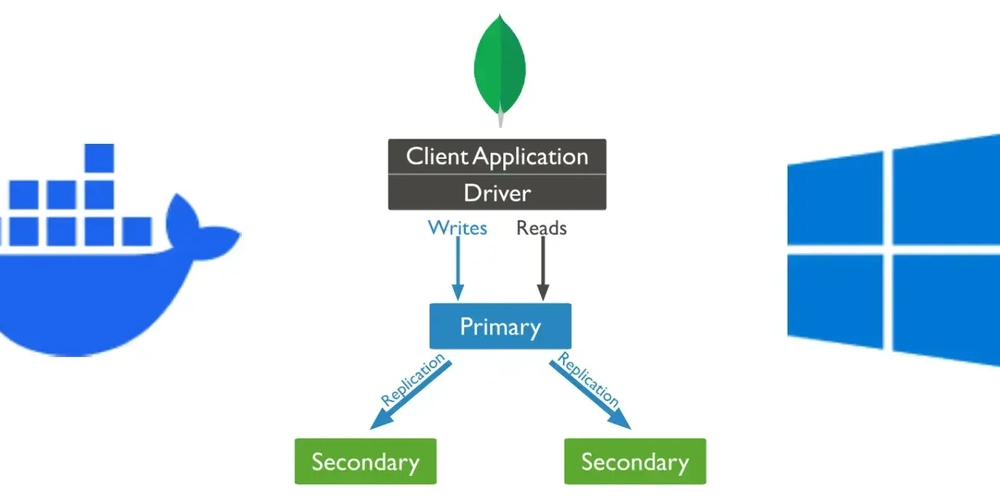
When developing modern applications, a replica set configuration is essential to simulate production environments that leverage MongoDB’s high availability and redundancy. In this article, I’ll share two approaches:
Deploying a MongoDB Replica Set Using Docker Desktop
Running a MongoDB Replica Set Natively on Windows Without Docker Desktop
Each method has its merits depending on your environment and constraints.
- Deploying a MongoDB Replica Set with Docker Desktop Docker is a great way to quickly spin up isolated environments. In this section, we’ll create a replica set using a custom Docker network and a Docker Compose file.
Step 1: Create a Docker Network
First, create an external Docker network that all MongoDB containers will share. Open your terminal and run:
docker network create mongo-cluster
Step 2: Prepare the docker-compose.yml File
Create a docker-compose.yml file with the following configuration. This file defines three services — one primary and two secondaries. Each service is configured to run with the replica set parameter ( — replSet rs0) and bind to all IP addresses:
version: ‘3.8’

services:

mongo-primary:

image: mongo:latest

container_name: mongo-primary

restart: always

command: mongod — replSet rs0 — bind_ip_all

ports:

- 27017:27017

volumes:

- E:/Program Files/MongoDB/primary/data:/data/db

networks:

- mongo-cluster

mongo-secondary1:

image: mongo:latest

container_name: mongo-secondary1

restart: always

command: mongod — replSet rs0 — bind_ip_all

ports:

- 27018:27017

volumes:

- E:/Program Files/MongoDB/secondary1/data:/data/db

networks:

- mongo-cluster

mongo-secondary2:

image: mongo:latest

container_name: mongo-secondary2

restart: always

command: mongod — replSet rs0 — bind_ip_all

ports:

- 27019:27017

volumes:

- E:/Program Files/MongoDB/secondary2/data:/data/db

networks:

- mongo-cluster

networks:

mongo-cluster:

external: true
Note: Adjust the volume paths (E:/Program Files/MongoDB/…) to your local directories as needed.
Step 3: Start the Containers
In the directory containing your docker-compose.yml file, execute:
docker-compose up -d
This command starts the three containers in detached mode.
Step 4: Initialize the Replica Set
Connect to the Primary Container:
Run the following command to open an interactive Mongo shell (mongosh) session inside the primary container:
docker exec -it mongo-primary mongosh
Initiate the Replica Set:
Within the shell, execute:
rs.initiate({_id: “rs0”,members: [{ _id: 0, host: “host.docker.internal:27017”},{ _id: 1, host: “host.docker.internal:27018” },{ _id: 2, host: “host.docker.internal:27019” }]});
Verify the Setup:
Run:
rs.status();
This command shows the status of your replica set. After the verification Run:
Exit
And go to step 5.
Step 5: Verify Data Persistence
Check your Docker volumes to ensure data is being persisted:
docker volume ls
Connection String
Connect your application using the following connection string:
mongodb://host.docker.internal:27017,host.docker.internal:27018,host.docker.internal:27019/?replicaSet=rs0
Tip: If host.docker.internal fails to resolve on Windows, add the following entry to your hosts file:
127.0.0.1 host.docker.internal
- Running a MongoDB Replica Set Natively on Windows (Without Docker Desktop) If you prefer or need to run MongoDB directly on Windows without containerization, follow these steps.
Step 1: Download and Install mongosh
Make sure you have mongosh installed. This shell will help you manage and interact with your replica set.
Step 2: Configure MongoDB via mongod.cfg
Prepare separate configuration files for each MongoDB instance. Below is an example configuration (mongod.cfg) for one node:
`
`
mongod.conf
Where and how to store data.
storage:
dbPath: C:\Program Files\MongoDB\Server\7.0\data
Where to write logging data.
systemLog:
destination: file
logAppend: true
path: C:\Program Files\MongoDB\Server\7.0\log\mongod.log
Network interfaces
net:
port: 27017
bindIp: 127.0.0.1
Replica set configuration
replication:
replSetName: “rs0”`
`
Note: Create a similar configuration file for each MongoDB instance, ensuring that the port numbers and data directories are unique (e.g., 27017, 27018, 27019).
Step 3: Start the MongoDB Instances
Run each MongoDB server instance as an administrator. You can launch them manually using a command prompt or create a batch file. For example, to run the instance on port 27017, execute:
“C:\Program Files\MongoDB\Server\7.1\bin\mongod” — config “C:\Program Files\MongoDB\Server\7.1\bin\mongod.cfg”
For convenience, you can create a .bat file with the following content:
`
@echo off
start “MongoDB 7.1” “C:\Program Files\MongoDB\Server\7.1\bin\mongod” — config “C:\Program Files\MongoDB\Server\7.1\bin\mongod.cfg”
start “MongoDB 7.2” “C:\Program Files\MongoDB\Server\7.2\bin\mongod” — config “C:\Program Files\MongoDB\Server\7.2\bin\mongod.cfg”
`
*Run the batch file as an administrator.
*
Step 4: Manually Initiate the Replica Set
Launch the Primary Instance:
If not already running, start the primary node with:
mongod — port 27017 — dbpath “C:\Program Files\MongoDB\Server\7.0\data” — replSet rs0
Connect with mongosh:
Open mongosh as an administrator and execute:
`
rs.initiate({_id: “rs0”,members: [{ _id: 0, host: “127.0.0.1:27017” },{ _id: 1,host: “127.0.0.1:27018” },{ _id: 2, host: “127.0.0.1:27019” }]});
`
Step 5: Optionally Install as Windows Services
For an even smoother development experience, you can install each MongoDB instance as a Windows service. Run the following commands as an administrator:
`
“C:\Program Files\MongoDB\Server\7.1\bin\mongod.exe” — config “C:\Program Files\MongoDB\Server\7.1\bin\mongod.cfg” — install — serviceName “MongoDB7.1”
“C:\Program Files\MongoDB\Server\7.2\bin\mongod.exe” — config “C:\Program Files\MongoDB\Server\7.2\bin\mongod.cfg” — install — serviceName “MongoDB7.2”
`
Then, register the services with:
`
sc.exe create “MongoDB7.1” binPath= “\”C:\Program Files\MongoDB\Server\7.1\bin\mongod.exe\” — service — config=\”C:\Program Files\MongoDB\Server\7.1\bin\mongod.cfg\”” DisplayName= “MongoDB 7.1” start= auto
sc.exe create “MongoDB7.2” binPath= “\”C:\Program Files\MongoDB\Server\7.2\bin\mongod.exe\” — service — config=\”C:\Program Files\MongoDB\Server\7.2\bin\mongod.cfg\”” DisplayName= “MongoDB 7.2” start= auto
`
Finally, start the services:
`
net start MongoDB7.1
net start MongoDB7.2
`
Note: Running MongoDB as a Windows service may present some challenges; evaluate this option based on your project needs.
Conclusion
Both methods enable you to run a MongoDB replica set locally for testing and development:
Docker Desktop: Provides an isolated, containerized environment that closely mirrors cloud deployments. It’s quick to set up and perfect for multi-node configurations without polluting your host system.
Native Windows Setup: Offers a more traditional approach, especially when containerization is not an option. This method uses configuration files, command-line instructions, and optional Windows service installation.
By understanding and leveraging these approaches, you can develop and test applications that depend on MongoDB’s replica set features with confidence.
Happy coding!