Let's make a custom theme in hax
In this tutorial I'll walk through the process of building a custom theme in HAX. HAX allows you to visually edit web component based content in a flat-file site. Get the CLI First let's install the hax command-line interface tool npm install --global @haxtheweb/create Next, run hax start to see available options and select "Create a HAXsite" Answer where you want the project to live, it's name, author, and then select "Create Custom Theme" Name your theme, one will be suggested that starts with custom-NAMEOFYOURSITE-theme. It is not required to start with custom- or end in -theme at this time but it recommended for name spacing. After this select the template you want to use. We recommend the Vanilla Theme if this is your first time. Then Launch your project. Your prompt should look like this for our tutorial: Next time if you wanted to script all that automatically you could have run: hax site customthemetutorial --theme "custom-theme" --custom-theme-name "custom-tutorial-theme" --custom-theme-template "base" --y After it has finished creating the files you should get a browser window that opens and looks like this: Now the fun part Open VSCode to the location you created your site Open a new terminal window and do cd custom followed by npm start You now have 2 terminals running. 1 that is monitoring files for changes to your custom theme (building it), and another that is serving the site so that you can edit it Navigate to custom/src/custom-tutorial-theme.js and edit as desired Things of note This is boilerplate, but is a custom theme. You can remove and add whatever as well as create additional elements if it makes it easier to develop your theme. The best way to learn theme development is to read through our documentation on theme development, especially around MobX, considerations for any HAXsite theme, and the available reusable site- elements that already exist to simplify the process of creating new themes. Publishing to surge.sh Due to this being so new, we have to manually edit 1 file in order to have our site work on surge.sh with it's custom theme. You can find documentation on this here. Edit index.html and change the following line: "@haxtheweb/": "./build/es6/node_modules/@haxtheweb/" to say "@haxtheweb/": "https://cdn.hax.cloud/cdn/build/es6/node_modules/@haxtheweb/" Then run surge . If it says command not found, first install surge by running npm install --global surge After this is published and you have an address, switch that line in the index.html back to what it was. This is a problem we are actively looking for a solution to but involves wrapping publishing into the CLI which is a larger task to script right now. Source of that file /** * Copyright 2025 btopro * @license Apache-2.0, see License.md for full text. */ import { HAXCMSLitElementTheme, css, unsafeCSS, html, store, autorun, toJS } from "@haxtheweb/haxcms-elements/lib/core/HAXCMSLitElementTheme.js"; import "@haxtheweb/haxcms-elements/lib/ui-components/navigation/site-menu-button.js"; import "@haxtheweb/haxcms-elements/lib/ui-components/site/site-title.js"; import "@haxtheweb/haxcms-elements/lib/ui-components/active-item/site-active-title.js"; /** * `CustomTutorialTheme` * `CustomTutorialTheme based on HAXCMS theming ecosystem` * `This theme is an example of extending an existing theme component` * * @microcopy - language worth noting: * - HAXcms - A headless content management system * - HAXCMSLitElementTheme - A class that provides correct baseline wiring to build a new theme that HAX can use * * @documentation - see HAX docs to learn more about theming * - Custom theme development - https://haxtheweb.org/documentation/developers/haxsite/custom-theme-development * - Theme Blocks - https://haxtheweb.org/documentation/developers/theme-blocks * - DDD - https://haxtheweb.org/documentation/ddd * - Data Store - https://haxtheweb.org/documentation/developers/haxsite/data-store * @element custom-tutorial-theme */ class CustomTutorialTheme extends HAXCMSLitElementTheme { /** * Store the tag name to make it easier to obtain directly. * @notice function name must be here for tooling to operate correctly */ static get tag() { return "custom-tutorial-theme"; } // set defaults or tie into the store constructor() { super(); this._items = []; this.activeId = null; autorun(() => { this.activeId = toJS(store.activeId); this._items = toJS(store.manifest.items); }); } // properties to respond to the activeID and list of items static get properties() { return { ...super.properties, activeId: { type: String }, _items: { type: Array }, }; } // allows for global styles to be set against the entire document // you can also use this to cascade styles down to the theme // but the more common reason is to in
In this tutorial I'll walk through the process of building a custom theme in HAX. HAX allows you to visually edit web component based content in a flat-file site.
Get the CLI
First let's install the hax command-line interface tool
npm install --global @haxtheweb/create
- Next, run
hax startto see available options and select "Create a HAXsite" - Answer where you want the project to live, it's name, author, and then select "Create Custom Theme"
- Name your theme, one will be suggested that starts with
custom-NAMEOFYOURSITE-theme. It is not required to start withcustom-or end in-themeat this time but it recommended for name spacing. - After this select the template you want to use. We recommend the
Vanilla Themeif this is your first time. Then Launch your project.
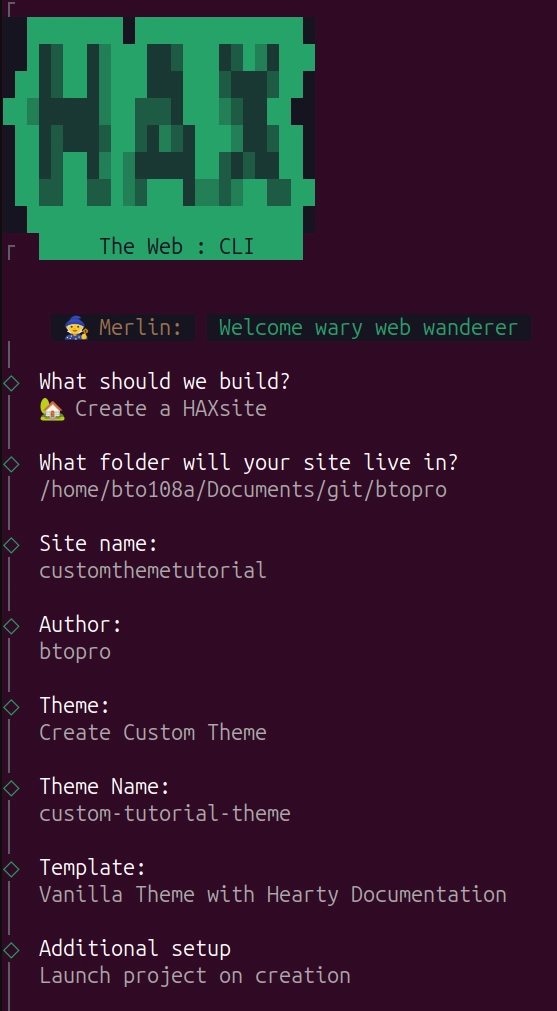
Your prompt should look like this for our tutorial:
Next time if you wanted to script all that automatically you could have run:
hax site customthemetutorial --theme "custom-theme" --custom-theme-name "custom-tutorial-theme" --custom-theme-template "base" --y
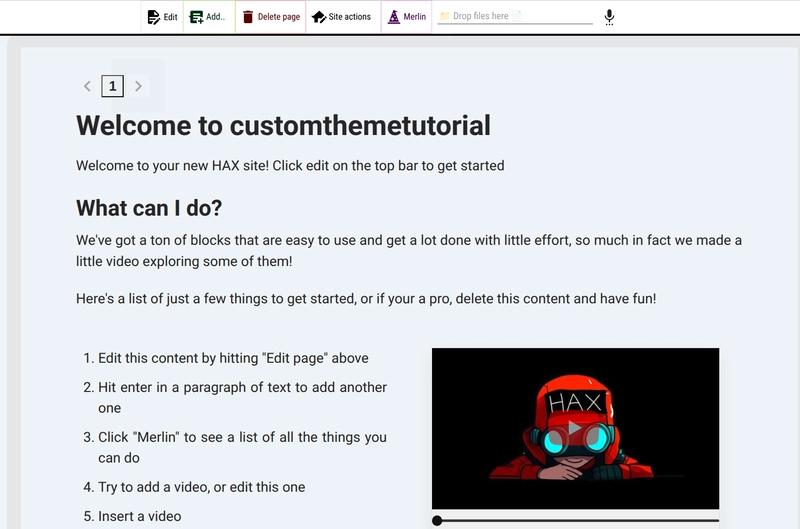
After it has finished creating the files you should get a browser window that opens and looks like this:
Now the fun part
- Open VSCode to the location you created your site
- Open a new terminal window and do
cd customfollowed bynpm start - You now have 2 terminals running. 1 that is monitoring files for changes to your custom theme (building it), and another that is serving the site so that you can edit it
- Navigate to
custom/src/custom-tutorial-theme.jsand edit as desired
Things of note
This is boilerplate, but is a custom theme. You can remove and add whatever as well as create additional elements if it makes it easier to develop your theme. The best way to learn theme development is to read through our documentation on theme development, especially around MobX, considerations for any HAXsite theme, and the available reusable site- elements that already exist to simplify the process of creating new themes.
Publishing to surge.sh
Due to this being so new, we have to manually edit 1 file in order to have our site work on surge.sh with it's custom theme. You can find documentation on this here.
Edit index.html and change the following line:
"@haxtheweb/": "./build/es6/node_modules/@haxtheweb/"
to say
"@haxtheweb/": "https://cdn.hax.cloud/cdn/build/es6/node_modules/@haxtheweb/"
Then run surge . If it says command not found, first install surge by running npm install --global surge
After this is published and you have an address, switch that line in the index.html back to what it was. This is a problem we are actively looking for a solution to but involves wrapping publishing into the CLI which is a larger task to script right now.
Source of that file
/**
* Copyright 2025 btopro
* @license Apache-2.0, see License.md for full text.
*/
import { HAXCMSLitElementTheme, css, unsafeCSS, html, store, autorun, toJS } from "@haxtheweb/haxcms-elements/lib/core/HAXCMSLitElementTheme.js";
import "@haxtheweb/haxcms-elements/lib/ui-components/navigation/site-menu-button.js";
import "@haxtheweb/haxcms-elements/lib/ui-components/site/site-title.js";
import "@haxtheweb/haxcms-elements/lib/ui-components/active-item/site-active-title.js";
/**
* `CustomTutorialTheme`
* `CustomTutorialTheme based on HAXCMS theming ecosystem`
* `This theme is an example of extending an existing theme component`
*
* @microcopy - language worth noting:
* - HAXcms - A headless content management system
* - HAXCMSLitElementTheme - A class that provides correct baseline wiring to build a new theme that HAX can use
*
* @documentation - see HAX docs to learn more about theming
* - Custom theme development - https://haxtheweb.org/documentation/developers/haxsite/custom-theme-development
* - Theme Blocks - https://haxtheweb.org/documentation/developers/theme-blocks
* - DDD - https://haxtheweb.org/documentation/ddd
* - Data Store - https://haxtheweb.org/documentation/developers/haxsite/data-store
* @element custom-tutorial-theme
*/
class CustomTutorialTheme extends HAXCMSLitElementTheme {
/**
* Store the tag name to make it easier to obtain directly.
* @notice function name must be here for tooling to operate correctly
*/
static get tag() {
return "custom-tutorial-theme";
}
// set defaults or tie into the store
constructor() {
super();
this._items = [];
this.activeId = null;
autorun(() => {
this.activeId = toJS(store.activeId);
this._items = toJS(store.manifest.items);
});
}
// properties to respond to the activeID and list of items
static get properties() {
return {
...super.properties,
activeId: { type: String },
_items: { type: Array },
};
}
// allows for global styles to be set against the entire document
// you can also use this to cascade styles down to the theme
// but the more common reason is to influence the body or other things
// put into the global index.html context by the system itself
HAXCMSGlobalStyleSheetContent() {
return [
...super.HAXCMSGlobalStyleSheetContent(),
css`
:root {
--my-theme-low-tone: var(--ddd-theme-default-slateMaxLight);
--my-theme-high-tone: var(--ddd-theme-default-coalyGray);
}
body {
padding: var(--ddd-spacing-0);
margin: var(--ddd-spacing-0);
background-color: var(--my-theme-low-tone);
}
body.dark-mode {
background-color: var(--my-theme-high-tone);
}
`,
];
}
//styles function
static get styles() {
return [
super.styles,
css`
:host {
display: block;
padding: var(--ddd-spacing-10) var(--ddd-spacing-20);
max-width: 960px;
min-width: 400px;
margin: var(--ddd-spacing-0) auto;
border: var(--ddd-border-lg);
border-width: var(--ddd-spacing-5);
border-radius: var(--ddd-radius-lg);
background-color: light-dark(var(--my-theme-low-tone), var(--my-theme-high-tone));
color: light-dark(var(--my-theme-high-tone), var(--my-theme-low-tone));
}
.wrapper {
border-radius: var(--ddd-radius-lg);
}
site-title {
font-size: var(--ddd-font-size-l);
}
header {
display: flex;
}
ul {
margin: var(--ddd-spacing-0);
padding: var(--ddd-spacing-0);
}
ul li {
display: inline-block;
margin: var(--ddd-spacing-0);
padding: var(--ddd-spacing-0);
list-style-type: none;
vertical-align: top;
}
ul li a {
display: block;
}
button {
height: var(--ddd-spacing-8);
width: var(--ddd-spacing-8);
margin: var(--ddd-spacing-0);
padding: 0;
font-size: var(--ddd-font-size-sm);
cursor: pointer;
}
.active button {
background-color: light-dark(var(--my-theme-low-tone), var(--my-theme-high-tone));
color: light-dark(var(--my-theme-high-tone), var(--my-theme-low-tone));
font-weight: bold;
}
site-menu-button {
display: inline-block;
vertical-align: top;
}
`,
];
}
render() {
return html`
-
${this._items.map((item, index) => {
return html`
- ${
item.id === this.activeId ? "active" : ""}">
${item.slug}">item.title}">${(index+1)}
`;
}
)}
-
`;
}
}
globalThis.customElements.define(CustomTutorialTheme.tag, CustomTutorialTheme);
export { CustomTutorialTheme };


![[The AI Show Episode 142]: ChatGPT’s New Image Generator, Studio Ghibli Craze and Backlash, Gemini 2.5, OpenAI Academy, 4o Updates, Vibe Marketing & xAI Acquires X](https://www.marketingaiinstitute.com/hubfs/ep%20142%20cover.png)














![YouTube Announces New Creation Tools for Shorts [Video]](https://www.iclarified.com/images/news/96923/96923/96923-640.jpg)

![Apple Faces New Tariffs but Has Options to Soften the Blow [Kuo]](https://www.iclarified.com/images/news/96921/96921/96921-640.jpg)


