


![[The AI Show Episode 145]: OpenAI Releases o3 and o4-mini, AI Is Causing “Quiet Layoffs,” Executive Order on Youth AI Education & GPT-4o’s Controversial Update](https://www.marketingaiinstitute.com/hubfs/ep%20145%20cover.png)


![Apple's New Ads Spotlight Apple Watch for Kids [Video]](https://www.iclarified.com/images/news/97197/97197/97197-640.jpg)


_Andy_Dean_Photography_Alamy.jpg?width=1280&auto=webp&quality=80&disable=upscale#)


![Here’s the Pebble smartwatch reboot in action, and how much tariffs might cost you [Video]](https://i0.wp.com/9to5google.com/wp-content/uploads/sites/4/2025/03/core-2-duo-smartwatch-3.jpg?resize=1200%2C628&quality=82&strip=all&ssl=1)


![[Weekly funding roundup April 26-May 2] VC inflow continues to remain downcast](https://images.yourstory.com/cs/2/220356402d6d11e9aa979329348d4c3e/WeeklyFundingRoundupNewLogo1-1739546168054.jpg)


Integrating KC Authorization Services into NestJS API
In this article, we are going to connect between Keycloak Authorization Services and a real NestJS API. After setting up all the resources, scopes, policies, and permissions in Keycloak, it's time to see it in action. We'll integrate Keycloak into our NestJS backend, protect specific endpoints based on permissions not just roles and test everything using Insomnia. Like i always say if you're new to Keycloak, check out my previous articles: Getting Started with Keycloak: Understanding the Basics to understand how to set up and configure Keycloak. Secure Your RESTful API Using Keycloak Role-Based Access Control to secure you API using RBAC. Going Deeper with Keycloak: Understanding Authorization Services to understand the basics of Keycloak Authorization Services and how to set up all the necessary configurations. So let's get started! Application configuration In this article, we'll build on the API code created in the Secure Your RESTful API Using Keycloak Role-Based Access Control article. First let's define some constants : resouces.ts : In this file, we define a list of resources that our application will work with. export const RESOURCES = { USER: 'user',// user resource for /users/* endpoints }; scopes.ts: In this file, we define all the scopes that represent the actions users can perform on our resources. export const SCOPES = { READ: 'read', WRITE: 'write', DELETE: 'delete', }; Now let's update our user.controller.ts file to stop relying on roles and instead use fine-grained permissions with scopes. import { Body, Controller, Delete, Get, Param, Post, Put, } from '@nestjs/common'; import { Resource, Scopes } from 'nest-keycloak-connect'; import { RESOURCES } from './constants/resources'; import { SCOPES } from './constants/scopes'; import { User } from './models/user'; import { UserService } from './user.service'; @Controller('users') @Resource(RESOURCES.USER) export class UserController { constructor(private readonly userService: UserService) {} @Post('create') @Scopes(SCOPES.WRITE) createUser(@Body() payload: User) { return this.userService.createUser(payload); } @Put(':userId/update') @Scopes(SCOPES.WRITE) updateUser(@Param('userId') userId: number, @Body() payload: User) { return this.userService.updateUser(userId, payload); } @Delete('delete/:id') @Scopes(SCOPES.DELETE) deleteUser(@Param('id') id: number) { return this.userService.deleteUser(id); } @Get('all') @Scopes(SCOPES.READ) findAllUsers() { return this.userService.findAllUsers(); } } Test in Insomnia (or Postman) Viewer User: The viewer user, who has the viewer role, is granted access only to the /users/all endpoint, which is protected using the read scope. If the viewer user tries to access other endpoints, they will receive a Forbidden error. Manager User: The manager user, who has the manager role, is allowed to access endpoints protected by the read and write scopes — like viewing all users and creating new ones. However, if the manager tries to access an endpoint that requires the delete scope, they’ll receive a Forbidden error. Admin User: The admin user, with the admin role, has full access to all user-related endpoints, including those protected by the read, write, and delete scopes. As expected, all authorized requests from the admin user will succeed without any Forbidden errors. Conclusion And that's it! In this article, we've integrated Keycloak Authorization Services into a NestJS API and used fine-grained permissions to protect our endpoints. By replacing static role checks, we've unlocked a more powerful and flexible way to handle authorization. Now your API can enforce access rules more cleanly, and users only get access to what they truly need. Much cleaner, much safer. If you think the Keycloak series ends here, you're wrong! Next, we'll explore testing additional policy types, moving beyond just roles to enhance authorization flexibility even further. Feel free to reach out if you have questions or feedback! Thanks for reading and stay tuned!
In this article, we are going to connect between Keycloak Authorization Services and a real NestJS API. After setting up all the resources, scopes, policies, and permissions in Keycloak, it's time to see it in action.
We'll integrate Keycloak into our NestJS backend, protect specific endpoints based on permissions not just roles and test everything using Insomnia.
Like i always say if you're new to Keycloak, check out my previous articles:
- Getting Started with Keycloak: Understanding the Basics to understand how to set up and configure Keycloak.
- Secure Your RESTful API Using Keycloak Role-Based Access Control to secure you API using RBAC.
- Going Deeper with Keycloak: Understanding Authorization Services to understand the basics of Keycloak Authorization Services and how to set up all the necessary configurations.
So let's get started!
Application configuration
In this article, we'll build on the API code created in the Secure Your RESTful API Using Keycloak Role-Based Access Control article.
First let's define some constants :
-
resouces.ts: In this file, we define a list of resources that our application will work with.
export const RESOURCES = {
  USER: 'user',// user resource for /users/* endpoints
};
-
scopes.ts: In this file, we define all the scopes that represent the actions users can perform on our resources.
export const SCOPES = {
  READ: 'read',
  WRITE: 'write',
  DELETE: 'delete',
};
Now let's update our user.controller.ts file to stop relying on roles and instead use fine-grained permissions with scopes.
import {
  Body,
  Controller,
  Delete,
  Get,
  Param,
  Post,
  Put,
} from '@nestjs/common';
import { Resource, Scopes } from 'nest-keycloak-connect';
import { RESOURCES } from './constants/resources';
import { SCOPES } from './constants/scopes';
import { User } from './models/user';
import { UserService } from './user.service';

@Controller('users')
@Resource(RESOURCES.USER)
export class UserController {
  constructor(private readonly userService: UserService) {}

  @Post('create')
  @Scopes(SCOPES.WRITE)
  createUser(@Body() payload: User) {
    return this.userService.createUser(payload);
  }

  @Put(':userId/update')
  @Scopes(SCOPES.WRITE)
  updateUser(@Param('userId') userId: number, @Body() payload: User) {
    return this.userService.updateUser(userId, payload);
  }

  @Delete('delete/:id')
  @Scopes(SCOPES.DELETE)
  deleteUser(@Param('id') id: number) {
    return this.userService.deleteUser(id);
  }

  @Get('all')
  @Scopes(SCOPES.READ)
  findAllUsers() {
    return this.userService.findAllUsers();
  }
}
Test in Insomnia (or Postman)
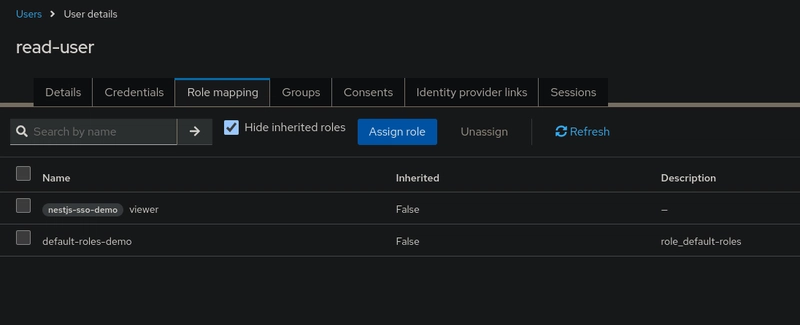
- Viewer User:
The viewer user, who has the viewer role, is granted access only to the /users/all endpoint, which is protected using the read scope.

If the viewer user tries to access other endpoints, they will receive a Forbidden error.

- Manager User:

The manager user, who has the manager role, is allowed to access endpoints protected by the read and write scopes — like viewing all users and creating new ones.

However, if the manager tries to access an endpoint that requires the delete scope, they’ll receive a Forbidden error.

- Admin User:

The admin user, with the admin role, has full access to all user-related endpoints, including those protected by the read, write, and delete scopes.
As expected, all authorized requests from the admin user will succeed without any Forbidden errors.


Conclusion
And that's it! In this article, we've integrated Keycloak Authorization Services into a NestJS API and used fine-grained permissions to protect our endpoints. By replacing static role checks, we've unlocked a more powerful and flexible way to handle authorization.
Now your API can enforce access rules more cleanly, and users only get access to what they truly need. Much cleaner, much safer.
If you think the Keycloak series ends here, you're wrong! Next, we'll explore testing additional policy types, moving beyond just roles to enhance authorization flexibility even further.
Feel free to reach out if you have questions or feedback!
Thanks for reading and stay tuned!