


![[The AI Show Episode 145]: OpenAI Releases o3 and o4-mini, AI Is Causing “Quiet Layoffs,” Executive Order on Youth AI Education & GPT-4o’s Controversial Update](https://www.marketingaiinstitute.com/hubfs/ep%20145%20cover.png)


![From Art School Drop-out to Microsoft Engineer with Shashi Lo [Podcast #170]](https://cdn.hashnode.com/res/hashnode/image/upload/v1746203291209/439bf16b-c820-4fe8-b69e-94d80533b2df.png?#)


(1).jpg?#)


_Inge_Johnsson-Alamy.jpg?width=1280&auto=webp&quality=80&disable=upscale#)


![Apple to Split iPhone Launches Across Fall and Spring in Major Shakeup [Report]](https://www.iclarified.com/images/news/97211/97211/97211-640.jpg)
![Apple to Move Camera to Top Left, Hide Face ID Under Display in iPhone 18 Pro Redesign [Report]](https://www.iclarified.com/images/news/97212/97212/97212-640.jpg)
![Apple Developing Battery Case for iPhone 17 Air Amid Battery Life Concerns [Report]](https://www.iclarified.com/images/news/97208/97208/97208-640.jpg)
![AirPods 4 On Sale for $99 [Lowest Price Ever]](https://www.iclarified.com/images/news/97206/97206/97206-640.jpg)


![[Updated] Samsung’s 65-inch 4K Smart TV Just Crashed to $299 — That’s Cheaper Than an iPad](https://www.androidheadlines.com/wp-content/uploads/2025/05/samsung-du7200.jpg)


How to use canvas in Web Workers with OffscreenCanvas
Lately, I have been working on a feature to capture images from media streams and scale them down to reduce their size. This helps save storage and reduce costs before uploading the images to a storage service. For this, I used Canvas to render the image data from the stream and then convert it into a blob of the required MIME type. Canvas rendering, animation, and user interaction occur on the main thread. If the rendering and animation are intensive, they can affect performance. After a few weeks, we received feedback from users that the application felt laggy and slow. So, I decided to move the whole pipeline to a web worker. However, Canvas requires DOM access for rendering and animations, which is not available in web workers. This limitation makes using Canvas in web workers challenging. This is a big challenge if you want to improve the performance of a web application that frequently uses canvas rendering. So, how can we solve this problem? Fortunately, OffscreenCanvas is the answer. OffscreenCanvas provides a canvas that can be rendered offscreen, removing the dependency on the DOM. In this article, I will discuss the OffscreenCanvas API and how to use it, using image capturing as an example. Let’s get started. What is OffscreenCanvas? OffscreenCanvas is a Web API that provides a canvas that can be rendered offscreen. It decouples the DOM from the Canvas API, so the element is no longer entirely dependent on the DOM. Rendering operations can also run inside a worker context, allowing certain tasks to be performed in a separate thread and reducing the load on the main thread. OffscreenCanvas accepts two parameters: the height and width of the canvas. You can then get the context using the getContext method: const offScreenCanvas = new OffscreenCanvas(width, height) const context = offScreenCanvas.getContext('2d') Now that you understand the limitations of canvas and the benefits of OffscreenCanvas, let’s look at its usage through an image capturing example. Using Canvas in the main thread Before jumping into OffscreenCanvas, let’s first discuss using canvas on the main thread. doctype html> Camera Capture Every 5 s body { font-family: Arial, Helvetica, sans-serif; display: flex; flex-direction: column; align-items: center; gap: 1rem; margin: 2rem; } #video { border: 2px solid #444; border-radius: 8px; } #captures { display: flex; flex-wrap: wrap; gap: 0.5rem; max-width: 100%; } #captures img { width: 160px; /* thumbnail size */ height: auto; border: 1px solid #888; border-radius: 4px; } Start Camera Captured Images (every 5 s) Type in the input below to experience lag during image capture: Characters typed: 0 Typing lag: 0 ms const startBtn = document.getElementById('startBtn'); const video = document.getElementById('video'); const captures = document.getElementById('captures'); let stream = null; let captureIntervalId = null; const canvas = document.createElement('canvas'); const ctx = canvas.getContext('2d'); ctx.canvas.width = 640; ctx.canvas.height = 480; function captureFrame() { if (!stream) return; ctx.drawImage(video, 0, 0, canvas.width, canvas.height); canvas.toBlob( (blob) => { if (!blob) return; const url = URL.createObjectURL(blob); const img = document.createElement('img'); img.src = url; img.onload = () => URL.revokeObjectURL(url); captures.prepend(img); }, 'image/webp', 0.9, ); } function startCapturing() { if (captureIntervalId) return; captureIntervalId = setInterval(captureFrame, 5000); } async function initCamera() { try { stream = await navigator.mediaDevices.getUserMedia({ video: true, audio: false }); video.srcObject = stream; video.hidden = false; startBtn.disabled = true; startCapturing(); } catch (err) { console.error(err); alert('Unable to access camera: ' + err.message); } } startBtn.addEventListener('click', () => { if (!stream) { initCamera(); } }); window.addEventListener('beforeunload', () => { if (stream) { stream.getTracks().forEach((track) => track.stop()); } if (captureIntervalId) { clearInterval(captureIntervalId); } }); const lagInput = document.getElementById('lagInput'); const charCount = document.getElementById('charCount'); const lagTime = document.getElementById(

Lately, I have been working on a feature to capture images from media streams and scale them down to reduce their size. This helps save storage and reduce costs before uploading the images to a storage service. For this, I used Canvas to render the image data from the stream and then convert it into a blob of the required MIME type.
Canvas rendering, animation, and user interaction occur on the main thread. If the rendering and animation are intensive, they can affect performance. After a few weeks, we received feedback from users that the application felt laggy and slow. So, I decided to move the whole pipeline to a web worker. However, Canvas requires DOM access for rendering and animations, which is not available in web workers. This limitation makes using Canvas in web workers challenging.
This is a big challenge if you want to improve the performance of a web application that frequently uses canvas rendering. So, how can we solve this problem? Fortunately, OffscreenCanvas is the answer. OffscreenCanvas provides a canvas that can be rendered offscreen, removing the dependency on the DOM.
In this article, I will discuss the OffscreenCanvas API and how to use it, using image capturing as an example. Let’s get started.
What is OffscreenCanvas?
OffscreenCanvas is a Web API that provides a canvas that can be rendered offscreen. It decouples the DOM from the Canvas API, so the element is no longer entirely dependent on the DOM. Rendering operations can also run inside a worker context, allowing certain tasks to be performed in a separate thread and reducing the load on the main thread.
OffscreenCanvas accepts two parameters: the height and width of the canvas. You can then get the context using the getContext method:
const offScreenCanvas = new OffscreenCanvas(width, height)
const context = offScreenCanvas.getContext('2d')
Now that you understand the limitations of canvas and the benefits of OffscreenCanvas, let’s look at its usage through an image capturing example.
Using Canvas in the main thread
Before jumping into OffscreenCanvas, let’s first discuss using canvas on the main thread.
doctype html>
<html lang="en">
  <head>
    <meta charset="UTF-8" />
    <meta http-equiv="X-UA-Compatible" content="IE=edge" />
    <meta name="viewport" content="width=device-width, initial-scale=1.0" />
    <title>Camera Capture Every 5 s</title>
    <style>
      body {
        font-family: Arial, Helvetica, sans-serif;
        display: flex;
        flex-direction: column;
        align-items: center;
        gap: 1rem;
        margin: 2rem;
      }
      #video {
        border: 2px solid #444;
        border-radius: 8px;
      }
      #captures {
        display: flex;
        flex-wrap: wrap;
        gap: 0.5rem;
        max-width: 100%;
      }
      #captures img {
        width: 160px; /* thumbnail size */
        height: auto;
        border: 1px solid #888;
        border-radius: 4px;
      }
    </style>
  </head>
  <body>
    <button id="startBtn">Start Camera</button>

    <video id="video" width="640" height="480" autoplay playsinline muted hidden></video>

    <h2>Captured Images (every 5 s)</h2>
    <div id="captures"></div>

    <div>
      <p>Type in the input below to experience lag during image capture:</p>
      <input
        type="text"
        id="lagInput"
        placeholder="Type here to experience lag..."
        style="width: 300px; padding: 8px; margin-bottom: 10px"
      />
      <div id="typingStats">
        <p>Characters typed: <span id="charCount">0</span>p>
        <p>Typing lag: <span id="lagTime">0</span> msp>
      </div>
    </div>

    <script>
      const startBtn = document.getElementById('startBtn');
      const video = document.getElementById('video');
      const captures = document.getElementById('captures');

      let stream = null;
      let captureIntervalId = null;

      const canvas = document.createElement('canvas');
      const ctx = canvas.getContext('2d');
      ctx.canvas.width = 640;
      ctx.canvas.height = 480;

      function captureFrame() {
        if (!stream) return;
        ctx.drawImage(video, 0, 0, canvas.width, canvas.height);

        canvas.toBlob(
          (blob) => {
            if (!blob) return;
            const url = URL.createObjectURL(blob);
            const img = document.createElement('img');
            img.src = url;

            img.onload = () => URL.revokeObjectURL(url);

            captures.prepend(img);
          },
          'image/webp',
          0.9,
        );
      }

      function startCapturing() {
        if (captureIntervalId) return;
        captureIntervalId = setInterval(captureFrame, 5000);
      }

      async function initCamera() {
        try {
          stream = await navigator.mediaDevices.getUserMedia({ video: true, audio: false });
          video.srcObject = stream;
          video.hidden = false;
          startBtn.disabled = true;
          startCapturing();
        } catch (err) {
          console.error(err);
          alert('Unable to access camera: ' + err.message);
        }
      }

      startBtn.addEventListener('click', () => {
        if (!stream) {
          initCamera();
        }
      });

      window.addEventListener('beforeunload', () => {
        if (stream) {
          stream.getTracks().forEach((track) => track.stop());
        }
        if (captureIntervalId) {
          clearInterval(captureIntervalId);
        }
      });

      const lagInput = document.getElementById('lagInput');
      const charCount = document.getElementById('charCount');
      const lagTime = document.getElementById('lagTime');

      lagInput.addEventListener('input', () => {
        const startTime = performance.now();
        const currentCount = lagInput.value.length;
        charCount.textContent = currentCount;
        const endTime = performance.now();
        const typingLag = endTime - startTime;
        lagTime.textContent = typingLag.toFixed(2);
      });
    </script>
  </body>
</html>
In this example, we capture an image by creating a canvas element, drawing the image on it, converting it to a blob, and then rendering it in the UI.
const canvas = document.createElement('canvas');
      const ctx = canvas.getContext('2d');
      ctx.canvas.width = 640;
      ctx.canvas.height = 480;

function captureFrame() {
        if (!stream) return;
        ctx.drawImage(video, 0, 0, canvas.width, canvas.height);

        canvas.toBlob(
          (blob) => {
            if (!blob) return;
            const url = URL.createObjectURL(blob);
            const img = document.createElement('img');
            img.src = url;

            img.onload = () => URL.revokeObjectURL(url);

            captures.prepend(img);
          },
          'image/webp',
          0.9,
        );
  }
Try the example. While capturing an image, type into the input box and observe any lag.
Now that we know there is lag, let’s move canvas operations to a worker to improve performance.
Using Canvas in a Web Worker
We will change the example above by adding a worker script and then using the worker to capture the image.
The initWorker function will create the worker by loading the worker script URL. It will then create the offscreen canvas and use postMessage to send the event data to the worker, passing the offscreen canvas as a transferable object in the second parameter.
Transferable objects are objects that can have their resources moved from one place to another, ensuring the resources are used in only one place at a time.
Now, the offscreen canvas will be available in the worker and can be used for canvas-related tasks.
Offscreen canvas has a different method for converting image data to a blob, called convertToBlob. By default, it provides a high-quality image, so be sure to include the quality parameter as well.
...

<body>
    <script>
      ...
      let worker = null;
      function initWorker() {
        const blob = new Blob(
          [
            `
        self.onmessage = async (e) => {
          if (e.data.type === 'init') {
            self.canvas = e.data.canvas;
            self.ctx = self.canvas.getContext('2d');
          } else if (e.data.type === 'frame') {
            const { bitmap } = e.data;
            self.ctx.drawImage(bitmap, 0, 0, self.canvas.width, self.canvas.height);
            bitmap.close();
            const blob = await self.canvas.convertToBlob({ type: 'image/webp', quality: 0.9 });
            self.postMessage({ type: 'image', blob });
          }
        };
        `,
          ],
          { type: 'application/javascript' },
        );
        const workerUrl = URL.createObjectURL(blob);
        worker = new Worker(workerUrl);

        const offscreen = new OffscreenCanvas(640, 480);
        worker.postMessage({ type: 'init', canvas: offscreen }, [offscreen]);

        worker.onmessage = (e) => {
          if (e.data.type === 'image') {
            const url = URL.createObjectURL(e.data.blob);
            const img = document.createElement('img');
            img.src = url;
            img.onload = () => URL.revokeObjectURL(url);
            captures.prepend(img);
          }
        };
      }

    </script>
</body>
...
Then update captureFrame to use the worker and send the video frame as a bitmap to the worker. This allows the worker to use the bitmap data to draw and capture the image on the canvas.
We use the createImageBitmap API to turn the video frame into a bitmap and then send it as a transferable object. This makes it available in the worker context and usable by the OffscreenCanvas.
function captureFrame() {
        if (!stream || !worker) return;
        createImageBitmap(video).then((bitmap) => {
          worker.postMessage({ type: 'frame', bitmap }, [bitmap]);
        });
}
Lastly, update the initCamera and call the initWorker function before the startCapturing function.
async function initCamera() {
        try {
          stream = await navigator.mediaDevices.getUserMedia({ video: true });
          video.srcObject = stream;
          video.hidden = false;
          startBtn.disabled = true;
          initWorker(); // NEW
          startCapturing();
        } catch (err) {
          console.error(err);
          alert('Unable to access camera: ' + err.message);
        }
}
Try the updated example. While capturing an image, use the input box to type as quickly as possible and observe for any lag.
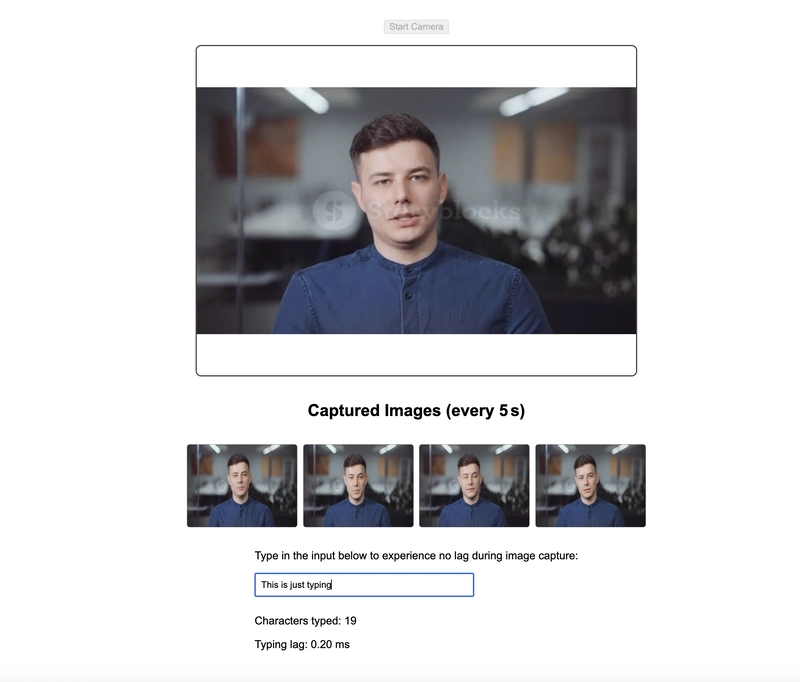
Notice the difference: when the canvas renders on the main thread, the log is 0.80ms, but in a web worker, it's 0.20ms. This clearly demonstrates better performance. In the real world, this difference can save significant money and reduce the user churn rate.
Conclusion
OffscreenCanvas is a helpful API that allows moving canvas tasks off the main thread, improving performance and user experience. In our example, we:
Created a regular canvas on the main thread
Moved it to a web worker using OffscreenCanvas
Handled image rendering in the worker
Sent the result back to the main thread for display
By using web workers and OffscreenCanvas, you can significantly improve performance in apps that use canvas for rendering. Try it in your next project.
Thanks for reading! If you found this article useful, please like, comment, and share it.