


![[The AI Show Episode 145]: OpenAI Releases o3 and o4-mini, AI Is Causing “Quiet Layoffs,” Executive Order on Youth AI Education & GPT-4o’s Controversial Update](https://www.marketingaiinstitute.com/hubfs/ep%20145%20cover.png)


![From Art School Drop-out to Microsoft Engineer with Shashi Lo [Podcast #170]](https://cdn.hashnode.com/res/hashnode/image/upload/v1746203291209/439bf16b-c820-4fe8-b69e-94d80533b2df.png?#)


![Re-designing a Git/development workflow with best practices [closed]](https://i.postimg.cc/tRvBYcrt/branching-example.jpg)


(1).jpg?#)


_Inge_Johnsson-Alamy.jpg?width=1280&auto=webp&quality=80&disable=upscale#)


![The Material 3 Expressive redesign of Google Clock leaks out [Gallery]](https://i0.wp.com/9to5google.com/wp-content/uploads/sites/4/2024/03/Google-Clock-v2.jpg?resize=1200%2C628&quality=82&strip=all&ssl=1)
![What Google Messages features are rolling out [May 2025]](https://i0.wp.com/9to5google.com/wp-content/uploads/sites/4/2023/12/google-messages-name-cover.png?resize=1200%2C628&quality=82&strip=all&ssl=1)


![New Apple iPad mini 7 On Sale for $399! [Lowest Price Ever]](https://www.iclarified.com/images/news/96096/96096/96096-640.jpg)
![Apple to Split iPhone Launches Across Fall and Spring in Major Shakeup [Report]](https://www.iclarified.com/images/news/97211/97211/97211-640.jpg)
![Apple to Move Camera to Top Left, Hide Face ID Under Display in iPhone 18 Pro Redesign [Report]](https://www.iclarified.com/images/news/97212/97212/97212-640.jpg)
![Apple Developing Battery Case for iPhone 17 Air Amid Battery Life Concerns [Report]](https://www.iclarified.com/images/news/97208/97208/97208-640.jpg)


How to Install Qwen2.5-Omni 3B Locally
Nowadays, the ability to seamlessly integrate and process multiple data modalities, text, images, audio, and video, is no longer a surprise but has become a necessity. However, Alibaba has once again gone one step further with its latest open-source multimodal model, Qwen2.5-Omni 3B. This model is designed to perceive diverse inputs and generate both text and natural speech responses in real-time. This means, unlike before, AI can now generate the same or different responses with multiple modalities simultaneously. Its innovative Thinker-Talker architecture enables synchronized understanding and generation across various data types, making it an invaluable open-source model for applications ranging from real-time voice and video interactions to advanced content analysis and creative content generation. This guide will walk you through the straightforward, step-by-step process of installing this model. If you are looking for slightly bigger parameter version, check out our previous Omni 7B installation guide. You can follow the steps to install it on a local machine or accelerate it with GPU-powered machines. Prerequisites The minimum system requirements for running this model are: GPU: RTX A6000 Storage: 50GB (preferable) VRAM: 16GB Step-by-step process to install and run Qwen2.5 Omni 3B For the purpose of this tutorial, we’ll use a GPU-powered Virtual Machine by NodeShift since it provides high compute Virtual Machines at a very affordable cost on a scale that meets GDPR, SOC2, and ISO27001 requirements. Also, it offers an intuitive and user-friendly interface, making it easier for beginners to get started with Cloud deployments. However, feel free to use any cloud provider of your choice and follow the same steps for the rest of the tutorial. Step 1: Setting up a NodeShift Account Visit app.nodeshift.com and create an account by filling in basic details, or continue signing up with your Google/GitHub account. If you already have an account, login straight to your dashboard. Step 2: Create a GPU Node After accessing your account, you should see a dashboard (see image), now: 1) Navigate to the menu on the left side. 2) Click on the GPU Nodes option. 3) Click on Start to start creating your very first GPU node. These GPU nodes are GPU-powered virtual machines by NodeShift. These nodes are highly customizable and let you control different environmental configurations for GPUs ranging from H100s to A100s, CPUs, RAM, and storage, according to your needs. Step 3: Selecting configuration for GPU (model, region, storage) 1) For this tutorial, we’ll be using 1x RTX A6000 GPU, however, you can choose any GPU as per the prerequisites. 2) Similarly, we’ll opt for 200GB storage by sliding the bar. You can also select the region where you want your GPU to reside from the available ones. Step 4: Choose GPU Configuration and Authentication method 1) After selecting your required configuration options, you'll see the available GPU nodes in your region and according to (or very close to) your configuration. In our case, we'll choose a 1x RTX A6000 48GB GPU node with 64vCPUs/63GB RAM/200GB SSD. 2) Next, you'll need to select an authentication method. Two methods are available: Password and SSH Key. We recommend using SSH keys, as they are a more secure option. To create one, head over to our official documentation. Step 5: Choose an Image The final step is to choose an image for the VM, which in our case is Nvidia Cuda. That's it! You are now ready to deploy the node. Finalize the configuration summary, and if it looks good, click Create to deploy the node. Step 6: Connect to active Compute Node using SSH 1) As soon as you create the node, it will be deployed in a few seconds or a minute. Once deployed, you will see a status Running in green, meaning that our Compute node is ready to use! 2) Once your GPU shows this status, navigate to the three dots on the right, click on Connect with SSH, and copy the SSH details that appear. As you copy the details, follow the below steps to connect to the running GPU VM via SSH: 1) Open your terminal, paste the SSH command, and run it. 2) In some cases, your terminal may take your consent before connecting. Enter ‘yes’. 3) A prompt will request a password. Type the SSH password, and you should be connected. Output: Next, If you want to check the GPU details, run the following command in the terminal: !nvidia-smi Step 7: Set up the project environment with dependencies 1) Create a virtual environment using Anaconda. conda create -n qwen python=3.11 -y && conda activate qwen Output: 2) Once you're inside the environment, install dependencies to run the model. pip install torch torchvision torchaudio einops timm pillow pip install git+https://github.com/huggingface/transformers pip install git+https://github.com/huggingfa

Nowadays, the ability to seamlessly integrate and process multiple data modalities, text, images, audio, and video, is no longer a surprise but has become a necessity. However, Alibaba has once again gone one step further with its latest open-source multimodal model, Qwen2.5-Omni 3B. This model is designed to perceive diverse inputs and generate both text and natural speech responses in real-time. This means, unlike before, AI can now generate the same or different responses with multiple modalities simultaneously. Its innovative Thinker-Talker architecture enables synchronized understanding and generation across various data types, making it an invaluable open-source model for applications ranging from real-time voice and video interactions to advanced content analysis and creative content generation.
This guide will walk you through the straightforward, step-by-step process of installing this model. If you are looking for slightly bigger parameter version, check out our previous Omni 7B installation guide. You can follow the steps to install it on a local machine or accelerate it with GPU-powered machines.
Prerequisites
The minimum system requirements for running this model are:
GPU: RTX A6000
Storage: 50GB (preferable)
VRAM: 16GB
Step-by-step process to install and run Qwen2.5 Omni 3B
For the purpose of this tutorial, we’ll use a GPU-powered Virtual Machine by NodeShift since it provides high compute Virtual Machines at a very affordable cost on a scale that meets GDPR, SOC2, and ISO27001 requirements. Also, it offers an intuitive and user-friendly interface, making it easier for beginners to get started with Cloud deployments. However, feel free to use any cloud provider of your choice and follow the same steps for the rest of the tutorial.
Step 1: Setting up a NodeShift Account
Visit app.nodeshift.com and create an account by filling in basic details, or continue signing up with your Google/GitHub account.
If you already have an account, login straight to your dashboard.
Step 2: Create a GPU Node
After accessing your account, you should see a dashboard (see image), now:
1) Navigate to the menu on the left side.
2) Click on the GPU Nodes option.
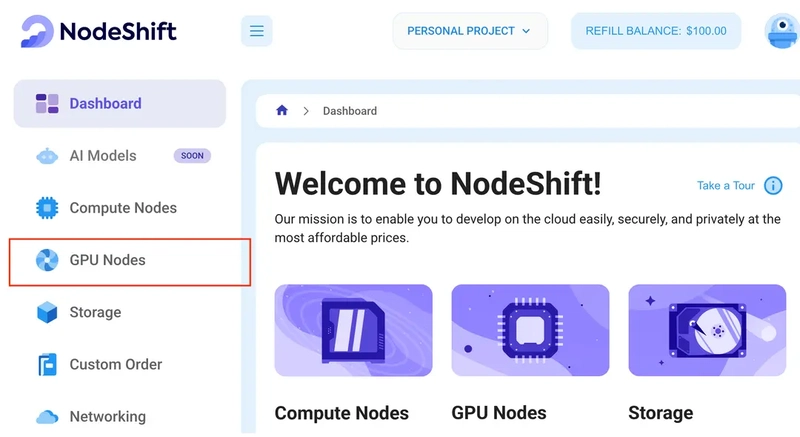
3) Click on Start to start creating your very first GPU node.

These GPU nodes are GPU-powered virtual machines by NodeShift. These nodes are highly customizable and let you control different environmental configurations for GPUs ranging from H100s to A100s, CPUs, RAM, and storage, according to your needs.
Step 3: Selecting configuration for GPU (model, region, storage)
1) For this tutorial, we’ll be using 1x RTX A6000 GPU, however, you can choose any GPU as per the prerequisites.
2) Similarly, we’ll opt for 200GB storage by sliding the bar. You can also select the region where you want your GPU to reside from the available ones.

Step 4: Choose GPU Configuration and Authentication method
1) After selecting your required configuration options, you'll see the available GPU nodes in your region and according to (or very close to) your configuration. In our case, we'll choose a 1x RTX A6000 48GB GPU node with 64vCPUs/63GB RAM/200GB SSD.

2) Next, you'll need to select an authentication method. Two methods are available: Password and SSH Key. We recommend using SSH keys, as they are a more secure option. To create one, head over to our official documentation.

Step 5: Choose an Image
The final step is to choose an image for the VM, which in our case is Nvidia Cuda.
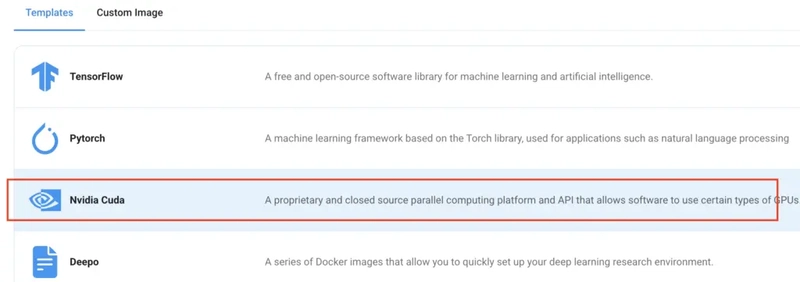
That's it! You are now ready to deploy the node. Finalize the configuration summary, and if it looks good, click Create to deploy the node.


Step 6: Connect to active Compute Node using SSH
1) As soon as you create the node, it will be deployed in a few seconds or a minute. Once deployed, you will see a status Running in green, meaning that our Compute node is ready to use!
2) Once your GPU shows this status, navigate to the three dots on the right, click on Connect with SSH, and copy the SSH details that appear.

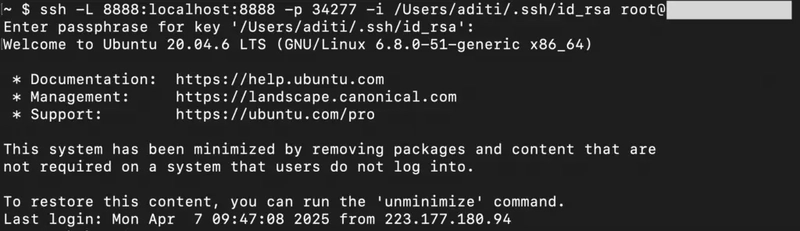
As you copy the details, follow the below steps to connect to the running GPU VM via SSH:
1) Open your terminal, paste the SSH command, and run it.
2) In some cases, your terminal may take your consent before connecting. Enter ‘yes’.
3) A prompt will request a password. Type the SSH password, and you should be connected.
Output:

Next, If you want to check the GPU details, run the following command in the terminal:
!nvidia-smi
Step 7: Set up the project environment with dependencies
1) Create a virtual environment using Anaconda.
conda create -n qwen python=3.11 -y && conda activate qwen
Output:

2) Once you're inside the environment, install dependencies to run the model.
pip install torch torchvision torchaudio einops timm pillow
pip install git+https://github.com/huggingface/transformers
pip install git+https://github.com/huggingface/accelerate
pip install git+https://github.com/huggingface/diffusers
pip install huggingface_hub
pip install sentencepiece bitsandbytes protobuf decord numpy av
Output:

3) Ensure ffmpeg is installed.
sudo apt install ffmpeg
Output:

4) Install packages for handling audio and video inputs.
pip install qwen-omni-utils[decord] -U
Output:

5) Install and run jupyter notebook.
conda install -c conda-forge --override-channels notebook -y
conda install -c conda-forge --override-channels ipywidgets -y
jupyter notebook --allow-root
6) If you're on a remote machine (e.g., NodeShift GPU), you'll need to do SSH port forwarding in order to access the jupyter notebook session on your local browser.
Run the following command in your local terminal after replacing:
ssh -L 8888:localhost:8888 -p -i root@
Output:
After this copy the URL you received in your remote server:

And paste this on your local browser to access the Jupyter Notebook session.
Step 8: Download and Run the model
1) Open a Python notebook inside Jupyter.

2) Download model checkpoints.
import soundfile as sf

from transformers import Qwen2_5OmniForConditionalGeneration, Qwen2_5OmniProcessor
from qwen_omni_utils import process_mm_info

# We recommend enabling flash_attention_2 for better acceleration and memory saving.
model = Qwen2_5OmniForConditionalGeneration.from_pretrained(
      "Qwen/Qwen2.5-Omni-3B",
      torch_dtype="auto",
      device_map="auto",
      attn_implementation="flash_attention_2",
  )

processor = Qwen2_5OmniProcessor.from_pretrained("Qwen/Qwen2.5-Omni-3B")
Output:

3) Finally, run the model with your desired prompt.
Here's the video that we're using in the code below: https://qianwen-res.oss-cn-beijing.aliyuncs.com/Qwen2.5-Omni/draw.mp4
conversation = [
    {
        "role": "system",
        "content": [
            {"type": "text", "text": "You are Qwen, a virtual human developed by the Qwen Team, Alibaba Group, capable of perceiving auditory and visual inputs, as well as generating text and speech."}
        ],
    },
    {
        "role": "user",
        "content": [
            {"type": "video", "video": "https://qianwen-res.oss-cn-beijing.aliyuncs.com/Qwen2.5-Omni/draw.mp4"},
        ],
    },
]

# set use audio in video
USE_AUDIO_IN_VIDEO = True

# Preparation for inference
text = processor.apply_chat_template(conversation, add_generation_prompt=True, tokenize=False)
audios, images, videos = process_mm_info(conversation, use_audio_in_video=USE_AUDIO_IN_VIDEO)
inputs = processor(text=text, audio=audios, images=images, videos=videos, return_tensors="pt", padding=True, use_audio_in_video=USE_AUDIO_IN_VIDEO)
inputs = inputs.to(model.device).to(model.dtype)

# Inference: Generation of the output text and audio
text_ids, audio = model.generate(**inputs, use_audio_in_video=USE_AUDIO_IN_VIDEO)

text = processor.batch_decode(text_ids, skip_special_tokens=True, clean_up_tokenization_spaces=False)
print(text)
sf.write(
    "output.wav",
    audio.reshape(-1).detach().cpu().numpy(),
    samplerate=24000,
)
Output:

Conclusion
Qwen-2.5 Omni 3B represents a significant advancement in AI by effortlessly integrating multiple data modalities, such as text, images, audio, and video, to generate real-time, natural responses. Deploying this model on NodeShift’s cloud platform enhances its capabilities by providing secure, scalable, and cost-effective infrastructure. NodeShift simplifies the deployment process, allowing developers to efficiently process the full workflow and potential of Qwen-2.5 Omni 3B without the complexities of traditional cloud setups.
For more information about NodeShift:

![[gsap/component] Full Screen Image Zoom on Hover](https://media2.dev.to/dynamic/image/width%3D1000,height%3D500,fit%3Dcover,gravity%3Dauto,format%3Dauto/https:%2F%2Fdev-to-uploads.s3.amazonaws.com%2Fuploads%2Farticles%2Fwmee25v2petiw3a5ck4z.png)