


![[Free Webinar] Guide to Securing Your Entire Identity Lifecycle Against AI-Powered Threats](https://blogger.googleusercontent.com/img/b/R29vZ2xl/AVvXsEjqbZf4bsDp6ei3fmQ8swm7GB5XoRrhZSFE7ZNhRLFO49KlmdgpIDCZWMSv7rydpEShIrNb9crnH5p6mFZbURzO5HC9I4RlzJazBBw5aHOTmI38sqiZIWPldRqut4bTgegipjOk5VgktVOwCKF_ncLeBX-pMTO_GMVMfbzZbf8eAj21V04y_NiOaSApGkM/s1600/webinar-play.jpg?#)


![[The AI Show Episode 145]: OpenAI Releases o3 and o4-mini, AI Is Causing “Quiet Layoffs,” Executive Order on Youth AI Education & GPT-4o’s Controversial Update](https://www.marketingaiinstitute.com/hubfs/ep%20145%20cover.png)


_Tanapong_Sungkaew_via_Alamy.jpg?width=1280&auto=webp&quality=80&disable=upscale#)


![Apple Restructures Global Affairs and Apple Music Teams [Report]](https://www.iclarified.com/images/news/97162/97162/97162-640.jpg)
![New iPhone Factory Goes Live in India, Another Just Days Away [Report]](https://www.iclarified.com/images/news/97165/97165/97165-640.jpg)


How to Install Qwen 3 Locally?
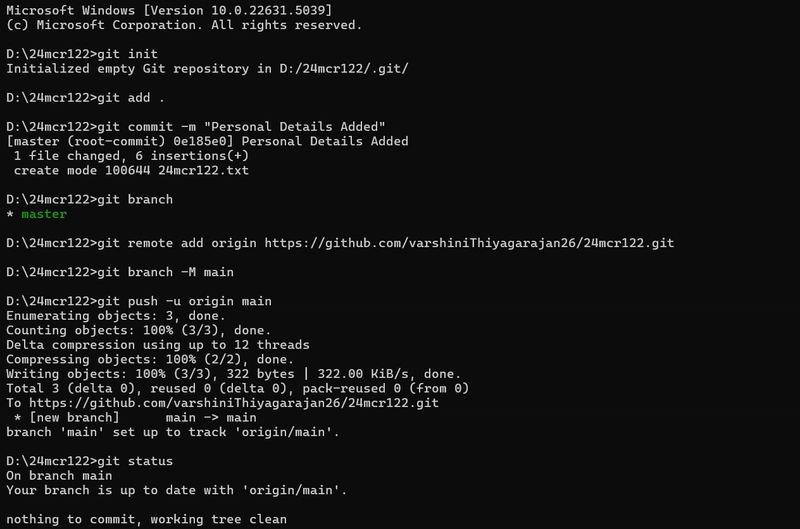
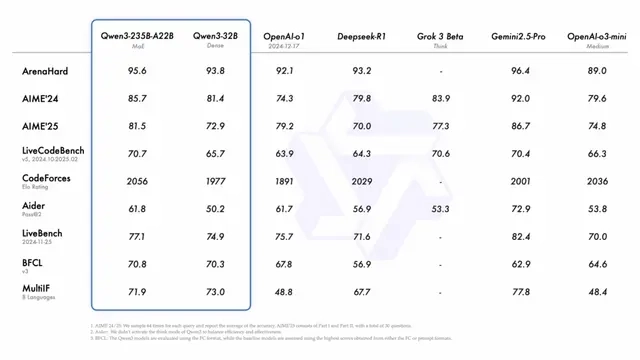
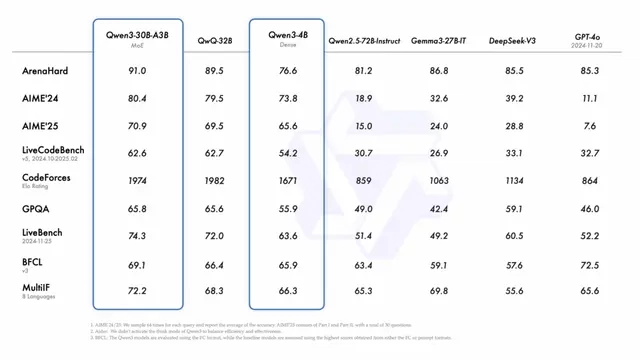
Built across eight sizes (0.6B, 1.7B, 4B, 8B, 14B, 30B, 32B, and 235B), the Qwen 3 family delivers a major leap in understanding, reasoning, and communication. With both dense and MoE (Mixture of Experts) models, there’s something for every use case — from lightweight tasks to heavyweight thinking. What sets Qwen 3 apart? ✅ Multilingual by default: Trained across 119 languages and dialects using a jaw-dropping 36 trillion words, it understands cultural nuance and translates like a native. ✅ Outperforms its predecessors: Smaller Qwen 3 models now outperform the bigger ones from the previous series. For instance, Qwen3-1.7B performs at the level of the older 3B model — and so on up the chain. ✅ Smarter reasoning: Thanks to a three-stage training approach, it’s excellent at STEM, logic, and writing complex code — not just chatting. ✅ Built for deep conversations: From math problems to creative storytelling, Qwen 3 seamlessly shifts between quick replies and deep thinking — depending on the challenge. ✅ Improved memory: Long documents, detailed instructions, or multi-turn dialogues? It holds context like a pro. ✅ Agent-ready: Strong decision-making and planning skills make it a great fit for tools that require step-by-step reasoning or goal-driven output. ✅ MCP support: Ready to work with multi-component processing frameworks out of the box. With Qwen 3, the game has changed. It’s not just faster — it’s sharper, more fluent, and truly feels like it understands you. Model Resource Hugging Face Link : https://huggingface.co/collections/Qwen/qwen3-67dd247413f0e2e4f653967f Step-by-Step Process to Install Qwen 3 Locally For the purpose of this tutorial, we will use a GPU-powered Virtual Machine offered by NodeShift; however, you can replicate the same steps with any other cloud provider of your choice. NodeShift provides the most affordable Virtual Machines at a scale that meets GDPR, SOC2, and ISO27001 requirements. Step 1: Sign Up and Set Up a NodeShift Cloud Account Visit the NodeShift Platform and create an account. Once you’ve signed up, log into your account. Follow the account setup process and provide the necessary details and information. Step 2: Create a GPU Node (Virtual Machine) GPU Nodes are NodeShift’s GPU Virtual Machines, on-demand resources equipped with diverse GPUs ranging from H100s to A100s. These GPU-powered VMs provide enhanced environmental control, allowing configuration adjustments for GPUs, CPUs, RAM, and Storage based on specific requirements. Navigate to the menu on the left side. Select the GPU Nodes option, create a GPU Node in the Dashboard, click the Create GPU Node button, and create your first Virtual Machine deploy Step 3: Select a Model, Region, and Storage In the “GPU Nodes” tab, select a GPU Model and Storage according to your needs and the geographical region where you want to launch your model. We will use 1 x H100 SXM GPU for this tutorial to achieve the fastest performance. However, you can choose a more affordable GPU with less VRAM if that better suits your requirements. Step 4: Select Authentication Method There are two authentication methods available: Password and SSH Key. SSH keys are a more secure option. To create them, please refer to our official documentation. Step 5: Choose an Image Next, you will need to choose an image for your Virtual Machine. We will deploy Qwen 3 on an NVIDIA Cuda Virtual Machine. This proprietary, closed-source parallel computing platform will allow you to install Qwen 3 on your GPU Node. After choosing the image, click the ‘Create’ button, and your Virtual Machine will be deployed. Step 6: Virtual Machine Successfully Deployed You will get visual confirmation that your node is up and running. Step 7: Connect to GPUs using SSH NodeShift GPUs can be connected to and controlled through a terminal using the SSH key provided during GPU creation. Once your GPU Node deployment is successfully created and has reached the ‘RUNNING’ status, you can navigate to the page of your GPU Deployment Instance. Then, click the ‘Connect’ button in the top right corner. Now open your terminal and paste the proxy SSH IP or direct SSH IP. Next, if you want to check the GPU details, run the command below: nvidia-smi Step 8: Install Ollama After connecting to the terminal via SSH, it’s now time to install Ollama from the official Ollama website. Website Link: https://ollama.com/ Run the following command to install the Ollama: curl -fsSL https://ollama.com/install.sh | sh Step 9: Serve Ollama Run the following command to host the Ollama so that it can be accessed and utilized efficiently: ollama serve Now, “Ollama is running.” Step 10: Select Qwen 3 Model Link: https://ollama.com/library/qwen3 Qwen 3 model is available in eight sizes. We will run one by one on our GPU virt
Built across eight sizes (0.6B, 1.7B, 4B, 8B, 14B, 30B, 32B, and 235B), the Qwen 3 family delivers a major leap in understanding, reasoning, and communication. With both dense and MoE (Mixture of Experts) models, there’s something for every use case — from lightweight tasks to heavyweight thinking.
What sets Qwen 3 apart?
✅ Multilingual by default: Trained across 119 languages and dialects using a jaw-dropping 36 trillion words, it understands cultural nuance and translates like a native.
✅ Outperforms its predecessors: Smaller Qwen 3 models now outperform the bigger ones from the previous series. For instance, Qwen3-1.7B performs at the level of the older 3B model — and so on up the chain.
✅ Smarter reasoning: Thanks to a three-stage training approach, it’s excellent at STEM, logic, and writing complex code — not just chatting.
✅ Built for deep conversations: From math problems to creative storytelling, Qwen 3 seamlessly shifts between quick replies and deep thinking — depending on the challenge.
✅ Improved memory: Long documents, detailed instructions, or multi-turn dialogues? It holds context like a pro.
✅ Agent-ready: Strong decision-making and planning skills make it a great fit for tools that require step-by-step reasoning or goal-driven output.
✅ MCP support: Ready to work with multi-component processing frameworks out of the box.
With Qwen 3, the game has changed. It’s not just faster — it’s sharper, more fluent, and truly feels like it understands you.
Model Resource
Hugging Face
Link : https://huggingface.co/collections/Qwen/qwen3-67dd247413f0e2e4f653967f
Step-by-Step Process to Install Qwen 3 Locally
For the purpose of this tutorial, we will use a GPU-powered Virtual Machine offered by NodeShift; however, you can replicate the same steps with any other cloud provider of your choice. NodeShift provides the most affordable Virtual Machines at a scale that meets GDPR, SOC2, and ISO27001 requirements.
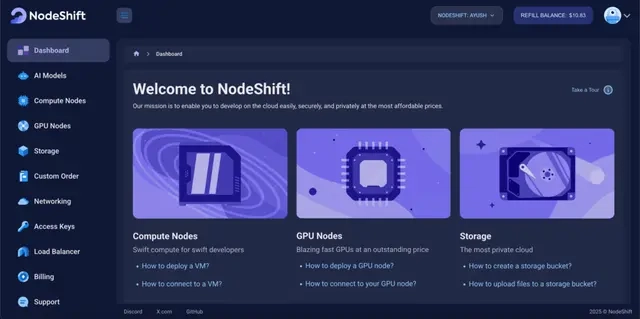
Step 1: Sign Up and Set Up a NodeShift Cloud Account
Visit the NodeShift Platform and create an account. Once you’ve signed up, log into your account.
Follow the account setup process and provide the necessary details and information.

Step 2: Create a GPU Node (Virtual Machine)
GPU Nodes are NodeShift’s GPU Virtual Machines, on-demand resources equipped with diverse GPUs ranging from H100s to A100s. These GPU-powered VMs provide enhanced environmental control, allowing configuration adjustments for GPUs, CPUs, RAM, and Storage based on specific requirements.
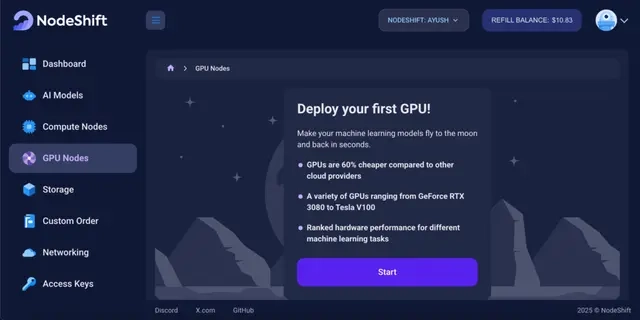
Navigate to the menu on the left side. Select the GPU Nodes option, create a GPU Node in the Dashboard, click the Create GPU Node button, and create your first Virtual Machine deploy
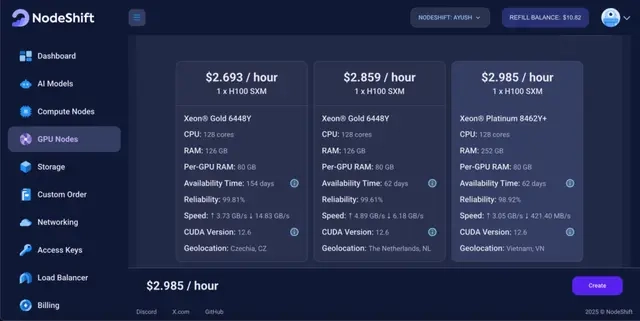
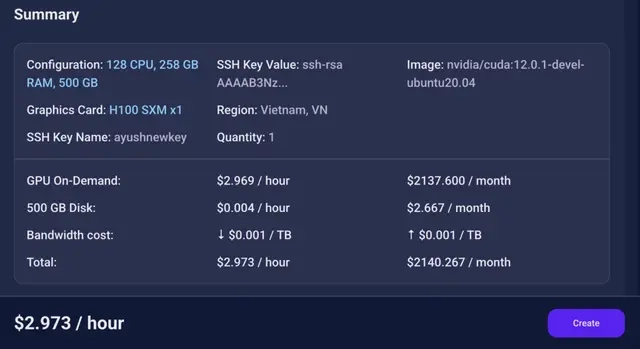
Step 3: Select a Model, Region, and Storage
In the “GPU Nodes” tab, select a GPU Model and Storage according to your needs and the geographical region where you want to launch your model.
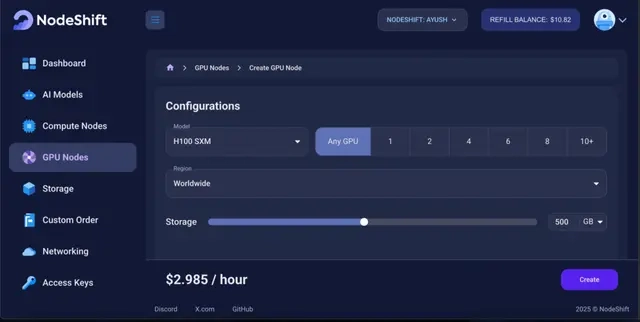
We will use 1 x H100 SXM GPU for this tutorial to achieve the fastest performance. However, you can choose a more affordable GPU with less VRAM if that better suits your requirements.
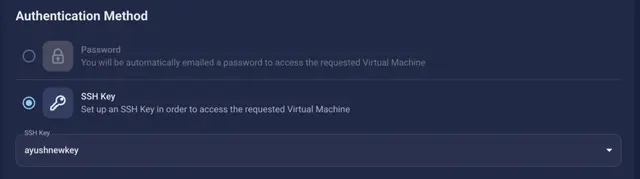
Step 4: Select Authentication Method
There are two authentication methods available: Password and SSH Key. SSH keys are a more secure option. To create them, please refer to our official documentation.
Step 5: Choose an Image
Next, you will need to choose an image for your Virtual Machine. We will deploy Qwen 3 on an NVIDIA Cuda Virtual Machine. This proprietary, closed-source parallel computing platform will allow you to install Qwen 3 on your GPU Node.
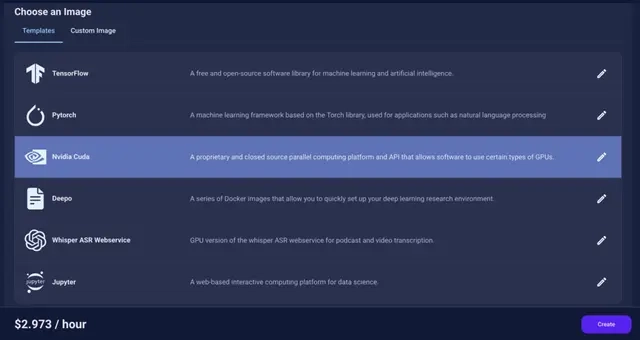
After choosing the image, click the ‘Create’ button, and your Virtual Machine will be deployed.
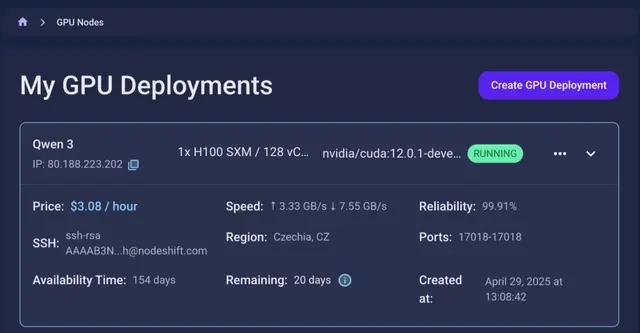
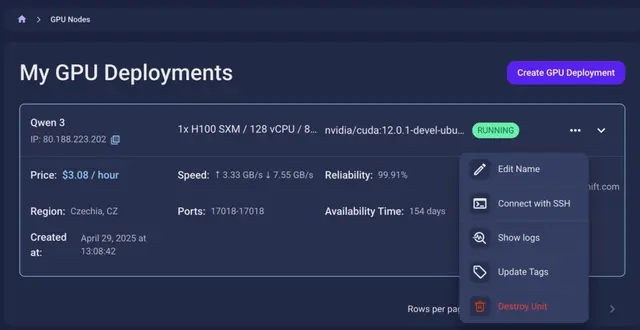
Step 6: Virtual Machine Successfully Deployed
You will get visual confirmation that your node is up and running.
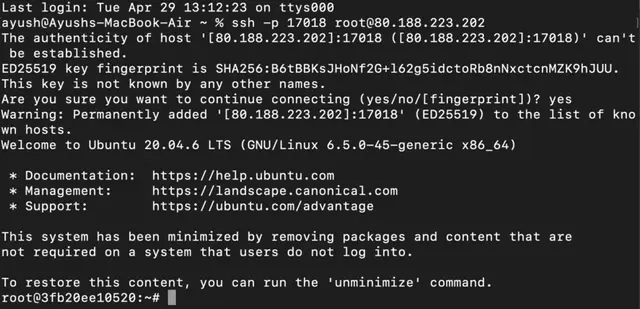
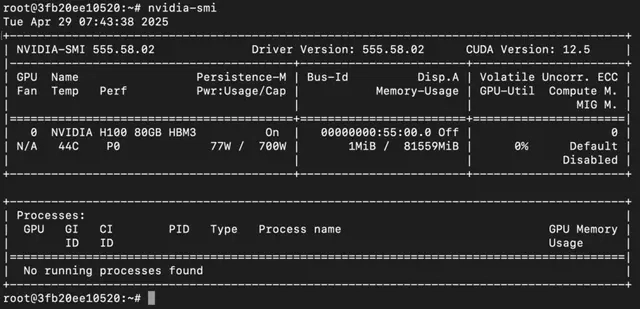
Step 7: Connect to GPUs using SSH
NodeShift GPUs can be connected to and controlled through a terminal using the SSH key provided during GPU creation.
Once your GPU Node deployment is successfully created and has reached the ‘RUNNING’ status, you can navigate to the page of your GPU Deployment Instance. Then, click the ‘Connect’ button in the top right corner.
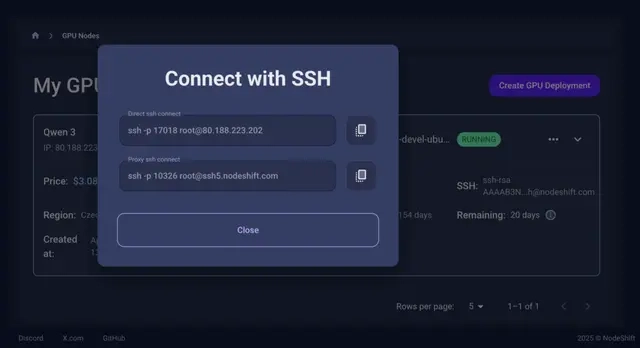
Now open your terminal and paste the proxy SSH IP or direct SSH IP.
Next, if you want to check the GPU details, run the command below:
nvidia-smi
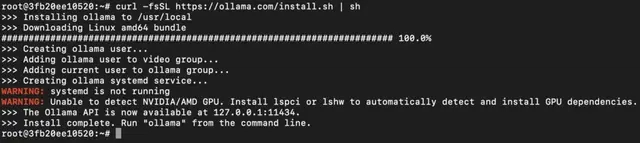
Step 8: Install Ollama
After connecting to the terminal via SSH, it’s now time to install Ollama from the official Ollama website.
Website Link: https://ollama.com/
Run the following command to install the Ollama:
curl -fsSL https://ollama.com/install.sh | sh
Step 9: Serve Ollama
Run the following command to host the Ollama so that it can be accessed and utilized efficiently:
ollama serve
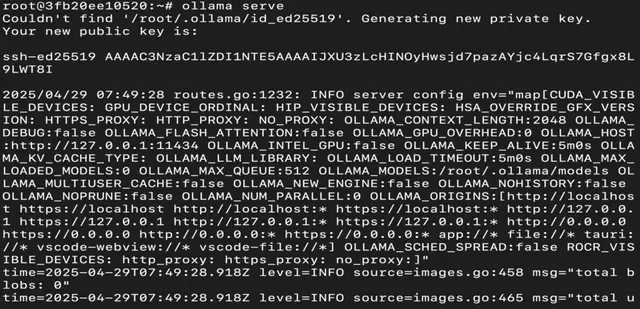
Now, “Ollama is running.”
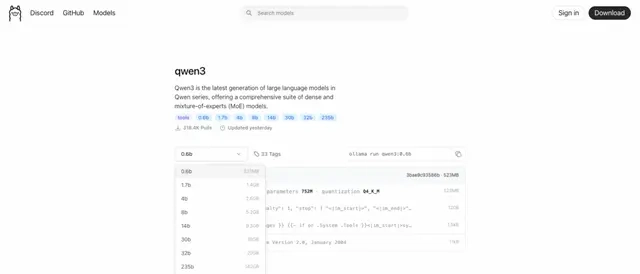
Step 10: Select Qwen 3 Model
Link: https://ollama.com/library/qwen3
Qwen 3 model is available in eight sizes. We will run one by one on our GPU virtual machine.
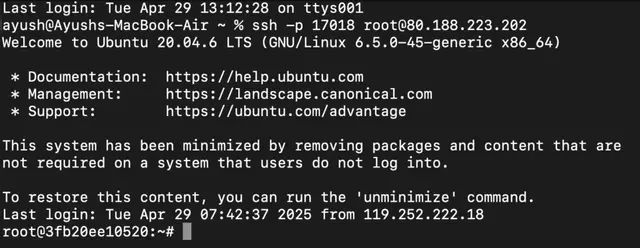
Step 11: Connect with SSH
Now, open a new tab in the terminal and reconnect using SSH.
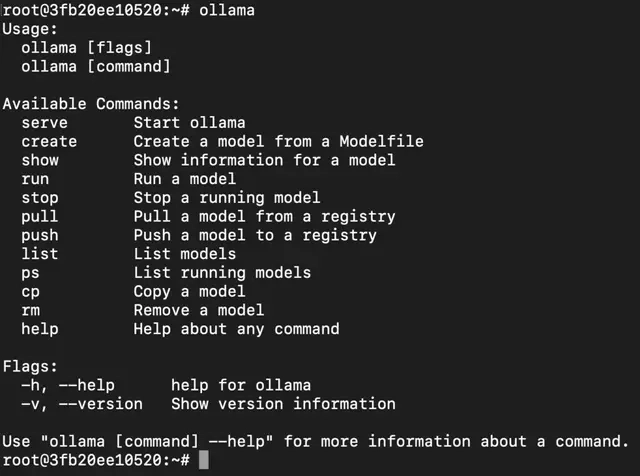
Step 12: Check Commands
Run, the following command to see a list of available commands:
ollama
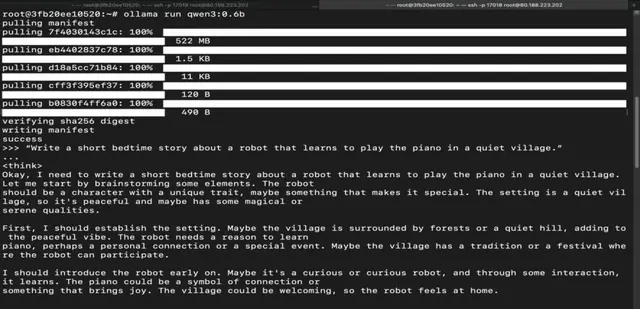
Step 13: Run Qwen 3 0.6B Model
Run the following command to interact with Qwen 3 0.6B Model:
ollama run qwen3:0.6b
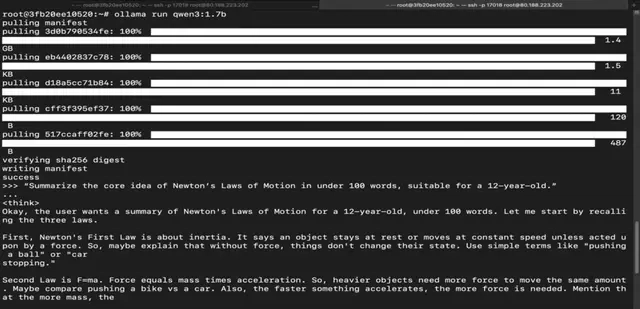
Step 14: Run Qwen 3 1.7B Model
Run the following command to interact with Qwen 3 1.7B Model:
ollama run qwen3:1.7b
Step 15: Run Qwen 3 4B Model
Run the following command to interact with Qwen 3 4B Model:
ollama run qwen3:4b

Step 16: Run Qwen 3 8B Model
Run the following command to interact with Qwen 3 8B Model:
ollama run qwen3:8b
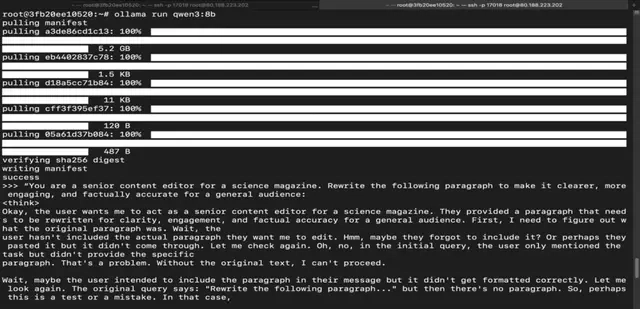
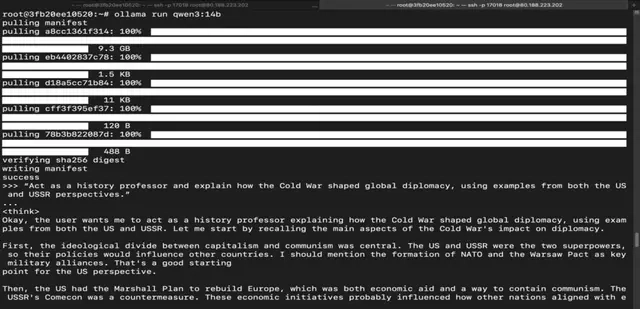
Step 17: Run Qwen 3 14B Model
Run the following command to interact with Qwen 3 14B Model:
ollama run qwen3:14b
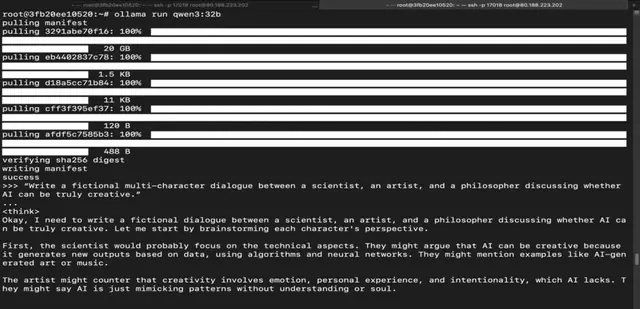
Step 18: Run Qwen 3 32B Model
Run the following command to interact with Qwen 3 32B Model:
ollama run qwen3:32b
Step 19: Run Qwen 3 30B Mixture-of-Experts Model
Run the following command to interact with Qwen 3 30B Mixture-of-Experts Model:
ollama run qwen3:30b-a3b

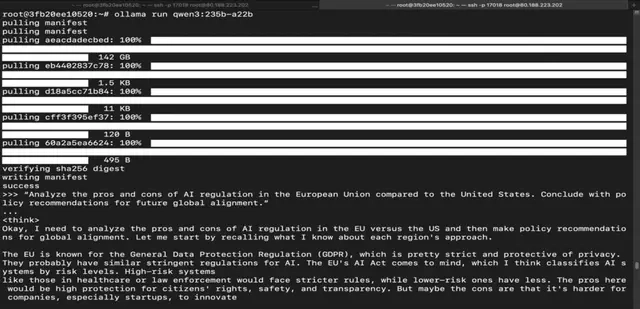
Step 20: Run Qwen 3 235B Mixture-of-Experts Model
Run the following command to interact with Qwen 3 235B Mixture-of-Experts Model:
ollama run qwen3:235b-a22b
Conclusion
Qwen 3 sets a new benchmark — combining deep reasoning, multilingual fluency, and unmatched flexibility across both lightweight and enterprise-grade deployments. Whether you’re solving equations, translating across cultures, writing long-form content, or building smart agents — there’s a Qwen 3 model that fits your need. With seamless setup on GPU-powered VMs and smooth integration via Ollama, you’re just a few commands away from unleashing next-gen performance.