


![[The AI Show Episode 145]: OpenAI Releases o3 and o4-mini, AI Is Causing “Quiet Layoffs,” Executive Order on Youth AI Education & GPT-4o’s Controversial Update](https://www.marketingaiinstitute.com/hubfs/ep%20145%20cover.png)


![From Art School Drop-out to Microsoft Engineer with Shashi Lo [Podcast #170]](https://cdn.hashnode.com/res/hashnode/image/upload/v1746203291209/439bf16b-c820-4fe8-b69e-94d80533b2df.png?#)


(1).jpg?#)


![[Updated] Samsung’s 65-inch 4K Smart TV Just Crashed to $299 — That’s Cheaper Than an iPad](https://www.androidheadlines.com/wp-content/uploads/2025/05/samsung-du7200.jpg)


_Inge_Johnsson-Alamy.jpg?width=1280&auto=webp&quality=80&disable=upscale#)


![Apple to Split iPhone Launches Across Fall and Spring in Major Shakeup [Report]](https://www.iclarified.com/images/news/97211/97211/97211-640.jpg)
![Apple to Move Camera to Top Left, Hide Face ID Under Display in iPhone 18 Pro Redesign [Report]](https://www.iclarified.com/images/news/97212/97212/97212-640.jpg)
![Apple Developing Battery Case for iPhone 17 Air Amid Battery Life Concerns [Report]](https://www.iclarified.com/images/news/97208/97208/97208-640.jpg)
![AirPods 4 On Sale for $99 [Lowest Price Ever]](https://www.iclarified.com/images/news/97206/97206/97206-640.jpg)


How to Install Microsoft Phi-4 Reasoning Locally?
Phi-4-Reasoning is Microsoft’s specialized model crafted to tackle advanced reasoning tasks with precision. Built on the solid foundation of Phi-4, this version has been carefully fine-tuned using high-quality datasets focusing on math, science, and coding challenges. What makes it stand out is its ability to walk through problems step-by-step, offering thoughtful explanations before arriving at final answers. With a focus on logical reasoning, chain-of-thought workflows, and advanced problem-solving, it performs impressively even against much larger models — all while running on a relatively efficient 14B parameter architecture. Ideal for scenarios where smart reasoning and accuracy matter the most, Phi-4-Reasoning shines in math olympiad problems, scientific queries, and complex coding tasks, while keeping the output clear, safe, and grounded. Model Resource Hugging Face Link: https://huggingface.co/microsoft/Phi-4-reasoning Step-by-Step Process to Install Microsoft Phi-4 Reasoning Locally For the purpose of this tutorial, we will use a GPU-powered Virtual Machine offered by NodeShift; however, you can replicate the same steps with any other cloud provider of your choice. NodeShift provides the most affordable Virtual Machines at a scale that meets GDPR, SOC2, and ISO27001 requirements. Step 1: Sign Up and Set Up a NodeShift Cloud Account Visit the NodeShift Platform and create an account. Once you’ve signed up, log into your account. Follow the account setup process and provide the necessary details and information. Step 2: Create a GPU Node (Virtual Machine) GPU Nodes are NodeShift’s GPU Virtual Machines, on-demand resources equipped with diverse GPUs ranging from H100s to A100s. These GPU-powered VMs provide enhanced environmental control, allowing configuration adjustments for GPUs, CPUs, RAM, and Storage based on specific requirements. Navigate to the menu on the left side. Select the GPU Nodes option, create a GPU Node in the Dashboard, click the Create GPU Node button, and create your first Virtual Machine deploy Step 3: Select a Model, Region, and Storage In the “GPU Nodes” tab, select a GPU Model and Storage according to your needs and the geographical region where you want to launch your model. We will use 1 x RTXA6000 GPU for this tutorial to achieve the fastest performance. However, you can choose a more affordable GPU with less VRAM if that better suits your requirements. Step 4: Select Authentication Method There are two authentication methods available: Password and SSH Key. SSH keys are a more secure option. To create them, please refer to our official documentation. Step 5: Choose an Image Next, you will need to choose an image for your Virtual Machine. We will deploy Microsoft Phi-4 Reasoning on a Jupyter Virtual Machine. This open-source platform will allow you to install and run the Microsoft Phi-4 Reasoning on your GPU node. By running this Model on a Jupyter Notebook, we avoid using the terminal, simplifying the process and reducing the setup time. This allows you to configure the model in just a few steps and minutes. Note: NodeShift provides multiple image template options, such as TensorFlow, PyTorch, NVIDIA CUDA, Deepo, Whisper ASR Webservice, and Jupyter Notebook. With these options, you don’t need to install additional libraries or packages to run Jupyter Notebook. You can start Jupyter Notebook in just a few simple clicks. After choosing the image, click the ‘Create’ button, and your Virtual Machine will be deployed. Step 6: Virtual Machine Successfully Deployed You will get visual confirmation that your node is up and running. Step 7: Connect to Jupyter Notebook Once your GPU VM deployment is successfully created and has reached the ‘RUNNING’ status, you can navigate to the page of your GPU Deployment Instance. Then, click the ‘Connect’ Button in the top right corner. After clicking the ‘Connect’ button, you can view the Jupyter Notebook. Now open Python 3(pykernel) Notebook. Step 8: Check GPU & CUDA Availability Run the following commands to check GPU & CUDA availability: !nvidia-smi !nvcc --version Step 9: Install Required Libraries Run the following command to install required libraries: pip install transformers accelerate torch Step 10: Load the Model Run the following code to load the model: `from transformers import AutoTokenizer, AutoModelForCausalLM tokenizer = AutoTokenizer.from_pretrained("microsoft/Phi-4-reasoning") model = AutoModelForCausalLM.from_pretrained("microsoft/Phi-4-reasoning", device_map="auto", torch_dtype="auto") ` Step 11: Run Inference Conclusion Running Microsoft’s Phi-4-Reasoning locally has never been easier. With just a few simple steps, you can deploy this powerful reasoning model right inside a Jupyter Notebook and begin exploring its advance
Phi-4-Reasoning is Microsoft’s specialized model crafted to tackle advanced reasoning tasks with precision. Built on the solid foundation of Phi-4, this version has been carefully fine-tuned using high-quality datasets focusing on math, science, and coding challenges. What makes it stand out is its ability to walk through problems step-by-step, offering thoughtful explanations before arriving at final answers. With a focus on logical reasoning, chain-of-thought workflows, and advanced problem-solving, it performs impressively even against much larger models — all while running on a relatively efficient 14B parameter architecture.
Ideal for scenarios where smart reasoning and accuracy matter the most, Phi-4-Reasoning shines in math olympiad problems, scientific queries, and complex coding tasks, while keeping the output clear, safe, and grounded.
Model Resource
Hugging Face
Link: https://huggingface.co/microsoft/Phi-4-reasoning

Step-by-Step Process to Install Microsoft Phi-4 Reasoning Locally
For the purpose of this tutorial, we will use a GPU-powered Virtual Machine offered by NodeShift; however, you can replicate the same steps with any other cloud provider of your choice. NodeShift provides the most affordable Virtual Machines at a scale that meets GDPR, SOC2, and ISO27001 requirements.
Step 1: Sign Up and Set Up a NodeShift Cloud Account
Visit the NodeShift Platform and create an account. Once you’ve signed up, log into your account.
Follow the account setup process and provide the necessary details and information.

Step 2: Create a GPU Node (Virtual Machine)
GPU Nodes are NodeShift’s GPU Virtual Machines, on-demand resources equipped with diverse GPUs ranging from H100s to A100s. These GPU-powered VMs provide enhanced environmental control, allowing configuration adjustments for GPUs, CPUs, RAM, and Storage based on specific requirements.


Navigate to the menu on the left side. Select the GPU Nodes option, create a GPU Node in the Dashboard, click the Create GPU Node button, and create your first Virtual Machine deploy
Step 3: Select a Model, Region, and Storage
In the “GPU Nodes” tab, select a GPU Model and Storage according to your needs and the geographical region where you want to launch your model.
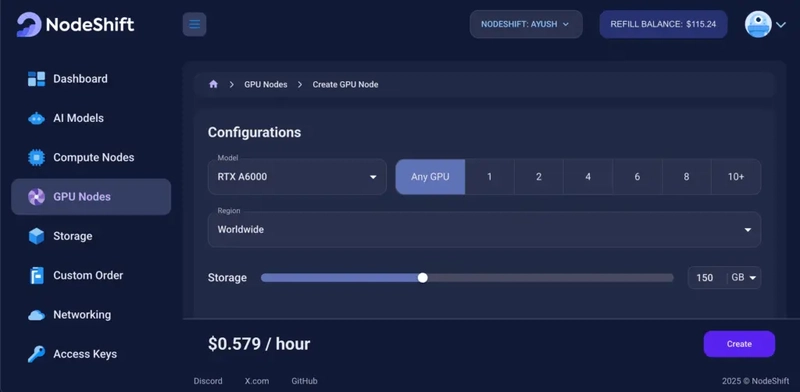

We will use 1 x RTXA6000 GPU for this tutorial to achieve the fastest performance. However, you can choose a more affordable GPU with less VRAM if that better suits your requirements.
Step 4: Select Authentication Method
There are two authentication methods available: Password and SSH Key. SSH keys are a more secure option. To create them, please refer to our official documentation.

Step 5: Choose an Image
Next, you will need to choose an image for your Virtual Machine. We will deploy Microsoft Phi-4 Reasoning on a Jupyter Virtual Machine. This open-source platform will allow you to install and run the Microsoft Phi-4 Reasoning on your GPU node. By running this Model on a Jupyter Notebook, we avoid using the terminal, simplifying the process and reducing the setup time. This allows you to configure the model in just a few steps and minutes.
Note: NodeShift provides multiple image template options, such as TensorFlow, PyTorch, NVIDIA CUDA, Deepo, Whisper ASR Webservice, and Jupyter Notebook. With these options, you don’t need to install additional libraries or packages to run Jupyter Notebook. You can start Jupyter Notebook in just a few simple clicks.

After choosing the image, click the ‘Create’ button, and your Virtual Machine will be deployed.

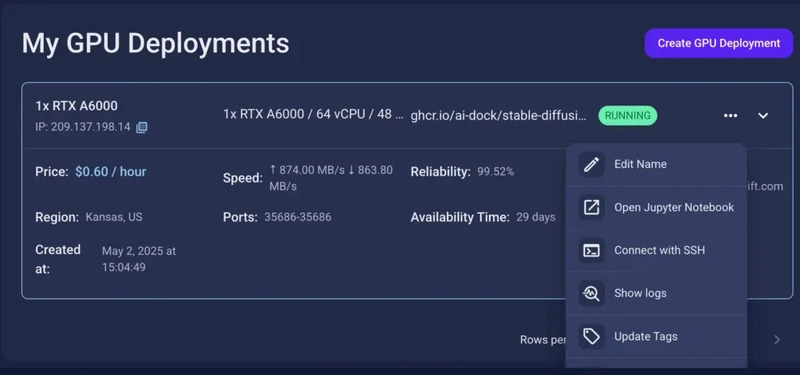
Step 6: Virtual Machine Successfully Deployed
You will get visual confirmation that your node is up and running.

Step 7: Connect to Jupyter Notebook
Once your GPU VM deployment is successfully created and has reached the ‘RUNNING’ status, you can navigate to the page of your GPU Deployment Instance. Then, click the ‘Connect’ Button in the top right corner.
After clicking the ‘Connect’ button, you can view the Jupyter Notebook.

Now open Python 3(pykernel) Notebook.

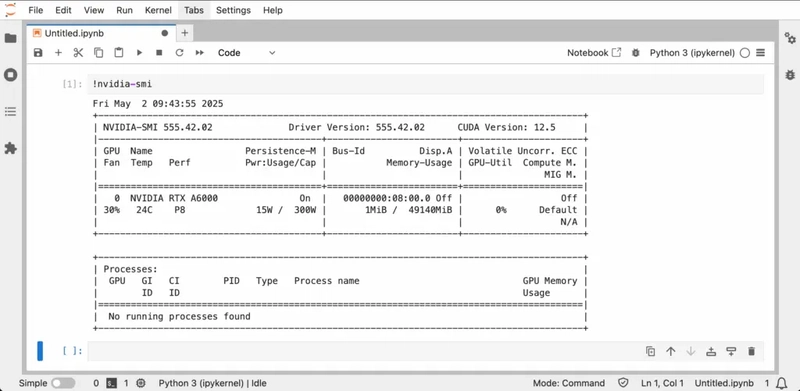
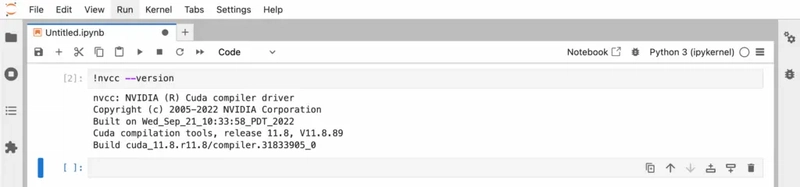
Step 8: Check GPU & CUDA Availability
Run the following commands to check GPU & CUDA availability:
!nvidia-smi

!nvcc --version
Step 9: Install Required Libraries
Run the following command to install required libraries:
pip install transformers accelerate torch

Step 10: Load the Model
Run the following code to load the model:
`from transformers import AutoTokenizer, AutoModelForCausalLM
tokenizer = AutoTokenizer.from_pretrained("microsoft/Phi-4-reasoning")
model = AutoModelForCausalLM.from_pretrained("microsoft/Phi-4-reasoning", device_map="auto", torch_dtype="auto")
`

Step 11: Run Inference


Conclusion
Running Microsoft’s Phi-4-Reasoning locally has never been easier. With just a few simple steps, you can deploy this powerful reasoning model right inside a Jupyter Notebook and begin exploring its advanced capabilities in math, science, coding, and more. Thanks to NodeShift’s GPU-powered virtual machines, the entire process is smooth, scalable, and accessible — whether you’re experimenting for research, solving complex problems, or building smart features into your own projects.
With its thoughtful chain-of-thought approach and strong performance across reasoning benchmarks, Phi-4-Reasoning strikes a great balance between efficiency and intelligence. Once set up, you’re free to dive into deep problem solving — all from your browser, without the hassle.