


![[The AI Show Episode 145]: OpenAI Releases o3 and o4-mini, AI Is Causing “Quiet Layoffs,” Executive Order on Youth AI Education & GPT-4o’s Controversial Update](https://www.marketingaiinstitute.com/hubfs/ep%20145%20cover.png)


![From Art School Drop-out to Microsoft Engineer with Shashi Lo [Podcast #170]](https://cdn.hashnode.com/res/hashnode/image/upload/v1746203291209/439bf16b-c820-4fe8-b69e-94d80533b2df.png?#)


(1).jpg?#)


_Inge_Johnsson-Alamy.jpg?width=1280&auto=webp&quality=80&disable=upscale#)


![New Apple iPad mini 7 On Sale for $399! [Lowest Price Ever]](https://www.iclarified.com/images/news/96096/96096/96096-640.jpg)
![Apple to Split iPhone Launches Across Fall and Spring in Major Shakeup [Report]](https://www.iclarified.com/images/news/97211/97211/97211-640.jpg)
![Apple to Move Camera to Top Left, Hide Face ID Under Display in iPhone 18 Pro Redesign [Report]](https://www.iclarified.com/images/news/97212/97212/97212-640.jpg)
![Apple Developing Battery Case for iPhone 17 Air Amid Battery Life Concerns [Report]](https://www.iclarified.com/images/news/97208/97208/97208-640.jpg)


How to Create DNS zones and configure DNS settings
**A DNS zone **is a distinct portion of the Domain Name System (DNS) namespace that is managed by a specific organization or administrator. It contains DNS records for a particular domain and its subdomains, allowing for granular control over DNS settings. Scenario Your organization requires workloads to use domain names instead of IP addresses for internal communications. The organization doesn’t want to add a custom DNS solution. You identify these requirements. .A private DNS zone is required for contoso.com. .The DNS will use a virtual network link to app-vnet. .A new DNS record is required for the backend subnet. Skilling tasks .Create and configure a private DNS zone. .Create and configure DNS records. .Configure DNS settings on a virtual network. Architecture diagram Create a private DNS zone *Azure Private DNS * provides a reliable, secure DNS service to manage and resolve domain names in a virtual network without the need to add a custom DNS solution. By using private DNS zones, you can use your own custom domain names rather than the Azure-provided names. Steps 1.On the Azure portal, search for and select Private dns zones. 2.Select + Create and configure the DNS zone. Property Value Subscription = Select your subscription Resource group = RG1 Name = private.contoso.com Region = East US 3.Select Review + create and then select Create. 4.Wait for the DNS zone to deploy, and then select Go to resource. Create a virtual network link to your private DNS zone To resolve DNS records in a private DNS zone, resources must be linked to the private zone. A virtual network link associates the virtual network to the private zone. Steps 1.In the portal, continue working on the private.contoso.com DNS zone. 2.In the DNS Management blade, select + Virtual network links. 3.Select + Add” and configure the virtual network link Property Value Link name = app-vnet-link Virtual network = app-net Enable auto registration = Enabled 4.Select Create and wait for the deployment to finish. If necessary, Refresh the page. Create a DNS record set DNS records provide information about the DNS zone. Steps 1.In the portal, continue working on the private.contoso.com DNS zone. 2.In the DNS Management blade, select + Recordsets. 3.Notice that two A records have automatically been created for each of the virtual machines. 4.Select + Add and configure a record set. When finished select Add. Property Value Name = backend Type = A TTL = 1 IP address = 10.1.1.5

**A DNS zone **is a distinct portion of the Domain Name System (DNS) namespace that is managed by a specific organization or administrator. It contains DNS records for a particular domain and its subdomains, allowing for granular control over DNS settings.
Scenario
Your organization requires workloads to use domain names instead of IP addresses for internal communications. The organization doesn’t want to add a custom DNS solution. You identify these requirements.
.A private DNS zone is required for contoso.com.
.The DNS will use a virtual network link to app-vnet.
.A new DNS record is required for the backend subnet.
Skilling tasks
.Create and configure a private DNS zone.
.Create and configure DNS records.
.Configure DNS settings on a virtual network.
Architecture diagram
Create a private DNS zone
*Azure Private DNS * provides a reliable, secure DNS service to manage and resolve domain names in a virtual network without the need to add a custom DNS solution. By using private DNS zones, you can use your own custom domain names rather than the Azure-provided names.
Steps
1.On the Azure portal, search for and select Private dns zones.

2.Select + Create and configure the DNS zone.
Property Value
Subscription = Select your subscription
Resource group = RG1
Name = private.contoso.com
Region = East US


3.Select Review + create and then select Create.


4.Wait for the DNS zone to deploy, and then select Go to resource.

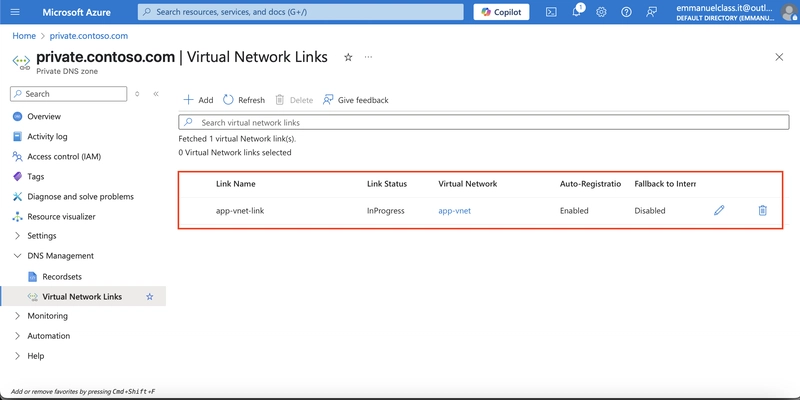
Create a virtual network link to your private DNS zone
To resolve DNS records in a private DNS zone, resources must be linked to the private zone. A virtual network link associates the virtual network to the private zone.
Steps
1.In the portal, continue working on the private.contoso.com DNS zone.

2.In the DNS Management blade, select + Virtual network links.
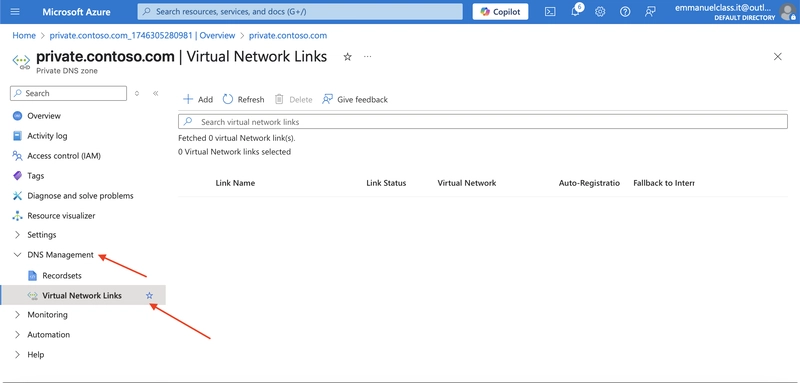
3.Select + Add” and configure the virtual network link
Property Value
Link name = app-vnet-link
Virtual network = app-net
Enable auto registration = Enabled


4.Select Create and wait for the deployment to finish. If necessary, Refresh the page.
Create a DNS record set
DNS records provide information about the DNS zone.
Steps
1.In the portal, continue working on the private.contoso.com DNS zone.

2.In the DNS Management blade, select + Recordsets.

3.Notice that two A records have automatically been created for each of the virtual machines.

4.Select + Add and configure a record set. When finished select Add.
Property Value
Name = backend
Type = A
TTL = 1
IP address = 10.1.1.5