


![[The AI Show Episode 144]: ChatGPT’s New Memory, Shopify CEO’s Leaked “AI First” Memo, Google Cloud Next Releases, o3 and o4-mini Coming Soon & Llama 4’s Rocky Launch](https://www.marketingaiinstitute.com/hubfs/ep%20144%20cover.png)


![From fast food worker to cybersecurity engineer with Tae'lur Alexis [Podcast #169]](https://cdn.hashnode.com/res/hashnode/image/upload/v1745242807605/8a6cf71c-144f-4c91-9532-62d7c92c0f65.png?#)


![BPMN-procesmodellering [closed]](https://i.sstatic.net/l7l8q49F.png)


.jpg?#)
.jpg?#)


.webp?#)


![CarPlay app with web browser for streaming video hits App Store [U]](https://i0.wp.com/9to5mac.com/wp-content/uploads/sites/6/2024/11/carplay-apple.jpeg?resize=1200%2C628&quality=82&strip=all&ssl=1)

![What’s new in Android’s April 2025 Google System Updates [U: 4/21]](https://i0.wp.com/9to5google.com/wp-content/uploads/sites/4/2025/01/google-play-services-3.jpg?resize=1200%2C628&quality=82&strip=all&ssl=1)


![Apple Releases iOS 18.5 Beta 3 and iPadOS 18.5 Beta 3 [Download]](https://www.iclarified.com/images/news/97076/97076/97076-640.jpg)
![Apple Seeds visionOS 2.5 Beta 3 to Developers [Download]](https://www.iclarified.com/images/news/97077/97077/97077-640.jpg)
![Apple Seeds tvOS 18.5 Beta 3 to Developers [Download]](https://www.iclarified.com/images/news/97078/97078/97078-640.jpg)
![Apple Seeds watchOS 11.5 Beta 3 to Developers [Download]](https://www.iclarified.com/images/news/97079/97079/97079-640.jpg)


How to Build an iOS MRZ and VIN Scanner App in Swift
The Dynamsoft GitHub page provides sample projects for learning iOS development with MRZ (Machine Readable Zone) and VIN (Vehicle Identification Number) scanning. Both sample projects are built using Storyboard. In this tutorial, we’ll use the official source code as a foundation to build an iOS application that supports both MRZ and VIN scanning using SwiftUI. iOS MRZ/VIN Scanner Demo Video Prerequisites Free Trial License for Dynamsoft Capture Vision. iOS MRZ Scanner: Includes both a framework and an application project. The framework wraps low-level APIs of Dynamsoft Capture Vision and provides a camera view, while the app demonstrates how to use the framework to scan MRZ and display results. iOS VIN Scanner: Demonstrates how to scan VINs using Dynamsoft Capture Vision. Make sure to request a license key and download both projects before getting started. Setting Up the iOS MRZ/VIN Scanner Project in Xcode Create a new Xcode project using the App template and select SwiftUI as the interface. Go to File > Add Package Dependencies and add all required dependencies from the capture-vision-spm repository. Drag the MRZ scanner framework project into your new project’s Project Navigator. In your project settings under the General tab, locate the Frameworks, Libraries, and Embedded Content section. Ensure that the iOS MRZ Scanner framework is set to Embed & Sign, and verify that all other frameworks are correctly linked. In the Signing & Capabilities tab, enable Automatically manage signing and select your development team. Xcode will automatically generate the signing certificate and provisioning profile for your app. In the Info tab, add a new key for Privacy - Camera Usage Description and provide a description for why your app needs camera access. Build the project to verify that the setup is complete and error-free. UI Design The UI consists of a radio button group for selecting the scan mode (MRZ or VIN), a text area for displaying scan results, and a button to start scanning. The radio button group is implemented using a custom modeButton function, which creates a button with a circular indicator to show the selected mode. The text area is a ScrollView that displays the scan results in a readable format. The start scanning button launches the scanner when tapped. import DynamsoftLicense import DynamsoftMRZScannerBundle import SwiftUI struct ContentView: View { @State private var scanResult: String = "" @State private var scanMode: ScanMode = .mrz var body: some View { VStack(spacing: 16) { // MARK: - Radio Group UI HStack(spacing: 24) { modeButton(title: "MRZ", mode: .mrz) modeButton(title: "VIN", mode: .vin) } .padding(.top, 16) ScrollView { Text(scanResult) .font(.system(size: 20)) .padding(16) .frame(maxWidth: .infinity, maxHeight: .infinity) .background(Color.white) .foregroundColor(.black) .lineSpacing(4) } .background(Color.white) .cornerRadius(8) .shadow(radius: 2) Spacer() HStack(spacing: 8) { Button(action: { presentScanner() }) { Text("START SCANNING") .font(.headline) .foregroundColor(.white) .padding() .frame(maxWidth: .infinity) .background(Color.blue) .cornerRadius(8) } } } .padding(16) .background(Color(UIColor.systemGroupedBackground)) } @ViewBuilder func modeButton(title: String, mode: ScanMode) -> some View { Button(action: { scanMode = mode scanResult = "" }) { HStack(spacing: 8) { ZStack { Circle() .stroke(Color.orange, lineWidth: 2) .frame(width: 20, height: 20) if scanMode == mode { Circle() .fill(Color.orange) .frame(width: 10, height: 10) } } Text(title) .foregroundColor(.black) .font(.system(size: 16, weight: .medium)) } } } } Opening the MRZ and VIN Scanner View The scanner view is implemented using UIKit in the framework project. To integrate it into a SwiftUI app, we create a UIViewControllerRepresentable wrapper around the scanner view controller. The current framework does not support VIN scanning by default, so we will extend it to handle both MRZ
The Dynamsoft GitHub page provides sample projects for learning iOS development with MRZ (Machine Readable Zone) and VIN (Vehicle Identification Number) scanning. Both sample projects are built using Storyboard. In this tutorial, we’ll use the official source code as a foundation to build an iOS application that supports both MRZ and VIN scanning using SwiftUI.
iOS MRZ/VIN Scanner Demo Video
Prerequisites
- Free Trial License for Dynamsoft Capture Vision.
- iOS MRZ Scanner: Includes both a framework and an application project. The framework wraps low-level APIs of Dynamsoft Capture Vision and provides a camera view, while the app demonstrates how to use the framework to scan MRZ and display results.
- iOS VIN Scanner: Demonstrates how to scan VINs using Dynamsoft Capture Vision.
Make sure to request a license key and download both projects before getting started.
Setting Up the iOS MRZ/VIN Scanner Project in Xcode
- Create a new Xcode project using the App template and select SwiftUI as the interface.
- Go to File > Add Package Dependencies and add all required dependencies from the capture-vision-spm repository.
- Drag the MRZ scanner framework project into your new project’s Project Navigator.
-
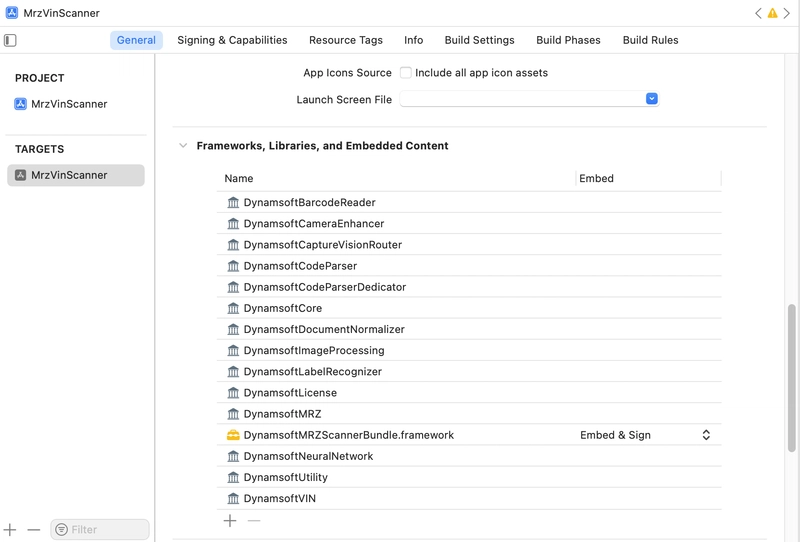
In your project settings under the General tab, locate the Frameworks, Libraries, and Embedded Content section. Ensure that the iOS MRZ Scanner framework is set to Embed & Sign, and verify that all other frameworks are correctly linked.
In the Signing & Capabilities tab, enable Automatically manage signing and select your development team. Xcode will automatically generate the signing certificate and provisioning profile for your app.
In the Info tab, add a new key for Privacy - Camera Usage Description and provide a description for why your app needs camera access.
Build the project to verify that the setup is complete and error-free.
UI Design
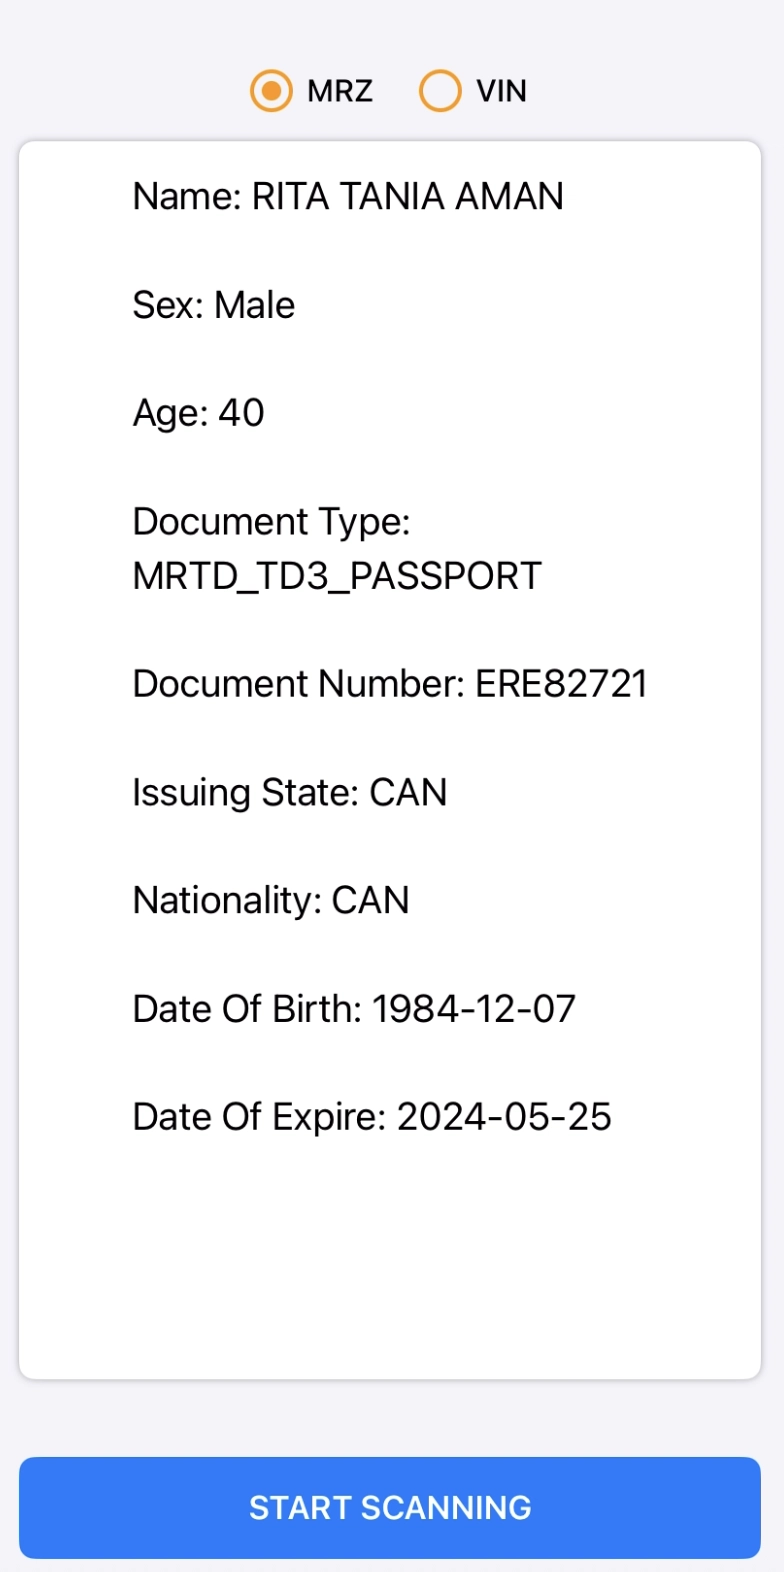
The UI consists of a radio button group for selecting the scan mode (MRZ or VIN), a text area for displaying scan results, and a button to start scanning.
- The radio button group is implemented using a custom
modeButtonfunction, which creates a button with a circular indicator to show the selected mode. - The text area is a
ScrollViewthat displays the scan results in a readable format. - The start scanning button launches the scanner when tapped.
import DynamsoftLicense
import DynamsoftMRZScannerBundle
import SwiftUI

struct ContentView: View {
    @State private var scanResult: String = ""
    @State private var scanMode: ScanMode = .mrz

    var body: some View {
        VStack(spacing: 16) {
            // MARK: - Radio Group UI
            HStack(spacing: 24) {
                modeButton(title: "MRZ", mode: .mrz)
                modeButton(title: "VIN", mode: .vin)
            }
            .padding(.top, 16)

            ScrollView {
                Text(scanResult)
                    .font(.system(size: 20))
                    .padding(16)
                    .frame(maxWidth: .infinity, maxHeight: .infinity)
                    .background(Color.white)
                    .foregroundColor(.black)
                    .lineSpacing(4)
            }
            .background(Color.white)
            .cornerRadius(8)
            .shadow(radius: 2)

            Spacer()

            HStack(spacing: 8) {
                Button(action: {
                    presentScanner()

                }) {
                    Text("START SCANNING")
                        .font(.headline)
                        .foregroundColor(.white)
                        .padding()
                        .frame(maxWidth: .infinity)
                        .background(Color.blue)
                        .cornerRadius(8)
                }
            }
        }
        .padding(16)
        .background(Color(UIColor.systemGroupedBackground))
    }

    @ViewBuilder
    func modeButton(title: String, mode: ScanMode) -> some View {
        Button(action: {
            scanMode = mode
            scanResult = ""
        }) {
            HStack(spacing: 8) {
                ZStack {
                    Circle()
                        .stroke(Color.orange, lineWidth: 2)
                        .frame(width: 20, height: 20)
                    if scanMode == mode {
                        Circle()
                            .fill(Color.orange)
                            .frame(width: 10, height: 10)
                    }
                }
                Text(title)
                    .foregroundColor(.black)
                    .font(.system(size: 16, weight: .medium))
            }
        }
    }
}
Opening the MRZ and VIN Scanner View
The scanner view is implemented using UIKit in the framework project. To integrate it into a SwiftUI app, we create a UIViewControllerRepresentable wrapper around the scanner view controller. The current framework does not support VIN scanning by default, so we will extend it to handle both MRZ and VIN scanning.
struct ContentView: View {
    ...

    func presentScanner() {
        let config = ScannerConfig()
        config.license =
            "LICENSE-KEY"
        config.mode = scanMode

        var scannerView = MRZScannerView(config: config)
        scannerView.onScannedResult = { result in
            DispatchQueue.main.async {
                switch result.resultStatus {
                case .finished:
                    switch scanMode {
                    case .mrz:
                        let mrzResult = result as? MRZScanResult
                        if let data = mrzResult?.data {
                            self.scanResult +=
                                "Name: " + data.firstName + " " + data.lastName + "\n\n"
                            self.scanResult += "Sex: " + data.sex.capitalized + "\n\n"
                            self.scanResult += "Age: " + String(data.age) + "\n\n"
                            self.scanResult += "Document Type: " + data.documentType + "\n\n"
                            self.scanResult += "Document Number: " + data.documentNumber + "\n\n"
                            self.scanResult += "Issuing State: " + data.issuingState + "\n\n"
                            self.scanResult += "Nationality: " + data.nationality + "\n\n"
                            self.scanResult += "Date Of Birth: " + data.dateOfBirth + "\n\n"
                            self.scanResult += "Date Of Expire: " + data.dateOfExpire + "\n\n"
                        }
                    case .vin:
                        let vinResult = result as? VINScanResult
                        if let data = vinResult?.data {
                            self.scanResult += "VIN String: " + data.vinString + "\n\n"
                            self.scanResult += "WMI: " + data.wmi + "\n\n"
                            self.scanResult += "Region: " + data.region + "\n\n"
                            self.scanResult += "VDS: " + data.vds + "\n\n"
                            self.scanResult += "Check Digit: " + data.checkDigit + "\n\n"
                            self.scanResult += "Model Year: " + data.modelYear + "\n\n"
                            self.scanResult += "Manufacturer plant: " + data.plantCode + "\n\n"
                            self.scanResult += "Serial Number: " + data.serialNumber + "\n\n"
                        }
                    }
                case .canceled:
                    self.scanResult = "Scan canceled"
                case .exception:
                    self.scanResult = result.errorString ?? "Unknown error"
                @unknown default:
                    break
                }

                let rootVC = UIApplication.shared.connectedScenes
                    .compactMap { $0 as? UIWindowScene }
                    .flatMap { $0.windows }
                    .first { $0.isKeyWindow }?.rootViewController

                rootVC?.dismiss(animated: true, completion: nil)
            }
        }

        let rootVC = UIApplication.shared.connectedScenes
            .compactMap { $0 as? UIWindowScene }
            .flatMap { $0.windows }
            .first { $0.isKeyWindow }?.rootViewController

        rootVC?.present(
            UIHostingController(rootView: scannerView),
            animated: true,
            completion: nil
        )
    }
}

struct MRZScannerView: UIViewControllerRepresentable {
    let config: ScannerConfig
    var onScannedResult: ((ScanResultBase) -> Void)?

    func makeUIViewController(context: Context) -> ScannerViewController {
        let vc = ScannerViewController()
        vc.config = config
        vc.onScannedResult = onScannedResult
        return vc
    }

    func updateUIViewController(_ uiViewController: ScannerViewController, context: Context) {}
}
Integrating VIN Scanning Capability into Scanner View
The recognition mode is determined by the template name:
- MRZ uses ReadPassportAndId
- VIN uses ReadVINText
When scanning starts, the appropriate template name activates the desired recognition mode.
Defining the Scan Mode
In ScannerConfig.swift, add a new enum representing the scan mode. The mode property is used to determine which template to use for scanning.
public enum ScanMode {
    case mrz
    case vin
}

public class ScannerConfig: NSObject {
    ...
    public var mode: ScanMode = ScanMode.mrz
}
VIN Recognition and Parsing Result
In ScanResult.swift, create a ScanResultBase class that serves as the base class for all scan results. The MRZScanResult and VINScanResult classes inherit from this base class. The VINScanResult class contains properties specific to VIN scanning.
@objcMembers
@objc(DSScanResultBase)
public class ScanResultBase: NSObject {
    public let resultStatus: ResultStatus
    public let errorCode: Int
    public let errorString: String?

    init(resultStatus: ResultStatus, errorCode: Int = 0, errorString: String? = nil) {
        self.resultStatus = resultStatus
        self.errorCode = errorCode
        self.errorString = errorString
    }
}

public class MRZScanResult: ScanResultBase {
    public let data: MRZData?

    init(
        resultStatus: ResultStatus, mrzdata: MRZData? = nil, errorCode: Int = 0,
        errorString: String? = nil
    ) {
        self.data = mrzdata
        super.init(resultStatus: resultStatus, errorCode: errorCode, errorString: errorString)
    }
}

public class VINScanResult: ScanResultBase {
    public let data: VINData?

    init(
        resultStatus: ResultStatus, vindata: VINData? = nil, errorCode: Int = 0,
        errorString: String? = nil
    ) {
        self.data = vindata
        super.init(resultStatus: resultStatus, errorCode: errorCode, errorString: errorString)
    }
}

@objcMembers
@objc(DSVINData)
public class VINData: NSObject {
    public let vinString: String
    public let wmi: String
    public let region: String
    public let vds: String
    public let checkDigit: String
    public let modelYear: String
    public let plantCode: String
    public let serialNumber: String

    init(
        vinString: String, wmi: String, region: String, vds: String, checkDigit: String,
        modelYear: String, plantCode: String, serialNumber: String
    ) {
        self.vinString = vinString
        self.wmi = wmi
        self.region = region
        self.vds = vds
        self.checkDigit = checkDigit
        self.modelYear = modelYear
        self.plantCode = plantCode
        self.serialNumber = serialNumber
    }
}
Handling VIN Recognition in ScannerViewController
When the scanner view is opened, the UI is presented based on the selected scanning mode. If the mode is set to VIN, the result must be parsed and converted into a VINData object.
public override func viewWillAppear(_ animated: Bool) {
        super.viewWillAppear(animated)
        dce.open()
        var name: String
        ...

        switch config.mode {
        case .mrz:
            name = "ReadPassportAndId"
        case .vin:
            name = "ReadVINText"
        }
        ...
        cvr.startCapturing(name) { isSuccess, error in
            if let error = error as? NSError, !isSuccess {
                self.onScannedResult?(
                    .init(
                        resultStatus: .exception, errorCode: error.code,
                        errorString: error.localizedDescription))
            }
        }
    }

private func setupUI() {
        ...

        switch config.mode {
        case .mrz:
            imageView.isHidden = !config.isGuideFrameVisible
            imageView.translatesAutoresizingMaskIntoConstraints = false
            view.addSubview(imageView)

            let safeArea = view.safeAreaLayoutGuide
            NSLayoutConstraint.activate([
                imageView.centerXAnchor.constraint(equalTo: safeArea.centerXAnchor),
                imageView.centerYAnchor.constraint(equalTo: safeArea.centerYAnchor),
                imageView.widthAnchor.constraint(
                    lessThanOrEqualTo: safeArea.widthAnchor, multiplier: 0.9),
                imageView.heightAnchor.constraint(
                    lessThanOrEqualTo: safeArea.heightAnchor, multiplier: 0.9),

                closeButton.leadingAnchor.constraint(equalTo: safeArea.leadingAnchor, constant: 20),
                closeButton.topAnchor.constraint(equalTo: safeArea.topAnchor, constant: 20),

                stackView.centerXAnchor.constraint(equalTo: safeArea.centerXAnchor),
                stackView.bottomAnchor.constraint(equalTo: safeArea.bottomAnchor, constant: -50),
            ])
        case .vin:
            let region = Rect()
            region.top = 0.4
            region.bottom = 0.6
            region.left = 0.1
            region.right = 0.9
            region.measuredInPercentage = true
            try? dce.setScanRegion(region)
        }
    }

extension ScannerViewController: CapturedResultReceiver {

    public func onParsedResultsReceived(_ result: ParsedResult) {
        guard let item = result.items?.first else { return }
        stop()
        if config.isBeepEnabled {
            Feedback.beep()
        }
        switch config.mode {
        case .mrz:
            let mrzdata = convertToMRZData(item: item)
            let data = MRZScanResult(resultStatus: .finished, mrzdata: mrzdata)
            onScannedResult?(data)
        case .vin:
            let vindata = convertToVINData(item: item)
            let data = VINScanResult(resultStatus: .finished, vindata: vindata)
            onScannedResult?(data)
        }
    }

    private func convertToVINData(item: ParsedResultItem) -> VINData? {
        let parsedFields = item.parsedFields

        guard let vinString = parsedFields["vinString"] == nil ? "N/A" : parsedFields["vinString"],
            let wmi = parsedFields["WMI"] == nil ? "N/A" : parsedFields["WMI"],
            let region = parsedFields["region"] == nil ? "N/A" : parsedFields["region"],
            let vds = parsedFields["VDS"] == nil ? "N/A" : parsedFields["VDS"],
            let checkDigit = parsedFields["checkDigit"] == nil ? "N/A" : parsedFields["checkDigit"],
            let modelYear = parsedFields["modelYear"] == nil ? "N/A" : parsedFields["modelYear"],
            let plantCode = parsedFields["plantCode"] == nil ? "N/A" : parsedFields["plantCode"],
            let serialNumber = parsedFields["serialNumber"] == nil
                ? "N/A" : parsedFields["serialNumber"]
        else { return nil }

        let vinData = VINData(
            vinString: vinString, wmi: wmi, region: region, vds: vds,
            checkDigit: checkDigit, modelYear: modelYear, plantCode: plantCode,
            serialNumber: serialNumber)
        return vinData
    }
}
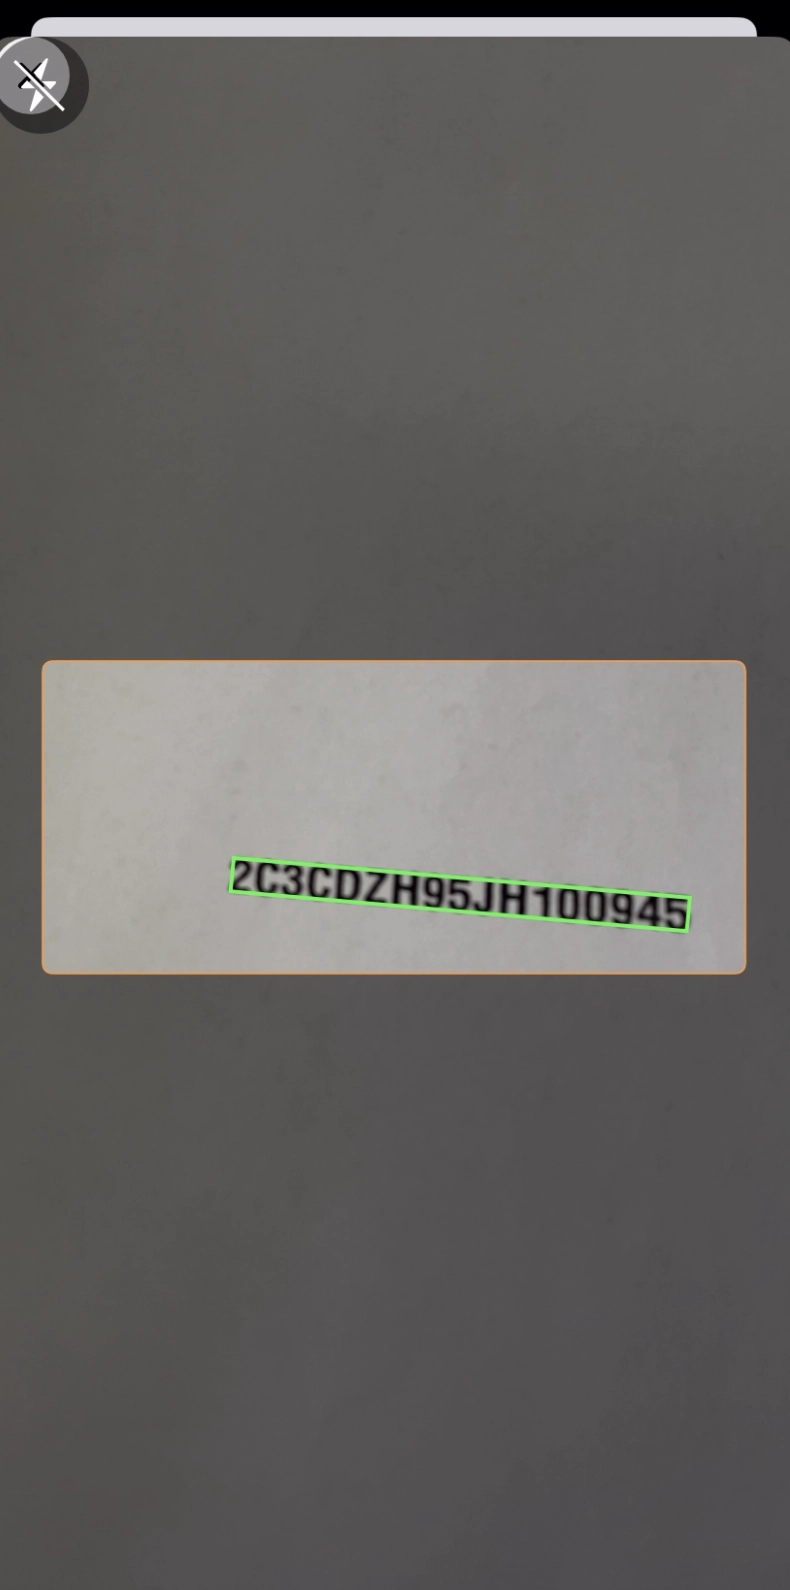
Final Scanner View for VIN Recognition
The final scanner view for VIN recognition is similar to the MRZ scanner view. However, it does not display the guide frame. In setupUI(), the guide frame is hidden when the scan mode is set to VIN, and a rectangular scan region is defined instead.
Source Code
https://github.com/yushulx/ios-swiftui-barcode-mrz-document-scanner/tree/main/examples/MrzVinScanner