


![[The AI Show Episode 147]: OpenAI Abandons For-Profit Plan, AI College Cheating Epidemic, Apple Says AI Will Replace Search Engines & HubSpot’s AI-First Scorecard](https://www.marketingaiinstitute.com/hubfs/ep%20147%20cover.png)


![Legends Reborn tier list of best heroes for each class [May 2025]](https://media.pocketgamer.com/artwork/na-33360-1656320479/pg-magnum-quest-fi-1.jpeg?#)


_KristofferTripplaar_Alamy_.jpg?width=1280&auto=webp&quality=80&disable=upscale#)


.webp?#)


-xl.jpg)


![Vision Pro May Soon Let You Scroll With Your Eyes [Report]](https://www.iclarified.com/images/news/97324/97324/97324-640.jpg)
![Apple's 20th Anniversary iPhone May Feature Bezel-Free Display, AI Memory, Silicon Anode Battery [Report]](https://www.iclarified.com/images/news/97323/97323/97323-640.jpg)


Hosting with SillyDev
Hey everyone! Today, we'll walk through how to host your projects for free using Sillydev (https://sillydev.co.uk/). Setting up your code is quite straightforward and not overly complicated. First, you'll need to create an account. Head over to their website and click "Free Hosting." You'll be directed to a login page where you can either log in or create a new account. Once your account is created, navigate to your dashboard. Look for the shopping cart icon (labeled "Store") and click it to create a new server. On the next page, click "Create Server." In the server creation section, you'll need to select a name for your server and an optional description. Configure the resources like RAM, storage, ports, database options, server backups, and choose a location. Next, select a "Nest" that corresponds to your project type. For example, if you're hosting a Minecraft server, select "Games." If you're using a programming language, select "Programming Language." If you choose "Programming Language," be sure to specify the language under the "Eggs" tab. After clicking "Create," you'll see a message indicating the server is being created. This process may take a few minutes, so please be patient. When you refresh the page, your new server should appear! Inside your server's management page, you'll find various sections: Console, Server Analytics, Activity, Files, Databases, Schedules, Users, Backups, Network, Startup, Settings, and Edit. To get your server running, you need to upload your project files. Go to the "Files" tab and click "Upload," then select the necessary files. Alternatively, you can click "New File" and paste your code directly. Once your files are in place, go to the "Startup" tab. In the "App File" field, enter the name of your main application file (e.g., app.py). Select your desired Docker image. Underneath, in the "Additional Packages" section, list any required dependencies for your code. After ensuring your changes are saved, head back to the "Console" and click "Start." Your server should now start smoothly! And that's how you can utilize Silyldev for free hosting! I hope this guide was helpful. If you require assistance with projects like creating a Discord bot, code help, or anything else, feel free to join my Discord server here: https://discord.gg/CttHusJ5ba. Thanks for reading!

Hey everyone! Today, we'll walk through how to host your projects for free using Sillydev (https://sillydev.co.uk/). Setting up your code is quite straightforward and not overly complicated.
First, you'll need to create an account. Head over to their website and click "Free Hosting." You'll be directed to a login page where you can either log in or create a new account.
Once your account is created, navigate to your dashboard. Look for the shopping cart icon (labeled "Store") and click it to create a new server. On the next page, click "Create Server."

In the server creation section, you'll need to select a name for your server and an optional description. Configure the resources like RAM, storage, ports, database options, server backups, and choose a location. Next, select a "Nest" that corresponds to your project type. For example, if you're hosting a Minecraft server, select "Games." If you're using a programming language, select "Programming Language." If you choose "Programming Language," be sure to specify the language under the "Eggs" tab.
 After clicking "Create," you'll see a message indicating the server is being created. This process may take a few minutes, so please be patient. When you refresh the page, your new server should appear!
Inside your server's management page, you'll find various sections: Console, Server Analytics, Activity, Files, Databases, Schedules, Users, Backups, Network, Startup, Settings, and Edit.

To get your server running, you need to upload your project files. Go to the "Files" tab and click "Upload," then select the necessary files. Alternatively, you can click "New File" and paste your code directly.
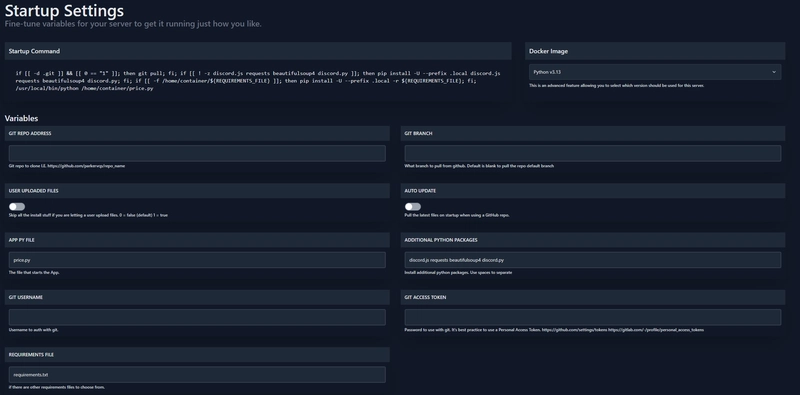
Once your files are in place, go to the "Startup" tab. In the "App File" field, enter the name of your main application file (e.g., app.py). Select your desired Docker image. Underneath, in the "Additional Packages" section, list any required dependencies for your code. After ensuring your changes are saved, head back to the "Console" and click "Start." Your server should now start smoothly!
And that's how you can utilize Silyldev for free hosting! I hope this guide was helpful. If you require assistance with projects like creating a Discord bot, code help, or anything else, feel free to join my Discord server here: https://discord.gg/CttHusJ5ba. Thanks for reading!