Deploying Redis and an ECS Service with websocket on AWS with Terraform
Amazon Web Services (AWS) provides a robust infrastructure for deploying scalable applications. In this tutorial, we will walk through setting up an Amazon ElastiCache Redis cluster and an ECS (Fargate) service using Terraform. This setup includes: A Redis cluster for caching. An ECS service running an API container. Security groups to control network access. CloudWatch logging for monitoring. Prerequisites Before you begin, ensure you have the following installed: Terraform (latest version) AWS CLI (configured with credentials) A VPC with available subnets An ECR repository for your application image 1. Configuring the Redis Cluster First, create an ElastiCache parameter group to customize Redis settings: resource "aws_elasticache_parameter_group" "custom_redis_parameter_group_dev" { name = "custom-redis-parameter-group-dev" family = "redis7" parameter { name = "maxmemory-policy" value = "allkeys-lru" } parameter { name = "timeout" value = "3600" } } Now, define a subnet group for Redis: resource "aws_elasticache_subnet_group" "redis_public_subnet_group_dev" { name = "redis-public-subnet-group-dev" subnet_ids = [var.subnet_id_a, var.subnet_id_b] tags = { Name = "redis-public-subnet-group-dev" } } Next, create the Redis cluster: resource "aws_elasticache_cluster" "redis_cluster_dev" { cluster_id = "redis-cluster-dev" engine = "redis" node_type = "cache.t2.micro" num_cache_nodes = 1 parameter_group_name = aws_elasticache_parameter_group.custom_redis_parameter_group_dev.name port = 6379 security_group_ids = [aws_security_group.redis_dev_sg.id] subnet_group_name = aws_elasticache_subnet_group.redis_public_subnet_group_dev.name } 2. Configuring the ECS Service Define the ECS Task Definition: resource "aws_ecs_task_definition" "game_api_task" { family = "game-api-task-dev" network_mode = "awsvpc" requires_compatibilities = ["FARGATE"] cpu = "256" memory = "512" execution_role_arn = aws_iam_role.ecs_task_execution_role.arn task_role_arn = aws_iam_role.ecs_task_role.arn container_definitions = jsonencode([ { name = "game_api_container_dev" image = "${aws_ecr_repository.game_api_ecr_dev.repository_url}:latest" cpu = 256 memory = 512 essential = true portMappings = [ { containerPort = 3000 hostPort = 3000 protocol = "tcp" } ] logConfiguration = { logDriver = "awslogs" options = { awslogs-group = aws_cloudwatch_log_group.game_api_dev_log_group.name awslogs-region = "us-east-1" awslogs-stream-prefix = "ecs" } } } ]) } Create a CloudWatch log group for logs: resource "aws_cloudwatch_log_group" "game_api_dev_log_group" { name = "/ecs/game-api-task-dev" retention_in_days = 7 } 3. Configuring Security Groups Define the security group for the API Load Balancer: resource "aws_security_group" "api_load_balancer_dev_sg" { name = "api-sg-dev" description = "Allow HTTP traffic" vpc_id = var.vpc_id ingress { description = "Allow HTTP traffic" from_port = 80 to_port = 80 protocol = "tcp" cidr_blocks = ["0.0.0.0/0"] } ingress { description = "Allow HTTPS traffic" from_port = 443 to_port = 443 protocol = "tcp" cidr_blocks = ["0.0.0.0/0"] } ingress { description = "Allow API traffic" from_port = 3000 to_port = 3000 protocol = "tcp" cidr_blocks = ["0.0.0.0/0"] } egress { description = "Allow all outbound traffic" from_port = 0 to_port = 0 protocol = "-1" cidr_blocks = ["0.0.0.0/0"] } } Define the security group for Redis: resource "aws_security_group" "redis_dev_sg" { name = "redis-sg-dev" description = "Security group for Redis cluster" vpc_id = var.vpc_id ingress { description = "Allow Redis access from ECS" from_port = 6379 to_port = 6379 protocol = "tcp" } Implementing a WebSocket Gateway in NestJS In real-time applications, WebSockets enable bidirectional communication between clients and servers. NestJS provides a built-in WebSocket module to facilitate this. Below, we define a WebSocket gateway using the @nestjs/websockets package. Setting Up the WebSocket Gateway The MatchGateway class listens for specific messages and manages client connections. import { SubscribeMessage, WebSocketGateway, WebSocketServer, MessageBody, ConnectedSocket } from "@nestjs/websockets"; import { Server, Socket } from "socket.io"; import { PlayerConnectionDto } from "./dto/player.dto"; import { SocketMessagesEn
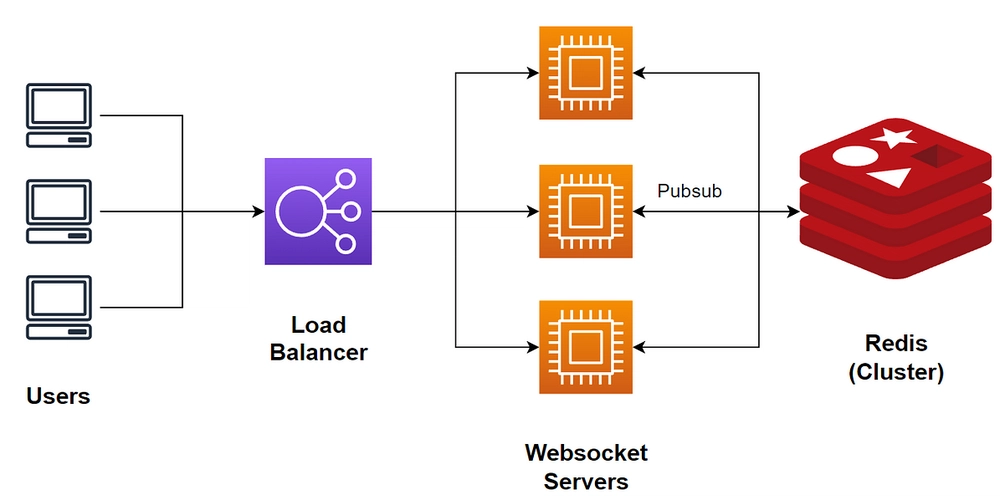
Amazon Web Services (AWS) provides a robust infrastructure for deploying scalable applications. In this tutorial, we will walk through setting up an Amazon ElastiCache Redis cluster and an ECS (Fargate) service using Terraform.
This setup includes:
A Redis cluster for caching.
An ECS service running an API container.
Security groups to control network access.
CloudWatch logging for monitoring.
Prerequisites
Before you begin, ensure you have the following installed:
Terraform (latest version)
AWS CLI (configured with credentials)
A VPC with available subnets
An ECR repository for your application image
1. Configuring the Redis Cluster
First, create an ElastiCache parameter group to customize Redis settings:
resource "aws_elasticache_parameter_group" "custom_redis_parameter_group_dev" {
  name   = "custom-redis-parameter-group-dev"
  family = "redis7"

  parameter {
    name  = "maxmemory-policy"
    value = "allkeys-lru"
  }

  parameter {
    name  = "timeout"
    value = "3600"
  }
}
Now, define a subnet group for Redis:
resource "aws_elasticache_subnet_group" "redis_public_subnet_group_dev" {
  name       = "redis-public-subnet-group-dev"
  subnet_ids = [var.subnet_id_a, var.subnet_id_b]

  tags = {
    Name = "redis-public-subnet-group-dev"
  }
}
Next, create the Redis cluster:
resource "aws_elasticache_cluster" "redis_cluster_dev" {
  cluster_id           = "redis-cluster-dev"
  engine               = "redis"
  node_type            = "cache.t2.micro"
  num_cache_nodes      = 1
  parameter_group_name = aws_elasticache_parameter_group.custom_redis_parameter_group_dev.name
  port                 = 6379
  security_group_ids   = [aws_security_group.redis_dev_sg.id]
  subnet_group_name    = aws_elasticache_subnet_group.redis_public_subnet_group_dev.name
}
2. Configuring the ECS Service
Define the ECS Task Definition:
resource "aws_ecs_task_definition" "game_api_task" {
  family                   = "game-api-task-dev"
  network_mode             = "awsvpc"
  requires_compatibilities = ["FARGATE"]
  cpu                      = "256"
  memory                   = "512"
  execution_role_arn       = aws_iam_role.ecs_task_execution_role.arn
  task_role_arn            = aws_iam_role.ecs_task_role.arn

  container_definitions = jsonencode([
    {
      name      = "game_api_container_dev"
      image     = "${aws_ecr_repository.game_api_ecr_dev.repository_url}:latest"
      cpu       = 256
      memory    = 512
      essential = true

      portMappings = [
        {
          containerPort = 3000
          hostPort      = 3000
          protocol      = "tcp"
        }
      ]

      logConfiguration = {
        logDriver = "awslogs"
        options = {
          awslogs-group         = aws_cloudwatch_log_group.game_api_dev_log_group.name
          awslogs-region        = "us-east-1"
          awslogs-stream-prefix = "ecs"
        }
      }
    }
  ])
}
Create a CloudWatch log group for logs:
resource "aws_cloudwatch_log_group" "game_api_dev_log_group" {
  name              = "/ecs/game-api-task-dev"
  retention_in_days = 7
}
3. Configuring Security Groups
Define the security group for the API Load Balancer:
resource "aws_security_group" "api_load_balancer_dev_sg" {
  name        = "api-sg-dev"
  description = "Allow HTTP traffic"
  vpc_id      = var.vpc_id

  ingress {
    description = "Allow HTTP traffic"
    from_port   = 80
    to_port     = 80
    protocol    = "tcp"
    cidr_blocks = ["0.0.0.0/0"]
  }

  ingress {
    description = "Allow HTTPS traffic"
    from_port   = 443
    to_port     = 443
    protocol    = "tcp"
    cidr_blocks = ["0.0.0.0/0"]
  }

  ingress {
    description = "Allow API traffic"
    from_port   = 3000
    to_port     = 3000
    protocol    = "tcp"
    cidr_blocks = ["0.0.0.0/0"]
  }

  egress {
    description = "Allow all outbound traffic"
    from_port   = 0
    to_port     = 0
    protocol    = "-1"
    cidr_blocks = ["0.0.0.0/0"]
  }
}
Define the security group for Redis:
resource "aws_security_group" "redis_dev_sg" {
  name        = "redis-sg-dev"
  description = "Security group for Redis cluster"
  vpc_id      = var.vpc_id

  ingress {
    description = "Allow Redis access from ECS"
    from_port   = 6379
    to_port     = 6379
    protocol    = "tcp"
  }
Implementing a WebSocket Gateway in NestJS
In real-time applications, WebSockets enable bidirectional communication between clients and servers. NestJS provides a built-in WebSocket module to facilitate this. Below, we define a WebSocket gateway using the @nestjs/websockets package.
Setting Up the WebSocket Gateway
The MatchGateway class listens for specific messages and manages client connections.
import {
  SubscribeMessage,
  WebSocketGateway,
  WebSocketServer,
  MessageBody,
  ConnectedSocket
} from "@nestjs/websockets";
import { Server, Socket } from "socket.io";
import { PlayerConnectionDto } from "./dto/player.dto";
import { SocketMessagesEnum } from "@/domain/enum/socket-messages";
import { AddPlayerToRoundUseCase } from "@/use-cases/player/add-player-to-round";

@WebSocketGateway({
  cors: {
    origin: "*",
    methods: ["GET", "POST"]
  },
  transports: ["websocket"]
})
export class MatchGateway {
  @WebSocketServer() server: Server;

  constructor(
    private readonly addPlayerToRoundUseCase: AddPlayerToRoundUseCase
  ) {}

  handleConnection(client: Socket): void {
    console.log("Client connected:", client.id);
  }

  @SubscribeMessage(SocketMessagesEnum.PLAYER_CONNECTION)
  async handlePlayerOn(
    @MessageBody() player: PlayerConnectionDto,
    @ConnectedSocket() client: Socket
  ): Promise {
    try {
      const playerData = { id: player.id };
      client.emit(SocketMessagesEnum.PLAYER_CONNECTION, playerData);
    } catch (error) {
      console.error("Error in WebSocket handler:", error);
      client.emit(SocketMessagesEnum.ERROR, {
        message: `Error processing player connection: ${error.message}`
      });
    }
  }

  @SubscribeMessage(SocketMessagesEnum.CHART_DATA)
  async handleChartData(): Promise {
    try {
      // Handle real-time chart data
    } catch (error) {
      console.error("Error in chart data handler:", error);
    }
  }
}
Setting Up the WebSocket Adapter
To ensure the WebSocket server runs smoothly within the NestJS application, an adapter is needed. This can be added in the bootstrap function:
import { IoAdapter } from "@nestjs/platform-socket.io";
import { NestFactory } from "@nestjs/core";
import { AppModule } from "./modules/app.module";

async function bootstrap() {
  const app = await NestFactory.create(AppModule);
  app.useWebSocketAdapter(new IoAdapter(app));
  app.enableCors({ origin: "*", methods: ["GET", "POST"] });

  const port = process.env.PORT || 3000;
  await app.listen(port);
console.log(` 




![[The AI Show Episode 142]: ChatGPT’s New Image Generator, Studio Ghibli Craze and Backlash, Gemini 2.5, OpenAI Academy, 4o Updates, Vibe Marketing & xAI Acquires X](https://www.marketingaiinstitute.com/hubfs/ep%20142%20cover.png)








![[DEALS] Microsoft Office Professional 2021 for Windows: Lifetime License (75% off) & Other Deals Up To 98% Off – Offers End Soon!](https://www.javacodegeeks.com/wp-content/uploads/2012/12/jcg-logo.jpg)












_Anthony_Brown_Alamy.jpg?#)
_Hanna_Kuprevich_Alamy.jpg?#)


.png?#)












![Hands-on: We got to play Nintendo Switch 2 for nearly six hours yesterday [Video]](https://i0.wp.com/9to5toys.com/wp-content/uploads/sites/5/2025/04/Switch-FI-.jpg.jpg?resize=1200%2C628&ssl=1)
![Fitbit redesigns Water stats and logging on Android, iOS [U]](https://i0.wp.com/9to5google.com/wp-content/uploads/sites/4/2023/03/fitbit-logo-2.jpg?resize=1200%2C628&quality=82&strip=all&ssl=1)


![YouTube Announces New Creation Tools for Shorts [Video]](https://www.iclarified.com/images/news/96923/96923/96923-640.jpg)

![Apple Faces New Tariffs but Has Options to Soften the Blow [Kuo]](https://www.iclarified.com/images/news/96921/96921/96921-640.jpg)


