


![[The AI Show Episode 145]: OpenAI Releases o3 and o4-mini, AI Is Causing “Quiet Layoffs,” Executive Order on Youth AI Education & GPT-4o’s Controversial Update](https://www.marketingaiinstitute.com/hubfs/ep%20145%20cover.png)


![From Art School Drop-out to Microsoft Engineer with Shashi Lo [Podcast #170]](https://cdn.hashnode.com/res/hashnode/image/upload/v1746203291209/439bf16b-c820-4fe8-b69e-94d80533b2df.png?#)


(1).jpg?#)


_Inge_Johnsson-Alamy.jpg?width=1280&auto=webp&quality=80&disable=upscale#)


![Apple to Split iPhone Launches Across Fall and Spring in Major Shakeup [Report]](https://www.iclarified.com/images/news/97211/97211/97211-640.jpg)
![Apple to Move Camera to Top Left, Hide Face ID Under Display in iPhone 18 Pro Redesign [Report]](https://www.iclarified.com/images/news/97212/97212/97212-640.jpg)
![Apple Developing Battery Case for iPhone 17 Air Amid Battery Life Concerns [Report]](https://www.iclarified.com/images/news/97208/97208/97208-640.jpg)
![AirPods 4 On Sale for $99 [Lowest Price Ever]](https://www.iclarified.com/images/news/97206/97206/97206-640.jpg)


![[Updated] Samsung’s 65-inch 4K Smart TV Just Crashed to $299 — That’s Cheaper Than an iPad](https://www.androidheadlines.com/wp-content/uploads/2025/05/samsung-du7200.jpg)


Deploying Kubernetes Cluster On On-premises
Kubernetes assembles one or more computers, either virtual machines or bare metal, into a cluster which can run workloads in containers. It works with various container runtimes, such as Docker. The Kubernetes master node handles the Kubernetes control plane of the cluster, managing its workload and directing communication across the system, etcd is a persistent, lightweight, distributed, key-value data store (originally developed for Container Linux). It reliably stores the configuration data of the cluster, representing the overall state of the cluster at any given point of time. The API server serves the Kubernetes API using JSON over HTTP, which provides both the internal and external interface to Kubernetes. The API server processes, validates REST requests, and updates the state of the API objects in etcd, thereby allowing clients to configure workloads and containers across worker nodes. The scheduler is an extensible component that selects the node that an unscheduled pod (the basic unit of workloads to be scheduled) runs, based on resource availability and other constraints. The scheduler tracks resource allocation on each node to ensure that workload is not scheduled in excess of available resources. A controller is a reconciliation loop that drives the actual cluster state toward the desired state, communicating with the API server to create, update, and delete the resources it manages. A node, also known as a worker or a minion, is a machine where containers (workloads) are deployed. Every node in the cluster must run a container runtime, as well as the below-mentioned components, for communication with the primary network configuration of these containers. kubelet is responsible for the running state of each node, ensuring that all containers on the node are healthy. It takes care of starting, stopping, and maintaining application containers organized into pods as directed by the control plane A container runtime is responsible for the lifecycle of containers, including launching, reconciling and killing of containers. kubelet interacts with container runtimes via the Container Runtime Interface (CRI), which decouples the maintenance of core Kubernetes from the actual CRI implementation. kube-proxy is an implementation of a network proxy and a load balancer, and it supports the service abstraction along with the other networking operations. It is responsible for routing traffic to the appropriate container based on IP and port number of the incoming request. This article is for deploying kubernetes on-permises cluster (bare-metal servers). Note : The kubernetes folder contains the files for preparing server to install kubernetes cluster or join to the cluster. Please run the following script on all servers : sudo ansible servers -m ping -i inventory.ini -u root sudo ansible-playbook -i inventory.ini Kubernetes/ServerPrepare.yml -u root Kubernetes Cluster : The control-plane nodes addresses are : 192.168.56.120 192.168.56.121 192.168.56.122 The worker nodes addresses are : 192.168.56.123 192.168.56.124 The vms hosted on virtualbox are like the below schema : HAProxy server (Load Balancer for kube apiserver) address is : 192.168.56.118 haproxy.cfg : stats enable (frontend bind to 192.168.56.118:6443) (backend bind to 192.168.56.120:6443 192.168.56.121:6443 192.168.56.122:6443) For starting a Kubernetes cluster, follow the below lines : Run below scripts only on 192.168.56.120 : sudo kubeadm init --control-plane-endpoint="192.168.56.118:6443" --upload-certs --apiserver-advertise-address=192.168.56.120 --pod-network-cidr=192.168.0.0/16 --cri-socket=unix:///var/run/cri-dockerd.sock --ignore-preflight-errors=all And below code for all nodes : mkdir -p $HOME/.kube sudo cp -i /etc/kubernetes/admin.conf $HOME/.kube/config sudo chown $(id -u):$(id -g) $HOME/.kube/config Install Calico network policy for on-premises deployments, 50 nodes or less : curl https://raw.githubusercontent.com/projectcalico/calico/v3.27.2/manifests/calico.yaml -O kubectl apply -f calico.yaml and run the below on other servers to join to the cluster : On control-plane (e.g. 192.168.56.122) : kubeadm join 192.168.56.118:6443 --token c4c6wt.2rzubblajmxx7wf1 \ --discovery-token-ca-cert-hash sha256:91877d933445148c650e5fa11acca05d455fe1e9e53cd33f8497ad06a2126142 \ --control-plane --certificate-key 2e8c3d0a1f2d4aec3e4ccb09a0dd6f43756344269c0b414cdd83c0ef02c0293d \ --apiserver-advertise-address=192.168.56.122 --cri-socket=unix:///var/run/cri-dockerd.sock --ignore-preflight-errors=all On worker nodes : kubeadm join 192.168.56.118:6443 --token c4c6wt.2rzubblajmxx7wf1 \ --discovery-token-ca-cert-hash sha256:91877d933445148c650e5fa11acca05d455fe1e9e53cd33f8497ad06a2126142 \ --cri-socket=unix:///var/run/cri-dockerd.sock --ignore-preflight-errors=all and
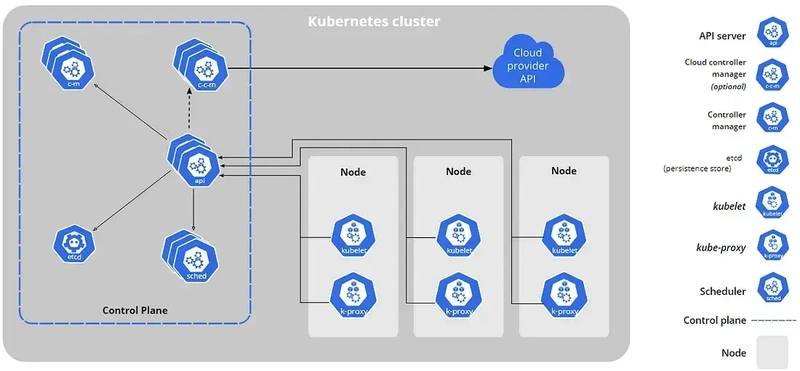
Kubernetes assembles one or more computers, either virtual machines or bare metal, into a cluster which can run workloads in containers. It works with various container runtimes, such as Docker.
The Kubernetes master node handles the Kubernetes control plane of the cluster, managing its workload and directing communication across the system, etcd is a persistent, lightweight, distributed, key-value data store (originally developed for Container Linux). It reliably stores the configuration data of the cluster, representing the overall state of the cluster at any given point of time.
The API server serves the Kubernetes API using JSON over HTTP, which provides both the internal and external interface to Kubernetes. The API server processes, validates REST requests, and updates the state of the API objects in etcd, thereby allowing clients to configure workloads and containers across worker nodes.
The scheduler is an extensible component that selects the node that an unscheduled pod (the basic unit of workloads to be scheduled) runs, based on resource availability and other constraints. The scheduler tracks resource allocation on each node to ensure that workload is not scheduled in excess of available resources.
A controller is a reconciliation loop that drives the actual cluster state toward the desired state, communicating with the API server to create, update, and delete the resources it manages.
A node, also known as a worker or a minion, is a machine where containers (workloads) are deployed. Every node in the cluster must run a container runtime, as well as the below-mentioned components, for communication with the primary network configuration of these containers.
kubelet is responsible for the running state of each node, ensuring that all containers on the node are healthy. It takes care of starting, stopping, and maintaining application containers organized into pods as directed by the control plane
A container runtime is responsible for the lifecycle of containers, including launching, reconciling and killing of containers. kubelet interacts with container runtimes via the Container Runtime Interface (CRI), which decouples the maintenance of core Kubernetes from the actual CRI implementation.
kube-proxy is an implementation of a network proxy and a load balancer, and it supports the service abstraction along with the other networking operations. It is responsible for routing traffic to the appropriate container based on IP and port number of the incoming request.
This article is for deploying kubernetes on-permises cluster (bare-metal servers).
Note : The kubernetes folder contains the files for preparing server to install kubernetes cluster or join to the cluster.
Please run the following script on all servers :
sudo ansible servers -m ping -i inventory.ini -u root

sudo ansible-playbook -i inventory.ini Kubernetes/ServerPrepare.yml -u root
Kubernetes Cluster :
The control-plane nodes addresses are :
192.168.56.120
192.168.56.121
192.168.56.122
The worker nodes addresses are :
192.168.56.123
192.168.56.124
The vms hosted on virtualbox are like the below schema :
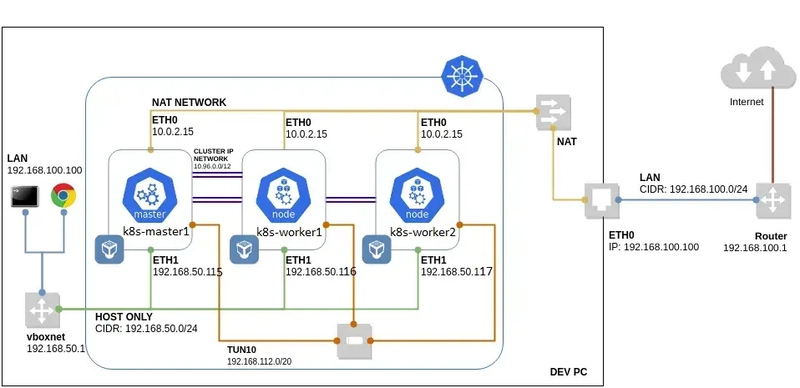
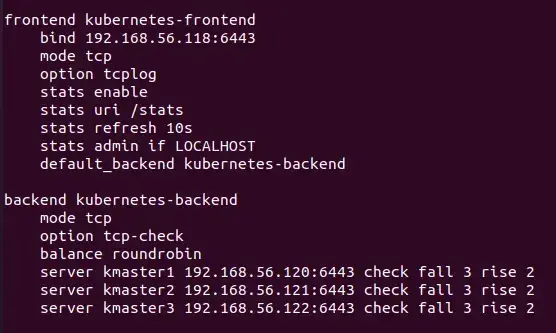
HAProxy server (Load Balancer for kube apiserver) address is :
192.168.56.118
haproxy.cfg :
stats enable
(frontend bind to 192.168.56.118:6443)
(backend bind to 192.168.56.120:6443 192.168.56.121:6443 192.168.56.122:6443)
For starting a Kubernetes cluster, follow the below lines :
Run below scripts only on 192.168.56.120 :
sudo kubeadm init  --control-plane-endpoint="192.168.56.118:6443"
      --upload-certs  --apiserver-advertise-address=192.168.56.120
      --pod-network-cidr=192.168.0.0/16
      --cri-socket=unix:///var/run/cri-dockerd.sock
      --ignore-preflight-errors=all
And below code for all nodes :
mkdir -p $HOME/.kube
sudo cp -i /etc/kubernetes/admin.conf $HOME/.kube/config
sudo chown $(id -u):$(id -g) $HOME/.kube/config
Install Calico network policy for on-premises deployments, 50 nodes or less :
curl https://raw.githubusercontent.com/projectcalico/calico/v3.27.2/manifests/calico.yaml -O

kubectl apply -f calico.yaml
and run the below on other servers to join to the cluster :
On control-plane (e.g. 192.168.56.122) :
kubeadm join 192.168.56.118:6443 --token c4c6wt.2rzubblajmxx7wf1 \
     --discovery-token-ca-cert-hash sha256:91877d933445148c650e5fa11acca05d455fe1e9e53cd33f8497ad06a2126142 \
     --control-plane --certificate-key 2e8c3d0a1f2d4aec3e4ccb09a0dd6f43756344269c0b414cdd83c0ef02c0293d \
     --apiserver-advertise-address=192.168.56.122
     --cri-socket=unix:///var/run/cri-dockerd.sock
     --ignore-preflight-errors=all
On worker nodes :
kubeadm join 192.168.56.118:6443 --token  c4c6wt.2rzubblajmxx7wf1 \
     --discovery-token-ca-cert-hash sha256:91877d933445148c650e5fa11acca05d455fe1e9e53cd33f8497ad06a2126142 \
     --cri-socket=unix:///var/run/cri-dockerd.sock
     --ignore-preflight-errors=all
and at final step enjoy from your cluster :
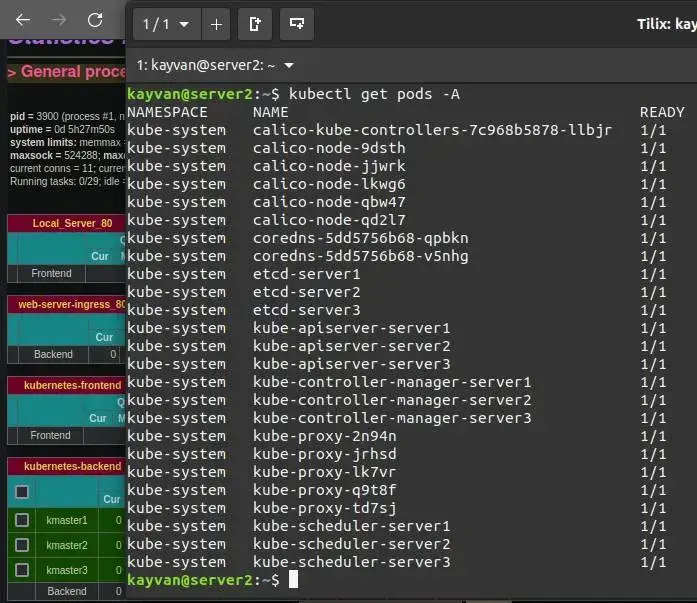
kubectl get nodes -o wide

kubectl get pod -A

HAProxy Stats :

haproxy.cfg :
Congratulation