Building Real-time Collaborative Applications with Go Backends and React Frontends
Real-time collaborative applications have transformed how teams work together by enabling multiple users to edit the same content simultaneously. The guide walks you through the fundamentals of building such systems using Go and React, with a focus on understanding the core concepts first before implementing them. Introduction Applications like Google Docs, Figma, and Notion leverage sophisticated synchronization mechanisms to create seamless collaborative experiences. Before diving into code, it's essential to understand what makes these applications work. In this guide, you'll learn: The architecture of real-time collaborative systems How to implement WebSocket communication between Go and React Techniques for conflict resolution using Operational Transformation (OT) Best practices for performance and security Understanding Collaborative Application Architecture Before writing any code, let's understand the key components of a collaborative system: Figure 1: Architecture of a real-time collaborative application Core Components Client Interface: Where users interact with shared content (React) Communication Layer: Enables real-time messaging (WebSockets) Synchronization Engine: Resolves conflicts between concurrent edits (OT) Persistence Layer: Stores document history and state Data Flow in Collaborative Systems When a user makes a change in a collaborative environment, the following sequence occurs: User's change is captured as an operation The operation is applied locally (optimistic update) Operation is sent to the server via WebSocket Server validates and transforms the operation if needed Transformed operation is broadcast to all clients Other clients apply the operation to their local state Understanding this flow is crucial before implementing any code. Prerequisites Before starting, ensure you have: A Go development environment (Go 1.20 or later) Node.js (v18 or later) and npm installed Basic knowledge of Go and React development A code editor of your choice Setting Up the Project Structure Let's start by creating the basic project structure: $ mkdir collaborative-app $ cd collaborative-app $ mkdir server client This creates separate directories for our backend (server) and frontend (client) components. Building the Go Backend The backend is responsible for managing connections, processing operations, and ensuring consistency across clients. Step 1: Initialize the Go Module $ cd server $ go mod init collaborative-server Step 2: Create the WebSocket Hub First, let's understand what the WebSocket Hub needs to do: Accept and manage client connections Broadcast messages to connected clients Process and transform operations Now, let's implement a basic version: // main.go package main import ( "log" "net/http" "github.com/gorilla/websocket" ) // Hub maintains the set of active connections type Hub struct { // Registered connections clients map[*Client]bool // Channel to broadcast messages to all clients broadcast chan []byte // Register requests from clients register chan *Client // Unregister requests from clients unregister chan *Client // Document state document *Document } // Client represents a connected WebSocket client type Client struct { // The WebSocket connection conn *websocket.Conn // Buffered channel of outbound messages send chan []byte // Unique client identifier id string // Reference to the hub hub *Hub } // Document represents the collaborative document type Document struct { Content string Version int } This code establishes the basic structure needed for WebSocket communication, but it doesn't handle operations yet. Step 3: Understanding Operational Transformation (OT) Operational Transformation is a crucial concept in collaborative editing. Let's understand it before implementing: What is OT? Operational Transformation is a technology for maintaining consistency when multiple users edit a document concurrently. It transforms operations so they can be applied in different orders while achieving the same final state. Here's a simple illustration of the problem OT solves: Initial document: "Hello" User A inserts "!" at position 5: "Hello!" User B simultaneously inserts " world" at position 5: "Hello world" Without OT, applying these operations sequentially would lead to inconsistent results. OT transforms operations to account for concurrent edits. Step 4: Implementing Basic Operation Types Now let's implement operations that can be applied to our document: // operation.go package main // OperationType defines the type of operation type OperationType string const ( Insert OperationType = "insert" Delete OperationType = "delete" Retain OperationType = "retain" ) // Operation re
Real-time collaborative applications have transformed how teams work together by enabling multiple users to edit the same content simultaneously. The guide walks you through the fundamentals of building such systems using Go and React, with a focus on understanding the core concepts first before implementing them.
Introduction
Applications like Google Docs, Figma, and Notion leverage sophisticated synchronization mechanisms to create seamless collaborative experiences. Before diving into code, it's essential to understand what makes these applications work.
In this guide, you'll learn:
- The architecture of real-time collaborative systems
- How to implement WebSocket communication between Go and React
- Techniques for conflict resolution using Operational Transformation (OT)
- Best practices for performance and security
Understanding Collaborative Application Architecture
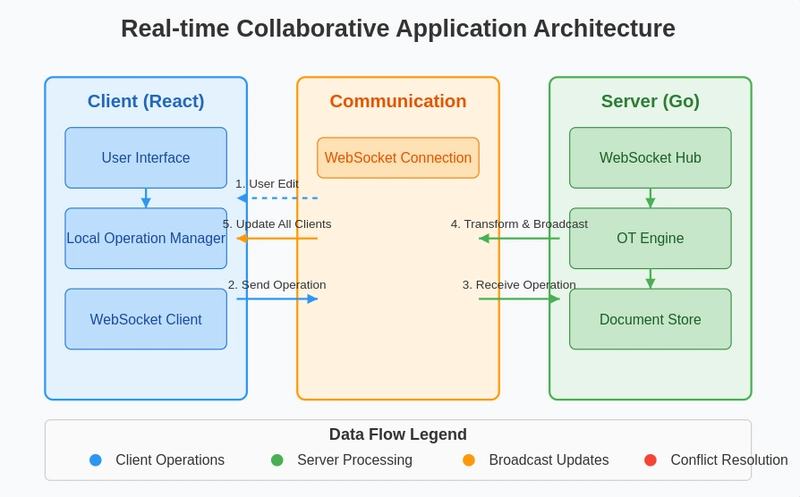
Before writing any code, let's understand the key components of a collaborative system:
Figure 1: Architecture of a real-time collaborative application
Core Components
- Client Interface: Where users interact with shared content (React)
- Communication Layer: Enables real-time messaging (WebSockets)
- Synchronization Engine: Resolves conflicts between concurrent edits (OT)
- Persistence Layer: Stores document history and state
Data Flow in Collaborative Systems
When a user makes a change in a collaborative environment, the following sequence occurs:
- User's change is captured as an operation
- The operation is applied locally (optimistic update)
- Operation is sent to the server via WebSocket
- Server validates and transforms the operation if needed
- Transformed operation is broadcast to all clients
- Other clients apply the operation to their local state
Understanding this flow is crucial before implementing any code.
Prerequisites
Before starting, ensure you have:
- A Go development environment (Go 1.20 or later)
- Node.js (v18 or later) and npm installed
- Basic knowledge of Go and React development
- A code editor of your choice
Setting Up the Project Structure
Let's start by creating the basic project structure:
$ mkdir collaborative-app
$ cd collaborative-app
$ mkdir server client
This creates separate directories for our backend (server) and frontend (client) components.
Building the Go Backend
The backend is responsible for managing connections, processing operations, and ensuring consistency across clients.
Step 1: Initialize the Go Module
$ cd server
$ go mod init collaborative-server
Step 2: Create the WebSocket Hub
First, let's understand what the WebSocket Hub needs to do:
- Accept and manage client connections
- Broadcast messages to connected clients
- Process and transform operations
Now, let's implement a basic version:
// main.go
package main

import (
    "log"
    "net/http"

    "github.com/gorilla/websocket"
)

// Hub maintains the set of active connections
type Hub struct {
    // Registered connections
    clients map[*Client]bool

    // Channel to broadcast messages to all clients
    broadcast chan []byte

    // Register requests from clients
    register chan *Client

    // Unregister requests from clients
    unregister chan *Client

    // Document state
    document *Document
}

// Client represents a connected WebSocket client
type Client struct {
    // The WebSocket connection
    conn *websocket.Conn

    // Buffered channel of outbound messages
    send chan []byte

    // Unique client identifier
    id string

    // Reference to the hub
    hub *Hub
}

// Document represents the collaborative document
type Document struct {
    Content string
    Version int
}
This code establishes the basic structure needed for WebSocket communication, but it doesn't handle operations yet.
Step 3: Understanding Operational Transformation (OT)
Operational Transformation is a crucial concept in collaborative editing. Let's understand it before implementing:
What is OT? Operational Transformation is a technology for maintaining consistency when multiple users edit a document concurrently. It transforms operations so they can be applied in different orders while achieving the same final state.
Here's a simple illustration of the problem OT solves:
Initial document: "Hello"
- User A inserts "!" at position 5: "Hello!"
- User B simultaneously inserts " world" at position 5: "Hello world"
Without OT, applying these operations sequentially would lead to inconsistent results. OT transforms operations to account for concurrent edits.
Step 4: Implementing Basic Operation Types
Now let's implement operations that can be applied to our document:
// operation.go
package main

// OperationType defines the type of operation
type OperationType string

const (
    Insert OperationType = "insert"
    Delete OperationType = "delete"
    Retain OperationType = "retain"
)

// Operation represents a single document transformation
type Operation struct {
    Type     OperationType `json:"type"`
    Position int           `json:"position"`
    Text     string        `json:"text,omitempty"`
    Length   int           `json:"length,omitempty"`
    ClientID string        `json:"clientId"`
    Version  int           `json:"version"`
}

// Apply applies an operation to a document
func (op *Operation) Apply(doc *Document) {
    switch op.Type {
    case Insert:
        // Insert text at position
        if op.Position <= len(doc.Content) {
            doc.Content = doc.Content[:op.Position] + op.Text + doc.Content[op.Position:]
        }
    case Delete:
        // Delete text from position
        if op.Position+op.Length <= len(doc.Content) {
            doc.Content = doc.Content[:op.Position] + doc.Content[op.Position+op.Length:]
        }
    }

    // Increment document version
    doc.Version++
}
Note: This is a simplified OT implementation. Real-world systems need more sophisticated transformation logic to handle complex concurrent edits.
Step 5: Handling WebSocket Connections
Now let's implement the connection handler:
// handlers.go
package main

import (
    "encoding/json"
    "log"
    "net/http"

    "github.com/google/uuid"
    "github.com/gorilla/websocket"
)

var upgrader = websocket.Upgrader{
    CheckOrigin: func(r *http.Request) bool {
        return true // For development; restrict in production
    },
}

// handleWebSocket upgrades HTTP connection to WebSocket
func (h *Hub) handleWebSocket(w http.ResponseWriter, r *http.Request) {
    // Upgrade connection to WebSocket
    conn, err := upgrader.Upgrade(w, r, nil)
    if err != nil {
        log.Println("Upgrade error:", err)
        return
    }

    // Create new client
    client := &Client{
        conn: conn,
        send: make(chan []byte, 256),
        id:   uuid.New().String(),
        hub:  h,
    }

    // Register client
    h.register <- client

    // Send current document state
    initialState := map[string]interface{}{
        "type":    "init",
        "content": h.document.Content,
        "version": h.document.Version,
    }

    data, _ := json.Marshal(initialState)
    client.send <- data

    // Start client goroutines
    go client.readPump()
    go client.writePump()
}
This handler upgrades HTTP connections to WebSockets and registers new clients with the hub.
Building the React Frontend
Now that we understand the backend, let's implement the React frontend to provide a user interface for our collaborative editor.
Step 1: Create a New React Application
$ cd ../client
$ npx create-react-app .
Step 2: Understanding the Frontend Architecture
Before coding, let's understand how the React frontend will work:
- Establish and maintain a WebSocket connection
- Capture user edits as operations
- Apply operations locally for immediate feedback
- Send operations to the server
- Apply operations received from the server
Step 3: Implementing the WebSocket Connection
First, create a service to handle WebSocket communication:
// src/services/WebSocketService.js

class WebSocketService {
  constructor(url, onMessage) {
    this.socket = null;
    this.url = url;
    this.onMessage = onMessage;
    this.clientId = Math.random().toString(36).substring(2, 15);
    this.isConnected = false;
    this.connect();
  }

  connect() {
    this.socket = new WebSocket(this.url);

    this.socket.onopen = () => {
      console.log('WebSocket connected');
      this.isConnected = true;
    };

    this.socket.onmessage = (event) => {
      const data = JSON.parse(event.data);
      this.onMessage(data);
    };

    this.socket.onclose = () => {
      console.log('WebSocket disconnected, trying to reconnect...');
      this.isConnected = false;
      setTimeout(() => this.connect(), 2000);
    };

    this.socket.onerror = (error) => {
      console.error('WebSocket error:', error);
    };
  }

  sendOperation(operation) {
    if (!this.isConnected) {
      console.warn('Cannot send operation: WebSocket not connected');
      return false;
    }

    operation.clientId = this.clientId;
    this.socket.send(JSON.stringify(operation));
    return true;
  }

  disconnect() {
    if (this.socket) {
      this.socket.close();
    }
  }
}

export default WebSocketService;
This service encapsulates WebSocket functionality, including reconnection logic and message handling.
Step 4: Creating the Editor Component
Now let's create a simple text editor component that uses our WebSocket service:
// src/components/CollaborativeEditor.js
import React, { useState, useEffect, useRef } from 'react';
import WebSocketService from '../services/WebSocketService';
import './CollaborativeEditor.css';

const CollaborativeEditor = () => {
  // State for document content and metadata
  const [content, setContent] = useState('');
  const [version, setVersion] = useState(0);
  const [activeUsers, setActiveUsers] = useState(0);
  const [isConnected, setIsConnected] = useState(false);

  // Ref for the WebSocket service
  const wsService = useRef(null);

  // Track the cursor position
  const selectionRef = useRef({ start: 0, end: 0 });
  const textareaRef = useRef(null);

  useEffect(() => {
    // Create WebSocket connection
    wsService.current = new WebSocketService('ws://localhost:8080/ws', handleMessage);

    // Cleanup function
    return () => {
      if (wsService.current) {
        wsService.current.disconnect();
      }
    };
  }, []);

  // Handle incoming WebSocket messages
  const handleMessage = (data) => {
    console.log('Received message:', data);

    switch (data.type) {
      case 'init':
        // Initial document state
        setContent(data.content);
        setVersion(data.version);
        setIsConnected(true);
        break;

      case 'update':
        // Update document state
        setContent(data.content);
        setVersion(data.version);
        break;

      case 'users':
        // Update active user count
        setActiveUsers(data.count);
        break;

      default:
        console.warn('Unknown message type:', data.type);
    }
  };

  // Preserve selection when content changes
  useEffect(() => {
    if (textareaRef.current) {
      const { start, end } = selectionRef.current;
      textareaRef.current.setSelectionRange(start, end);
    }
  }, [content]);

  // Handle text changes
  const handleTextChange = (e) => {
    const newContent = e.target.value;
    const oldContent = content;

    // Save current selection
    selectionRef.current = {
      start: e.target.selectionStart,
      end: e.target.selectionEnd
    };

    // Update local state immediately for responsiveness
    setContent(newContent);

    // Create and send operation
    // This is simplified - a real implementation would compute the actual diff
    if (newContent.length > oldContent.length) {
      // Assume it's an insert
      const position = findDiffPosition(oldContent, newContent);
      const insertedText = newContent.substring(position, position + (newContent.length - oldContent.length));

      sendOperation({
        type: 'insert',
        position: position,
        text: insertedText,
        version: version
      });
    } else if (newContent.length < oldContent.length) {
      // Assume it's a delete
      const position = findDiffPosition(oldContent, newContent);
      const length = oldContent.length - newContent.length;

      sendOperation({
        type: 'delete',
        position: position,
        length: length,
        version: version
      });
    }
  };

  // Find position where two strings differ
  const findDiffPosition = (str1, str2) => {
    const minLength = Math.min(str1.length, str2.length);
    for (let i = 0; i < minLength; i++) {
      if (str1[i] !== str2[i]) {
        return i;
      }
    }
    return minLength;
  };

  // Send operation to server
  const sendOperation = (operation) => {
    if (wsService.current) {
      wsService.current.sendOperation(operation);
    }
  };

  return (
    <div className="editor-container">
      <div className="editor-header">
        <div className="connection-status">
          Status: {isConnected ? 'Connected' : 'Disconnected'}
        div>
        <div className="document-info">
          Version: {version} | Active Users: {activeUsers}
        div>
      div>

      <textarea
        ref={textareaRef}
        value={content}
        onChange={handleTextChange}
        className="collaborative-editor"
        placeholder="Start typing..."
      />

      <div className="editor-footer">
        <p>Changes are automatically saved and shared with all collaborators.p>
      div>
    div>
  );
};

export default CollaborativeEditor;
This component provides a user interface for editing text and handles the transformation of user edits into operations.
Data Synchronization Challenges
Building collaborative systems involves addressing several key challenges:
1. Maintaining Consistency
When multiple users edit simultaneously, the system must ensure all clients converge to the same state. Here's how to approach this:
Server-Side Conflict Resolution:
// Handle incoming operation
func (h *Hub) handleOperation(op Operation) {
    // If operation is outdated, transform it
    if op.Version != h.document.Version {
        op = transformOperation(op, h.document)
    }

    // Apply operation to document
    op.Apply(h.document)

    // Broadcast updated state to all clients
    h.broadcastDocumentState()
}

// Transform an operation to be valid for the current document state
func transformOperation(op Operation, doc *Document) Operation {
    // This is where the real OT magic happens
    // A complete implementation would transform the operation against
    // all operations since the client's base version

    // For simplicity, we're just updating the version
    op.Version = doc.Version
    return op
}
Important: Real OT implementations must handle complex transformation matrices to ensure convergence. The example above is greatly simplified.
2. Handling Network Latency
Users expect immediate feedback, but network transmission takes time. Implementing optimistic updates helps create a responsive experience:
Client-Side Implementation:
// In the CollaborativeEditor component

// Track pending operations
const [pendingOps, setPendingOps] = useState([]);

// Handle text changes with optimistic updates
const handleTextChange = (e) => {
  const newContent = e.target.value;

  // Create operation
  const operation = createOperation(content, newContent);

  // Apply locally immediately
  setContent(newContent);

  // Add to pending operations
  setPendingOps([...pendingOps, operation]);

  // Send to server
  sendOperation(operation);
};

// When server confirms update, remove from pending
const handleServerConfirmation = (confirmedVersion) => {
  setPendingOps(pendingOps.filter(op => op.version > confirmedVersion));
};
Performance Optimizations
Real-time collaboration can be resource-intensive. Here are some practical optimizations:
1. Debounce Client Updates
Rather than sending every keystroke, group rapid changes together:
import { useCallback } from 'react';
import { debounce } from 'lodash';

// In your component
const debouncedSendOperation = useCallback(
  debounce((operation) => {
    wsService.current.sendOperation(operation);
  }, 100),
  [] // Empty dependency array ensures this is only created once
);

// Use the debounced function when sending operations
const handleTextChange = (e) => {
  // Update local state immediately
  setContent(e.target.value);

  // Create operation
  const operation = createOperation(content, e.target.value);

  // Send with debounce
  debouncedSendOperation(operation);
};
2. Batch Server Updates
Process multiple operations in a single update cycle:
// BatchProcessor handles batching of operations
type BatchProcessor struct {
    operations []Operation
    processingInterval time.Duration
    document  *Document
    hub       *Hub
}

func NewBatchProcessor(doc *Document, hub *Hub) *BatchProcessor {
    return &BatchProcessor{
        operations: []Operation{},
        processingInterval: 100 * time.Millisecond,
        document: doc,
        hub: hub,
    }
}

func (bp *BatchProcessor) Start() {
    ticker := time.NewTicker(bp.processingInterval)
    defer ticker.Stop()

    for range ticker.C {
        if len(bp.operations) > 0 {
            bp.ProcessBatch()
        }
    }
}

func (bp *BatchProcessor) AddOperation(op Operation) {
    bp.operations = append(bp.operations, op)
}

func (bp *BatchProcessor) ProcessBatch() {
    // Process all operations in the current batch
    ops := bp.operations
    bp.operations = []Operation{} // Clear the batch

    for _, op := range ops {
        // Apply each operation
        op.Apply(bp.document)
    }

    // Broadcast only once after all operations
    bp.hub.broadcastDocumentState()
}
Security Considerations
Collaborative applications require additional security measures beyond typical web applications:
1. Authentication for WebSockets
// Authenticate WebSocket connections
func authMiddleware(next http.HandlerFunc) http.HandlerFunc {
    return func(w http.ResponseWriter, r *http.Request) {
        // Get token from query parameter or header
        token := r.URL.Query().Get("token")
        if token == "" {
            token = r.Header.Get("Authorization")
        }

        // Validate token (implementation depends on your auth system)
        userID, err := validateToken(token)
        if err != nil {
            http.Error(w, "Unauthorized", http.StatusUnauthorized)
            return
        }

        // Add user info to context
        ctx := context.WithValue(r.Context(), "userID", userID)
        next(w, r.WithContext(ctx))
    }
}

// Usage
http.HandleFunc("/ws", authMiddleware(hub.handleWebSocket))
2. Rate Limiting
Prevent abuse by implementing rate limiting:
// Simple rate limiter for operations
type RateLimiter struct {
    clients map[string]*clientState
    limit   int           // Max operations per minute
    window  time.Duration // Time window for rate limiting
}

type clientState struct {
    operations int       // Count of operations
    resetAt    time.Time // When the count resets
}

func (rl *RateLimiter) Allow(clientID string) bool {
    now := time.Now()
    state, exists := rl.clients[clientID]

    if !exists || now.After(state.resetAt) {
        // New client or window expired, reset
        rl.clients[clientID] = &clientState{
            operations: 1,
            resetAt:    now.Add(rl.window),
        }
        return true
    }

    if state.operations >= rl.limit {
        // Rate limit exceeded
        return false
    }

    // Increment operation count
    state.operations++
    return true
}
Troubleshooting Common Issues
When building collaborative applications, you might encounter these issues:
1. Inconsistent Document States
Problem: Clients end up with different document content.
Solution:
- Verify that all operations are properly transformed
- Implement periodic state synchronization
- Add logging to track operation sequences
2. WebSocket Connection Issues
Problem: WebSocket connections drop or fail to establish.
Solution:
- Implement automatic reconnection logic
- Add ping/pong messages to keep connections alive
- Check proxy configurations if behind load balancers
3. Performance Degradation
Problem: Editor becomes slow with multiple users.
Solution:
- Optimize operation size (send diffs instead of full documents)
- Implement efficient OT algorithms
- Add server-side caching of document state
Conclusion
Building real-time collaborative applications requires understanding several complex areas:
- Communication: WebSockets provide the real-time channel between client and server
- Conflict Resolution: Operational Transformation enables concurrent editing
- User Experience: Optimistic updates create responsive interfaces
- Scalability: Batching and efficient algorithms enable performance at scale
This guide has walked you through the fundamentals and implementation details of each component. While we've built a simplified collaborative text editor, the concepts apply to more complex collaborative systems like spreadsheets, diagrams, or code editors.
For production applications, consider:
- Adding persistent storage for document history
- Implementing user presence indicators (cursors, user lists)
- Adding offline support with operation queuing
- Setting up monitoring for WebSocket connections








![[The AI Show Episode 142]: ChatGPT’s New Image Generator, Studio Ghibli Craze and Backlash, Gemini 2.5, OpenAI Academy, 4o Updates, Vibe Marketing & xAI Acquires X](https://www.marketingaiinstitute.com/hubfs/ep%20142%20cover.png)











![[DEALS] Microsoft Office Professional 2021 for Windows: Lifetime License (75% off) & Other Deals Up To 98% Off – Offers End Soon!](https://www.javacodegeeks.com/wp-content/uploads/2012/12/jcg-logo.jpg)




















_Anthony_Brown_Alamy.jpg?#)
_Hanna_Kuprevich_Alamy.jpg?#)


.png?#)










![Hands-on: We got to play Nintendo Switch 2 for nearly six hours yesterday [Video]](https://i0.wp.com/9to5toys.com/wp-content/uploads/sites/5/2025/04/Switch-FI-.jpg.jpg?resize=1200%2C628&ssl=1)
![Fitbit redesigns Water stats and logging on Android, iOS [U]](https://i0.wp.com/9to5google.com/wp-content/uploads/sites/4/2023/03/fitbit-logo-2.jpg?resize=1200%2C628&quality=82&strip=all&ssl=1)


![YouTube Announces New Creation Tools for Shorts [Video]](https://www.iclarified.com/images/news/96923/96923/96923-640.jpg)

![Apple Faces New Tariffs but Has Options to Soften the Blow [Kuo]](https://www.iclarified.com/images/news/96921/96921/96921-640.jpg)


