


![[The AI Show Episode 144]: ChatGPT’s New Memory, Shopify CEO’s Leaked “AI First” Memo, Google Cloud Next Releases, o3 and o4-mini Coming Soon & Llama 4’s Rocky Launch](https://www.marketingaiinstitute.com/hubfs/ep%20144%20cover.png)


.jpg?#)


![Apple to Shift Robotics Unit From AI Division to Hardware Engineering [Report]](https://www.iclarified.com/images/news/97128/97128/97128-640.jpg)

![Apple Shares New Ad for iPhone 16: 'Trust Issues' [Video]](https://www.iclarified.com/images/news/97125/97125/97125-640.jpg)


Building a Simple QR Code Appointment System (Using PSA as an Example)
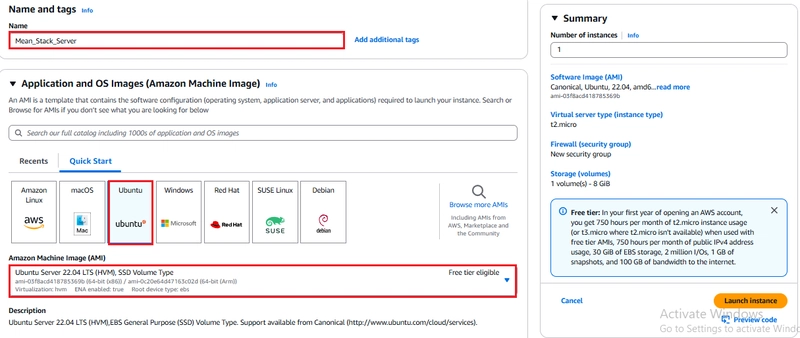
Government services are improving through digital systems, and one great example of this is the use of QR codes in online appointments. The Philippine Statistics Authority (PSA) is already using a QR-based appointment system that helps users easily book a schedule online and receive a QR code for confirmation. This QR code is then scanned during their visit to verify the appointment details quickly. In this post, we’ll explore how you can build a simple appointment system with QR code support — just like PSA’s system. Whether you're a developer building for government services, clinics, or offices, this system can be useful and easy to create. Why QR Codes Are Useful for Appointments QR codes make appointment handling faster, paperless, and more secure. Users no longer need to print their appointment forms or memorize reference numbers. Instead, they just scan their QR code at the entry point. For staff or guards, scanning a code is much quicker and helps in managing large queues efficiently. PSA uses this exact method to confirm a user’s schedule and appointment details in just a few seconds. What Tools You’ll Need To build this system, you don’t need advanced tools. You can use basic web technologies: Frontend: HTML, CSS, JavaScript (or any framework you prefer) Backend: Node.js, PHP, or Python QR Code Generator: A JavaScript library like qrcode.js, or an API such as goqr.me Database: MySQL or MongoDB to store appointment data These tools are enough to create a functional and simple appointment system with QR code generation. How the Appointment System Works Here is a simple breakdown of how the system will work: The user fills out a form with their name, selected service, appointment date, and time. This information is stored in the database. A QR code is created using the saved appointment data. The QR code is shown on the screen or sent to the user via email. Let’s look at a basic JavaScript example using qrcode.js: javascript Copy Edit let appointmentData = { name: "Juan Dela Cruz", date: "2025-05-10", time: "10:00 AM", service: "PSA Birth Certificate" }; let qrData = JSON.stringify(appointmentData); new QRCode(document.getElementById("qrcode"), qrData); This code turns the appointment data into a QR code which the user can scan at the location to confirm their booking. Real Example: PSA QR Code Online Appointment The PSA has a working online appointment system that issues QR codes after booking. For example, when someone sets an appointment to request a birth certificate, the system provides a QR code with all the appointment information. This QR code is scanned at the PSA office during the person’s scheduled visit. It's a fast and efficient way to manage visitors and verify appointment details. To understand more about how PSA’s system works, you can check this helpful guide:

Government services are improving through digital systems, and one great example of this is the use of QR codes in online appointments. The Philippine Statistics Authority (PSA) is already using a QR-based appointment system that helps users easily book a schedule online and receive a QR code for confirmation. This QR code is then scanned during their visit to verify the appointment details quickly.
In this post, we’ll explore how you can build a simple appointment system with QR code support — just like PSA’s system. Whether you're a developer building for government services, clinics, or offices, this system can be useful and easy to create.
Why QR Codes Are Useful for Appointments
QR codes make appointment handling faster, paperless, and more secure. Users no longer need to print their appointment forms or memorize reference numbers. Instead, they just scan their QR code at the entry point. For staff or guards, scanning a code is much quicker and helps in managing large queues efficiently. PSA uses this exact method to confirm a user’s schedule and appointment details in just a few seconds.
What Tools You’ll Need
To build this system, you don’t need advanced tools. You can use basic web technologies:
- Frontend: HTML, CSS, JavaScript (or any framework you prefer)
- Backend: Node.js, PHP, or Python
- QR Code Generator: A JavaScript library like qrcode.js, or an API such as goqr.me
- Database: MySQL or MongoDB to store appointment data
These tools are enough to create a functional and simple appointment system with QR code generation.
How the Appointment System Works
Here is a simple breakdown of how the system will work:
- The user fills out a form with their name, selected service, appointment date, and time.
- This information is stored in the database.
- A QR code is created using the saved appointment data.
- The QR code is shown on the screen or sent to the user via email. Let’s look at a basic JavaScript example using qrcode.js:
javascript
Copy
Edit
let appointmentData = {
name: "Juan Dela Cruz",
date: "2025-05-10",
time: "10:00 AM",
service: "PSA Birth Certificate"
};
let qrData = JSON.stringify(appointmentData);
new QRCode(document.getElementById("qrcode"), qrData);
This code turns the appointment data into a QR code which the user can scan at the location to confirm their booking.
Real Example: PSA QR Code Online Appointment
The PSA has a working online appointment system that issues QR codes after booking. For example, when someone sets an appointment to request a birth certificate, the system provides a QR code with all the appointment information. This QR code is scanned at the PSA office during the person’s scheduled visit. It's a fast and efficient way to manage visitors and verify appointment details.
To understand more about how PSA’s system works, you can check this helpful guide: