Boost your Website's Performance: How to provide Seamless Storage for the Public
In today’s digital landscape, ensuring high availability for your website is crucial to providing a seamless user experience. One of the most effective ways to achieve this is through Azure’s Storage Accounts, which offer high availability and redundancy options. This guide will walk you through the process of creating a robust, publicly accessible storage solution for your website that supports images, documents, and other media files, even during a regional outage. Step 1: Create a New Storage Account with High Availability Start by Accessing the Azure Portal: Open the Azure Portal and search for Storage accounts. Click on + Create to begin the process. Select Resource Group: Choose New for the resource group, and give it a unique name, such as "WebsiteResourceGroup". Click OK to continue. Set Storage Account Name: Enter a unique storage account name, like “publicwebsite.” To ensure the name is available, you may need to add a random identifier to the end (e.g., "publicwebsite123"). Choose Default Settings: Accept the default settings for performance, replication, and security, but ensure the redundancy setting is configured for high availability. Enable Read Access to the Secondary Region: In the Data management section, go to the Redundancy blade and select Read-access Geo-redundant storage (RA-GRS). This setting ensures that your data is replicated across regions, making it accessible even during a regional outage. Finalize and Deploy: Review your settings and click Create. Wait for the deployment to finish and click Go to Resource. Step 2: Enable Anonymous Blob Access for the Public Website To make your website content accessible to everyone without requiring authentication: Allow Blob Anonymous Access: In the storage account, navigate to the Settings section and select Configuration. Enable the Allow blob anonymous access setting and click Save. Step 3: Create a Blob Storage Container for Website Content Next, create a container to hold your website's files such as images and documents: Navigate to Containers: In the Data storage section of the storage account, select Containers. Create a New Container: Click + Container and name the container “public.” Make sure it’s set to Private (No anonymous access) initially. Enable Public Access: After creating the container, select it, and on the Overview blade, click Change access level. Set the Public access level to Blob (anonymous read access for blobs only). Save and Test Access: Test the public access by uploading a small file (e.g., an image or text file). Browse the file’s URL and confirm it opens or downloads correctly. Step 4: Enable Soft Delete for Blobs To protect your files from accidental deletion, enable the soft delete feature for blobs: Navigate to Blob Soft Delete Settings: In the Properties section, under the Blob service category, select Blob soft delete. Configure Retention Period: Ensure the Enable soft delete for blobs box is checked, and set the Keep deleted blobs for (in days) to 21 days. This ensures you can restore any files within 21 days if they are accidentally deleted. Save Your Settings: Don’t forget to click Save after configuring these settings. Step 5: Practice Restoring Deleted Files Using Soft Delete Delete a File: Go to your public container, select a file, and click Delete. Restore the File: After deletion, toggle the slider to Show deleted blobs. Select the deleted file and choose Undelete. This will restore the file back to the container. Confirm Restoration: Refresh the container, and you should see the file has been restored. Step 6: Enable Blob Versioning To track different versions of your website documents, enable blob versioning: Navigate to Blob Versioning Settings: In the Properties section of your storage account, go to Versioning under Blob service. Enable Versioning: Check the Enable versioning for blobs box to ensure all versions of your documents are saved automatically. You can choose whether to keep all versions or delete older versions after a certain period. Save Your Settings: Click Save to apply the versioning settings. Step 7: Test Blob Versioning Upload a New Version of a File: Upload a new version of an existing file in your container. This will overwrite the previous version. Check Previous Versions: Go to the Show deleted blobs page, where you’ll see the old version listed. You can restore it if needed. Conclusion By following these steps, you've created a highly available, publicly accessible storage solution for your website that ensures high uptime, automatic redundancy, and protection against accidental deletions. You’ve also set up essential features such as soft delete and versioning to safeguard your website’s content. With these configurations, you can rest easy knowing your website’s files are safe, accessible, and ready to serve your users even in the event of a regional failure.
In today’s digital landscape, ensuring high availability for your website is crucial to providing a seamless user experience. One of the most effective ways to achieve this is through Azure’s Storage Accounts, which offer high availability and redundancy options. This guide will walk you through the process of creating a robust, publicly accessible storage solution for your website that supports images, documents, and other media files, even during a regional outage.
Step 1: Create a New Storage Account with High Availability
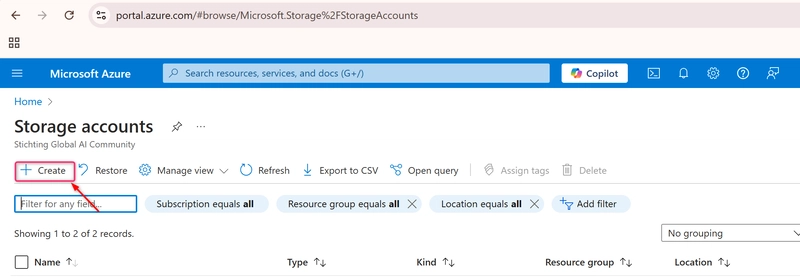
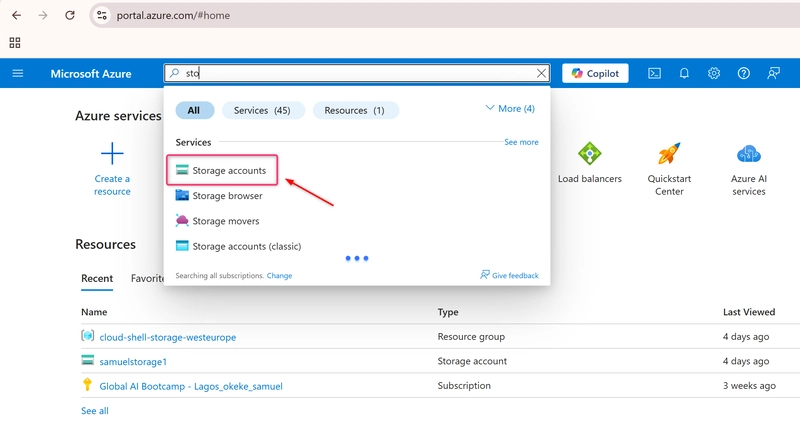
Start by Accessing the Azure Portal: Open the Azure Portal and search for Storage accounts. Click on + Create to begin the process.
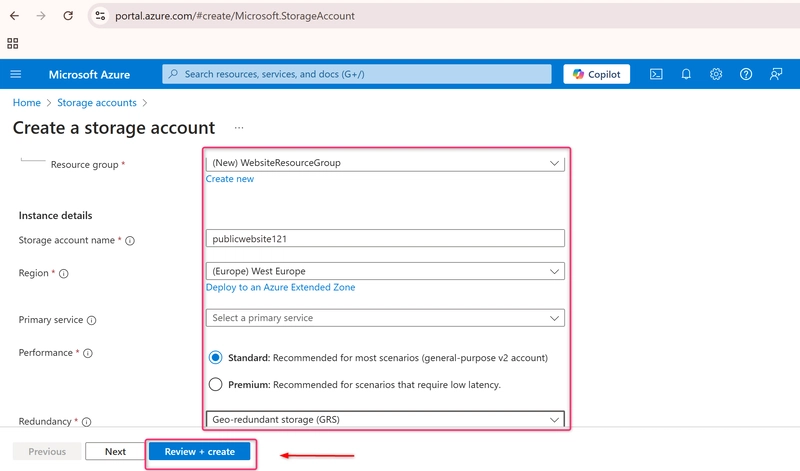
Select Resource Group: Choose New for the resource group, and give it a unique name, such as "WebsiteResourceGroup". Click OK to continue.
Set Storage Account Name: Enter a unique storage account name, like “publicwebsite.” To ensure the name is available, you may need to add a random identifier to the end (e.g., "publicwebsite123").
Choose Default Settings: Accept the default settings for performance, replication, and security, but ensure the redundancy setting is configured for high availability.
Enable Read Access to the Secondary Region: In the Data management section, go to the Redundancy blade and select Read-access Geo-redundant storage (RA-GRS). This setting ensures that your data is replicated across regions, making it accessible even during a regional outage.
Finalize and Deploy: Review your settings and click Create. Wait for the deployment to finish and click Go to Resource.
Step 2: Enable Anonymous Blob Access for the Public Website
To make your website content accessible to everyone without requiring authentication:
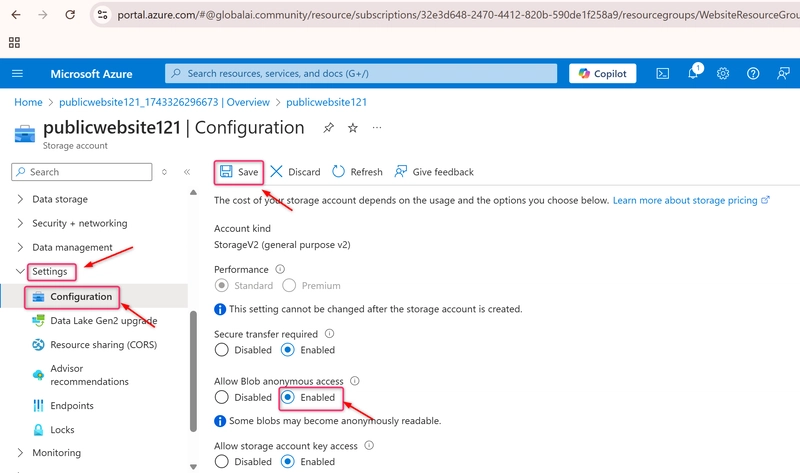
Allow Blob Anonymous Access: In the storage account, navigate to the Settings section and select Configuration. Enable the Allow blob anonymous access setting and click Save.
Step 3: Create a Blob Storage Container for Website Content
Next, create a container to hold your website's files such as images and documents:
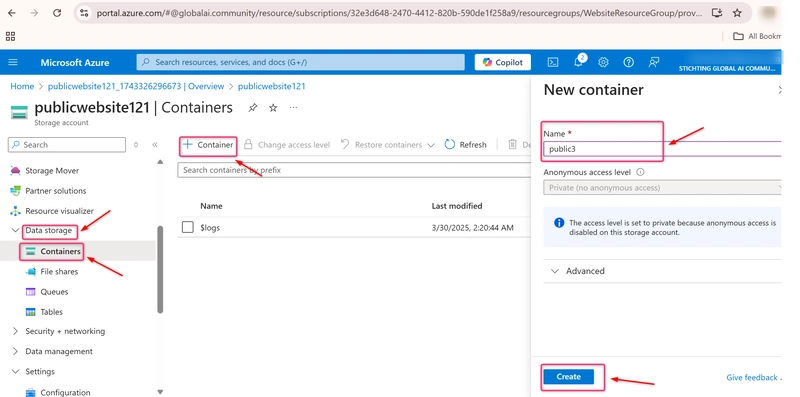
Navigate to Containers: In the Data storage section of the storage account, select Containers.
Create a New Container: Click + Container and name the container “public.” Make sure it’s set to Private (No anonymous access) initially.
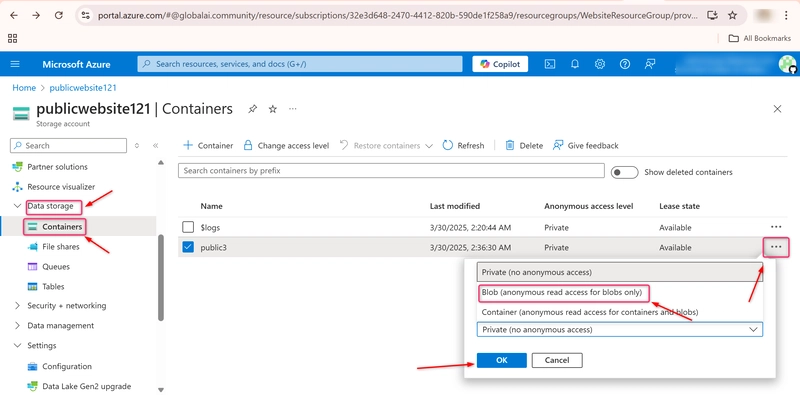
Enable Public Access: After creating the container, select it, and on the Overview blade, click Change access level. Set the Public access level to Blob (anonymous read access for blobs only).
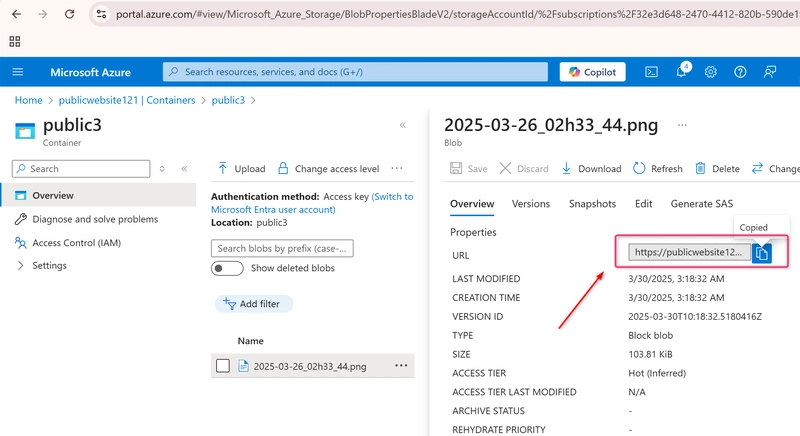
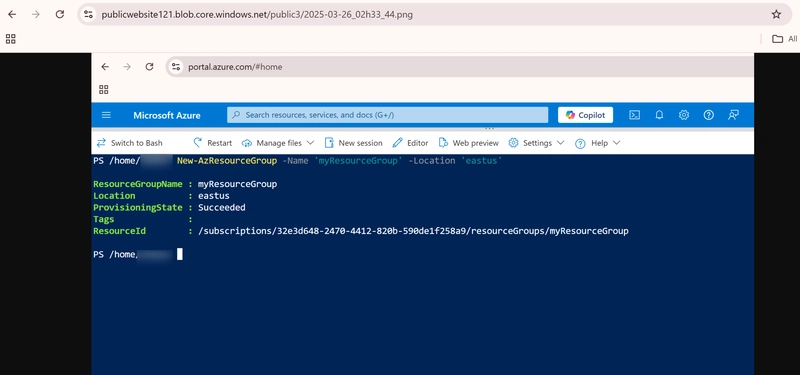
Save and Test Access: Test the public access by uploading a small file (e.g., an image or text file). Browse the file’s URL and confirm it opens or downloads correctly.
Step 4: Enable Soft Delete for Blobs
To protect your files from accidental deletion, enable the soft delete feature for blobs:
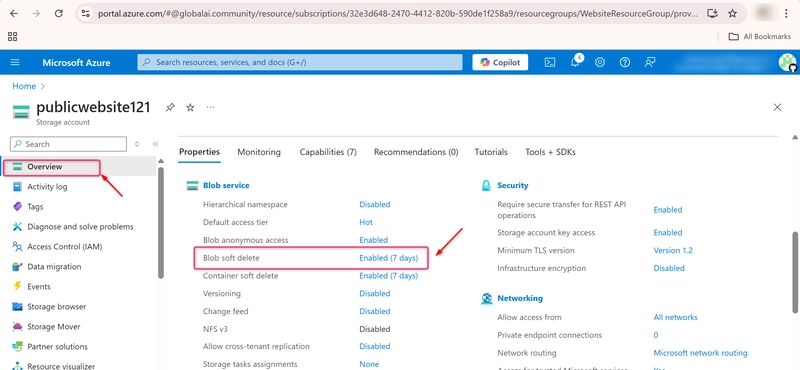
Navigate to Blob Soft Delete Settings: In the Properties section, under the Blob service category, select Blob soft delete.
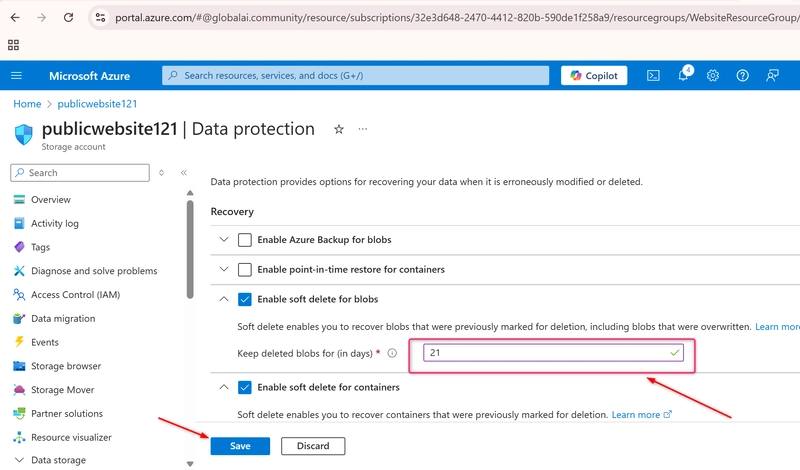
Configure Retention Period: Ensure the Enable soft delete for blobs box is checked, and set the Keep deleted blobs for (in days) to 21 days. This ensures you can restore any files within 21 days if they are accidentally deleted.
Save Your Settings: Don’t forget to click Save after configuring these settings.
Step 5: Practice Restoring Deleted Files Using Soft Delete
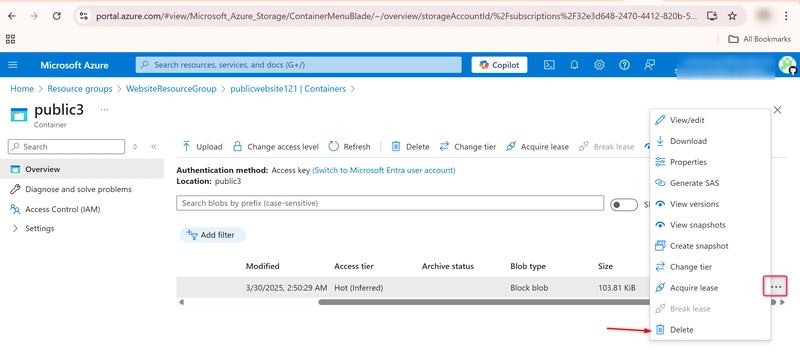
Delete a File: Go to your public container, select a file, and click Delete.
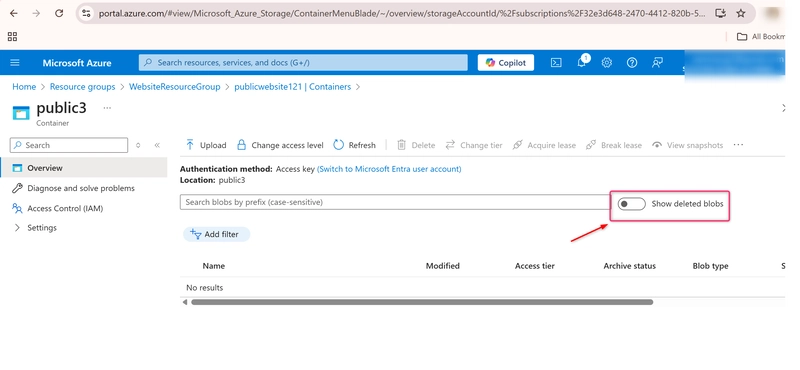
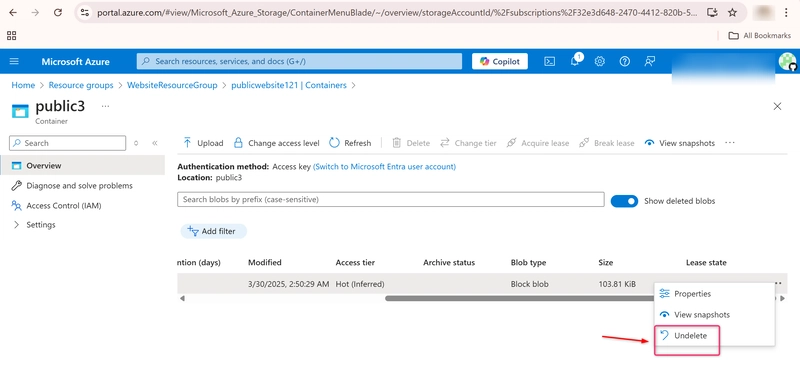
Restore the File: After deletion, toggle the slider to Show deleted blobs. Select the deleted file and choose Undelete. This will restore the file back to the container.
Confirm Restoration: Refresh the container, and you should see the file has been restored.
Step 6: Enable Blob Versioning
To track different versions of your website documents, enable blob versioning:
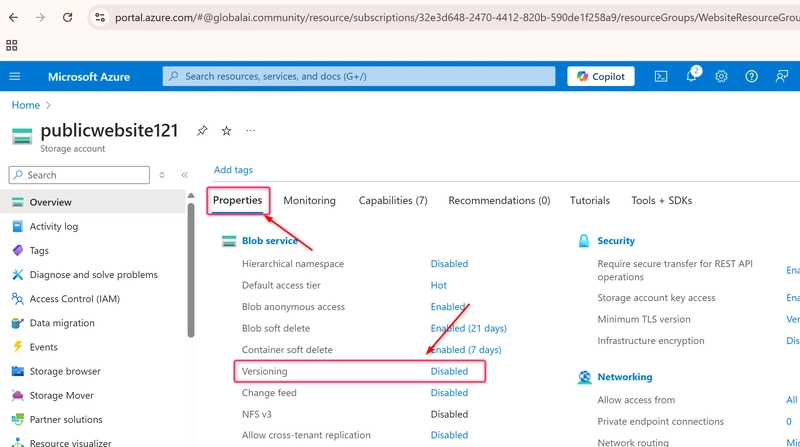
Navigate to Blob Versioning Settings: In the Properties section of your storage account, go to Versioning under Blob service.
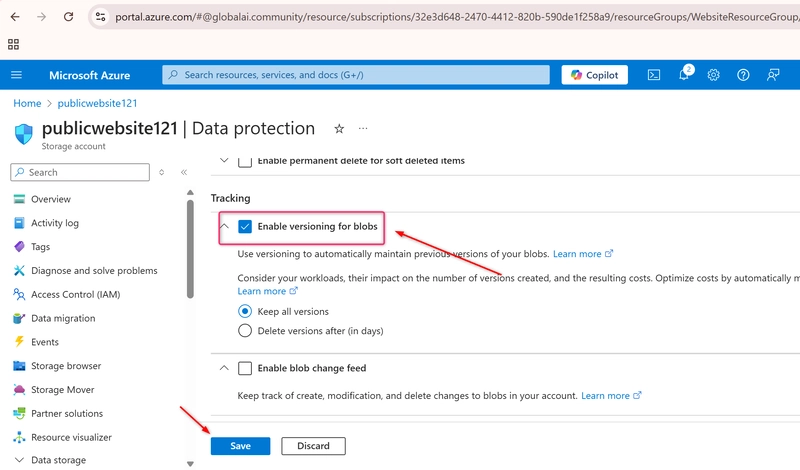
Enable Versioning: Check the Enable versioning for blobs box to ensure all versions of your documents are saved automatically. You can choose whether to keep all versions or delete older versions after a certain period.
Save Your Settings: Click Save to apply the versioning settings.
Step 7: Test Blob Versioning
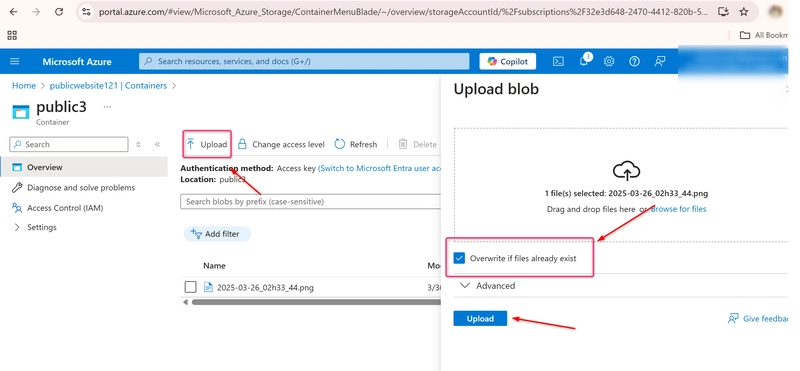
Upload a New Version of a File: Upload a new version of an existing file in your container. This will overwrite the previous version.
Check Previous Versions: Go to the Show deleted blobs page, where you’ll see the old version listed. You can restore it if needed.
Conclusion
By following these steps, you've created a highly available, publicly accessible storage solution for your website that ensures high uptime, automatic redundancy, and protection against accidental deletions. You’ve also set up essential features such as soft delete and versioning to safeguard your website’s content. With these configurations, you can rest easy knowing your website’s files are safe, accessible, and ready to serve your users even in the event of a regional failure.


.jpg)
%20Abstract%20Background%20112024%20SOURCE%20Amazon.jpg)


![[The AI Show Episode 142]: ChatGPT’s New Image Generator, Studio Ghibli Craze and Backlash, Gemini 2.5, OpenAI Academy, 4o Updates, Vibe Marketing & xAI Acquires X](https://www.marketingaiinstitute.com/hubfs/ep%20142%20cover.png)


![From drop-out to software architect with Jason Lengstorf [Podcast #167]](https://cdn.hashnode.com/res/hashnode/image/upload/v1743796461357/f3d19cd7-e6f5-4d7c-8bfc-eb974bc8da68.png?#)


.png?#)


.jpg?#)




_Christophe_Coat_Alamy.jpg?#)















![Rapidus in Talks With Apple as It Accelerates Toward 2nm Chip Production [Report]](https://www.iclarified.com/images/news/96937/96937/96937-640.jpg)


