


![[The AI Show Episode 145]: OpenAI Releases o3 and o4-mini, AI Is Causing “Quiet Layoffs,” Executive Order on Youth AI Education & GPT-4o’s Controversial Update](https://www.marketingaiinstitute.com/hubfs/ep%20145%20cover.png)


![From Art School Drop-out to Microsoft Engineer with Shashi Lo [Podcast #170]](https://cdn.hashnode.com/res/hashnode/image/upload/v1746203291209/439bf16b-c820-4fe8-b69e-94d80533b2df.png?#)


(1).jpg?#)


_Inge_Johnsson-Alamy.jpg?width=1280&auto=webp&quality=80&disable=upscale#)


![Apple to Split iPhone Launches Across Fall and Spring in Major Shakeup [Report]](https://www.iclarified.com/images/news/97211/97211/97211-640.jpg)
![Apple to Move Camera to Top Left, Hide Face ID Under Display in iPhone 18 Pro Redesign [Report]](https://www.iclarified.com/images/news/97212/97212/97212-640.jpg)
![Apple Developing Battery Case for iPhone 17 Air Amid Battery Life Concerns [Report]](https://www.iclarified.com/images/news/97208/97208/97208-640.jpg)
![AirPods 4 On Sale for $99 [Lowest Price Ever]](https://www.iclarified.com/images/news/97206/97206/97206-640.jpg)


![[Updated] Samsung’s 65-inch 4K Smart TV Just Crashed to $299 — That’s Cheaper Than an iPad](https://www.androidheadlines.com/wp-content/uploads/2025/05/samsung-du7200.jpg)


A Step-by-Step Guide to Setting Up Custom SSH Keys for GitHub
Securely connecting to GitHub using SSH keys enhances your workflow by eliminating the need for passwords during authentication. This guide will walk you through generating a key pair, configuring it on GitHub, and troubleshooting common issues. Step 1: Generate an SSH Key Pair Objective: Create a secure SSH key pair (public and private) to authenticate with GitHub. Process: Open your terminal. Run the following command to generate an Ed25519 SSH key pair: Generate SSH key with your_custom_file_name! ssh-keygen -t ed25519 -f ~/.ssh/file_name -C "your_github@email.address" -f your custom file_name with path -C comment ( required | optional)? -f output_keyfile The -f option specifies the filename for the private key. Choose a meaningful name, like localpc or hostingdomaincom Step 2: Add Your Public Key to GitHub Objective: Authorize your public key for SSH authentication on your GitHub account. Process: Copy the public key: Run this command to copy your public key to the clipboard: cat ~/.ssh/file_name.pub Access GitHub Settings: Go to GitHub Account Settings . Click on "Add SSH Key" and provide a title (e.g., "Custom SSH Key"). Paste the public key: Paste the content of custom_key.pub into the text box. Click "Add key" to save. Step 3: Configure SSH to Use Your Custom Key Objective: Tell SSH to use your custom key for connections to GitHub. Test your connection ssh -i ~/.ssh/file_name -T git@github.com 2.Edit the SSH configuration file: Open the following file in a text editor: nano ~/.ssh/config Host github.com HostName github.com User git IdentityFile ~/.ssh/file_name IdentitiesOnly yes Save and exit: Press Ctrl+O to write changes. Press Ctrl+X to close the editor. Common Issues & Solutions Issue 1: "Permission denied (publickey)" when testing SSH connection Ensure your public key is correctly added to GitHub. Verify the private key filename in ~/.ssh/config matches the public key. Testing connection ssh -T git@github.com git@github.com: Permission denied (publickey). Testing connection with verbose mode (debug) ssh -vT git@github.com ... debug1: SSH2_MSG_SERVICE_ACCEPT received debug1: Authentications that can continue: publickey debug1: Next authentication method: publickey debug1: Trying private key: /home/user/.ssh/id_rsa debug1: Trying private key: /home/user/.ssh/id_ecdsa debug1: Trying private key: /home/user/.ssh/id_ecdsa_sk debug1: Trying private key: /home/user/.ssh/id_ed25519 debug1: Trying private key: /home/user/.ssh/id_ed25519_sk debug1: Trying private key: /home/user/.ssh/id_xmss debug1: Trying private key: /home/user/.ssh/id_dsa debug1: No more authentication methods to try. git@github.com: Permission denied (publickey). Github doesn't know your custom file name follow Step 3. Check your current remote URL List current remotes: git remote -v Replace the HTTPS URL with the SSH equivalent in your repository. For example: bash git remote set-url origin git@github.com:username/repo.git Issues: Local "master" Branch Renaming to "main" Description: Commands Used: git push -u origin main Error received: "src refspec main does not match any" git branch -M master main Expected Outcome: Successfully rename the local master branch to main and set it as the default branch for future pushes. Objectives: Local git repository with master branch Github repository with main branch git push -u origin main error: src refspec main does not match any Rename local "master" branch to "main" git branch -M main git branch help: git branch (-m | -M) [] _ Issue: SSH Agent not open _ ssh-add ~/.ssh/your_custom_file_name error: Could not open a connection to your authentication agent. Solution: eval "$(ssh-agent -s)" ssh-add ~/.ssh/file_name Identity added: /home/user/.ssh/file_name To automatically start the SSH agent on login, edit your shell configuration file (e.g., ~/.bashrc) and add: nvim ~/.bashrc file # START Start SSH agent automatically if [ -z "$SSH_AUTH_SOCK" ]; then # Check if ssh-agent is already running ps -aux | grep ssh-agent | grep -v grep >/dev/null if [ $? -ne 0 ]; then # Start ssh-agent eval "$(ssh-agent -s)" fi fi # END Start SSH agent automatically
Securely connecting to GitHub using SSH keys enhances your workflow by eliminating the need for passwords during authentication. This guide will walk you through generating a key pair, configuring it on GitHub, and troubleshooting common issues.
Step 1: Generate an SSH Key Pair
Objective:
Create a secure SSH key pair (public and private) to authenticate with GitHub.
Process:
- Open your terminal.
- Run the following command to generate an Ed25519 SSH key pair:
Generate SSH key with your_custom_file_name!
ssh-keygen -t ed25519 -f ~/.ssh/file_name -C "your_github@email.address"
- -f your custom file_name with path
- -C comment ( required | optional)?
- -f output_keyfile
- The -f option specifies the filename for the private key. Choose a meaningful name, like localpc or hostingdomaincom
Step 2: Add Your Public Key to GitHub
Objective:
Authorize your public key for SSH authentication on your GitHub account.
Process:
- Copy the public key:
Run this command to copy your public key to the clipboard:
cat ~/.ssh/file_name.pub - Access GitHub Settings: Go to GitHub Account Settings . Click on "Add SSH Key" and provide a title (e.g., "Custom SSH Key").
- Paste the public key: Paste the content of custom_key.pub into the text box. Click "Add key" to save.
Step 3: Configure SSH to Use Your Custom Key
Objective:
Tell SSH to use your custom key for connections to GitHub.
- Test your connection
ssh -i ~/.ssh/file_name -T git@github.com
2.Edit the SSH configuration file:
Open the following file in a text editor:
nano ~/.ssh/config
Host github.com
    HostName github.com
    User git
    IdentityFile ~/.ssh/file_name
    IdentitiesOnly yes
- Save and exit:
Press
Ctrl+Oto write changes. PressCtrl+Xto close the editor.
Common Issues & Solutions
Issue 1: "Permission denied (publickey)" when testing SSH connection
- Ensure your public key is correctly added to GitHub.
- Verify the private key filename in ~/.ssh/config matches the public key.
Testing connection
ssh -T git@github.comgit@github.com: Permission denied (publickey).
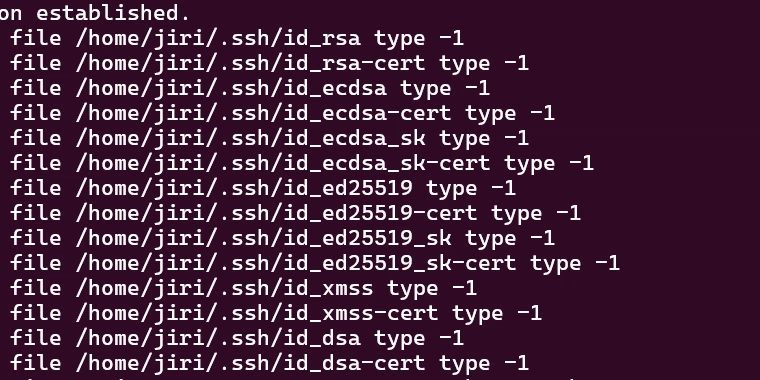
Testing connection with verbose mode (debug)
ssh -vT git@github.com
...
debug1: SSH2_MSG_SERVICE_ACCEPT received
debug1: Authentications that can continue: publickey
debug1: Next authentication method: publickey
debug1: Trying private key: /home/user/.ssh/id_rsa
debug1: Trying private key: /home/user/.ssh/id_ecdsa
debug1: Trying private key: /home/user/.ssh/id_ecdsa_sk
debug1: Trying private key: /home/user/.ssh/id_ed25519
debug1: Trying private key: /home/user/.ssh/id_ed25519_sk
debug1: Trying private key: /home/user/.ssh/id_xmss
debug1: Trying private key: /home/user/.ssh/id_dsa
debug1: No more authentication methods to try.
git@github.com: Permission denied (publickey).
Github doesn't know your custom file name follow Step 3.
Check your current remote URL
List current remotes:
git remote -v
Replace the HTTPS URL with the SSH equivalent in your repository. For example:
bash
git remote set-url origin git@github.com:username/repo.git
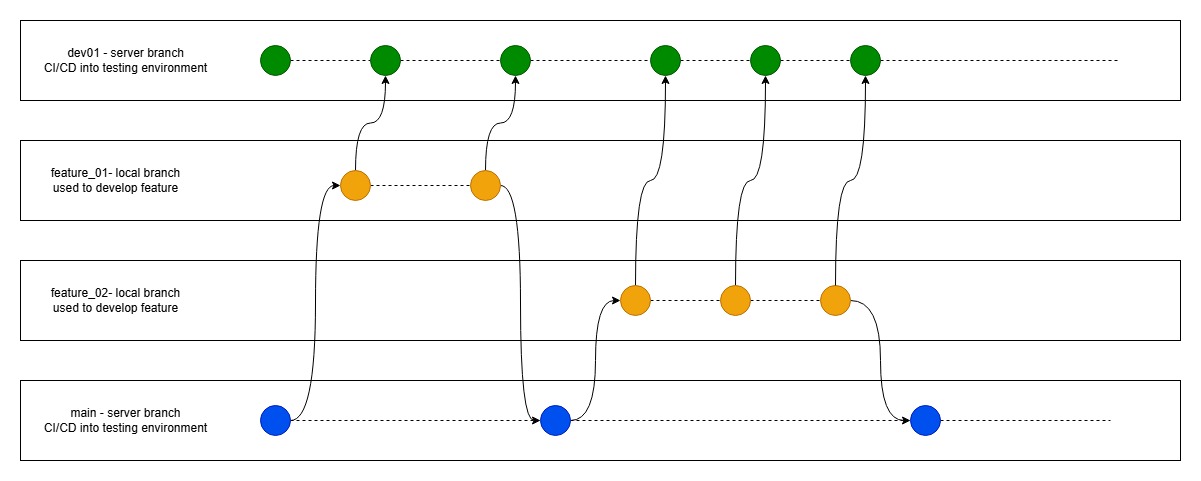
Issues: Local "master" Branch Renaming to "main"
Description:
Commands Used:
git push -u origin main
Error received: "src refspec main does not match any"
git branch -M master main
Expected Outcome:
Successfully rename the local master branch to main and set it as the default branch for future pushes.
Objectives:
- Local git repository with master branch
- Github repository with main branch
git push -u origin main
error: src refspec main does not match any
Rename local "master" branch to "main"
git branch -M main
git branch help: git branch (-m | -M) []
_
Issue: SSH Agent not open
_
ssh-add ~/.ssh/your_custom_file_name
error: Could not open a connection to your authentication agent.
Solution:
eval "$(ssh-agent -s)"
ssh-add ~/.ssh/file_name
Identity added: /home/user/.ssh/file_name
To automatically start the SSH agent on login, edit your shell configuration file (e.g., ~/.bashrc) and add:
nvim ~/.bashrc file
# START Start SSH agent automatically
if [ -z "$SSH_AUTH_SOCK" ]; then
  # Check if ssh-agent is already running
  ps -aux | grep ssh-agent | grep -v grep >/dev/null
  if [ $? -ne 0 ]; then
    # Start ssh-agent
    eval "$(ssh-agent -s)"
  fi
fi
# END Start SSH agent automatically