


![[The AI Show Episode 143]: ChatGPT Revenue Surge, New AGI Timelines, Amazon’s AI Agent, Claude for Education, Model Context Protocol & LLMs Pass the Turing Test](https://www.marketingaiinstitute.com/hubfs/ep%20143%20cover.png)


_Muhammad_R._Fakhrurrozi_Alamy.jpg?width=1280&auto=webp&quality=80&disable=upscale#)
_NicoElNino_Alamy.jpg?width=1280&auto=webp&quality=80&disable=upscale#)


![Apple Releases iOS 18.5 Beta 4 and iPadOS 18.5 Beta 4 [Download]](https://www.iclarified.com/images/news/97145/97145/97145-640.jpg)
![Apple Seeds watchOS 11.5 Beta 4 to Developers [Download]](https://www.iclarified.com/images/news/97147/97147/97147-640.jpg)
![Apple Seeds visionOS 2.5 Beta 4 to Developers [Download]](https://www.iclarified.com/images/news/97150/97150/97150-640.jpg)
![Apple Seeds tvOS 18.5 Beta 4 to Developers [Download]](https://www.iclarified.com/images/news/97153/97153/97153-640.jpg)


Supabase WordPress Integration — Save Users Data
Integrating Supabase with WordPress offers a modern, scalable way to enhance your WordPress site with powerful backend capabilities such as user authentication and real-time data handling. Let's see how this integration is done. Get the plugin: https://techcater.com Demo Video: https://www.youtube.com/watch?v=BewjtbcFZ3M SupaWP plugin configuration (v1.1.0) The ability to create users data from WordPress to Supabase is added in version 1.1.0. Before you enable users synchronization, please make sure the table exists in Supabase. All you need to do is to enter the table name to the Sync Data tab in WordPress. After that, whenever users log in using the plugin's shortcode, their data is saved to Supabase. Video demo: https://www.youtube.com/watch?v=yqg1vulLZyw Bonus: Create and save data to tables in Supabase The SupaWP plugin does the hard lifting of the integration between WordPress and Supabase. In case you are curious on how it's done, please continue reading. Create Supabase Tables Create a new table in supabase is pretty straight forward, you can either do by using Table Editor or SQL Editor. Here are some SQL scripts to create profiles table using SQL Editor: -- 1. Create the table to store user profiles -- Replace 'public.profiles' with your actual table name if different. CREATE TABLE public.profiles ( id uuid NOT NULL PRIMARY KEY, -- Matches auth.users.id, Primary Key email text, -- User's email created_at timestamptz DEFAULT now(), -- Timestamp when the row is created updated_at timestamptz DEFAULT now() -- Timestamp for updates (can be auto-updated later with triggers if needed) ); -- 2. Add Foreign Key constraint linking to auth.users table -- Ensures that the 'id' in your profiles table corresponds to a real user in Supabase Auth. -- Replace 'public.profiles' with your actual table name. ALTER TABLE public.profiles ADD CONSTRAINT fk_auth_users FOREIGN KEY (id) REFERENCES auth.users(id) ON DELETE CASCADE; -- ON DELETE CASCADE means if a user is deleted from auth.users, their corresponding row here is also deleted. Protect your tables with Row Level Security (RLS) Using Row-Level Security (RLS) in Supabase is essential for implementing robust data security at the database level. Here's why it's valuable: Fine-grained access control - RLS lets you control data access at the row level, meaning users only see data they're authorized to access, even when they're querying the same table. Security at the database layer - Rather than implementing security checks only in your application code (which can be bypassed), RLS enforces permissions directly in the database. Simplified application code - With security rules defined in the database, your frontend doesn't need complex authorization logic, reducing potential security bugs. Consistent policy enforcement - RLS policies apply consistently regardless of how data is accessed—whether through the Supabase client library, API, or direct database connections. Data isolation - Perfect for multi-tenant applications where you need to ensure users from one organization can't access another organization's data. Here are the example scripts that only allow authenticated users to create and update their own Profiles: -- 1. Enable Row Level Security (RLS) on the table -- IMPORTANT: This secures your table so that policies are enforced. -- Replace 'public.profiles' with your actual table name. ALTER TABLE public.profiles ENABLE ROW LEVEL SECURITY; -- 2. Create the INSERT policy -- Allows any authenticated user to insert a row *only if* the 'id' they are inserting -- matches their own authenticated User ID (auth.uid()). -- Replace 'public.profiles' with your actual table name. CREATE POLICY "Allow authenticated users insert own profile" ON public.profiles FOR INSERT TO authenticated WITH CHECK (auth.uid() = id); -- 3. Create the UPDATE policy -- Allow users to update their own profile -- Replace 'public.profiles' with your actual table name. CREATE POLICY "Allow authenticated users update own profile" ON public.profiles FOR UPDATE TO authenticated USING (auth.uid() = id) -- Specifies which rows the policy applies to (only their own) WITH CHECK (auth.uid() = id); -- Ensures they can't change the 'id' column Save data to Supabase Tables (Frontend) For saving data from the frontend, you will need @supabase/supabase-js package. Here is the example on how we initialize Supabase client and save data to profiles table: import { createClient } from '@supabase/supabase-js'; // Initialize the Supabase client const supabaseUrl = 'YOUR_SUPABASE_URL'; const supabaseKey = 'YOUR_SUPABASE_KEY'; const supabase = createClient(supabaseUrl, supabaseKey); // Function to insert a new profile async function insertProfile(profile: { id: string; username: string; full_name?: string; avatar_url?: string; }) { const { data, error } = await supabase .from('prof
Integrating Supabase with WordPress offers a modern, scalable way to enhance your WordPress site with powerful backend capabilities such as user authentication and real-time data handling. Let's see how this integration is done.
Get the plugin: https://techcater.com
Demo Video: https://www.youtube.com/watch?v=BewjtbcFZ3M
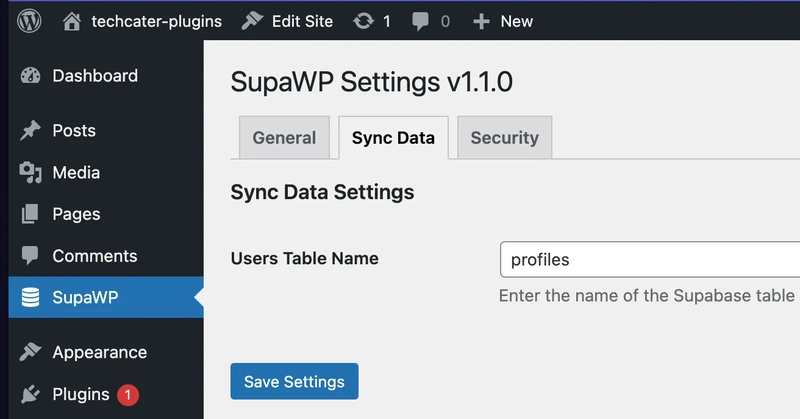
SupaWP plugin configuration (v1.1.0)
The ability to create users data from WordPress to Supabase is added in version 1.1.0. Before you enable users synchronization, please make sure the table exists in Supabase. All you need to do is to enter the table name to the Sync Data tab in WordPress.
After that, whenever users log in using the plugin's shortcode, their data is saved to Supabase.
Video demo: https://www.youtube.com/watch?v=yqg1vulLZyw
Bonus: Create and save data to tables in Supabase
The SupaWP plugin does the hard lifting of the integration between WordPress and Supabase. In case you are curious on how it's done, please continue reading.
Create Supabase Tables
Create a new table in supabase is pretty straight forward, you can either do by using Table Editor or SQL Editor.
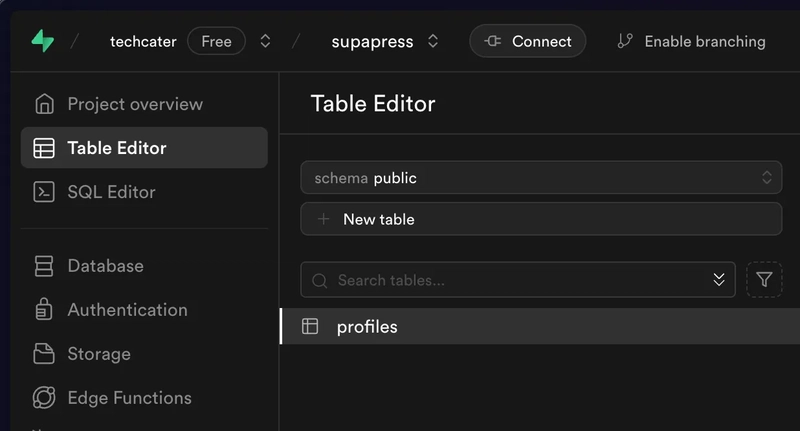
Here are some SQL scripts to create profiles table using SQL Editor:
-- 1. Create the table to store user profiles
-- Replace 'public.profiles' with your actual table name if different.
CREATE TABLE public.profiles (
  id uuid NOT NULL PRIMARY KEY, -- Matches auth.users.id, Primary Key
  email text,                  -- User's email
  created_at timestamptz DEFAULT now(), -- Timestamp when the row is created
  updated_at timestamptz DEFAULT now()  -- Timestamp for updates (can be auto-updated later with triggers if needed)
);

-- 2. Add Foreign Key constraint linking to auth.users table
-- Ensures that the 'id' in your profiles table corresponds to a real user in Supabase Auth.
-- Replace 'public.profiles' with your actual table name.
ALTER TABLE public.profiles
  ADD CONSTRAINT fk_auth_users FOREIGN KEY (id) REFERENCES auth.users(id) ON DELETE CASCADE;
  -- ON DELETE CASCADE means if a user is deleted from auth.users, their corresponding row here is also deleted.
Protect your tables with Row Level Security (RLS)
Using Row-Level Security (RLS) in Supabase is essential for implementing robust data security at the database level. Here's why it's valuable:
Fine-grained access control - RLS lets you control data access at the row level, meaning users only see data they're authorized to access, even when they're querying the same table.
Security at the database layer - Rather than implementing security checks only in your application code (which can be bypassed), RLS enforces permissions directly in the database.
Simplified application code - With security rules defined in the database, your frontend doesn't need complex authorization logic, reducing potential security bugs.
Consistent policy enforcement - RLS policies apply consistently regardless of how data is accessed—whether through the Supabase client library, API, or direct database connections.
Data isolation - Perfect for multi-tenant applications where you need to ensure users from one organization can't access another organization's data.
Here are the example scripts that only allow authenticated users to create and update their own Profiles:
-- 1. Enable Row Level Security (RLS) on the table
-- IMPORTANT: This secures your table so that policies are enforced.
-- Replace 'public.profiles' with your actual table name.
ALTER TABLE public.profiles ENABLE ROW LEVEL SECURITY;

-- 2. Create the INSERT policy
-- Allows any authenticated user to insert a row *only if* the 'id' they are inserting
-- matches their own authenticated User ID (auth.uid()).
-- Replace 'public.profiles' with your actual table name.
CREATE POLICY "Allow authenticated users insert own profile"
ON public.profiles
FOR INSERT
TO authenticated
WITH CHECK (auth.uid() = id);

-- 3. Create the UPDATE policy
-- Allow users to update their own profile
-- Replace 'public.profiles' with your actual table name.
CREATE POLICY "Allow authenticated users update own profile"
ON public.profiles
FOR UPDATE
TO authenticated
USING (auth.uid() = id) -- Specifies which rows the policy applies to (only their own)
WITH CHECK (auth.uid() = id); -- Ensures they can't change the 'id' column
Save data to Supabase Tables (Frontend)
For saving data from the frontend, you will need @supabase/supabase-js package. Here is the example on how we initialize Supabase client and save data to profiles table:
import { createClient } from '@supabase/supabase-js';

// Initialize the Supabase client
const supabaseUrl = 'YOUR_SUPABASE_URL';
const supabaseKey = 'YOUR_SUPABASE_KEY';
const supabase = createClient(supabaseUrl, supabaseKey);

// Function to insert a new profile
async function insertProfile(profile: {
  id: string;
  username: string;
  full_name?: string;
  avatar_url?: string;
}) {
  const { data, error } = await supabase
    .from('profiles')
    .insert(profile)
    .select(); // Optional: returns the inserted row(s)


  if (error) {
    console.error('Error inserting profile:', error);
    return null;
  }

  return data;
}

// Example usage
const newProfile = {
  id: 'user-456',
  username: 'janedoe',
  full_name: 'Jane Doe',
  avatar_url: 'https://example.com/jane-avatar.png'
};

insertProfile(newProfile);
As you can see, the .insert() method adds a new row to the table. You can chain .select() to return the newly inserted data, or omit it if you don't need the response data.
Conclusion
The SupaWP plugin from TechCater simplifies integrating Supabase’s powerful backend services with WordPress, providing scalable authentication, real-time data, and centralized user management. In this article, you know how to create a new user data from WordPress and save it to Supabase database.