


![[The AI Show Episode 144]: ChatGPT’s New Memory, Shopify CEO’s Leaked “AI First” Memo, Google Cloud Next Releases, o3 and o4-mini Coming Soon & Llama 4’s Rocky Launch](https://www.marketingaiinstitute.com/hubfs/ep%20144%20cover.png)


![Is this too much for a modular monolith system? [closed]](https://i.sstatic.net/pYL1nsfg.png)


_Andreas_Prott_Alamy.jpg?width=1280&auto=webp&quality=80&disable=upscale#)


![What features do you get with Gemini Advanced? [April 2025]](https://i0.wp.com/9to5google.com/wp-content/uploads/sites/4/2024/02/gemini-advanced-cover.jpg?resize=1200%2C628&quality=82&strip=all&ssl=1)


![Apple Shares Official Trailer for 'Long Way Home' Starring Ewan McGregor and Charley Boorman [Video]](https://www.iclarified.com/images/news/97069/97069/97069-640.jpg)
![Apple Watch Series 10 Back On Sale for $299! [Lowest Price Ever]](https://www.iclarified.com/images/news/96657/96657/96657-640.jpg)
![EU Postpones Apple App Store Fines Amid Tariff Negotiations [Report]](https://www.iclarified.com/images/news/97068/97068/97068-640.jpg)
![Apple Slips to Fifth in China's Smartphone Market with 9% Decline [Report]](https://www.iclarified.com/images/news/97065/97065/97065-640.jpg)


Streamlining Workflows with AWS Step Functions, Lambda, and SQS
Introduction In today’s fast-paced digital world, automating workflows can save time, reduce errors, and streamline operations. AWS provides a suite of powerful tools, including Lambda, SQS, and Step Functions, to create scalable, serverless applications that can manage complex workflows efficiently. In this article, we will walk you through how to automate a multi-step workflow using these AWS services. Overview A quick overview of how the automation will be: Create a standard SQS queue to handle support ticket messages. Develop Lambda functions to validate the tickets, assign tickets, and notify customers. Define a Step Functions state machine to orchestrate workflow tasks. Configure the SQS queue to trigger the Lambda function for event-driven processing. Test the workflow. Creating the Amazon SQS Queue Login to the AWS Management Console. Navigate to the Amazon SQS service. Click Create Queue and choose Standard Queue. Provide the queue name (e.g., SupportTicketsQueue). Leave the default settings, or adjust as needed: Visibility Timeout: 30 seconds (default). Message Retention: 4 days (default). Click Create Queue. Creating and Deploying Lambda Functions We will need three Lambda functions: ValidateTicketFunction, AssignTicketFunction, and NotifyCustomerFunction. 1. Create IAM Roles for Lambda functions Open the AWS Management Console and go to IAM. Create a New Role for Each Function: Click Roles > Create Role. Under Trusted Entity Type, select AWS Service and choose Lambda. Attach the necessary permissions: AmazonSQSReadOnlyAccess for ValidateTicketFunction. AmazonSESFullAccess for NotifyCustomerFunction. AmazonSQSFullAccess and the following Custom permission StateMachineTriggerPolicy for TriggerStateMachine function. { "Version": "2012-10-17", "Statement": [ { "Effect": "Allow", "Action": "states:StartExecution", "Resource": "arn:aws:states:REGION:ACCOUNT_ID:stateMachine:MyStateMachine-eat9e7ot8" } ] } Replace REGION and ACCOUNT_ID with your AWS region and account ID. AWSLambdaBasicExecutionRole for all functions. Name the roles appropriately (e.g., ValidateTicketRole, NotifyCustomerRole, AssignTicketRole ,TriggerTestMachine) and click Create Role. Deploy the ValidateTicketFunction Lambda function Navigate to the AWS Lambda Console: Open AWS Lambda from the AWS Management Console. Click Create Function. Choose Author from Scratch. Fill in the details: Function Name: ValidateTicketFunction. Runtime: Select Python 3.9 or higher. Execution Role: Select Use an existing role and choose ValidateTicketRole. In the function editor, write this Python code: import json def lambda_handler(event, context): # Directly access the event data (ticket details) # This will be the structured input passed to the state machine ticket_id = event.get("ticket_id") customer_email = event.get("customer_email") issue_description = event.get("issue_description") # Process the message (For example, validate or log the ticket) print(f"Processing ticket: {ticket_id} for customer: {customer_email}") # You can validate or modify the input here if not ticket_id or not customer_email: raise ValueError("Missing required ticket information.") # Return structured output if needed return { "status": "validated", "ticket_id": ticket_id, "customer_email": customer_email, "issue_description": issue_description } Click Deploy to save the changes. Deploy the AssignTicketFunction Lambda function Repeat the steps for creating a new function, this time with the following details: Function Name: AssignTicketFunction. Runtime: Python 3.9 or higher. Execution Role: Select AssignTicketRole. In the function editor, write this Python code: import json def lambda_handler(event, context): try: # The event input will be the output of the previous state (ValidateTicket) ticket_id = event.get("ticket_id") customer_email = event.get("customer_email") # You can perform ticket assignment logic here print(f"Assigning ticket: {ticket_id} to customer: {customer_email}") # You can return the updated status after assignment return { "status": "assigned", "ticket_id": ticket_id, "customer_email": customer_email } except KeyError as e: print(f"KeyError: Missing key {e}") return {"status": "error", "message": f"Missing key: {e}"} except Exception as e: print(f"Unexpected error: {e}") return {"status": "error", "message": str(e)} Click Deploy to save the changes. Deploy the NotifyCustomerFunction Lambda function Create another Lambda function with the following details: Function Name: NotifyCustomerFunction. Runtime: Pyt
Introduction
In today’s fast-paced digital world, automating workflows can save time, reduce errors, and streamline operations. AWS provides a suite of powerful tools, including Lambda, SQS, and Step Functions, to create scalable, serverless applications that can manage complex workflows efficiently. In this article, we will walk you through how to automate a multi-step workflow using these AWS services.
Overview
A quick overview of how the automation will be:
- Create a standard SQS queue to handle support ticket messages.
- Develop Lambda functions to validate the tickets, assign tickets, and notify customers.
- Define a Step Functions state machine to orchestrate workflow tasks.
- Configure the SQS queue to trigger the Lambda function for event-driven processing.
- Test the workflow.
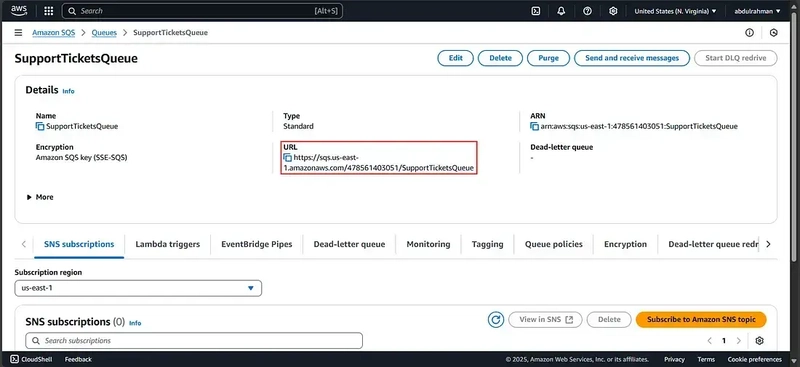
Creating the Amazon SQS Queue
Login to the AWS Management Console.
- Navigate to the Amazon SQS service.
- Click Create Queue and choose Standard Queue.
- Provide the queue name (e.g., SupportTicketsQueue).
- Leave the default settings, or adjust as needed:
- Visibility Timeout: 30 seconds (default).
- Message Retention: 4 days (default).
- Click Create Queue.
Creating and Deploying Lambda Functions
We will need three Lambda functions: ValidateTicketFunction, AssignTicketFunction, and NotifyCustomerFunction.
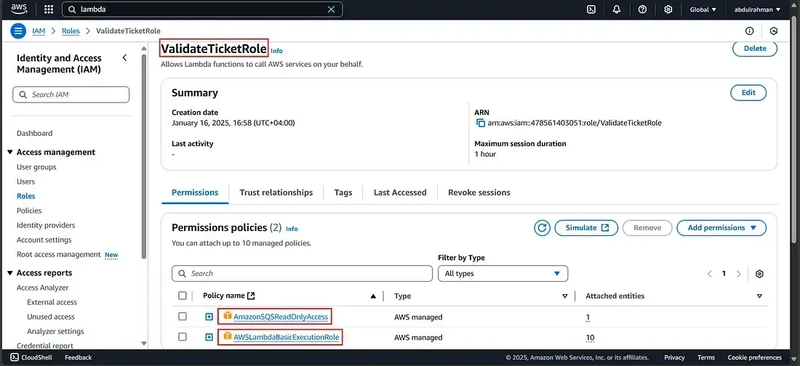
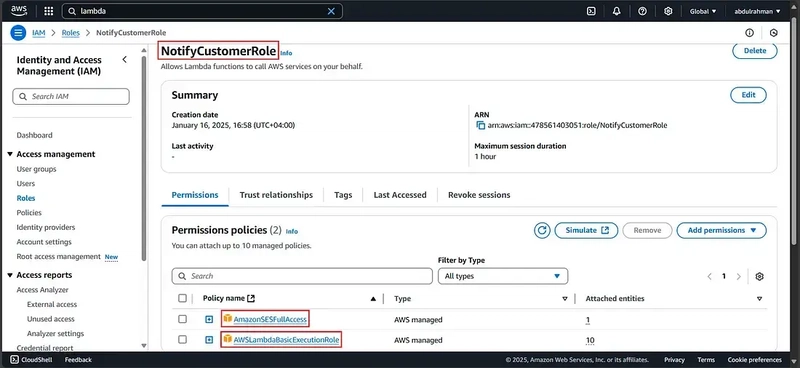
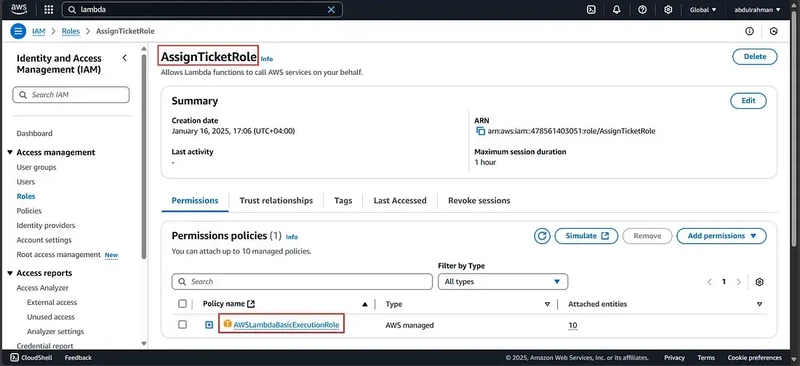
1. Create IAM Roles for Lambda functions
- Open the AWS Management Console and go to IAM.
- Create a New Role for Each Function:
- Click Roles > Create Role.
- Under Trusted Entity Type, select AWS Service and choose Lambda.
- Attach the necessary permissions:
- AmazonSQSReadOnlyAccess for ValidateTicketFunction.
- AmazonSESFullAccess for NotifyCustomerFunction.
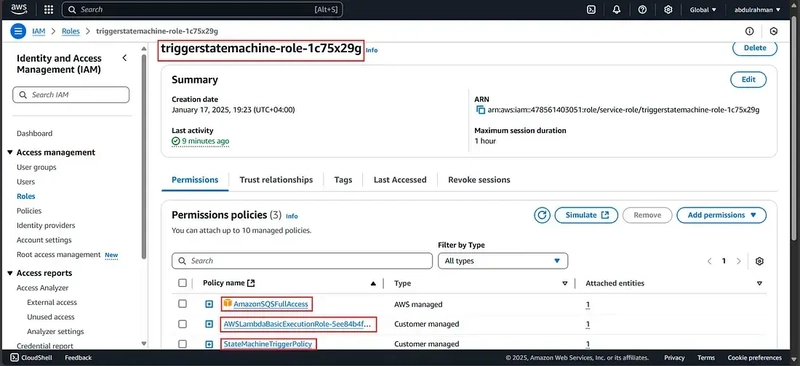
- AmazonSQSFullAccess and the following Custom permission StateMachineTriggerPolicy for TriggerStateMachine function.
{
    "Version": "2012-10-17",
    "Statement": [
        {
            "Effect": "Allow",
            "Action": "states:StartExecution",
            "Resource": "arn:aws:states:REGION:ACCOUNT_ID:stateMachine:MyStateMachine-eat9e7ot8"
        }
    ]
}
- Replace REGION and ACCOUNT_ID with your AWS region and account ID.
- AWSLambdaBasicExecutionRole for all functions.
- Name the roles appropriately (e.g., ValidateTicketRole, NotifyCustomerRole, AssignTicketRole ,TriggerTestMachine) and click Create Role.
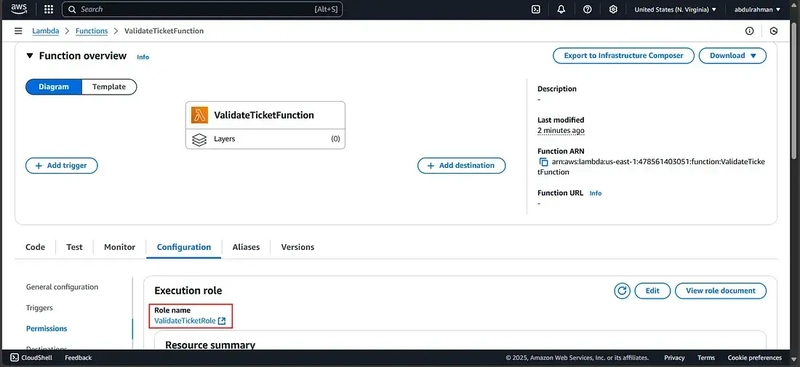
- Deploy the ValidateTicketFunction Lambda function
- Navigate to the AWS Lambda Console:
- Open AWS Lambda from the AWS Management Console.
- Click Create Function.
- Choose Author from Scratch.
- Fill in the details:
- Function Name: ValidateTicketFunction.
- Runtime: Select Python 3.9 or higher.
- Execution Role: Select Use an existing role and choose ValidateTicketRole.
- In the function editor, write this Python code:
import json

def lambda_handler(event, context):
    # Directly access the event data (ticket details)
    # This will be the structured input passed to the state machine
    ticket_id = event.get("ticket_id")
    customer_email = event.get("customer_email")
    issue_description = event.get("issue_description")

    # Process the message (For example, validate or log the ticket)
    print(f"Processing ticket: {ticket_id} for customer: {customer_email}")

    # You can validate or modify the input here
    if not ticket_id or not customer_email:
        raise ValueError("Missing required ticket information.")

    # Return structured output if needed
    return {
        "status": "validated",
        "ticket_id": ticket_id,
        "customer_email": customer_email,
        "issue_description": issue_description
    }
- Click Deploy to save the changes.
- Deploy the AssignTicketFunction Lambda function
Repeat the steps for creating a new function, this time with the following details:
- Function Name: AssignTicketFunction.
- Runtime: Python 3.9 or higher.
- Execution Role: Select AssignTicketRole.
- In the function editor, write this Python code:
import json

def lambda_handler(event, context):
    try:
        # The event input will be the output of the previous state (ValidateTicket)
        ticket_id = event.get("ticket_id")
        customer_email = event.get("customer_email")

        # You can perform ticket assignment logic here
        print(f"Assigning ticket: {ticket_id} to customer: {customer_email}")

        # You can return the updated status after assignment
        return {
            "status": "assigned",
            "ticket_id": ticket_id,
            "customer_email": customer_email
        }
    except KeyError as e:
        print(f"KeyError: Missing key {e}")
        return {"status": "error", "message": f"Missing key: {e}"}
    except Exception as e:
        print(f"Unexpected error: {e}")
        return {"status": "error", "message": str(e)}
- Click Deploy to save the changes.

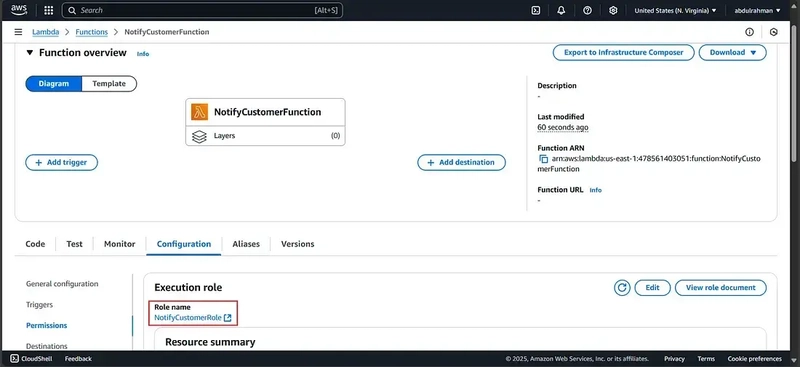
- Deploy the NotifyCustomerFunction Lambda function
Create another Lambda function with the following details:
- Function Name: NotifyCustomerFunction.
- Runtime: Python 3.9 or higher.
- Execution Role: Select NotifyCustomerRole.
- In the function editor, write this Python code:
import json
import boto3

def lambda_handler(event, context):
    try:
        # The event input will be the output of the previous state (AssignTicketFunction)
        ticket_id = event.get("ticket_id")
        customer_email = event.get("customer_email")

        # Send a notification (e.g., email) to the customer
        ses_client = boto3.client('ses')

        # Placeholder: send email logic here
        print(f"Notifying customer {customer_email} about ticket {ticket_id} assignment.")

        # You can implement SES email sending logic here
        # Example: ses_client.send_email(...)

        return {
            "status": "notified",
            "ticket_id": ticket_id,
            "customer_email": customer_email
        }
    except KeyError as e:
        print(f"KeyError: Missing key {e}")
        return {"status": "error", "message": f"Missing key: {e}"}
    except Exception as e:
        print(f"Unexpected error: {e}")
        return {"status": "error", "message": str(e)}
- Click Deploy to save the changes.
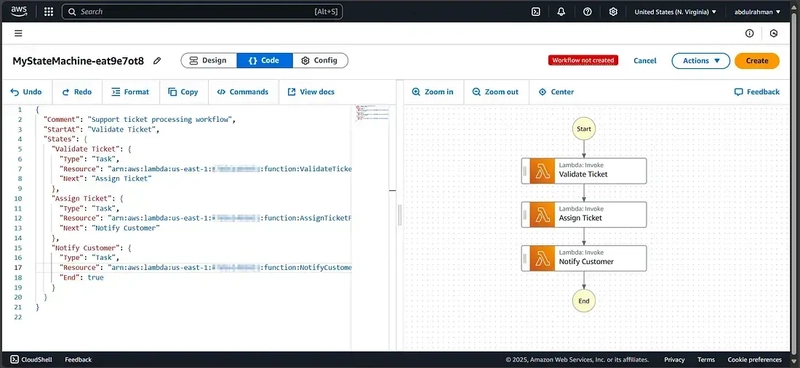
Defining The Step Function State Machine
- Navigate to the Step Functions Console.
- Click Create State Machine.
- Choose Blank.
- Under the Code Section, Define the state machine with the following workflow:
{
  "Comment": "Support ticket processing workflow",
  "StartAt": "Validate Ticket",
  "States": {
    "Validate Ticket": {
      "Type": "Task",
      "Resource": "arn:aws:lambda:REGION:ACCOUNT_ID:function:ValidateTicketFunction",
      "Next": "Assign Ticket"
    },
    "Assign Ticket": {
      "Type": "Task",
      "Resource": "arn:aws:lambda:REGION:ACCOUNT_ID:function:AssignTicketFunction",
      "Next": "Notify Customer"
    },
    "Notify Customer": {
      "Type": "Task",
      "Resource": "arn:aws:lambda:REGION:ACCOUNT_ID:function:NotifyCustomerFunction",
      "End": true
    }
  }
}
- Replace REGION and ACCOUNT_ID with your AWS region and account ID.
- Click Create, then Confirm for the new IAM role associated with the state machine.
Configuring the Workflow Trigger
We will create a Lambda function that is triggered by the SQS message. This Lambda function can then invoke the Step Functions state machine.
Create a Lambda Function:
- Function Name: TriggerstateMachine.
- Runtime: Python 3.9 or higher.
- Execution Role: Select TriggerstateMachine-role-1c75x29g .
- In the function editor, write this Python code:
import json
import boto3

def lambda_handler(event, context):
    # Initialize Step Functions client
    stepfunctions_client = boto3.client('stepfunctions')
    state_machine_arn = 'arn:aws:states:REGION:ACCOUNT_ID:stateMachine:MyStateMachine-eat9e7ot8'

    # Log the event for debugging
    print(f"Received event: {json.dumps(event)}")

    try:
        # Process the SQS message
        for record in event['Records']:
            sqs_message = json.loads(record['body'])  # Parse the SQS message body
            print(f"Parsed message: {sqs_message}")

            # Start the Step Functions execution
            response = stepfunctions_client.start_execution(
                stateMachineArn=state_machine_arn,
                name=f"execution-{record['messageId']}",  # Unique name per execution
                input=json.dumps(sqs_message)  # Convert the input back to JSON string
            )
            print(f"Step Functions response: {response}")

        return {
            'statusCode': 200,
            'body': json.dumps('Execution started for all messages')
        }

    except Exception as e:
        print(f"Error: {str(e)}")
        return {
            'statusCode': 500,
            'body': json.dumps(f"Error: {str(e)}")
        }
- Replace REGION and ACCOUNT_ID with your AWS region and account ID.
- Click Deploy to save the changes.
Set the Lambda Function as the SQS Trigger:
- Go to the SQS Console and select SupportTicketsQueueSQS queue.
- Under Lambda triggers, add the TriggerstateMachine function.
- This Lambda function will now be invoked whenever a message is sent to the SQS queue.
Testing The Workflow
Send a test message to SQS
- Navigate to the SQS queue.
- Click Send and receive messages.
- Navigate to the SQS queue.
- Provide a sample JSON message:
{
  "ticket_id": "1234",
  "customer_email": "customer@example.com",
  "issue_description": "Issue with the application"
}
- Replace the customer email with email you have access to it.
- Click Send Message.
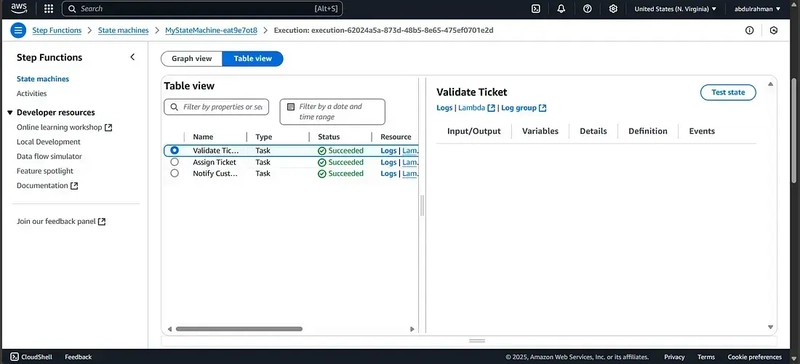
Verify the workflow
- Check the Executions tab of the created State Machine.
- you should see that the execution is successful under the Details tab.
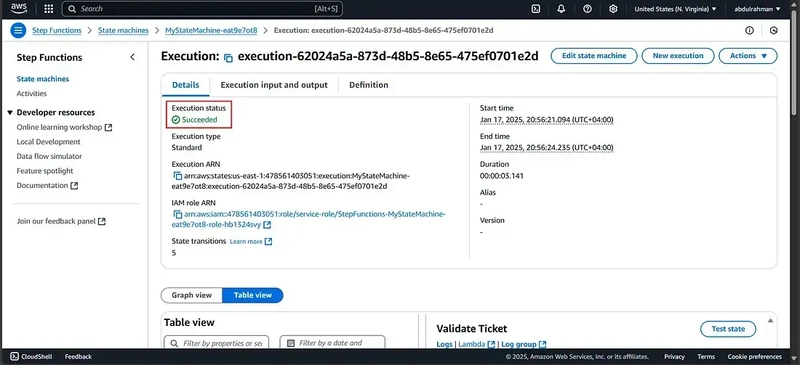
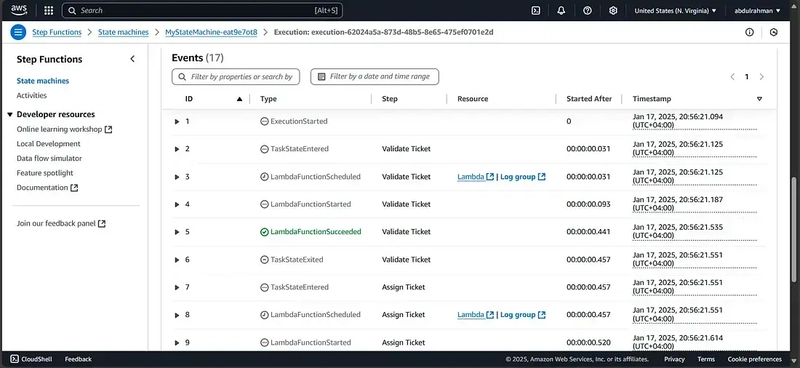
Scroll down to see the successful executions of all of the related Lambda functions and the overall state machine execution events.
Conclusion
By combining AWS Lambda, SQS, and Step Functions, we’ve built a scalable, automated workflow to streamline processes and reduce manual effort. This solution highlights how these services integrate seamlessly to handle message queuing, custom logic execution, and task orchestration in a cost-effective and reliable manner.
This architecture is versatile, extending beyond support ticket processing to use cases like order fulfillment and data pipelines. It scales effortlessly and minimizes infrastructure management, allowing you to focus on delivering value to your customers. Use this framework as a starting point to enhance your workflows and drive efficiency in your operations.