Steps to Deploy Angular Application on EC2
Step 1: Create EC2 Instance Follow the steps to create an EC2 instance via AWS Console. Make sure you have a security group allowing HTTP (port 80) and SSH (port 22) access. Step 1.1 : Connecting EC2 Instance via SSH To securely connect to your EC2 instance, you'll need the .pem private key file you downloaded during the creation of your EC2 instance. Use the following SSH command to connect: ssh -i /path/to/your/private-key.pem ec2-user@ Note: If you encounter permissions issues, you might need to adjust the permissions of the .pem key file: chmod 400 /path/to/your/private-key.pem Once connected, you should see a terminal prompt for the EC2 instance. Step 2: Create the Build for Angular Application Run the following Angular CLI command to build your project for production: ng build The build output will be stored in the dist/ directory under the name of your app (dist/). Step 3: Transfer Build to EC2 Instance Use SCP to securely transfer your built Angular project to your EC2 instance: scp -r -i ~/OneDrive/Desktop/angulardeploy.pem "/c/Users/Admin/OneDrive/Desktop/KANBAN/Kanban-Task-Management-Web-App/dist/frontend/" ec2-user@ec2-34-224-41-250.compute-1.amazonaws.com:~/ Step 4: Nginx Setup with Paths Install Nginx on your EC2 instance if it is not already installed by using the following respectively commands: sudo yum update sudo yum install nginx sudo amazon-linux-extras install nginx1 sudo systemctl start nginx sudo systemctl status nginx -1 Update Nginx.conf file: Edit the Nginx configuration file: sudo vim /etc/nginx/nginx.conf Update the serverblock with the path to your application directory and set up a try_filesdirective: server { listen 80; listen [::]:80; server_name _; location / { autoindex on; root /home/ec2-user/frontend; try_files $uri $uri/ /index.html; } root /usr/share/nginx/html; error_page 404 /404.html; location = /404.html { } error_page 500 502 503 504 /50x.html; location = /50x.html { } } Provide permissions: namei -om /usr/share/nginx/html namei -om /home/ec2-user/YourBuildName sudo chmod 755 /home/ec2-user namei-om /home/ec2-user/YourBuildName This command ensures that the build directory has the necessary permissions (read, write, and executefor the owner, and read/execute for others) by modifying permissions for /home/ec2-user: Verify Nginx is running: sudo systemctl reload nginx sudo systemctl restart nginx Step 5: Test Deployment Open your browser and navigate to your EC2 instance's public IP or domain name: http://

Step 1: Create EC2 Instance
Follow the steps to create an EC2 instance via AWS Console.
Make sure you have a security group allowing HTTP (port 80) and SSH (port 22) access.
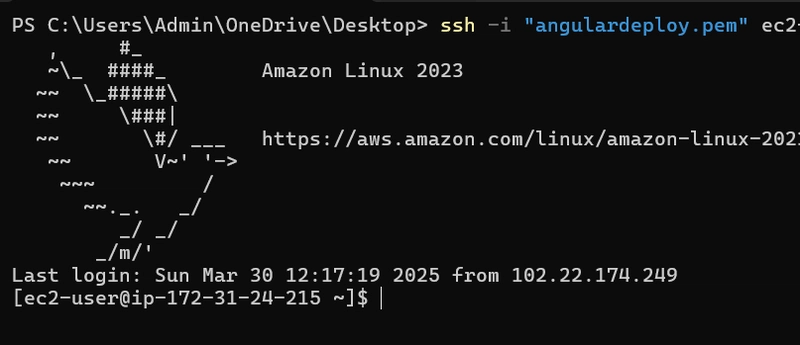
Step 1.1 : Connecting EC2 Instance via SSH
- To securely connect to your EC2 instance, you'll need the .pem private key file you downloaded during the creation of your EC2 instance. Use the following SSH command to connect:
ssh -i /path/to/your/private-key.pem ec2-user@<your-ec2-public-ip>
Note: If you encounter permissions issues, you might need to adjust the permissions of the .pem key file:
chmod 400 /path/to/your/private-key.pem
Once connected, you should see a terminal prompt for the EC2 instance.
Step 2: Create the Build for Angular Application
Run the following Angular CLI command to build your project for production:
ng build
The build output will be stored in the dist/ directory under the name of your app (dist/).
Step 3: Transfer Build to EC2 Instance
Use SCP to securely transfer your built Angular project to your EC2 instance:
scp -r -i ~/OneDrive/Desktop/angulardeploy.pem "/c/Users/Admin/OneDrive/Desktop/KANBAN/Kanban-Task-Management-Web-App/dist/frontend/" ec2-user@ec2-34-224-41-250.compute-1.amazonaws.com:~/
Step 4: Nginx Setup with Paths
- Install Nginx on your EC2 instance if it is not already installed by using the following respectively commands:
sudo yum update
sudo yum install nginx
sudo amazon-linux-extras install nginx1
sudo systemctl start nginx
sudo systemctl status nginx -1
- Update Nginx.conf file: Edit the Nginx configuration file:
sudo vim /etc/nginx/nginx.conf
- Update the
serverblock with the path to your application directory and set up atry_filesdirective:
server {
    listen       80;
    listen       [::]:80;
    server_name  _;

    location / {
        autoindex on;
        root /home/ec2-user/frontend;
        try_files $uri $uri/ /index.html;
    }
    root         /usr/share/nginx/html;

    error_page  404 /404.html;
    location = /404.html {
    }

    error_page   500 502 503 504 /50x.html;
    location = /50x.html {
    }
}
- Provide permissions:
namei -om /usr/share/nginx/html
namei -om /home/ec2-user/YourBuildName
sudo chmod 755 /home/ec2-user
namei-om /home/ec2-user/YourBuildName
This command ensures that the build directory has the necessary permissions (read, write, and executefor the owner, and read/execute for others) by modifying permissions for /home/ec2-user:
- Verify Nginx is running:
sudo systemctl reload nginx
sudo systemctl restart nginx
Step 5: Test Deployment
Open your browser and navigate to your EC2 instance's public IP or domain name:
http://


%20Abstract%20Background%20112024%20SOURCE%20Amazon.jpg)


![[The AI Show Episode 142]: ChatGPT’s New Image Generator, Studio Ghibli Craze and Backlash, Gemini 2.5, OpenAI Academy, 4o Updates, Vibe Marketing & xAI Acquires X](https://www.marketingaiinstitute.com/hubfs/ep%20142%20cover.png)


-Nintendo-Switch-2-–-Overview-trailer-00-00-10.png?width=1920&height=1920&fit=bounds&quality=80&format=jpg&auto=webp#)


_Anna_Berkut_Alamy.jpg?#)


![YouTube Announces New Creation Tools for Shorts [Video]](https://www.iclarified.com/images/news/96923/96923/96923-640.jpg)


![[Weekly funding roundup March 29-April 4] Steady-state VC inflow pre-empts Trump tariff impact](https://images.yourstory.com/cs/2/220356402d6d11e9aa979329348d4c3e/WeeklyFundingRoundupNewLogo1-1739546168054.jpg)


