


![[The AI Show Episode 145]: OpenAI Releases o3 and o4-mini, AI Is Causing “Quiet Layoffs,” Executive Order on Youth AI Education & GPT-4o’s Controversial Update](https://www.marketingaiinstitute.com/hubfs/ep%20145%20cover.png)


![From Art School Drop-out to Microsoft Engineer with Shashi Lo [Podcast #170]](https://cdn.hashnode.com/res/hashnode/image/upload/v1746203291209/439bf16b-c820-4fe8-b69e-94d80533b2df.png?#)


(1).jpg?#)


_Inge_Johnsson-Alamy.jpg?width=1280&auto=webp&quality=80&disable=upscale#)


![Apple Developing AI 'Vibe-Coding' Assistant for Xcode With Anthropic [Report]](https://www.iclarified.com/images/news/97200/97200/97200-640.jpg)
![Apple's New Ads Spotlight Apple Watch for Kids [Video]](https://www.iclarified.com/images/news/97197/97197/97197-640.jpg)


![[Weekly funding roundup April 26-May 2] VC inflow continues to remain downcast](https://images.yourstory.com/cs/2/220356402d6d11e9aa979329348d4c3e/WeeklyFundingRoundupNewLogo1-1739546168054.jpg)


[REPOST] Installing Genymotion for Android App Pentesting: The Definitive Guide
With the growing use of mobile applications, the security of these applications has become a key concern for developers and businesses. Although it is sometimes overlooked, testing the security of Android applications is a crucial step in ensuring that they are protected against vulnerabilities and threats. In this article, I will demonstrate how to install Genymotion, a powerful virtualization tool, so that you can perform penetration testing on Android applications. Genymotion Genymotion is by far the most widely used Android device emulation tool for auditing Android apps, due to its practicality and some of the features it offers. You can install it directly from the official website. It is worth remembering that Genymotion is, in principle, based on VirtualBox. It is worth remembering that Genymotion is, in principle, based on VirtualBox. You can install it together with it, or separately. You also need to create an account on the website to log into the app later. Genymotion is usually a paid tool with support, but it has a free version for personal use. There are also trials and student discounts. Creating your first Instance When you click the “Add Virtual Device” button, Genymotion suggests several image options from different brands. I suggest choosing the one that best suits you, always keeping in mind the physical limitations and physical capabilities of your machine. Also, certain apps don’t support very old versions of Android, so be aware of that. One of the advantages of Genymotion over some other emulators is that it enables root by default. One caveat is that as pentesters, we typically leave the network configuration in NAT (Network Address Translation) mode, which assigns the VM an IP address and allows us to access it locally. This address will likely be 10.0.3.16. To install the PlayStore app, simply access the Open GApps option in the sidebar of the virtual device and restart it. Troubleshooting Many Windows users, when trying to start an instance in Genymotion, face the following error: To resolve it, if none of the instructions in this FAQ work, the recommendation is to change the hypervisor to QEMU. Since this requires Hyper-V to be enabled, we will enable it with PowerShell and then reboot the computer. Enable-WindowsOptionalFeature -Online -FeatureName Microsoft-Hyper-V -All Restart-Computer Next, we access the Genymotion settings and set “QEMU (experimental)” in the “Hypervisor” tab. Now it will probably work correctly. Setting up Burp Suite Burp Suite is a web proxy widely used for testing web applications and APIs. It allows you to intercept traffic between an application and its backend, revealing interesting information. To configure the proxy between the device’s communication with the internet, we access the Wi-Fi settings, and click on the edit connection button (advanced options), and add a “manual proxy”. By default, in emulated environments, localhost is represented by the address 10.0.3.2. We then configure the default port of Burp Suite, which is 8080. If it does not work with IP 10.0.3.2, it is also possible to obtain information about the IP of the VirtualBox Ethernet interface using the ipconfig command. Importing CA Cert In order to intercept HTTPS traffic, we need to export a CA Cert from Burp Suite via the “Proxy Settings” > “Import/Export CA Cert” tab and choose the “Cert in DER Format” option. To transfer it to the virtual device, just drag and drop. To import the certificate on Android, go to “Settings” > “Internet” > “Wi-Fi Preferences” > “Install certificates” and upload the DER file, from /sdcard. That’s it, now our environment for testing Android applications is complete. Thanks!
![[REPOST] Installing Genymotion for Android App Pentesting: The Definitive Guide](https://media2.dev.to/dynamic/image/width=800%2Cheight=%2Cfit=scale-down%2Cgravity=auto%2Cformat=auto/https%3A%2F%2Fdev-to-uploads.s3.amazonaws.com%2Fuploads%2Farticles%2F7zx2oyrfun6gecomzwf2.png)
With the growing use of mobile applications, the security of these applications has become a key concern for developers and businesses. Although it is sometimes overlooked, testing the security of Android applications is a crucial step in ensuring that they are protected against vulnerabilities and threats. In this article, I will demonstrate how to install Genymotion, a powerful virtualization tool, so that you can perform penetration testing on Android applications.
Genymotion
Genymotion is by far the most widely used Android device emulation tool for auditing Android apps, due to its practicality and some of the features it offers. You can install it directly from the official website. It is worth remembering that Genymotion is, in principle, based on VirtualBox. It is worth remembering that Genymotion is, in principle, based on VirtualBox. You can install it together with it, or separately. You also need to create an account on the website to log into the app later.
Genymotion is usually a paid tool with support, but it has a free version for personal use. There are also trials and student discounts.
Creating your first Instance
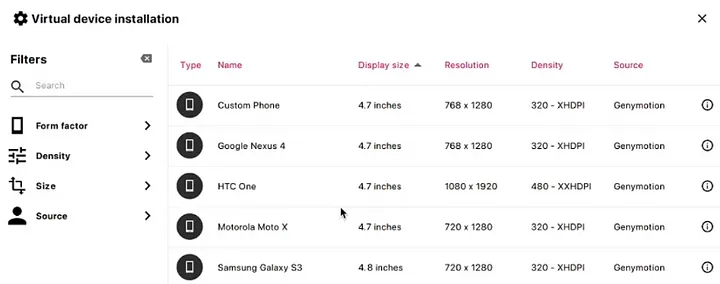
When you click the “Add Virtual Device” button, Genymotion suggests several image options from different brands. I suggest choosing the one that best suits you, always keeping in mind the physical limitations and physical capabilities of your machine. Also, certain apps don’t support very old versions of Android, so be aware of that. One of the advantages of Genymotion over some other emulators is that it enables root by default.
One caveat is that as pentesters, we typically leave the network configuration in NAT (Network Address Translation) mode, which assigns the VM an IP address and allows us to access it locally. This address will likely be 10.0.3.16.

To install the PlayStore app, simply access the Open GApps option in the sidebar of the virtual device and restart it.
Troubleshooting
Many Windows users, when trying to start an instance in Genymotion, face the following error:

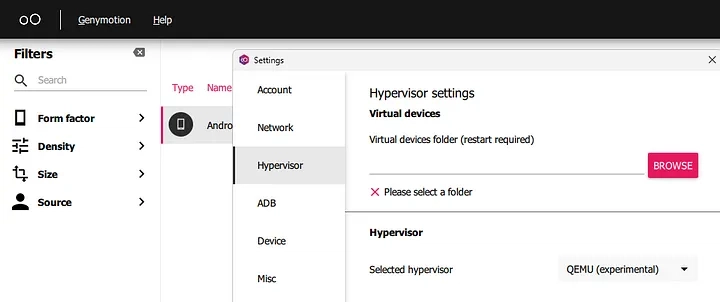
To resolve it, if none of the instructions in this FAQ work, the recommendation is to change the hypervisor to QEMU. Since this requires Hyper-V to be enabled, we will enable it with PowerShell and then reboot the computer.
Enable-WindowsOptionalFeature -Online -FeatureName Microsoft-Hyper-V -All

Restart-Computer
Next, we access the Genymotion settings and set “QEMU (experimental)” in the “Hypervisor” tab. Now it will probably work correctly.
Setting up Burp Suite
Burp Suite is a web proxy widely used for testing web applications and APIs. It allows you to intercept traffic between an application and its backend, revealing interesting information. To configure the proxy between the device’s communication with the internet, we access the Wi-Fi settings, and click on the edit connection button (advanced options), and add a “manual proxy”. By default, in emulated environments, localhost is represented by the address 10.0.3.2. We then configure the default port of Burp Suite, which is 8080.

If it does not work with IP 10.0.3.2, it is also possible to obtain information about the IP of the VirtualBox Ethernet interface using the ipconfig command.
Importing CA Cert
In order to intercept HTTPS traffic, we need to export a CA Cert from Burp Suite via the “Proxy Settings” > “Import/Export CA Cert” tab and choose the “Cert in DER Format” option. To transfer it to the virtual device, just drag and drop.
To import the certificate on Android, go to “Settings” > “Internet” > “Wi-Fi Preferences” > “Install certificates” and upload the DER file, from /sdcard.
That’s it, now our environment for testing Android applications is complete.
Thanks!