


![[The AI Show Episode 144]: ChatGPT’s New Memory, Shopify CEO’s Leaked “AI First” Memo, Google Cloud Next Releases, o3 and o4-mini Coming Soon & Llama 4’s Rocky Launch](https://www.marketingaiinstitute.com/hubfs/ep%20144%20cover.png)


![Is this too much for a modular monolith system? [closed]](https://i.sstatic.net/pYL1nsfg.png)


_Andreas_Prott_Alamy.jpg?width=1280&auto=webp&quality=80&disable=upscale#)


![What features do you get with Gemini Advanced? [April 2025]](https://i0.wp.com/9to5google.com/wp-content/uploads/sites/4/2024/02/gemini-advanced-cover.jpg?resize=1200%2C628&quality=82&strip=all&ssl=1)


![Apple Shares Official Trailer for 'Long Way Home' Starring Ewan McGregor and Charley Boorman [Video]](https://www.iclarified.com/images/news/97069/97069/97069-640.jpg)
![Apple Watch Series 10 Back On Sale for $299! [Lowest Price Ever]](https://www.iclarified.com/images/news/96657/96657/96657-640.jpg)
![EU Postpones Apple App Store Fines Amid Tariff Negotiations [Report]](https://www.iclarified.com/images/news/97068/97068/97068-640.jpg)
![Apple Slips to Fifth in China's Smartphone Market with 9% Decline [Report]](https://www.iclarified.com/images/news/97065/97065/97065-640.jpg)


Launch and Configure an EC2 Instance( Step-by-Step EC2 Setup + SSH Connection (Windows)
Introduction Launching an EC2 instance is one of the first and most crucial steps when working with Amazon Web Services (AWS). It allows you to run virtual servers in the cloud, providing you with flexibility and scalability. In this tutorial, we’ll go step-by-step to launch an EC2 instance and connect to it via SSH using Windows. This guide is designed for beginners, so even if you're just starting out with AWS, you'll be able to follow along easily. Let’s dive into how to launch your first EC2 instance and establish an SSH connection. ✅ Step 1: Launch a New EC2 Instance Go to the EC2 Dashboard: Open the EC2 console by visiting EC2 Dashboard. Click “Launch Instance”: On the EC2 dashboard, find and click the Launch Instance button to start the process of creating a new instance. Configure the Instance: Name your instance: This is for identification purposes. You can name your instance anything you'd like (e.g., Durga-EC2). Choose an Amazon Machine Image (AMI): For simplicity, we’ll choose Amazon Linux 2 AMI (HVM), SSD Volume Type, which is free-tier eligible and suitable for most use cases. Select Instance Type: Choose t2.micro (Free tier eligible) for a low-cost option. This instance type is great for lightweight workloads. Configure Key Pair: Key Pair (login): Here, you can either choose an existing key pair or create a new one. For this guide, let’s create a new key pair with any name you like (e.g., my-key-pair). Key Pair Type: Select .pem. Download the key pair: Ensure that you download and save the .pem file in a safe location (e.g., C:\Users\Durga V\Downloads\my-key-pair.pem). You’ll need this file later to connect to your instance securely. Network Settings: Click “Edit inbound rules” and add a new rule to allow SSH access: Type: SSH Port: 22 Source: Anywhere (0.0.0.0/0), which allows access from any IP address (you can adjust this for more security if needed). Launch the Instance: After configuring the settings, click “Launch Instance” to create your EC2 instance. ✅ Step 2: Verify Instance Is Running Once the instance is launched: Go to Instances in the EC2 console. Find your instance in the list and verify that: ✅ Instance State = Running ✅ The Public IPv4 or DNS name is visible (you’ll need this to connect via SSH). ✅ Step 3: Open Git Bash (Not CMD) Windows users should use Git Bash for the SSH connection process. Git Bash is a terminal emulator that supports the necessary Linux commands for SSH. Open Git Bash: Press the Start menu, search for Git Bash, and open it. Navigate to the Folder: Use the cd command to change the directory to where you saved the .pem key pair file: cd "/c/Users/Durga V/Downloads" ✅ Step 4: Fix File Permission (Only Once) Before connecting via SSH, ensure your key file has the correct permissions by running: chmod 400 my-key-pair.pem This command ensures that your key file is only readable by you, which is a requirement for secure SSH connections. ✅ Step 5: Connect to the EC2 Instance via SSH Now, it’s time to connect to your EC2 instance using the SSH protocol. Use the SSH Command: In Git Bash, replace ec2-XX-XX-XX-XX.us-east-2.compute.amazonaws.com with your instance’s Public IPv4 DNS (or IP address). The general SSH command looks like this: ssh -i "my-key-pair.pem" ec2-user@ec2-XX-XX-XX-XX.us-east-2.compute.amazonaws.com Or you can use the public IP: ssh -i "my-key-pair.pem" ec2-user@ Accept the Security Warning: The first time you connect, you may see a warning about the authenticity of the host. Type yes to accept and proceed. Login: If everything is set up correctly, you’ll be connected to your EC2 instance and be presented with a terminal prompt for the ec2-user account. Cleanup or delete the instance:
Introduction
Launching an EC2 instance is one of the first and most crucial steps when working with Amazon Web Services (AWS). It allows you to run virtual servers in the cloud, providing you with flexibility and scalability. In this tutorial, we’ll go step-by-step to launch an EC2 instance and connect to it via SSH using Windows. This guide is designed for beginners, so even if you're just starting out with AWS, you'll be able to follow along easily.
Let’s dive into how to launch your first EC2 instance and establish an SSH connection.
✅ Step 1: Launch a New EC2 Instance
Go to the EC2 Dashboard:
Open the EC2 console by visiting EC2 Dashboard.Click “Launch Instance”:
On the EC2 dashboard, find and click the Launch Instance button to start the process of creating a new instance.-
Configure the Instance:
-
Name your instance: This is for identification purposes. You can name your instance anything you'd like (e.g.,
Durga-EC2). - Choose an Amazon Machine Image (AMI): For simplicity, we’ll choose Amazon Linux 2 AMI (HVM), SSD Volume Type, which is free-tier eligible and suitable for most use cases.
-
Select Instance Type:
Choose
t2.micro(Free tier eligible) for a low-cost option. This instance type is great for lightweight workloads. -
Configure Key Pair:
-
Key Pair (login): Here, you can either choose an existing key pair or create a new one. For this guide, let’s create a new key pair with any name you like (e.g.,
my-key-pair). -
Key Pair Type: Select
.pem. -
Download the key pair: Ensure that you download and save the
.pemfile in a safe location (e.g.,C:\Users\Durga V\Downloads\my-key-pair.pem). You’ll need this file later to connect to your instance securely.
-
Key Pair (login): Here, you can either choose an existing key pair or create a new one. For this guide, let’s create a new key pair with any name you like (e.g.,
-
Network Settings:
- Click “Edit inbound rules” and add a new rule to allow SSH access:
- Type: SSH
- Port: 22
-
Source:
Anywhere (0.0.0.0/0), which allows access from any IP address (you can adjust this for more security if needed).
-
Name your instance: This is for identification purposes. You can name your instance anything you'd like (e.g.,
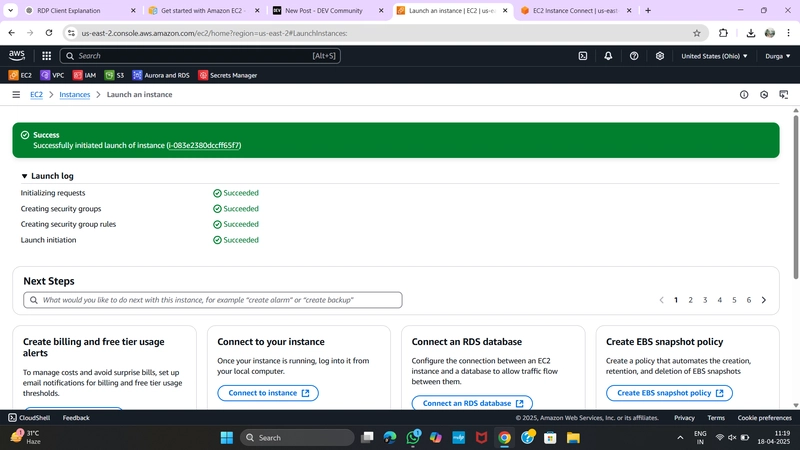
Launch the Instance:
After configuring the settings, click “Launch Instance” to create your EC2 instance.
✅ Step 2: Verify Instance Is Running
Once the instance is launched:
- Go to Instances in the EC2 console.
- Find your instance in the list and verify that:
- ✅ Instance State = Running
- ✅ The Public IPv4 or DNS name is visible (you’ll need this to connect via SSH).
✅ Step 3: Open Git Bash (Not CMD)
Windows users should use Git Bash for the SSH connection process. Git Bash is a terminal emulator that supports the necessary Linux commands for SSH.
-
Open Git Bash:
- Press the Start menu, search for Git Bash, and open it.
Navigate to the Folder:
Use thecdcommand to change the directory to where you saved the.pemkey pair file:
cd "/c/Users/Durga V/Downloads"
✅ Step 4: Fix File Permission (Only Once)
Before connecting via SSH, ensure your key file has the correct permissions by running:
chmod 400 my-key-pair.pem
This command ensures that your key file is only readable by you, which is a requirement for secure SSH connections.
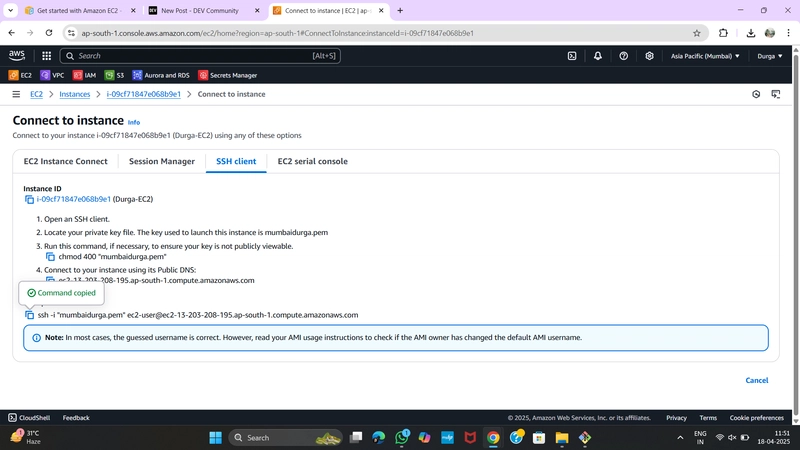
✅ Step 5: Connect to the EC2 Instance via SSH
Now, it’s time to connect to your EC2 instance using the SSH protocol.
-
Use the SSH Command:
In Git Bash, replace
ec2-XX-XX-XX-XX.us-east-2.compute.amazonaws.comwith your instance’s Public IPv4 DNS (or IP address). The general SSH command looks like this:
ssh -i "my-key-pair.pem" ec2-user@ec2-XX-XX-XX-XX.us-east-2.compute.amazonaws.com
Or you can use the public IP:
ssh -i "my-key-pair.pem" ec2-user@
Accept the Security Warning:
The first time you connect, you may see a warning about the authenticity of the host. Type yes to accept and proceed.Login:
If everything is set up correctly, you’ll be connected to your EC2 instance and be presented with a terminal prompt for theec2-useraccount.

- Cleanup or delete the instance: