I've build permissions for my Next.js 15 app with Permit.io
In this article, I’ll walk you through all the steps to integrate and manage fine-grained permissions in your application using Next.js, Permit.io, and the Permit SDK. By the end of this tutorial, you’ll be able to create a fully working permission system where users have role-based access to specific resources—like products—in real time, all powered by Permit.io. You can check the video OR get the full code available in this GitHub repo. You’ll see how the SDK handles user-role-resource checks cleanly. What are we going to learn? To get started, we’ll build a modern web application using Next.js and connect it to Permit.io, which will handle all our authorization logic externally. Permit.io is a powerful, API-driven access control service that lets you build complex RBAC and ABAC systems with minimal configuration. I highly recommend it for any project where user access levels matter. 1. Create a free account on Permit.io Start by creating a free account at Permit.io. Once logged in, you’ll land in the default project named development. Navigate to the Policies tab from the sidebar to begin configuring your permission system. 2. Create Your First Resources Resources in Permit.io represent entities you want to protect. In our case, we’ll create three products: product_1 (key: product_1) product_2 (key: product_2) product_3 (key: product_3) Note: The name and the resource key can be different. What's important for integration is the resource key, which — in my case — match the IDs I’ll use in my app. As soon as you create these resources, Permit.io automatically generates common roles for each: admin, editor, and viewer. But you can create new ones if you want to. 3. Explore and Use the Policy Editor Inside the Policy Editor, you’ll see a matrix of roles for each product. This is where you define what each role can do. Permit.io makes it incredibly easy to customize permissions per resource and per role. 4. Add Users and Assign Roles Go to the Directory tab, and under Users, you can start adding users via email. For this demo, we’ll create three users: An admin user An editor user A viewer user Assign the relevant roles to each user for the resources you've created Note: you can also do this programmatically using the Permit SDK. 5. Install the Permit.io SDK in Your Next.js App Permit.io is API-driven, which means you can integrate permissions seamlessly in your codebase. npm install permitio I’ve created a route in api/permission/route.ts which checks the permission of the current user. import { NextRequest } from 'next/server'; import { Permit } from 'permitio'; interface User { id: string; firstName: string; lastName: string; email: string; } const permit = new Permit({ pdp: process.env.NEXT_PUBLIC_PERMIT_PDP, token: process.env.NEXT_PUBLIC_PERMIT_TOKEN, }); export async function GET(request: NextRequest) { try { const searchParams = request.nextUrl.searchParams; const action = searchParams.get('action') || 'read'; const resource = searchParams.get('resource') || 'document'; const userId = searchParams.get('userId') || 'unknown'; const permitted: boolean = await permit.check(userId, action, resource); if (permitted) { return new Response( `${userId} is PERMITTED to ${action} ${resource} !`, { status: 200 } ); } else { return new Response( `${userId} is NOT PERMITTED to ${action} ${resource} !`, { status: 403 } ); } } catch (error) { console.error('Permission check error:', error); return new Response('Error checking permissions', { status: 500 }); } } On the front-end, I have this complete page displaying products. I call this route with a helper function checkPermission() to verify access before displaying content. 'use client'; import Image from 'next/image'; import { useEffect, useState } from 'react'; import iphone from "../../public/iphone.jpg"; import macbook from "../../public/macbook.jpg"; import watch from "../../public/watch.jpg"; const HeaderComponent = ({ user }: any) => { return {!user && Login} {user && Logged in as {user.name} {user.userId} } } const PostItem = ({ post, user }: any) => { const [canRead, setCanRead] = useState(false); const checkPermission = async () => { try { const response = await fetch(`/api/permission?userId=${user.id || 'unknown'}&resource=${post.id}&action=read`); const isPermitted = response.status === 200; setCanRead(isPermitted); } catch (error) { console.error('Error checking permissions:', error); setCanRead(false); } }; useEffect(() => { checkPermission(); }, [post.resource]); if (!canRead) { return null; } return ( {/* Background Image */}

In this article, I’ll walk you through all the steps to integrate and manage fine-grained permissions in your application using Next.js, Permit.io, and the Permit SDK. By the end of this tutorial, you’ll be able to create a fully working permission system where users have role-based access to specific resources—like products—in real time, all powered by Permit.io.
You can check the video OR get the full code available in this GitHub repo. You’ll see how the SDK handles user-role-resource checks cleanly.
What are we going to learn?
To get started, we’ll build a modern web application using Next.js and connect it to Permit.io, which will handle all our authorization logic externally. Permit.io is a powerful, API-driven access control service that lets you build complex RBAC and ABAC systems with minimal configuration. I highly recommend it for any project where user access levels matter.
1. Create a free account on Permit.io
Start by creating a free account at Permit.io. Once logged in, you’ll land in the default project named development. Navigate to the Policies tab from the sidebar to begin configuring your permission system.
2. Create Your First Resources
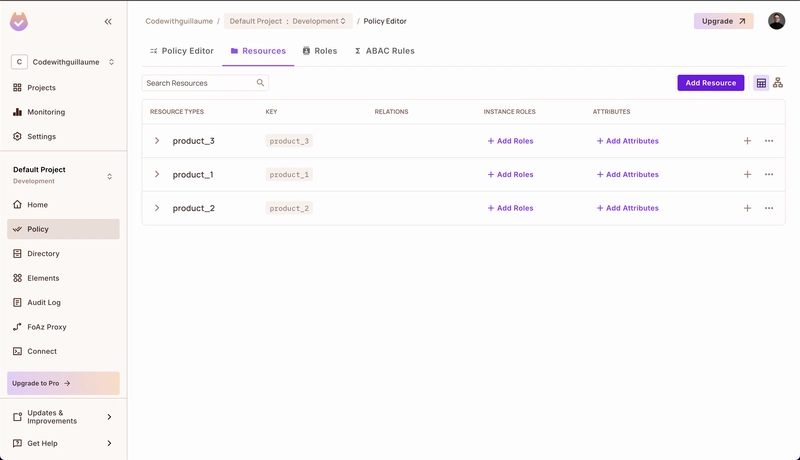
Resources in Permit.io represent entities you want to protect. In our case, we’ll create three products:
- product_1 (key: product_1)
- product_2 (key: product_2)
- product_3 (key: product_3)
Note: The name and the resource key can be different. What's important for integration is the resource key, which — in my case — match the IDs I’ll use in my app.
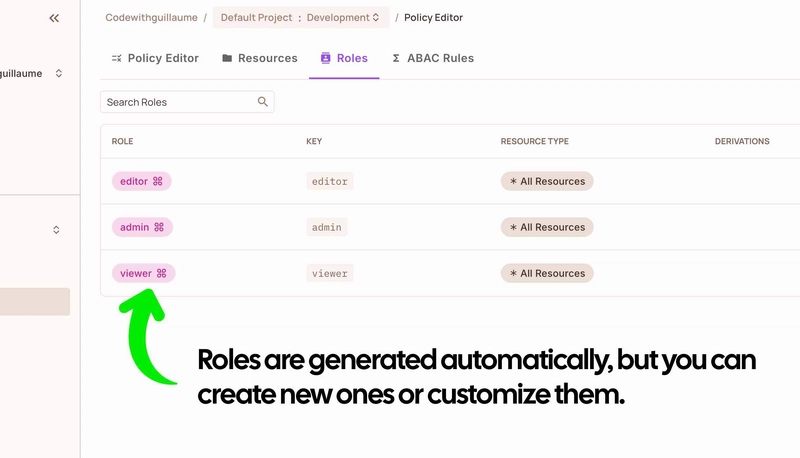
As soon as you create these resources, Permit.io automatically generates common roles for each: admin, editor, and viewer. But you can create new ones if you want to.
3. Explore and Use the Policy Editor
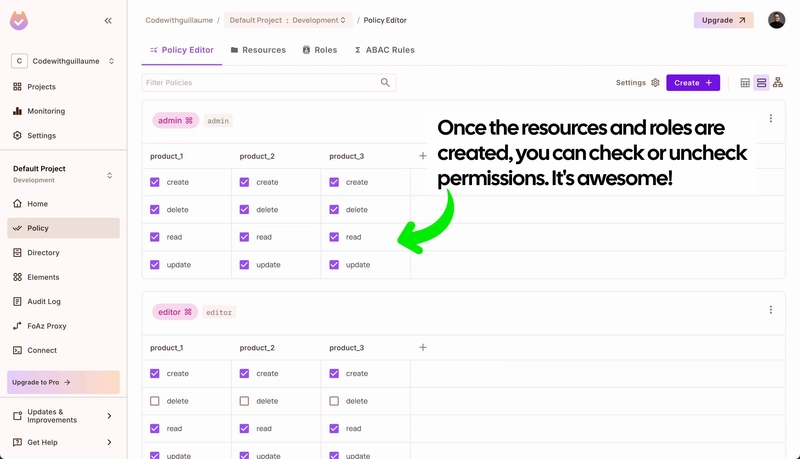
Inside the Policy Editor, you’ll see a matrix of roles for each product. This is where you define what each role can do.
Permit.io makes it incredibly easy to customize permissions per resource and per role.
4. Add Users and Assign Roles
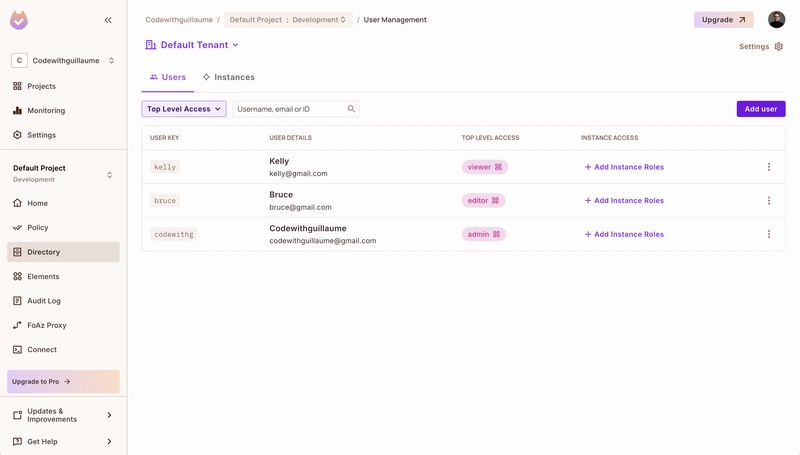
Go to the Directory tab, and under Users, you can start adding users via email. For this demo, we’ll create three users:
- An admin user
- An editor user
- A viewer user
Assign the relevant roles to each user for the resources you've created
Note: you can also do this programmatically using the Permit SDK.
5. Install the Permit.io SDK in Your Next.js App
Permit.io is API-driven, which means you can integrate permissions seamlessly in your codebase.
npm install permitio
I’ve created a route in api/permission/route.ts which checks the permission of the current user.
import { NextRequest } from 'next/server';
import { Permit } from 'permitio';

interface User {
  id: string;
  firstName: string;
  lastName: string;
  email: string;
}

const permit = new Permit({
  pdp: process.env.NEXT_PUBLIC_PERMIT_PDP,
  token: process.env.NEXT_PUBLIC_PERMIT_TOKEN,
});

export async function GET(request: NextRequest) {
  try {
    const searchParams = request.nextUrl.searchParams;
    const action = searchParams.get('action') || 'read';
    const resource = searchParams.get('resource') || 'document';
    const userId = searchParams.get('userId') || 'unknown';

    const permitted: boolean = await permit.check(userId, action, resource);

    if (permitted) {
      return new Response(
        `${userId} is PERMITTED to ${action} ${resource} !`,
        { status: 200 }
      );
    } else {
      return new Response(
        `${userId} is NOT PERMITTED to ${action} ${resource} !`,
        { status: 403 }
      );
    }
  } catch (error) {
    console.error('Permission check error:', error);
    return new Response('Error checking permissions', { status: 500 });
  }
}
On the front-end, I have this complete page displaying products.
I call this route with a helper function checkPermission() to verify access before displaying content.
'use client';
import Image from 'next/image';
import { useEffect, useState } from 'react';
import iphone from "../../public/iphone.jpg";
import macbook from "../../public/macbook.jpg";
import watch from "../../public/watch.jpg";

const HeaderComponent = ({ user }: any) => {
  return <header className="flex items-center gap-4">
    {!user && <span className="font-[600]">Login</span>}
    {user && <div className="flex items-center gap-4">
      <span className="font-[600]">Logged in as</span>
      <div className="flex items-center gap-2 border rounded p-2 border-neutral-200 shadow cursor-pointer min-w-[200px]">
        <div className="rounded-full bg-red-500 w-8 h-8 bg-cover bg-center" style={{
          backgroundImage: "url('https://avatars.githubusercontent.com/u/31253241?v=4')"
        }} />
        <div className="text-sm">
          <p className="font-[600]" style={{
            lineHeight: 1
          }}>{user.name}</p>
          <p className="text-xs text-neutral-500">{user.userId}</p>
        </div>
      </div>
    </div>}
  </header>
}

const PostItem = ({ post, user }: any) => {
  const [canRead, setCanRead] = useState(false);

  const checkPermission = async () => {
    try {
      const response = await fetch(`/api/permission?userId=${user.id || 'unknown'}&resource=${post.id}&action=read`);
      const isPermitted = response.status === 200;
      setCanRead(isPermitted);
    } catch (error) {
      console.error('Error checking permissions:', error);
      setCanRead(false);
    }
  };

  useEffect(() => {
    checkPermission();
  }, [post.resource]);

  if (!canRead) {
    return null;
  }

  return (
    <div className="border border-neutral-100 dark:text-white text-center">
      {/* Background Image */}
      <div className="flex items-center justify-center min-h-[200px] max-h-[200px] overflow-hidden">
        <Image alt={post.title} src={post.img} />
      </div>

      {/* Content */}
      <div className="grid gap-4 p-4">
        <header className="grid gap-2">
          <div>
            <h2 className="text-lg text-center font-semibold text-black">{post.title}</h2>
            <p className="text-gray-500 text-sm m-0">{post.content}</p>
          </div>
        </header>
        <div className="h-3 mb-2">
          {post.id === 'product_1' && <div>
            <span className="text-black text-xs bg-yellow-500 rounded px-2 py-1 text-white font-[500]">Exclusive to admins</span>
          </div>}
          {post.id === 'product_2' && <div>
            <span className="text-black text-xs bg-emerald-500 rounded px-2 py-1 text-white font-[500]">Exclusive to editors</span>
          </div>}
        </div>
        {/* Price & Reserve Button */}
        <div className="flex justify-center items-center">
          <button className="border rounded-lg hover:bg-blue-400 transition border-blue-500 bg-blue-500 text-[13px] px-4 py-2 font-[600] cursor-pointer">Order – ${post.price}</button>
        </div>

      </div>
    </div >
  );
};

const Dashboard = () => {
  const [user, setUser] = useState({
    name: "Codewithguillaume",
    id: "codewithg"
  })
  const posts = [
    {
      id: "product_1",
      img: iphone,
      title: "iPhone 16 Pro",
      content: "The latest and greatest iPhone.",
      price: 1299,
      type: "document_admin"
    },
    {
      id: "product_2",
      img: macbook,
      title: "MacBook Pro 2025",
      content: "Powerful and portable.",
      price: 1599,
      type: "document_employee"
    },
    {
      id: "product_3",
      img: watch,
      title: "Apple Watch 8",
      content: "Stay connected and healthy.",
      price: 399,
      type: "document_viewer"
    }
  ];

  return <main>
    <div className="container grid gap-8 py-16 max-w-[1000px] mx-auto">
      <HeaderComponent {...{ user }} />
      <div className="grid lg:grid-cols-3 gap-4">
        {posts.map((post) => (
          <PostItem key={post.id} {...{ post, user }} />
        ))}
      </div>
    </div>
  </main>
};

export default Dashboard;
6. Test Your Complete Permission System
Switch between users and test what each one can see:
- Admin: Can access all 3 products
- Editor: Can access 2 products
- Viewer: Can access only 1 product
This is the power of Permit.io: you can instantly change permissions, roles, and access directly from the dashboard—no redeploy needed.
Conclusion
Permit.io makes access control simple, powerful, and scalable. Whether you’re managing a few resources or an enterprise-grade system, the flexibility and ease-of-use are impressive.
Try it yourself and simplify your permission management!
Guillaume Duhan aka Codewithguillaume.


![[The AI Show Episode 142]: ChatGPT’s New Image Generator, Studio Ghibli Craze and Backlash, Gemini 2.5, OpenAI Academy, 4o Updates, Vibe Marketing & xAI Acquires X](https://www.marketingaiinstitute.com/hubfs/ep%20142%20cover.png)








.jpg?#)






![YouTube Announces New Creation Tools for Shorts [Video]](https://www.iclarified.com/images/news/96923/96923/96923-640.jpg)

![Apple Faces New Tariffs but Has Options to Soften the Blow [Kuo]](https://www.iclarified.com/images/news/96921/96921/96921-640.jpg)


