


![[The AI Show Episode 144]: ChatGPT’s New Memory, Shopify CEO’s Leaked “AI First” Memo, Google Cloud Next Releases, o3 and o4-mini Coming Soon & Llama 4’s Rocky Launch](https://www.marketingaiinstitute.com/hubfs/ep%20144%20cover.png)


.jpg?width=1920&height=1920&fit=bounds&quality=70&format=jpg&auto=webp#)


-Resident-Evil-4-Remake-Review---SPOILER-FREE-RESIDENT-EVIL-4-REVIEW-00-04-20.png?width=1920&height=1920&fit=bounds&quality=70&format=jpg&auto=webp#)


![Apple to Shift Robotics Unit From AI Division to Hardware Engineering [Report]](https://www.iclarified.com/images/news/97128/97128/97128-640.jpg)

![Apple Shares New Ad for iPhone 16: 'Trust Issues' [Video]](https://www.iclarified.com/images/news/97125/97125/97125-640.jpg)


How to use HiveMQ as your MQTT broker for your IoT projects
This article was co-authored by @nehvar. Introduction In the rapidly evolving world of the Internet of Things (IoT), reliable and scalable communication between devices is crucial. MQTT (Message Queuing Telemetry Transport) has emerged as one of the most popular lightweight messaging protocols for IoT applications due to its efficiency, low bandwidth usage, and support for unreliable networks. At the heart of any MQTT-based architecture is the broker—a central hub that manages message delivery between connected devices. In this article, we’ll explore how you can leverage HiveMQ as your MQTT broker, from setting up your first broker instance to connecting IoT devices and monitoring their communication. Whether you're a hobbyist building a smart home project or an engineer working on industrial IoT systems, this article will help you get started with HiveMQ and take your IoT projects to the next level. Terms used in this article HiveMQ - stands out as a powerful and developer-friendly MQTT broker, designed to handle everything from small-scale prototypes to enterprise-grade deployments. With features like high availability, real-time monitoring, and seamless integration with cloud platforms, HiveMQ provides a robust foundation for building secure and responsive IoT solutions. Microcontroller - is a small, self-contained computer on a single integrated circuit (IC) designed to control specific functions within an embedded system. Atom Dashboard - an application for easy control of IoT devices and many more. Send and receive messages via the MQTT server using customizable tiles. Arduino IDE - an integrated development environment or arduino software that allows users to write code and upload it to any Arduino board. A user-friendly environment, making it accessible to beginners and experienced users alike. Wemos D1 Mini R3 - is a compact microcontroller board based on the ESP8266 chip that is widely used in IoT projects, which has built-in Wi-Fi capabilities. It’s essentially a mini version of the NodeMCU board, designed to be small, easy to use, and breadboard-friendly. Step by Step Process There are three main parts in creating an IOT device that can either send or receive small packets of information from or to other devices. This consists of setting up the desired MQTT Broker (HiveMQ in our case), setting up the microcontroller, and setting up the other device to send or receive data. In this example we would be implementing a remote switch that will simulate a button press to turn on a computer. A Wemos D1 Mini R3 was used as the microcontroller, 3.3v Relay for the switch mechanism, and a Motherboard switch power splitter cable to connect the relay and motherboard. On the other hand, a smartphone is used as a device that will trigger the relay through the microcontroller. 1. Setting up your MQTT Broker Create your HiveMQ Account - Creating a HiveMQ account is as easy as how you do it on other sites. Only an email account and a password is required. You can also opt to sign up with GitHub, Google, and LinkedIn. Create a Cluster - Once logged in, create a new cluster by clicking the “Create New Cluster” button. You can choose the serverless for testing purposes. For our case click Create Serverless Cluster. After clicking it a cluster is automatically created. Create Authentication - After creating your cluster, set up your authentication credentials. Go to the cluster you have created and navigate your way through Access Management and click on Add New Credential. You’ll need a username and password for connecting your microcontroller or phone app to the broker. You can set the permissions to Publish and Subscribe since we are going to use one credential for both the receiver (microcontroller) and sender (smartphone) for our case. Copy the URL, PORT, and Credentials - Take note of the following, as they will be used in both your microcontroller and dashboard app: URL (e.g., your-cluster.hivemq.cloud) Port (typically 8883 for secure connection) Username and Password you created above. 2. Setting Up your Microcontroller Create your own program - Write a program using your preferred environment (Arduino IDE in this case). Make sure to select the correct board (Wemos D1 Mini) and install the required libraries. If you cannot find your chosen board make sure you have it installed in the board manager. Integrate the MQTT Broker Library - You’ll need to install and include the following libraries: ESP8266WiFi.h - allows the Wemos D1 Mini R3 to connect to a Wi-Fi network, enabling communication with your MQTT broker over the internet. WiFiClientSecure.h - Provides a secure (SSL/TLS) connection over Wi-Fi, ensuring encrypted communications between the Wemos and the MQTT. PubSubClient.h - enables the Wemos to publish and subscribe to MQTT topics, allowing it to receive commands or send status updates t
This article was co-authored by @nehvar.
Introduction
In the rapidly evolving world of the Internet of Things (IoT), reliable and scalable communication between devices is crucial. MQTT (Message Queuing Telemetry Transport) has emerged as one of the most popular lightweight messaging protocols for IoT applications due to its efficiency, low bandwidth usage, and support for unreliable networks. At the heart of any MQTT-based architecture is the broker—a central hub that manages message delivery between connected devices.
In this article, we’ll explore how you can leverage HiveMQ as your MQTT broker, from setting up your first broker instance to connecting IoT devices and monitoring their communication. Whether you're a hobbyist building a smart home project or an engineer working on industrial IoT systems, this article will help you get started with HiveMQ and take your IoT projects to the next level.
Terms used in this article
HiveMQ - stands out as a powerful and developer-friendly MQTT broker, designed to handle everything from small-scale prototypes to enterprise-grade deployments. With features like high availability, real-time monitoring, and seamless integration with cloud platforms, HiveMQ provides a robust foundation for building secure and responsive IoT solutions.
Microcontroller - is a small, self-contained computer on a single integrated circuit (IC) designed to control specific functions within an embedded system.
Atom Dashboard - an application for easy control of IoT devices and many more. Send and receive messages via the MQTT server using customizable tiles.
Arduino IDE - an integrated development environment or arduino software that allows users to write code and upload it to any Arduino board. A user-friendly environment, making it accessible to beginners and experienced users alike.
Wemos D1 Mini R3 - is a compact microcontroller board based on the ESP8266 chip that is widely used in IoT projects, which has built-in Wi-Fi capabilities. It’s essentially a mini version of the NodeMCU board, designed to be small, easy to use, and breadboard-friendly.
Step by Step Process
There are three main parts in creating an IOT device that can either send or receive small packets of information from or to other devices. This consists of setting up the desired MQTT Broker (HiveMQ in our case), setting up the microcontroller, and setting up the other device to send or receive data.
In this example we would be implementing a remote switch that will simulate a button press to turn on a computer. A Wemos D1 Mini R3 was used as the microcontroller, 3.3v Relay for the switch mechanism, and a Motherboard switch power splitter cable to connect the relay and motherboard. On the other hand, a smartphone is used as a device that will trigger the relay through the microcontroller.
1. Setting up your MQTT Broker
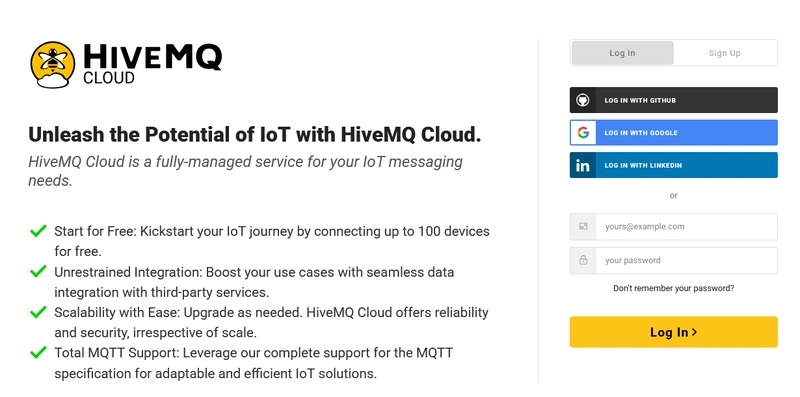
Create your HiveMQ Account - Creating a HiveMQ account is as easy as how you do it on other sites. Only an email account and a password is required. You can also opt to sign up with GitHub, Google, and LinkedIn.
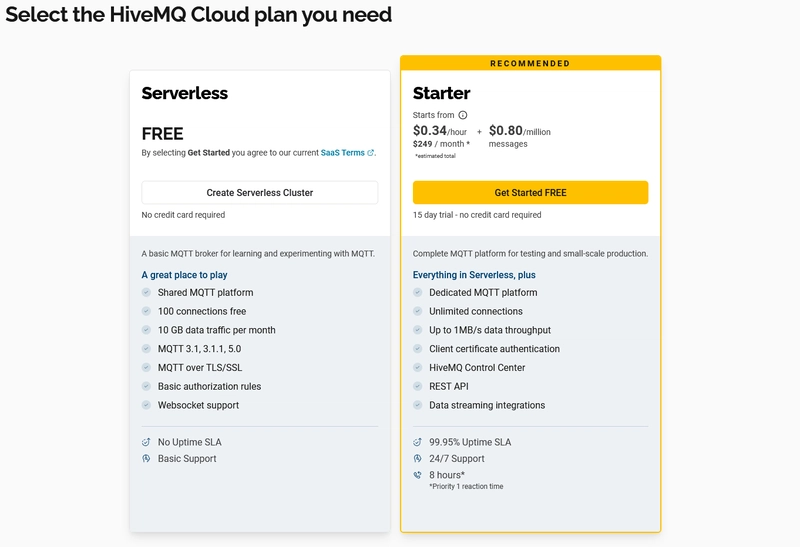
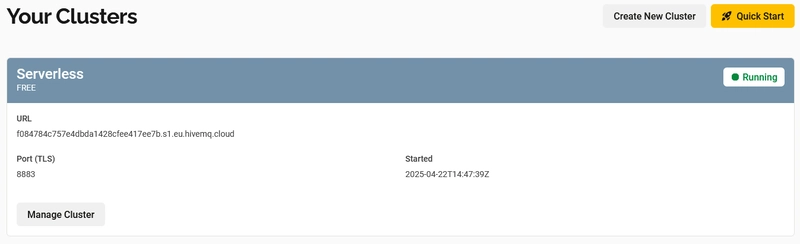
Create a Cluster - Once logged in, create a new cluster by clicking the “Create New Cluster” button. You can choose the serverless for testing purposes. For our case click Create Serverless Cluster. After clicking it a cluster is automatically created.
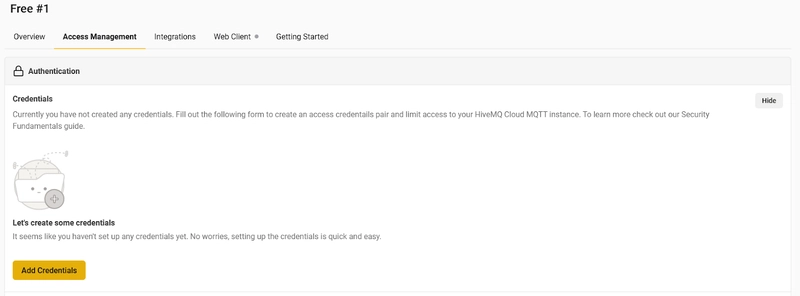
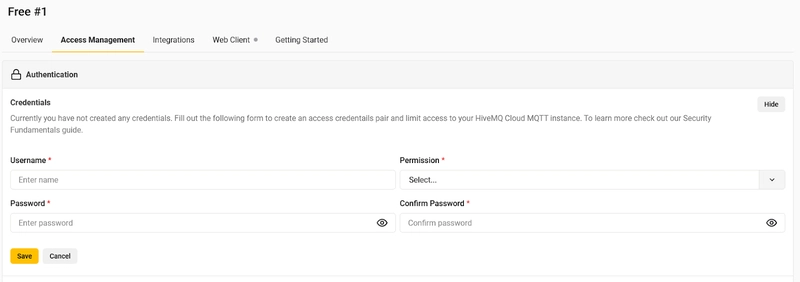
Create Authentication - After creating your cluster, set up your authentication credentials. Go to the cluster you have created and navigate your way through Access Management and click on Add New Credential. You’ll need a username and password for connecting your microcontroller or phone app to the broker. You can set the permissions to Publish and Subscribe since we are going to use one credential for both the receiver (microcontroller) and sender (smartphone) for our case.

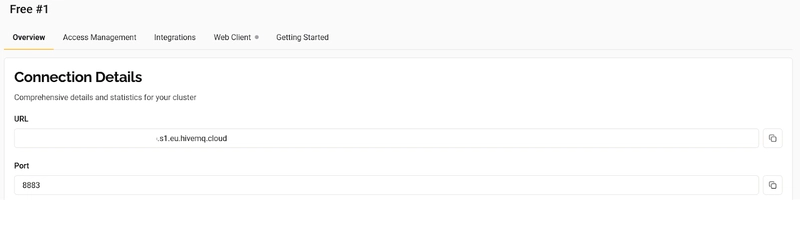
Copy the URL, PORT, and Credentials - Take note of the following, as they will be used in both your microcontroller and dashboard app:
- URL (e.g., your-cluster.hivemq.cloud)
- Port (typically 8883 for secure connection)
- Username and Password you created above.
2. Setting Up your Microcontroller
Create your own program - Write a program using your preferred environment (Arduino IDE in this case). Make sure to select the correct board (Wemos D1 Mini) and install the required libraries. If you cannot find your chosen board make sure you have it installed in the board manager.
Integrate the MQTT Broker Library - You’ll need to install and include the following libraries:
- ESP8266WiFi.h - allows the Wemos D1 Mini R3 to connect to a Wi-Fi network, enabling communication with your MQTT broker over the internet.
- WiFiClientSecure.h - Provides a secure (SSL/TLS) connection over Wi-Fi, ensuring encrypted communications between the Wemos and the MQTT.
- PubSubClient.h - enables the Wemos to publish and subscribe to MQTT topics, allowing it to receive commands or send status updates to simulate button presses via the relay.
REMINDERS: Make sure to include in your microcontroller’s program the following:
- Wifi connection setup using your SSID and password
- MQTT broker’s URL
- MQTT PORT ( usually 8883 for HiveMQ with TLS or 1883 for non-TLS)
- MQTT Topic to subscribe to or to publish (e.g., “home/pc/power”)
- Give it a Unique ID (e.g., WemosD1)
#include
#include
#include

// WiFi credentials
const char* ssid = "";          // Wifi SSID
const char* password = "";          // WiFi Password

// MQTT Broker details
const char* mqtt_server = "";           // MQTT Broker's URL
const int mqtt_port = 8883;             // TLS Port
const char* mqtt_user = "";         // Credential Username
const char* mqtt_password =";           // Credential Password
const char* mqtt_topic = "home/pc/power";   // MQTT Topic

WiFiClientSecure espClient;
PubSubClient client(espClient);

#define RELAY_PIN D5

void setup() {
    Serial.begin(115200);
    pinMode(RELAY_PIN, OUTPUT);
    digitalWrite(RELAY_PIN, HIGH);

    // Connect to WiFi
    WiFi.begin(ssid, password);
    Serial.print("Connecting to WiFi");
    while (WiFi.status() != WL_CONNECTED) {
        delay(500);
        Serial.print(".");
    }
    Serial.println("\nWiFi connected");

    // Set up MQTT with TLS
    espClient.setInsecure(); // Use this if you don't have a certificate
    client.setServer(mqtt_server, mqtt_port);
    client.setCallback(callback);
}

void loop() {
    if (!client.connected()) {
        reconnect();
    }
    client.loop();
}

void callback(char* topic, byte* payload, unsigned int length) {
    Serial.print("Message received: ");
    String message;
    for (unsigned int i = 0; i < length; i++) {
        message += (char)payload[i];
    }
    Serial.println(message);

    int delayTime = message.toInt(); // Convert message to integer
    if (delayTime > 0) {
        digitalWrite(RELAY_PIN, LOW);
        delay(delayTime);
        digitalWrite(RELAY_PIN, HIGH);
    }
}

void reconnect() {
    while (!client.connected()) {
        Serial.print("Attempting MQTT connection...");
        if (client.connect("WemosD1", mqtt_user, mqtt_password)) {
            Serial.println("connected");
            client.subscribe(mqtt_topic);
        } else {
            Serial.print("failed, rc=");
            Serial.print(client.state());
            Serial.println(" trying again in 5 seconds");
            delay(5000);
        }
    }
}
Source Code for our example.
Hardware Setup - After uploading the code, connect the hardware components according to the wiring diagram. The D5 pin of the Wemos D1 Mini R3 is connected to the IN pin of the relay module, 3.3V to VCC, and GND to GND. On the other side of the relay, connect the + wire from the motherboard power switch to the Normally Open (NO) terminal, and the - wire to the Common(COM) terminal. This setup allows the relay to briefly close the circuit and simulate a physical power button press when triggered.
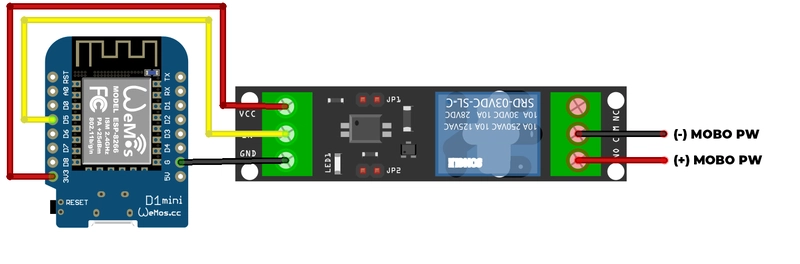
Wiring Diagram for our example.
3. Setting Up your Other Device
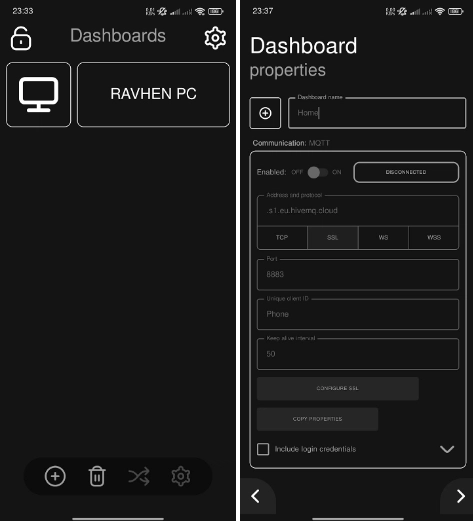
Choose a Dashboard Application - There are many applications that can send or receive data from MQTT brokers — you can even create your own. For this example, we’ll use Atom Dashboard. It’s free and easy to use.
Create a Connection to MQTT Broker - In the main dashboard, tap the Add button to create a new connection. A form will appear asking for the Dashboard Name and Connection Properties. Input the following:
- Address (e.g., your-cluster.hivemq.cloud)
- Protocol – Select SSL (if you haven’t changed this in your HiveMQ cluster settings)
- Port – Default is 8883
- Client ID – Make sure it’s different from the one used in your microcontroller’s program
Don’t forget to enable the connection once all fields are filled in.
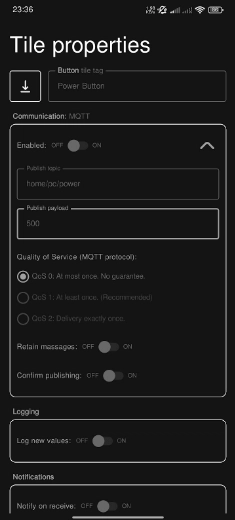
Create Button - After setting up the connection, add a new Button widget to your dashboard. Give it a label (e.g., "Power PC") and set the following:
- Communication Type – MQTT
- Publish Topic – Same topic your microcontroller is subscribed to (e.g.,"home/pc/power")
- Payload – Choose something like "ON" or "1" to simulate a button press
- Delay – A delay of 500 ms works well for simulating a real press
- Once done, make sure the button is enabled.
And that’s it — with everything set up, you now have a working IoT remote switch that can control your PC with a simple tap from your phone. This setup can be expanded further to suit other automation ideas you might have in mind.
Conclusion
As IoT continues to shape the future of technology, having a reliable and efficient communication system between devices is essential. MQTT stands out as a protocol tailored for the unique demands of IoT, and HiveMQ provides a robust and scalable platform to serve as its backbone. With its user-friendly interface, enterprise-grade features, and strong support for MQTT standards, HiveMQ makes it easier than ever to build, manage, and scale your IoT infrastructure.
Whether you're experimenting with a Wemos D1 Mini ESP8266 at home or managing a fleet of connected sensors in an industrial setting, HiveMQ gives you the versatility and power to make your thoughts a reality. Integrating HiveMQ into your projects ensures a consistent message flow, increased device responsiveness, and a scalable basis for future growth.
Start small, think big, and let HiveMQ be the bridge that connects your devices and your vision.