


![[The AI Show Episode 143]: ChatGPT Revenue Surge, New AGI Timelines, Amazon’s AI Agent, Claude for Education, Model Context Protocol & LLMs Pass the Turing Test](https://www.marketingaiinstitute.com/hubfs/ep%20143%20cover.png)


![Building Telegram Mini App based on existing frontend app [closed]](https://cdn.sstatic.net/Sites/softwareengineering/Img/apple-touch-icon@2.png?v=1ef7363febba)


 CISO’s Core Focus.webp?#)


![Hostinger Horizons lets you effortlessly turn ideas into web apps without coding [10% off]](https://i0.wp.com/9to5mac.com/wp-content/uploads/sites/6/2025/04/IMG_1551.png?resize=1200%2C628&quality=82&strip=all&ssl=1)


![This new Google TV streaming dongle looks just like a Chromecast [Gallery]](https://i0.wp.com/9to5google.com/wp-content/uploads/sites/4/2025/04/thomson-cast-150-google-tv-1.jpg?resize=1200%2C628&quality=82&strip=all&ssl=1)


![iPadOS 19 May Introduce Menu Bar, iOS 19 to Support External Displays [Rumor]](https://www.iclarified.com/images/news/97137/97137/97137-640.jpg)

![Apple Drops New Immersive Adventure Episode for Vision Pro: 'Hill Climb' [Video]](https://www.iclarified.com/images/news/97133/97133/97133-640.jpg)


How to Reliably Mount a CIFS Share Using systemd on Boot
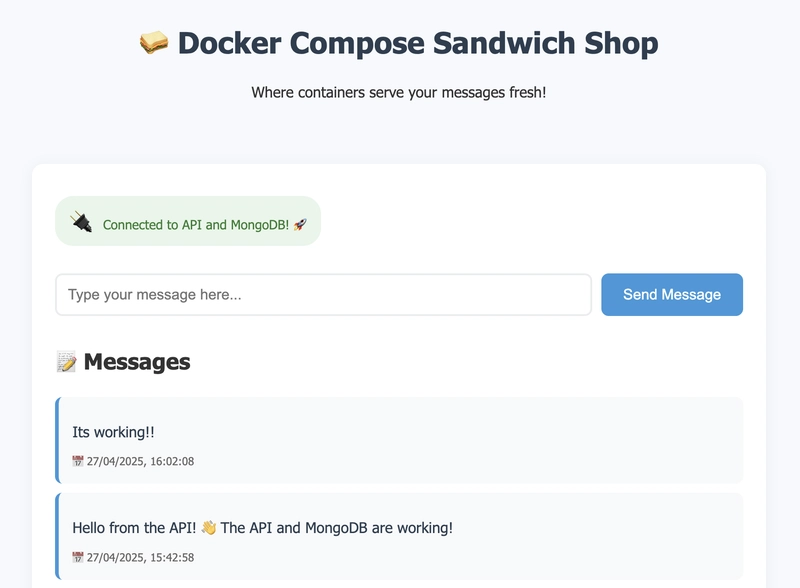
Mounting a CIFS share at boot via /etc/fstab can often lead to issues if the network isn't ready. A more reliable solution is to create a systemd mount unit that ensures the network is online before attempting to mount. Here's how you do it: Step 1: Create a credentials file Create a file to store your SMB credentials: sudo nano /etc/smb-credentials With content: username=your_username password=your_password Secure it so only root can read: sudo chmod 600 /etc/smb-credentials sudo chown root:root /etc/smb-credentials Step 2: Create the mount point Make the local directory where the CIFS share will be mounted: sudo mkdir -p /mnt/nas_share Step 3: Create a systemd mount unit Run the following command to create or edit the mount unit: sudo systemctl edit --force --full mnt-nas_share.mount Paste the following content: [Unit] Description=Mount SMB Share After=network-online.target Wants=network-online.target [Mount] What=//nas.local/share Where=/mnt/nas_share Type=cifs Options=credentials=/etc/smb-credentials,iocharset=utf8,nounix,noserverino,nofail,_netdev,soft,vers=3.0 TimeoutSec=30 [Install] WantedBy=multi-user.target Explanation: [Unit] Description=Mount NAS HDD Share: Human-readable description. After=network-online.target: Ensures the mount waits for the network to be up. Wants=network-online.target: Pulls in the network-online target if not already present. [Mount] What=//nas.local/share: UNC path to the CIFS share. Where=/mnt/nas_share: Local mount point. Type=cifs: Filesystem type. Options=...: Mount options: credentials=...: Path to the credentials file (should be root-only readable). iocharset=utf8: Character encoding. nounix, noserverino: Workarounds for specific CIFS behaviors. nofail: Don’t block boot if the mount fails. _netdev: Marks this mount as requiring network. soft: Causes the mount to time out if the server is unresponsive. vers=3.0: Explicitly uses SMB version 3.0. TimeoutSec=30: Maximum wait time before systemd considers the mount failed. [Install] WantedBy=multi-user.target: Starts the mount at boot in multi-user mode. Step 4: Enable the mount After saving the unit file, reload and enable it: sudo systemctl daemon-reexec sudo systemctl daemon-reload sudo systemctl enable mnt-nas_share.mount sudo systemctl start mnt-nas_share.mount These commands: daemon-reexec: Ensures systemd itself is up-to-date. daemon-reload: Reloads unit files. enable: Enables the mount to persist across reboots. start: Immediately mounts the share. Step 5: Verify the mount Check the status with: sudo systemctl status mnt-nas_share.mount You should see the share is mounted without errors. Using this method ensures your CIFS mounts only attempt to initialize when the network is available, solving the common Permission denied opening credential file problem caused by early mount attempts during boot.
Mounting a CIFS share at boot via /etc/fstab can often lead to issues if the network isn't ready. A more reliable solution is to create a systemd mount unit that ensures the network is online before attempting to mount.
Here's how you do it:
Step 1: Create a credentials file
Create a file to store your SMB credentials:
sudo nano /etc/smb-credentials
With content:
username=your_username
password=your_password
Secure it so only root can read:
sudo chmod 600 /etc/smb-credentials
sudo chown root:root /etc/smb-credentials
Step 2: Create the mount point
Make the local directory where the CIFS share will be mounted:
sudo mkdir -p /mnt/nas_share
Step 3: Create a systemd mount unit
Run the following command to create or edit the mount unit:
sudo systemctl edit --force --full mnt-nas_share.mount
Paste the following content:
[Unit]
Description=Mount SMB Share
After=network-online.target
Wants=network-online.target

[Mount]
What=//nas.local/share
Where=/mnt/nas_share
Type=cifs
Options=credentials=/etc/smb-credentials,iocharset=utf8,nounix,noserverino,nofail,_netdev,soft,vers=3.0
TimeoutSec=30

[Install]
WantedBy=multi-user.target
Explanation:
[Unit]
-
Description=Mount NAS HDD Share: Human-readable description. -
After=network-online.target: Ensures the mount waits for the network to be up. -
Wants=network-online.target: Pulls in the network-online target if not already present.
[Mount]
-
What=//nas.local/share: UNC path to the CIFS share. -
Where=/mnt/nas_share: Local mount point. -
Type=cifs: Filesystem type. -
Options=...: Mount options:-
credentials=...: Path to the credentials file (should be root-only readable). iocharset=utf8: Character encoding. -
nounix,noserverino: Workarounds for specific CIFS behaviors. -
nofail: Don’t block boot if the mount fails. -
_netdev: Marks this mount as requiring network. -
soft: Causes the mount to time out if the server is unresponsive. -
vers=3.0: Explicitly uses SMB version 3.0. -
TimeoutSec=30: Maximum wait time before systemd considers the mount failed.
-
[Install]
-
WantedBy=multi-user.target: Starts the mount at boot in multi-user mode.
Step 4: Enable the mount
After saving the unit file, reload and enable it:
sudo systemctl daemon-reexec
sudo systemctl daemon-reload
sudo systemctl enable mnt-nas_share.mount
sudo systemctl start mnt-nas_share.mount
These commands:
-
daemon-reexec: Ensures systemd itself is up-to-date. -
daemon-reload: Reloads unit files. -
enable: Enables the mount to persist across reboots. -
start: Immediately mounts the share.
Step 5: Verify the mount
Check the status with:
sudo systemctl status mnt-nas_share.mount
You should see the share is mounted without errors.
Using this method ensures your CIFS mounts only attempt to initialize when the network is available, solving the common Permission denied opening credential file problem caused by early mount attempts during boot.