How to Design a Sofa Using 3D CAD Software
How to Design a Sofa Using 3D CAD Software 3D modeling has revolutionized the way designers create furniture, allowing for precise and customizable designs. One of the most effective tools for this purpose is SelfCAD, a user-friendly and versatile 3D modeling software that simplifies the design process. In this article, we will explore how to design a sofa using SelfCAD, covering key steps such as shape creation, refinement, and detailing. Whether for game assets, interior design visualization, or 3D printing, mastering sofa modeling in SelfCAD can open up new creative possibilities for designers of all skill levels To access the interactive tutorial to this article, check out; https://www.selfcad.com/tutorials/1z4z4j1t2l58243x1e4k212a4w3a2i4f5q6w Once you’ve launched the editor; From the 3D Shapes category on the toolbar choose cube; Set width to 400, height to 50, depth to 150, width segment to 10, depth segment to 5 Tick the checkmark finalize cube Click solid+wireframe button to set rendering mode; Click to activate face selection; Click on highlighted region to select it From the modify category on the toolbar choose extrusion; Set extrusion amount to 60. Tick the checkmark to finalize extrusion Click on highlighted region to deselect it Click on highlighted region to select it; From the modify category on the toolbar choose extrusion; Set extrusion amount to 100. Tick the checkmark to finalize extrusion Click on highlighted region to deselect it Click to activate edge selection; Click on highlighted region to select it From the modify category on the toolbar choose fillet; Set intensity to 6 Tick the checkmark to finalize fillet Click to activate face selection; Click on highlighted region to select it Click copy button to copy selected objects From the modify category on the toolbar choose add thickness; Set thickness to 15 Tick the checkmark to finalize add thickness From the modify category on the toolbar choose fillet; Set intensity to 6 Tick the checkmark to finalize fillet Click copy button to copy selected objects Click move on the toolbar; Set x to 79 using highlighted gizmo Click highlighted part on selection cube to turn off region selection Click copy button to copy selected objects Click rotate on the toolbar; Set x to -270. Click move on the toolbar. Set z to -36, y to 45 using highlighted gizmo Click to activate face selection; Click on highlighted region to select it From the modify category on the toolbar choose extrusion; Set extrusion amount to 10. Tick the checkmark to finalize extrusion Click highlighted part on selection cube to turn off region selection From the 3D Shapes category on the toolbar choose cube; Set width to 65, height to 65, depth to 28, width segment to 6, height segment to 5, depth segment to 5, position y to 64, position z to -13, rotation z to 38. Tick the checkmark finalize cube From the modify category on the toolbar choose round object; Set smoothness to 2 Tick the checkmark to finalize round object Click solid button to set rendering mode From the deform category on the toolbar choose inflate; Set z to 13, z to 4 using highlighted gizmo Click ‘x’ to close transformation panel Click move on the toolbar; Click copy button to copy selected objects, Set x to -109 using highlighted gizmo Click copy button to copy selected objects; Set x to 56 using highlighted gizmo Click copy button to copy selected objects; Set x to 129 using highlighted gizmo Click on all the meshes Click stitch & scoop on the toolbar; From the tool panel choose union. Tick the checkmark to finalize union As you continue honing your design skills, remember that SelfCAD offers a wealth of resources to support your learning journey. To deepen your understanding and explore more advanced features, consider checking out the interactive tutorials (https://www.selfcad.com/tutorials) available on the SelfCAD website. The tutorials page provides a treasure trove of guides, tips, and tricks that cater to designers of all levels. More structured learning experience can also be accessed at the SelfCAD Academy (https://www.selfcad.com/academy/curriculum/), https://www.youtube.com/@3dmodeling101, and 3D Modeling 101 series (https://www.youtube.com/playlist?list=PL74nFNT8yS9DcE1UlUUdiR1wFGv9DDfTB). This comprehensive resource offers in-depth courses taught by industry experts, allowing you to master the intricacies of SelfCAD at your own pace
How to Design a Sofa Using 3D CAD Software
3D modeling has revolutionized the way designers create furniture, allowing for precise and customizable designs. One of the most effective tools for this purpose is SelfCAD, a user-friendly and versatile 3D modeling software that simplifies the design process. In this article, we will explore how to design a sofa using SelfCAD, covering key steps such as shape creation, refinement, and detailing. Whether for game assets, interior design visualization, or 3D printing, mastering sofa modeling in SelfCAD can open up new creative possibilities for designers of all skill levels
To access the interactive tutorial to this article, check out; https://www.selfcad.com/tutorials/1z4z4j1t2l58243x1e4k212a4w3a2i4f5q6w
Once you’ve launched the editor;
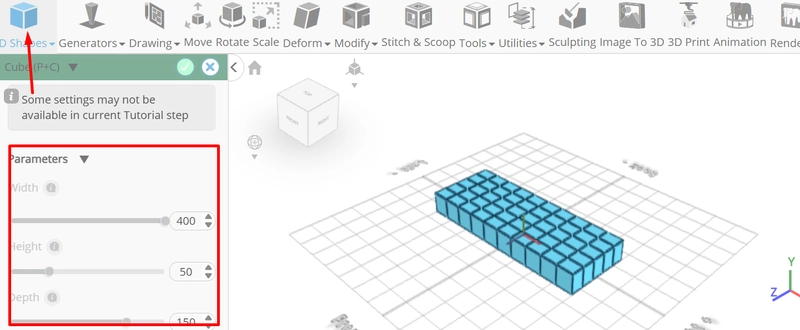
From the 3D Shapes category on the toolbar choose cube; Set width to 400, height to 50, depth to 150, width segment to 10, depth segment to 5

Tick the checkmark finalize cube
Click solid+wireframe button to set rendering mode; Click to activate face selection; Click on highlighted region to select it
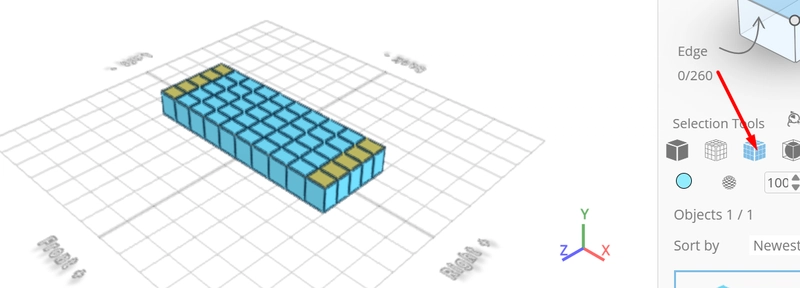
From the modify category on the toolbar choose extrusion; Set extrusion amount to 60.
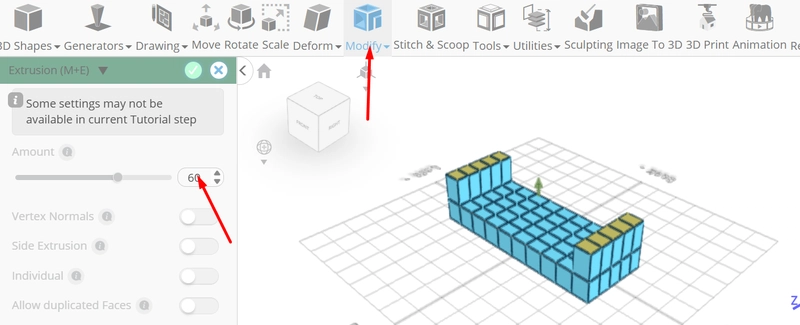
Tick the checkmark to finalize extrusion
Click on highlighted region to deselect it
Click on highlighted region to select it; From the modify category on the toolbar choose extrusion; Set extrusion amount to 100.
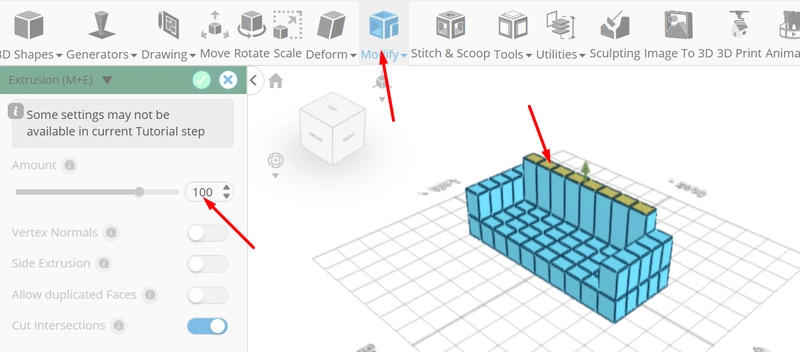
Tick the checkmark to finalize extrusion
Click on highlighted region to deselect it
Click to activate edge selection; Click on highlighted region to select it
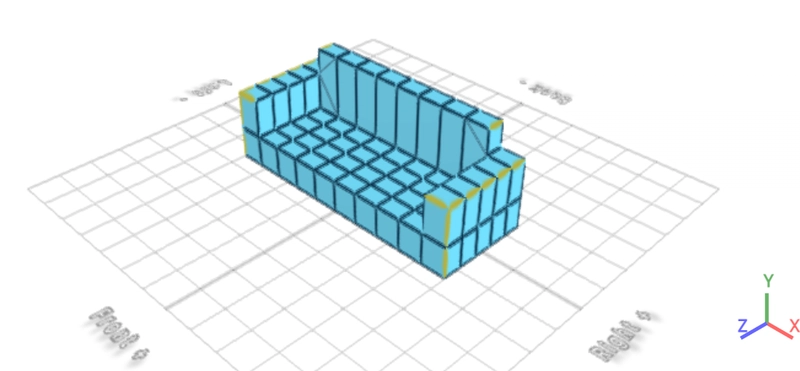
From the modify category on the toolbar choose fillet; Set intensity to 6
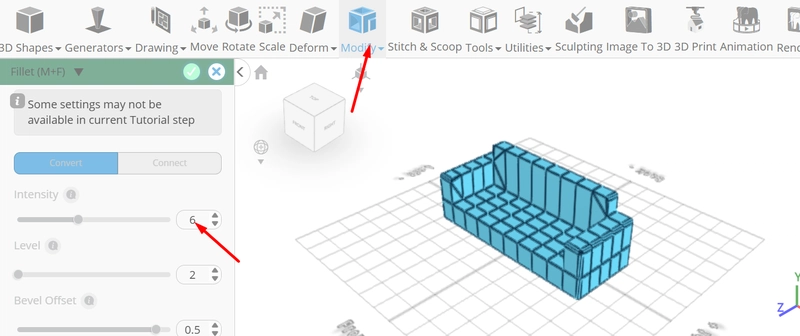
Tick the checkmark to finalize fillet
Click to activate face selection; Click on highlighted region to select it
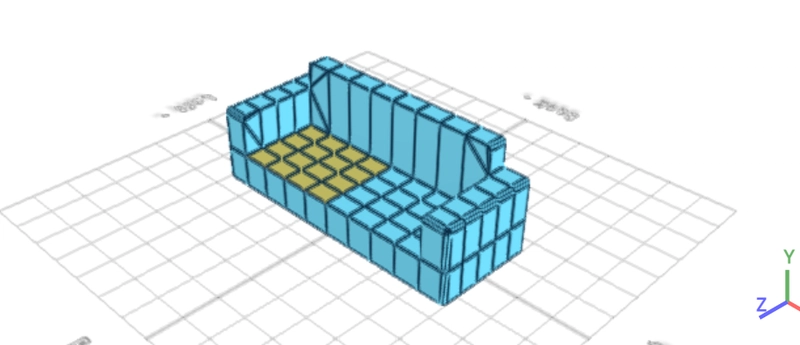
Click copy button to copy selected objects
From the modify category on the toolbar choose add thickness; Set thickness to 15
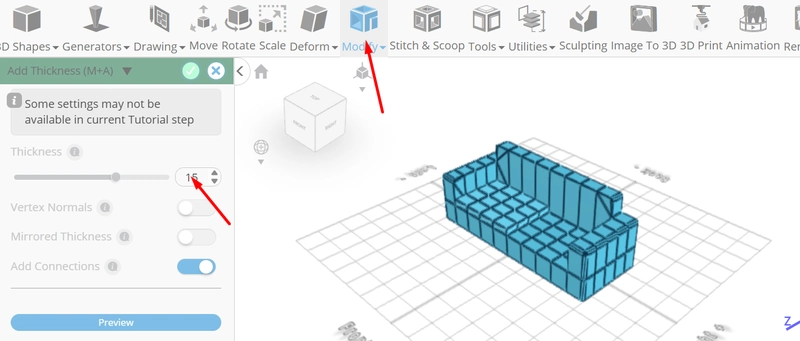
Tick the checkmark to finalize add thickness
From the modify category on the toolbar choose fillet; Set intensity to 6
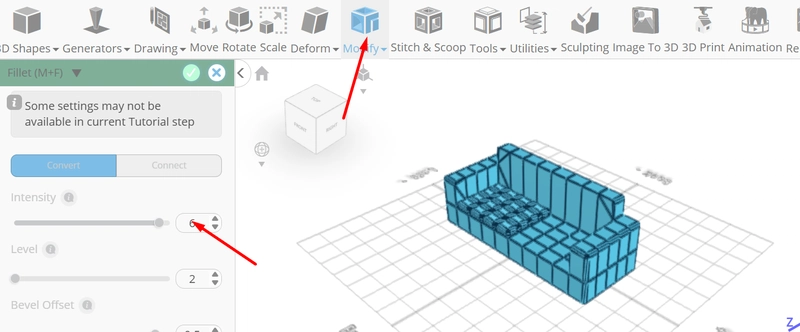
Tick the checkmark to finalize fillet
Click copy button to copy selected objects
Click move on the toolbar; Set x to 79 using highlighted gizmo
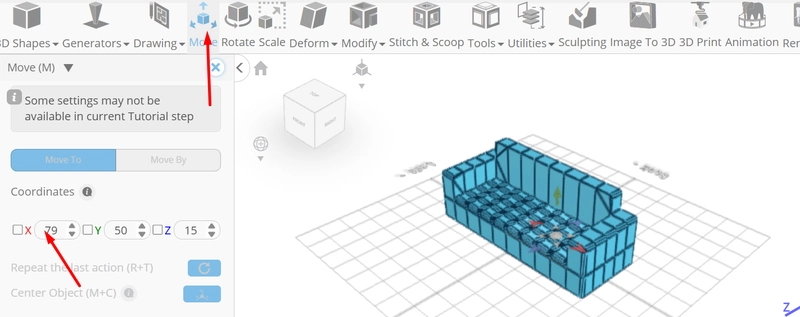
Click highlighted part on selection cube to turn off region selection
Click copy button to copy selected objects
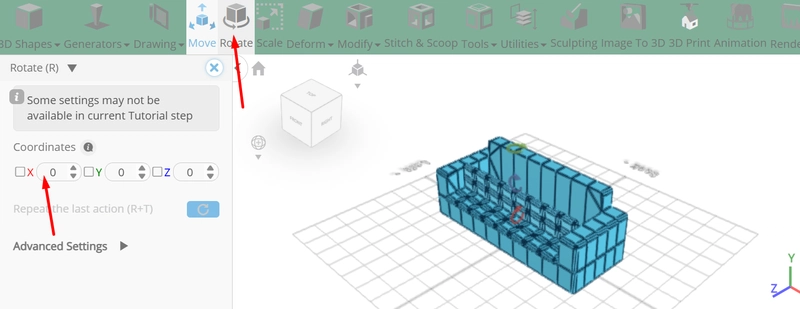
Click rotate on the toolbar; Set x to -270.
Click move on the toolbar.
Set z to -36, y to 45 using highlighted gizmo

Click to activate face selection; Click on highlighted region to select it
From the modify category on the toolbar choose extrusion; Set extrusion amount to 10.
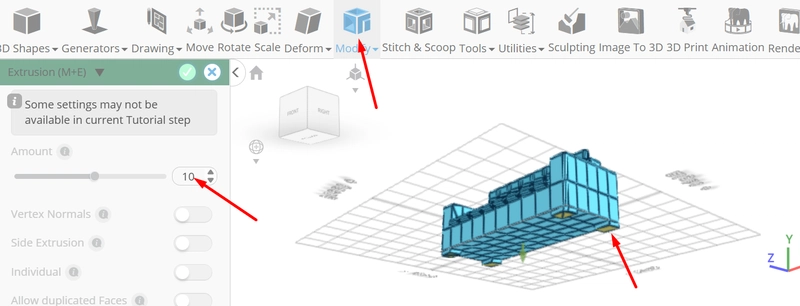
Tick the checkmark to finalize extrusion
Click highlighted part on selection cube to turn off region selection
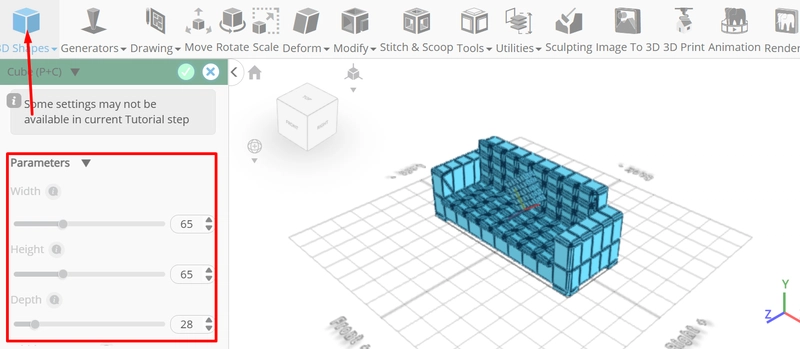
From the 3D Shapes category on the toolbar choose cube; Set width to 65, height to 65, depth to 28, width segment to 6, height segment to 5, depth segment to 5, position y to 64, position z to -13, rotation z to 38.
Tick the checkmark finalize cube
From the modify category on the toolbar choose round object; Set smoothness to 2
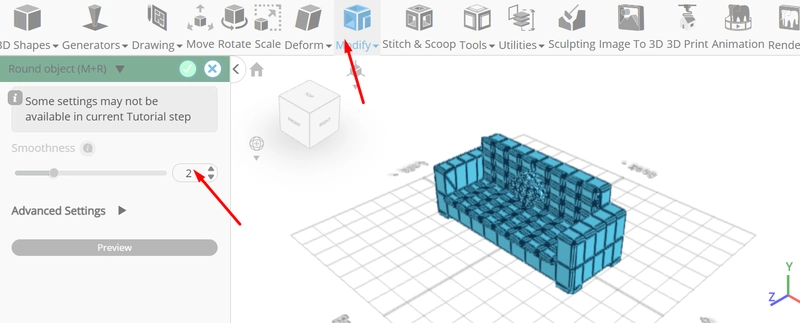
Tick the checkmark to finalize round object
Click solid button to set rendering mode
From the deform category on the toolbar choose inflate; Set z to 13, z to 4 using highlighted gizmo
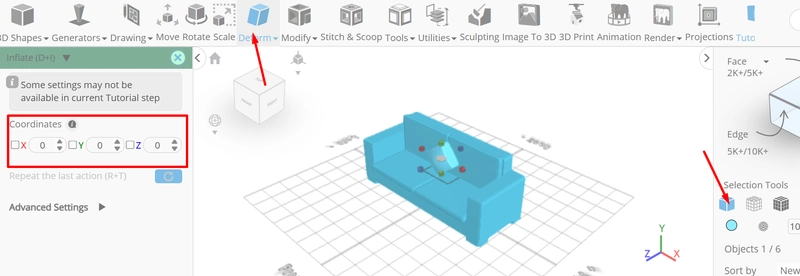
Click ‘x’ to close transformation panel
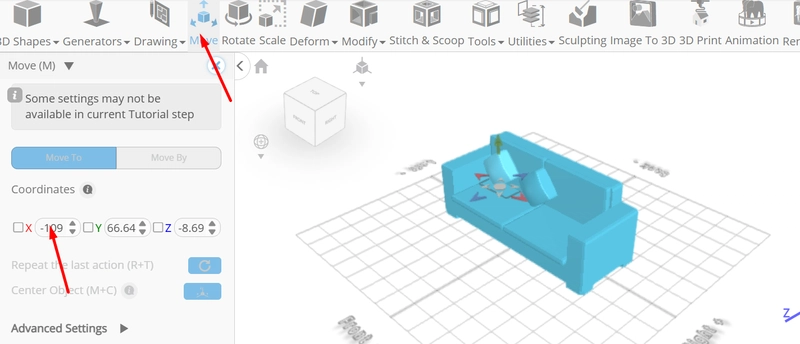
Click move on the toolbar; Click copy button to copy selected objects, Set x to -109 using highlighted gizmo
Click copy button to copy selected objects; Set x to 56 using highlighted gizmo
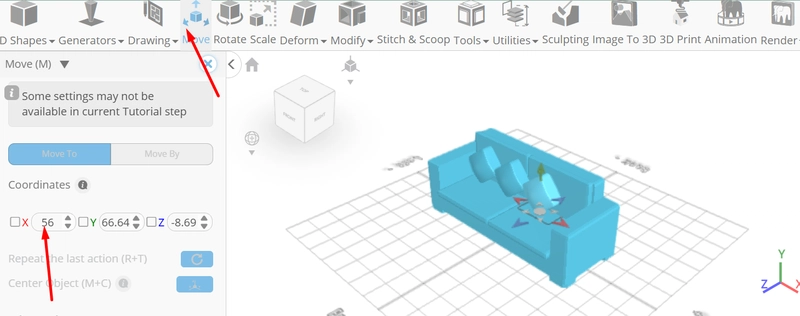
Click copy button to copy selected objects; Set x to 129 using highlighted gizmo
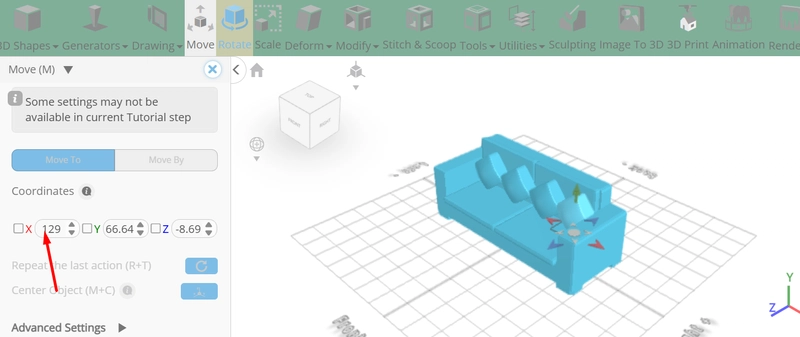
Click on all the meshes
Click stitch & scoop on the toolbar; From the tool panel choose union.
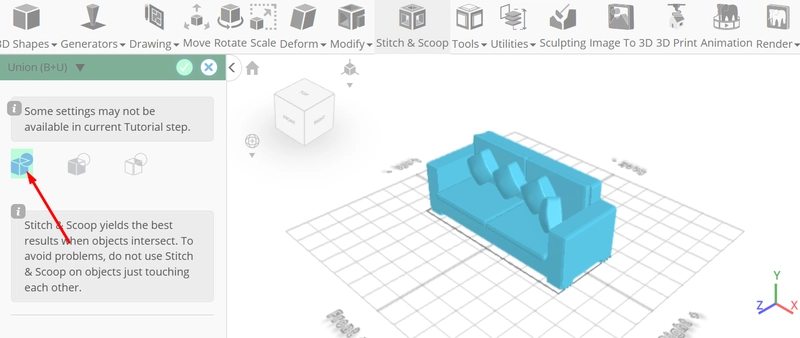
Tick the checkmark to finalize union
As you continue honing your design skills, remember that SelfCAD offers a wealth of resources to support your learning journey. To deepen your understanding and explore more advanced features, consider checking out the interactive tutorials (https://www.selfcad.com/tutorials) available on the SelfCAD website. The tutorials page provides a treasure trove of guides, tips, and tricks that cater to designers of all levels.
More structured learning experience can also be accessed at the SelfCAD Academy (https://www.selfcad.com/academy/curriculum/), https://www.youtube.com/@3dmodeling101, and 3D Modeling 101 series (https://www.youtube.com/playlist?list=PL74nFNT8yS9DcE1UlUUdiR1wFGv9DDfTB). This comprehensive resource offers in-depth courses taught by industry experts, allowing you to master the intricacies of SelfCAD at your own pace




![[The AI Show Episode 142]: ChatGPT’s New Image Generator, Studio Ghibli Craze and Backlash, Gemini 2.5, OpenAI Academy, 4o Updates, Vibe Marketing & xAI Acquires X](https://www.marketingaiinstitute.com/hubfs/ep%20142%20cover.png)


![[FREE EBOOKS] The Kubernetes Bible, The Ultimate Linux Shell Scripting Guide & Four More Best Selling Titles](https://www.javacodegeeks.com/wp-content/uploads/2012/12/jcg-logo.jpg)


![From drop-out to software architect with Jason Lengstorf [Podcast #167]](https://cdn.hashnode.com/res/hashnode/image/upload/v1743796461357/f3d19cd7-e6f5-4d7c-8bfc-eb974bc8da68.png?#)


.png?#)


.jpg?#)


_Christophe_Coat_Alamy.jpg?#)




![Rapidus in Talks With Apple as It Accelerates Toward 2nm Chip Production [Report]](https://www.iclarified.com/images/news/96937/96937/96937-640.jpg)


