How to build MCP servers with TypeScript SDK
This blog post demonstrates how to get started building your own MCP (Model Context Protocol) servers. There are a lot of resources in the internet that attempts to explain this topic. Although these resources are great, I couldn’t find a comprehensive guide and decided to piece together this blog post. This guide consolidates key information into a clear, step-by-step walkthrough for developers ready to build their own MCP servers. MCP in Layman's term Model Context Protocol (MCP) is an open standard that connects LLMs like Claude to your data sources. It enables LLMs to: Analyze local files (such as logs, pdfs, CSVs in your file system) Access and query databases Retrieve documents from Google Drive Browse the internet In essence, MCP servers act as bridges that give LLMs controlled access to specific data sources or enable them to perform specialized tasks. You first MCP server Let’s create a new project. Create a new folder and change directory into it. mkdir my-mcp-server cd my-mcp-server Next, initialize a new project npm init -y Install, necessary dependencies npm install @modelcontextprotocol/sdk zod npm install -D @types/node typescript Create a src directory and a src/index.ts file mkdir src touch src/index.ts Open up the package.json file and add the following lines to it { // ... rest of the code "type": "module", "bin": { "weather": "./build/index.js" }, "scripts": { "build": "tsc && chmod 755 build/index.js" }, "files": [ "build" ], } We will also create a tsconfig.json file in the root of our project. // tsconfig.json { "compilerOptions": { "target": "ES2022", "module": "Node16", "moduleResolution": "Node16", "outDir": "./build", "rootDir": "./src", "strict": true, "esModuleInterop": true, "skipLibCheck": true, "forceConsistentCasingInFileNames": true }, "include": ["src/**/*"], "exclude": ["node_modules"] } Next, let’s update the index.ts file. Add the following code to index.ts file import { Server } from "@modelcontextprotocol/sdk/server/index.js"; import { StdioServerTransport } from "@modelcontextprotocol/sdk/server/stdio.js"; import { z } from "zod"; const server = new Server({ name: "my-mcp-server", version: "1.0.0" }, { capabilities: { resources: {}, tools: {}, } }); The code above is initializing a new MCP server. It imports Server and StdioServerTransport from MCP SDK. The Server class is used to initialize a new server instance. The StdioServerTransport allows the server to communicate through standard input/output (stdin/stdout). Provide custom data to LLM using Resources Resources are a core primitive. It is used to provide data as context to the LLM. The data can be any of the following format File content (txt, pdf, csv, images) Database records Live system data Logs and more Back in your index.ts file add the following code: // List available resources server.setRequestHandler(ListResourcesRequestSchema, async () => { return { resources: [ { uri: "file:///Users/Documents/my-mcp-server/logs.txt", name: "Application Logs", mimeType: "text/plain" } ] }; }); // Read resource contents server.setRequestHandler(ReadResourceRequestSchema, async (request) => { const uri = request.params.uri; if (uri === "file:///Users/Documents/my-mcp-server/logs.txt") { const logContents = await readLogFile(); return { contents: [ { uri, mimeType: "text/plain", text: logContents } ] }; } throw new Error("Resource not found"); }); In the code above we have two handlers. The ListResourcesRequestSchema handler returns a list of resources that clients can access. In this case, it exposes just one resource - an application log file located at the absolute path defined The ReadResourceRequestSchema handler is responsible for actually retrieving the content of a requested resource. Finally add the following code in the index.ts file: // ... rest of the code async function readLogFile() { try { // Get the absolute path to the log file // Note: You might need to adjust this path based on your system const logPath = path.resolve('file:///Users/Documents/my-mcp-server/logs.txt'); // Read the file const data = await fs.readFile(logPath, 'utf8'); return data; } catch (error) { console.error('Error reading log file:', error); return "Error reading log file: " + (error instanceof Error ? error.message : String(error)); } } // Start the server with stdio transport async function main() { try { const transport = new StdioServerTransport(); await server
This blog post demonstrates how to get started building your own MCP (Model Context Protocol) servers. There are a lot of resources in the internet that attempts to explain this topic. Although these resources are great, I couldn’t find a comprehensive guide and decided to piece together this blog post. This guide consolidates key information into a clear, step-by-step walkthrough for developers ready to build their own MCP servers.
MCP in Layman's term
Model Context Protocol (MCP) is an open standard that connects LLMs like Claude to your data sources. It enables LLMs to:
- Analyze local files (such as logs, pdfs, CSVs in your file system)
- Access and query databases
- Retrieve documents from Google Drive
- Browse the internet
In essence, MCP servers act as bridges that give LLMs controlled access to specific data sources or enable them to perform specialized tasks.
You first MCP server
Let’s create a new project. Create a new folder and change directory into it.
mkdir my-mcp-server
cd my-mcp-server
Next, initialize a new project
npm init -y
Install, necessary dependencies
npm install @modelcontextprotocol/sdk zod
npm install -D @types/node typescript
Create a src directory and a src/index.ts file
mkdir src
touch src/index.ts
Open up the package.json file and add the following lines to it
{
    // ... rest of the code
  "type": "module",
  "bin": {
    "weather": "./build/index.js"
  },
  "scripts": {
    "build": "tsc && chmod 755 build/index.js"
  },
  "files": [
    "build"
  ],

}
We will also create a tsconfig.json file in the root of our project.
// tsconfig.json

{
    "compilerOptions": {
      "target": "ES2022",
      "module": "Node16",
      "moduleResolution": "Node16",
      "outDir": "./build",
      "rootDir": "./src",
      "strict": true,
      "esModuleInterop": true,
      "skipLibCheck": true,
      "forceConsistentCasingInFileNames": true
    },
    "include": ["src/**/*"],
    "exclude": ["node_modules"]
}
Next, let’s update the index.ts file. Add the following code to index.ts file
import { Server } from "@modelcontextprotocol/sdk/server/index.js";
import {
  StdioServerTransport
} from "@modelcontextprotocol/sdk/server/stdio.js";
import { z } from "zod";

const server = new Server({
    name: "my-mcp-server",
    version: "1.0.0"
  }, {
    capabilities: {
      resources: {},
      tools: {},
    }
});
The code above is initializing a new MCP server. It imports Server and StdioServerTransport from MCP SDK. The Server class is used to initialize a new server instance. The StdioServerTransport allows the server to communicate through standard input/output (stdin/stdout).
Provide custom data to LLM using Resources
Resources are a core primitive. It is used to provide data as context to the LLM. The data can be any of the following format
- File content (txt, pdf, csv, images)
- Database records
- Live system data
- Logs and more
Back in your index.ts file add the following code:
// List available resources
server.setRequestHandler(ListResourcesRequestSchema, async () => {
    return {
      resources: [
        {
          uri: "file:///Users/Documents/my-mcp-server/logs.txt",
          name: "Application Logs",
          mimeType: "text/plain"
        }
      ]
    };
});

// Read resource contents
server.setRequestHandler(ReadResourceRequestSchema, async (request) => {
    const uri = request.params.uri;
    if (uri === "file:///Users/Documents/my-mcp-server/logs.txt") {
        const logContents = await readLogFile();
        return {
        contents: [
            {
                uri,
                mimeType: "text/plain",
                text: logContents
            }
        ]
        };
    }
    throw new Error("Resource not found");
});
In the code above we have two handlers.
- The
ListResourcesRequestSchemahandler returns a list of resources that clients can access. In this case, it exposes just one resource - an application log file located at the absolute path defined - The
ReadResourceRequestSchemahandler is responsible for actually retrieving the content of a requested resource.
Finally add the following code in the index.ts file:
// ... rest of the code
async function readLogFile() {
    try {
        // Get the absolute path to the log file
        // Note: You might need to adjust this path based on your system
        const logPath =
          path.resolve('file:///Users/Documents/my-mcp-server/logs.txt');

        // Read the file
        const data = await fs.readFile(logPath, 'utf8');
        return data;
    } catch (error) {
        console.error('Error reading log file:', error);
        return "Error reading log file: " +
          (error instanceof Error ? error.message : String(error));
    }
}

// Start the server with stdio transport
async function main() {
    try {
        const transport = new StdioServerTransport();
        await server.connect(transport);
        console.error("Server started and listening on stdio");
    } catch (error) {
        console.error("Failed to start server:", error);
        process.exit(1);
    }
}

main();
The readLogFile helper function handles the file reading operations. The main function initializes a StdioServerTransport instance which enables communication over standard input/output. Finally it connects the previously defined server with the transport.
Next, run the build script:
npm run build
Copy the absolute path of the generated build/index.js file. You will need to add this to Claude desktop client config.
Configuring Claude desktop client
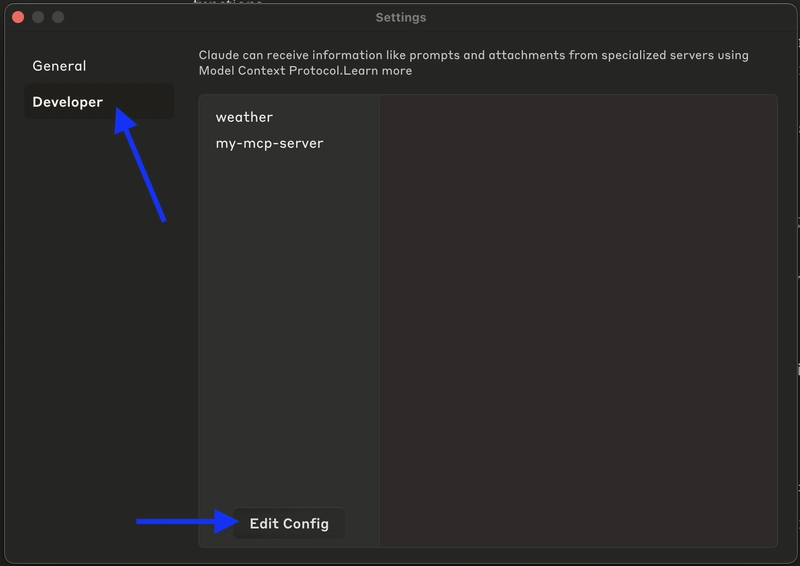
The easiest way to test your MCP servers in to use Claude desktop client. Open the settings of your Claude desktop client and navigate to Developer > Edit Config.
Open the claude_desktop_config.json file and add the following JSON object.
{
  "mcpServers": {
        "my-mcp-server": {
            "command": "node",
            "args": [
                "/Users/Documents/my-mcp-server/build/index.js"
            ]
        }
  }
}
Make sure to replace /Users/Documents/my-mcp-server/build/index.js with the absolute path of your index.js file path you copied earlier.
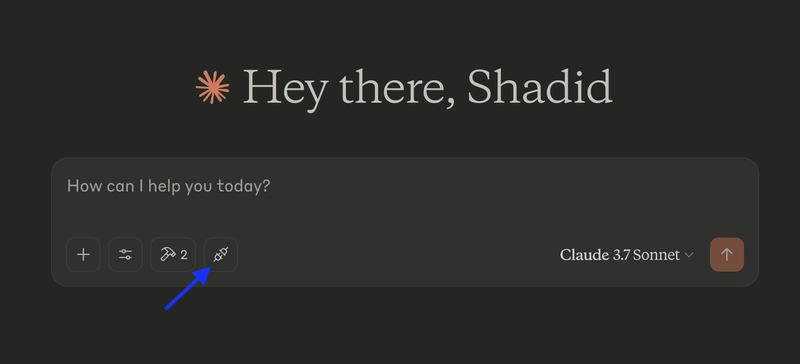
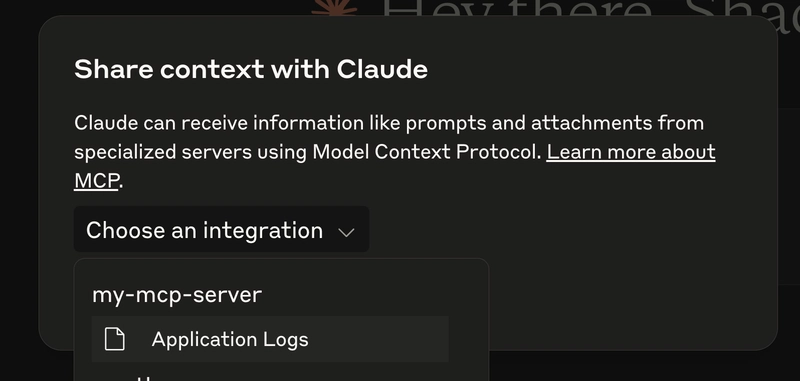
Open your Claude desktop app and you should see a new plug icon for the MCP.
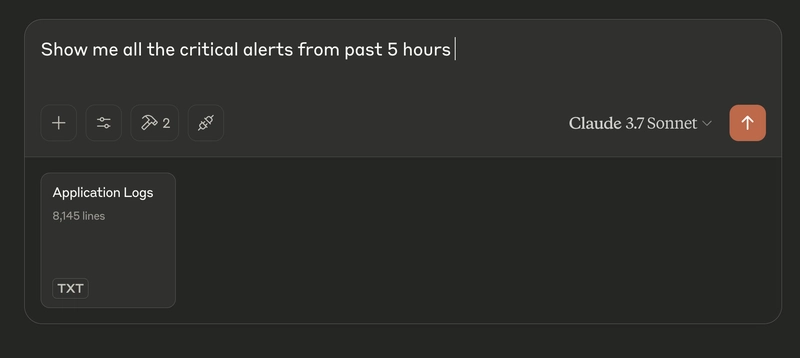
Click on the button and you should be able to use the MCP server resources in your next chat.
You can now interact with your data using the LLM.
Debugging MCP servers
We can use the @modelcontextprotocol/inspector package to visually inspect and debug MCP server functionality.
Run the following command to get the inspector running
npx @modelcontextprotocol/inspector node /your-build-path/index.js
Learn more about the inspector here.
Execute functions using MCP Tools
Tools gives LLM the ability to perform actions. For instance
- LLM can execute an API call gather required data to answer questions.
- Using tools you can give LLMs can browse the internet
- You can make LLMs write and execute queries in your database using tools
Let’s create a new MCP server that can gather data from the CocktailDB API and gives us drinks recipes.
Create a new folder and setup a new TypeScript project following the previous steps. Next, add the following code to your index.ts file
import { Server } from "@modelcontextprotocol/sdk/server/index.js";
import {
  StdioServerTransport
} from "@modelcontextprotocol/sdk/server/stdio.js";
import {
  CallToolRequestSchema,
  ListToolsRequestSchema
} from "@modelcontextprotocol/sdk/types.js";
import z from "zod";

// Create the server
const server = new Server({
  name: "cocktail-api-server",
  version: "1.0.0"
}, {
  capabilities: {
    tools: {}
  }
});

// Define tool schema using zod
const getCocktailSchema = z.object({
  name: z.string().describe("Cocktail name to search for")
});

// Register tools
server.setRequestHandler(ListToolsRequestSchema, async () => {
  return {
    tools: [
      {
        name: "get_cocktail",
        description: "Search for cocktail recipes by name",
        inputSchema: {
          type: "object",
          properties: {
            name: {
              type: "string",
              description: "Cocktail name to search for"
            }
          },
          required: ["name"]
        }
      }
    ]
  };
});
In the code above we are registering a new tool for the server. You have to define the Tools using a valid JSON structure. You can learn more about this JSON structure in the official documentation page.
Next, create a function for handling the tools function. Add the following code:
// Implement the tool handler
server.setRequestHandler(CallToolRequestSchema, async (request) => {
  if (request.params.name === "get_cocktail") {
    try {
      // Parse and validate arguments using zod
      const args = getCocktailSchema.parse(request.params.arguments);

      // Make the API call to CocktailDB
      const url = `
       https://www.thecocktaildb.com/api/json/v1/1/search.php?
       s=${encodeURIComponent(args.name)}
      `;
      const response = await fetch(url);

      if (!response.ok) {
        throw new Error(`CocktailDB API error: ${response.statusText}`);
      }

      const data = await response.json();

      // Check if any drinks were found
      if (!data.drinks) {
        return {
          content: [
            {
              type: "text",
              text: `
               No cocktails found matching "${args.name}".
               Try a different search term.
              `
            }
          ]
        };
      }

      // Format each cocktail recipe
      const cocktailRecipes = data.drinks.map(formatCocktail);

      // Create the formatted response
      const result = `
        Found ${data.drinks.length} cocktail(s) matching
        "${args.name}":\n\n${cocktailRecipes.join('\n\n')}
      `;

      return {
        content: [
          {
            type: "text",
            text: result
          }
        ]
      };
    } catch (error) {
      console.error("Error in get_cocktail tool:", error);

      return {
        isError: true,
        content: [
          {
            type: "text",
            text: `Error searching for cocktail:
${error instanceof Error ? error.message : 'Unknown error'}`
          }
        ]
      };
    }
  }

  // Handle unknown tool
  return {
    isError: true,
    content: [
      {
        type: "text",
        text: `Unknown tool: ${request.params.name}`
      }
    ]
  };
});
The above code:
- Validates incoming search parameters
- Queries TheCocktailDB's API for cocktails matching the provided name
- Returns formatted results if found, or a helpful message if none exist
- Handles errors appropriately throughout the process
- Rejects requests for unknown tools
This response is then send to the LLM. The LLM then creates an answer based on this context.
Let’s also add a helper function to format the response from the API.
// ... rest of the code
function formatCocktail(drink: any) {
  // Create an array of ingredients paired with measurements
  const ingredients = [];
  for (let i = 1; i <= 15; i++) {
    const ingredient = drink[`strIngredient${i}`];
    const measure = drink[`strMeasure${i}`];

    if (ingredient) {
      ingredients.push(`${measure ? measure.trim() : ''} ${ingredient}`);
    }
  }

  return `


![[The AI Show Episode 142]: ChatGPT’s New Image Generator, Studio Ghibli Craze and Backlash, Gemini 2.5, OpenAI Academy, 4o Updates, Vibe Marketing & xAI Acquires X](https://www.marketingaiinstitute.com/hubfs/ep%20142%20cover.png)








-Nintendo-Switch-2-–-Overview-trailer-00-00-10.png?width=1920&height=1920&fit=bounds&quality=80&format=jpg&auto=webp#)








![YouTube Announces New Creation Tools for Shorts [Video]](https://www.iclarified.com/images/news/96923/96923/96923-640.jpg)

![Apple Faces New Tariffs but Has Options to Soften the Blow [Kuo]](https://www.iclarified.com/images/news/96921/96921/96921-640.jpg)


