From Zero to Hosted: Building a Static Website Platform with Pulumi and MinIO
Introduction Have you ever wanted to create your own cloud infrastructure at home? Whether you're looking to learn more about cloud technologies, test deployments before pushing to production, or simply set up a personal storage solution, a home lab environment can be incredibly valuable. In this guide, I'll walk you through setting up a HomeLab MiniCloud using Pulumi as infrastructure-as-code (IaC) and Docker with MinIO as our object storage service. What You'll Learn How to set up Pulumi for infrastructure as code Deploying MinIO (an S3-compatible object storage) using Docker Configuring NGINX as a reverse proxy with SSL Hosting a static website from your MinIO instance Troubleshooting common issues Prerequisites Before we dive in, let's make sure you have all the necessary dependencies installed on your system. We'll need Docker for containerization, Python for our Pulumi code, and a few other utilities: sudo apt update && sudo apt install -y \ docker.io \ python3.10 \ python3.10-venv \ curl \ unzip What is Pulumi? Pulumi is an open-source infrastructure as code (IaC) tool that allows you to define and manage cloud infrastructure using familiar programming languages rather than domain-specific languages. In our case, we'll use Python to define our infrastructure, which means we can leverage Python's full feature set, including loops, conditionals, and functions, making our infrastructure code more flexible and maintainable. Installing Pulumi Let's install Pulumi using their official installation script: curl -fsSL https://get.pulumi.com | sh export PATH=$PATH:$HOME/.pulumi/bin To make the Pulumi command available in your shell permanently, add it to your shell configuration file: echo 'export PATH=$HOME/.pulumi/bin:$PATH' >> ~/.bashrc source ~/.bashrc Setting Up Our MiniCloud Infrastructure 1. Creating the Project Directory Let's start by creating a directory for our project: mkdir -p ~/Home-Lab/Pulumi/homelab-minicloud cd ~/Home-Lab/Pulumi/homelab-minicloud 2. Initializing a Pulumi Project Now, let's initialize a new Pulumi project with Python as our language of choice: pulumi new python -y This command creates a new Pulumi project with the necessary scaffolding to get started. 3. Installing Dependencies Navigate to the infrastructure directory and install the required Python packages: cd infra pip install -r requirements.txt I recommend using a virtual environment to isolate our project dependencies: python3 -m venv venv source venv/bin/activate pip install -r requirements.txt 4. Installing the Pulumi Docker Provider Since we'll be deploying Docker containers, we need to install the Pulumi Docker provider: pip install pulumi_docker 5. Defining Our MinIO Infrastructure Now comes the exciting part! Let's define our MinIO infrastructure by editing the __main__.py file in the infra directory: """A Python Pulumi program""" import pulumi import pulumi_docker as docker # MinIO credentials minio_access_key = "minioadmin" minio_secret_key = "minioadmin" # Create a shared Docker network network = docker.Network("homelab-network", name="homelab-network") # Pull MinIO image minio_image = docker.RemoteImage("minio-image", name="minio/minio:latest", keep_locally=True ) # Run MinIO container minio_container = docker.Container("minio-container", image=minio_image.repo_digest, name="minio", ports=[ docker.ContainerPortArgs(internal=9000, external=9000), docker.ContainerPortArgs(internal=9001, external=9001), ], envs=[ f"MINIO_ROOT_USER={minio_access_key}", f"MINIO_ROOT_PASSWORD={minio_secret_key}" ], command=["server", "/data", "--console-address", ":9001"], volumes=[ docker.ContainerVolumeArgs( host_path="/home/arjun//minio/data", container_path="/data", ) ], networks_advanced=[docker.ContainerNetworksAdvancedArgs(name=network.name)], ) pulumi.export("minio_container_name", minio_container.name) Let's break down this code: We define MinIO credentials (in a production environment, you'd want to use Pulumi's secrets management) We create a Docker network for our containers to communicate We pull the latest MinIO image We define and run the MinIO container with: Port mappings (9000 for the API, 9001 for the web console) Environment variables for credentials Volume mapping to persist data Network configuration 6. Deploying MinIO Now let's deploy our infrastructure: cd infra pulumi up This command will: Preview the changes Pulumi will make Ask for confirmation Deploy the infrastructure according to our code After deployment, you can verify that MinIO is running: docker ps You should see output similar to: CONTAINER ID IMAGE COMMAND
Introduction
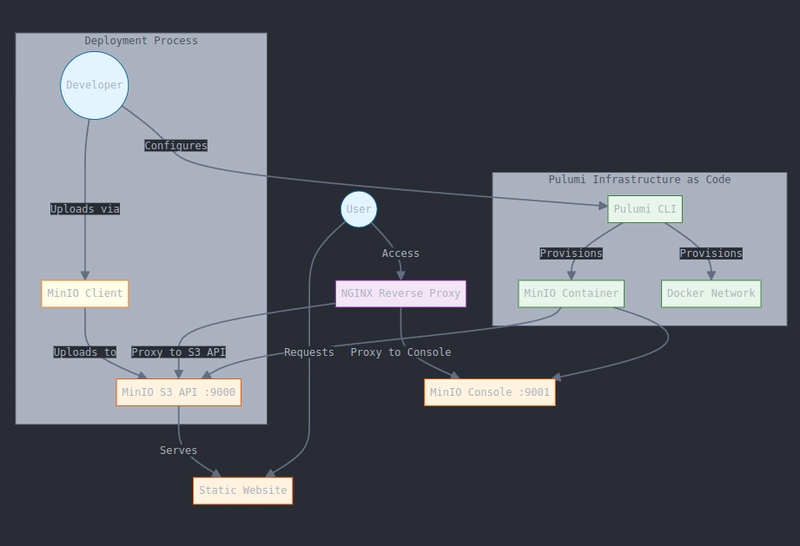
Have you ever wanted to create your own cloud infrastructure at home? Whether you're looking to learn more about cloud technologies, test deployments before pushing to production, or simply set up a personal storage solution, a home lab environment can be incredibly valuable. In this guide, I'll walk you through setting up a HomeLab MiniCloud using Pulumi as infrastructure-as-code (IaC) and Docker with MinIO as our object storage service.
What You'll Learn
- How to set up Pulumi for infrastructure as code
- Deploying MinIO (an S3-compatible object storage) using Docker
- Configuring NGINX as a reverse proxy with SSL
- Hosting a static website from your MinIO instance
- Troubleshooting common issues
Prerequisites
Before we dive in, let's make sure you have all the necessary dependencies installed on your system. We'll need Docker for containerization, Python for our Pulumi code, and a few other utilities:
sudo apt update && sudo apt install -y \
  docker.io \
  python3.10 \
  python3.10-venv \
  curl \
  unzip
What is Pulumi?
Pulumi is an open-source infrastructure as code (IaC) tool that allows you to define and manage cloud infrastructure using familiar programming languages rather than domain-specific languages. In our case, we'll use Python to define our infrastructure, which means we can leverage Python's full feature set, including loops, conditionals, and functions, making our infrastructure code more flexible and maintainable.
Installing Pulumi
Let's install Pulumi using their official installation script:
curl -fsSL https://get.pulumi.com | sh
export PATH=$PATH:$HOME/.pulumi/bin
To make the Pulumi command available in your shell permanently, add it to your shell configuration file:
echo 'export PATH=$HOME/.pulumi/bin:$PATH' >> ~/.bashrc
source ~/.bashrc
Setting Up Our MiniCloud Infrastructure
1. Creating the Project Directory
Let's start by creating a directory for our project:
mkdir -p ~/Home-Lab/Pulumi/homelab-minicloud
cd ~/Home-Lab/Pulumi/homelab-minicloud
2. Initializing a Pulumi Project
Now, let's initialize a new Pulumi project with Python as our language of choice:
pulumi new python -y
This command creates a new Pulumi project with the necessary scaffolding to get started.
3. Installing Dependencies
Navigate to the infrastructure directory and install the required Python packages:
cd infra
pip install -r requirements.txt
I recommend using a virtual environment to isolate our project dependencies:
python3 -m venv venv
source venv/bin/activate
pip install -r requirements.txt
4. Installing the Pulumi Docker Provider
Since we'll be deploying Docker containers, we need to install the Pulumi Docker provider:
pip install pulumi_docker
5. Defining Our MinIO Infrastructure
Now comes the exciting part! Let's define our MinIO infrastructure by editing the __main__.py file in the infra directory:
"""A Python Pulumi program"""

import pulumi
import pulumi_docker as docker

# MinIO credentials
minio_access_key = "minioadmin"
minio_secret_key = "minioadmin"

# Create a shared Docker network
network = docker.Network("homelab-network", name="homelab-network")

# Pull MinIO image
minio_image = docker.RemoteImage("minio-image",
    name="minio/minio:latest",
    keep_locally=True
)

# Run MinIO container
minio_container = docker.Container("minio-container",
    image=minio_image.repo_digest,
    name="minio",
    ports=[
        docker.ContainerPortArgs(internal=9000, external=9000),
        docker.ContainerPortArgs(internal=9001, external=9001),
    ],
    envs=[
        f"MINIO_ROOT_USER={minio_access_key}",
        f"MINIO_ROOT_PASSWORD={minio_secret_key}"
    ],
    command=["server", "/data", "--console-address", ":9001"],
    volumes=[
        docker.ContainerVolumeArgs(
            host_path="/home/arjun//minio/data",
            container_path="/data",
        )
    ],
    networks_advanced=[docker.ContainerNetworksAdvancedArgs(name=network.name)],
)

pulumi.export("minio_container_name", minio_container.name)
Let's break down this code:
- We define MinIO credentials (in a production environment, you'd want to use Pulumi's secrets management)
- We create a Docker network for our containers to communicate
- We pull the latest MinIO image
- We define and run the MinIO container with:
- Port mappings (9000 for the API, 9001 for the web console)
- Environment variables for credentials
- Volume mapping to persist data
- Network configuration
6. Deploying MinIO
Now let's deploy our infrastructure:
cd infra
pulumi up
This command will:
- Preview the changes Pulumi will make
- Ask for confirmation
- Deploy the infrastructure according to our code
After deployment, you can verify that MinIO is running:
docker ps
You should see output similar to:
CONTAINER ID   IMAGE       COMMAND     STATUS    PORTS           NAMES
xxxxxxxxxxxx   minio/minio "..."       Up       0.0.0.0:9000->9000/tcp   minio
7. Accessing MinIO
Once deployed, you can access the MinIO console at http://localhost:9001 with the following credentials:
-
Username:
minioadmin -
Password:
minioadmin
Enhancing Our Setup with NGINX and SSL
Now that we have MinIO running, let's enhance our setup by adding NGINX as a reverse proxy and implementing SSL for secure connections.
Generating a Self-Signed Certificate with SAN
For development purposes, we'll create a self-signed SSL certificate with Subject Alternative Name (SAN) support. First, create an OpenSSL configuration file named cert.conf:
[req]
default_bits       = 2048
distinguished_name = req_distinguished_name
req_extensions     = req_ext
x509_extensions    = v3_ca
prompt             = no

[req_distinguished_name]
C  = IN
ST = Karnataka
L  = Bangalore
O  = HomeLab
OU = IT
CN = minio.local

[req_ext]
subjectAltName = @alt_names

[v3_ca]
subjectAltName = @alt_names
basicConstraints = critical, CA:true

[alt_names]
DNS.1 = minio.local
Now, generate the certificate and key:
openssl req -x509 -nodes -days 365 \
  -newkey rsa:2048 \
  -keyout minio.key \
  -out minio.crt \
  -config cert.conf
This creates two files:
-
minio.crt- The certificate -
minio.key- The private key
Setting Up NGINX as a Reverse Proxy
We have two options for configuring NGINX: subpath routing or subdomain split. Let's look at both approaches.
Option 1: Subpath Routing
With this approach, we'll serve both the MinIO console and our static site from the same domain but different paths:
server {
    listen 443 ssl;
    server_name minio.local;

    ssl_certificate     /etc/nginx/ssl/minio.crt;
    ssl_certificate_key /etc/nginx/ssl/minio.key;

    # MinIO Console
    location / {
        proxy_pass http://minio:9001/;
        proxy_set_header Host $host;
        proxy_set_header X-Real-IP $remote_addr;
        proxy_set_header X-Forwarded-For $proxy_add_x_forwarded_for;
        proxy_set_header X-Forwarded-Proto $scheme;
    }

    # Static Site
    location /static/ {
        proxy_pass http://minio:9000/static-site/;
        proxy_ssl_verify off;
        proxy_set_header Host $host;
        proxy_set_header X-Real-IP $remote_addr;
        proxy_set_header X-Forwarded-For $proxy_add_x_forwarded_for;
        proxy_set_header X-Forwarded-Proto $scheme;
    }
}
With this configuration:
- The MinIO console will be accessible at
https://minio.local/ - The static site will be accessible at
https://minio.local/static/
Option 2: Subdomain Split
Alternatively, we can use different subdomains for the MinIO console and the static site:
First, update your /etc/hosts file:
127.0.0.1 minio.local static.local
Then, configure NGINX:
# Static site on static.local
server {
    listen 443 ssl;
    server_name static.local;

    ssl_certificate     /etc/nginx/ssl/minio.crt;
    ssl_certificate_key /etc/nginx/ssl/minio.key;

    location / {
        proxy_pass http://minio:9000/static-site/;
        proxy_ssl_verify off;
    }
}

# MinIO Console on minio.local
server {
    listen 443 ssl;
    server_name minio.local;

    ssl_certificate     /etc/nginx/ssl/minio.crt;
    ssl_certificate_key /etc/nginx/ssl/minio.key;

    location / {
        proxy_pass http://minio:9001/;
    }
}
With this configuration:
- The MinIO console will be accessible at
https://minio.local/ - The static site will be accessible at
https://static.local/
After configuring NGINX, check the configuration and reload:
sudo nginx -t  # Check config
sudo systemctl reload nginx
Deploying a Static Website to MinIO
Now that we have MinIO and NGINX set up, let's deploy a static website to our MinIO bucket and make it publicly accessible.
Setting Up the MinIO Client (mc)
The MinIO Client (mc) is a command-line tool for working with MinIO and other S3-compatible storage services. Let's create a script to upload our static site to MinIO:
#!/bin/bash

set -e

# Connect to our MinIO instance (using --insecure for self-signed certificates)
mc alias set local https://minio.local minioadmin minioadmin --insecure

# Create a bucket for our static site (if it doesn't exist)
mc mb local/static-site --insecure || true

# Set the bucket to allow anonymous (public) downloads
mc anonymous set download local/static-site --insecure

# Upload our static site files
mc cp --recursive ../static-site/ local/static-site --insecure

echo "✅ Static site uploaded to MinIO!"
Handling Self-Signed Certificate Issues
Since we're using a self-signed certificate, you might encounter certificate verification errors. Here are two ways to handle them:
Option 1: Using the --insecure Flag
As shown in the script above, you can use the --insecure flag to skip certificate verification. This is not recommended for production but is fine for a development environment.
Option 2: Trusting the Self-Signed Certificate
A better approach is to add the certificate to your system's trusted certificates:
For Ubuntu/Debian:
sudo cp minio.crt /usr/local/share/ca-certificates/minio.crt
sudo update-ca-certificates
For RedHat-based systems:
sudo cp minio.crt /etc/pki/ca-trust/source/anchors/minio.crt
sudo update-ca-trust extract
After adding the certificate, restart your terminal and try the script without the --insecure flag.
Configuring MinIO for Website Hosting
MinIO has built-in support for static website hosting. Let's configure it:
mc alias set local https://minio.local
mc anonymous set download local/static-site
mc website set local/static-site --index index.html --error index.html
With this configuration, MinIO will serve index.html for directory requests and as the error page.
Troubleshooting Common Issues
Issue: ModuleNotFoundError: No module named 'pulumi_docker'
If you encounter this error, follow these steps:
- Ensure you are inside the
infradirectory - Activate the virtual environment:
source venv/bin/activate
- Reinstall the Pulumi Docker provider:
pip install pulumi_docker
- Verify the installation:
pip list | grep pulumi_docker
- Try running
pulumi upagain
Issue: Pulumi asks for a passphrase
Pulumi encrypts secrets. If prompted for a passphrase, you can set an environment variable to avoid re-entering it:
export PULUMI_CONFIG_PASSPHRASE="your-passphrase"
Cleaning Up Resources
When you're done with your HomeLab MiniCloud, you can clean up all resources using:
pulumi destroy
This will remove all resources created by Pulumi.
Conclusion
Congratulations! You've successfully set up a HomeLab MiniCloud environment with MinIO for object storage, protected it with SSL, and configured it to host a static website. This setup provides a great foundation for learning cloud concepts, testing deployments, or simply running your own personal cloud services.
Some next steps you might consider:
- Add more services to your MiniCloud (like a database or a web application)
- Implement proper authentication for production use
- Set up automated backups of your MinIO data
- Explore other Pulumi providers to expand your infrastructure
Building a home lab is an excellent way to gain hands-on experience with cloud technologies without incurring significant costs. As you grow more comfortable with these tools, you'll find it easier to design, deploy, and manage cloud infrastructure in professional environments as well.
Happy cloud building!





![[The AI Show Episode 142]: ChatGPT’s New Image Generator, Studio Ghibli Craze and Backlash, Gemini 2.5, OpenAI Academy, 4o Updates, Vibe Marketing & xAI Acquires X](https://www.marketingaiinstitute.com/hubfs/ep%20142%20cover.png)







.jpg?#)













![YouTube Announces New Creation Tools for Shorts [Video]](https://www.iclarified.com/images/news/96923/96923/96923-640.jpg)

![Apple Faces New Tariffs but Has Options to Soften the Blow [Kuo]](https://www.iclarified.com/images/news/96921/96921/96921-640.jpg)


