


![[The AI Show Episode 142]: ChatGPT’s New Image Generator, Studio Ghibli Craze and Backlash, Gemini 2.5, OpenAI Academy, 4o Updates, Vibe Marketing & xAI Acquires X](https://www.marketingaiinstitute.com/hubfs/ep%20142%20cover.png)


![From drop-out to software architect with Jason Lengstorf [Podcast #167]](https://cdn.hashnode.com/res/hashnode/image/upload/v1743796461357/f3d19cd7-e6f5-4d7c-8bfc-eb974bc8da68.png?#)


(1).jpg?width=1920&height=1920&fit=bounds&quality=80&format=jpg&auto=webp#)


.png?#)


-(1).png?width=1920&height=1920&fit=bounds&quality=80&format=jpg&auto=webp#)


_Christophe_Coat_Alamy.jpg?#)
.webp?#)
.webp?#)


![Apple Considers Delaying Smart Home Hub Until 2026 [Gurman]](https://www.iclarified.com/images/news/96946/96946/96946-640.jpg)
![iPhone 17 Pro Won't Feature Two-Toned Back [Gurman]](https://www.iclarified.com/images/news/96944/96944/96944-640.jpg)
![Tariffs Threaten Apple's $999 iPhone Price Point in the U.S. [Gurman]](https://www.iclarified.com/images/news/96943/96943/96943-640.jpg)


EC2 User Data for Beginners
Amazon EC2 (Elastic Compute Cloud) allows you to launch virtual servers in the cloud, and one of its most powerful features is the ability to run custom setup scripts at instance startup using User Data. This guide walks you through creating an EC2 instance and configuring it to serve a basic HTML page using NGINX installed automatically through User Data. What is EC2 User Data? User Data is a feature in AWS EC2 that lets you pass a script to an instance at the time of its launch. This script runs as the root user the first time the instance boots. It's commonly used to: Install software packages. Configure the system. Deploy applications. Set up services (e.g., web servers, databases) Prerequisites An AWS account with the necessary permissions. Access to the EC2 dashboard. A key pair for SSH access (create one in AWS if needed) Step-by-Step: Launching an EC2 Instance to Serve HTML with NGINX 1. Go to the EC2 Dashboard Log in to the AWS Management Console Navigate to EC2 under "Services" Click Launch Instance 2. Configure Basic Settings Name: nginx-html-server AMI: Amazon Linux 2 (Free Tier eligible) Instance Type: t2.micro (Free Tier eligible) Key Pair: Select or create a key pair 3. Set Network and Security Enable the following ports in the Security Group: SSH (port 22) HTTP (port 80) 4. Add the User Data Script Scroll to the Advanced Detail section and paste the following script: #!/bin/bash yum update -y amazon-linux-extras install nginx1 -y systemctl enable nginx systemctl start nginx echo "Hello from NGINX!" > /usr/share/nginx/html/index.html This script will: Update the OS Install NGINX Start and enable the NGINX service Replace the default welcome page with a custom HTML file 5. Launch the Instance Click Launch Instance Wait a few seconds for the instance to initialize Verifying the Setup Method 1: Browser Copy the Public IPV4 address of the instance Open a web browser and go to http:// You should see the custom HTML page served by NGINX Method 2: SSH Open a terminal and SSH into your EC2 instance using the key pair you created: ssh -i .pem ec2-user@ sudo cat /var/log/cloud-init-output.log This log will show you the output of the User Data script. Check for any errors or output to confirm everything is working correctly. Advanced Use Cases for User Data 1. Automated Deployment User Data can be used to automate the deployment of applications. For example, you can use it to install and configure a web application. 2. Configuration Management User Data can be used to manage configuration files. For example, you can use it to update the configuration of a web server. 3. Security Best Practices User Data can be used to enforce security best practices. For example, you can use it to install security tools and configure them. User Data Scripts can be extended to: Deploy a full website from a GitHub repository. Configure SSL certificates. Add firewall rules, monitoring, and logging. If you are having full static website (including, html, css, js and so on), you can use the following script to install and configure NGINX: #!/bin/bash #!/bin/bash yum update -y amazon-linux-extras install nginx1 -y yum install -y nginx git cd /usr/share/nginx/html rm -rf * git clone https://github.com/your-repo/static-website.git . systemctl enable nginx systemctl start nginx Summary Using EC2 User Data and NGINX, you can automate the deployment of a static HTML site the moment your instance boots. It’s a clean and fast way to get up and running with a web server in minutes—perfect for prototyping, demos, or even hosting a simple landing page. Whether you're automating infrastructure or deploying a portfolio site, this approach gives you flexibility and speed. Happy deploying! Got questions or want to explore more ways to use NGINX on EC2? Reach out to me on LinkedIn. Read this blog on https://blog.python.rest EC2 User Data for Beginners | Python & Rest Launch an AWS EC2 instance and automatically serve a custom HTML page using User Data. This guide walks you through step-by-step setup with screenshots—no manual configuration needed! blog.python.rest

Amazon EC2 (Elastic Compute Cloud) allows you to launch virtual servers in the cloud, and one of its most powerful features is the ability to run custom setup scripts at instance startup using User Data. This guide walks you through creating an EC2 instance and configuring it to serve a basic HTML page using NGINX installed automatically through User Data.
What is EC2 User Data?
User Data is a feature in AWS EC2 that lets you pass a script to an instance at the time of its launch. This script runs as the root user the first time the instance boots. It's commonly used to:
- Install software packages.
- Configure the system.
- Deploy applications.
- Set up services (e.g., web servers, databases)
Prerequisites
- An AWS account with the necessary permissions.
- Access to the EC2 dashboard.
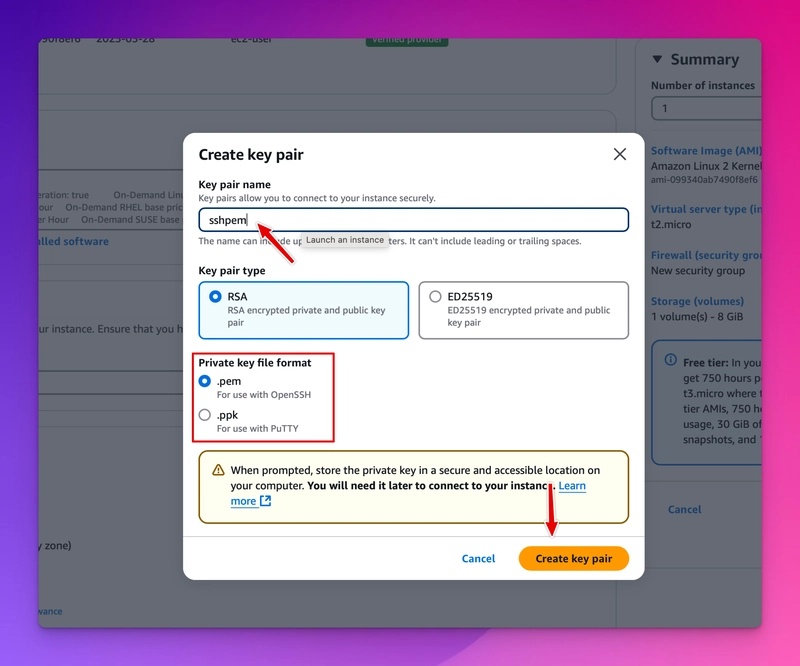
- A key pair for SSH access (create one in AWS if needed)
Step-by-Step: Launching an EC2 Instance to Serve HTML with NGINX
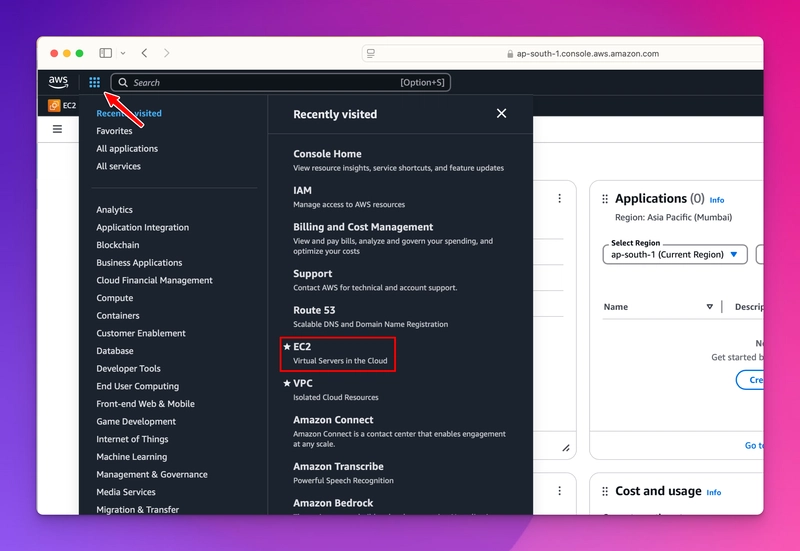
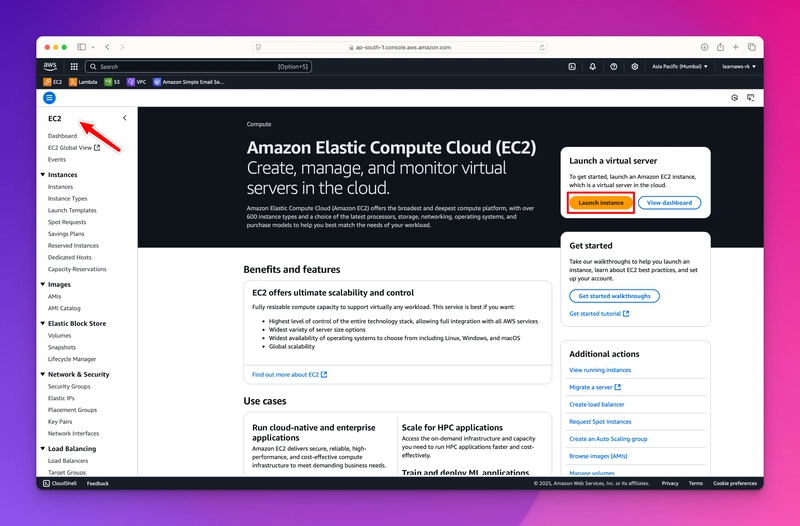
1. Go to the EC2 Dashboard
- Log in to the AWS Management Console
- Navigate to EC2 under "Services"
- Click Launch Instance
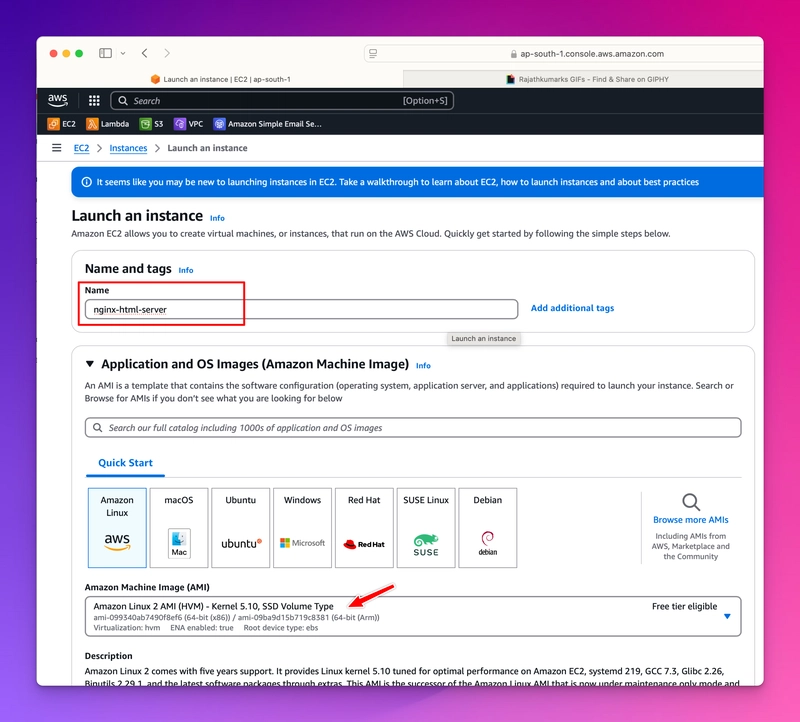
2. Configure Basic Settings
- Name: nginx-html-server
- AMI: Amazon Linux 2 (Free Tier eligible)
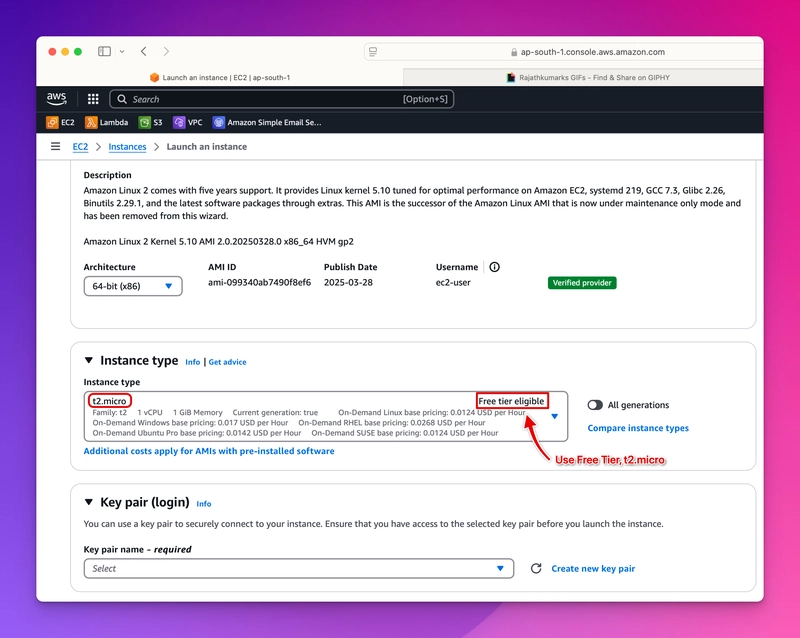
- Instance Type: t2.micro (Free Tier eligible)
- Key Pair: Select or create a key pair
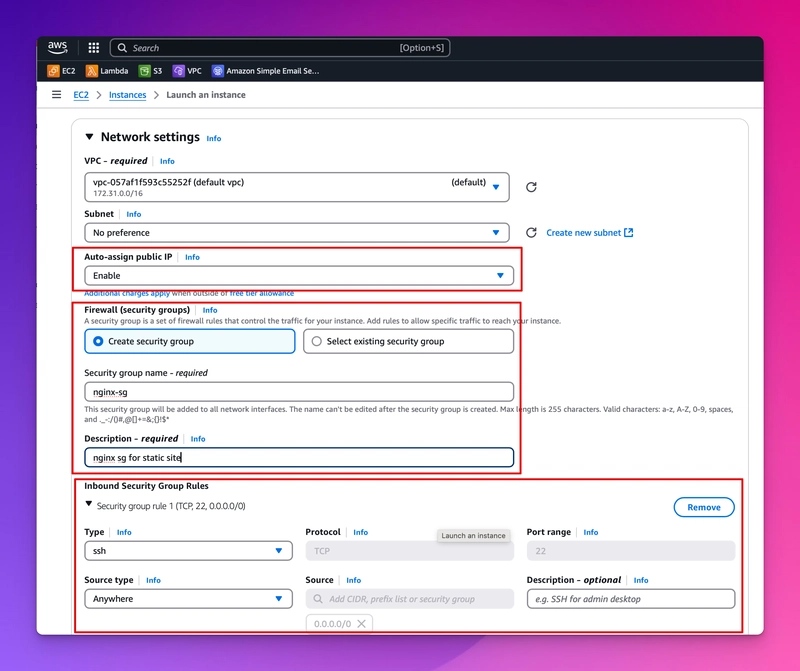
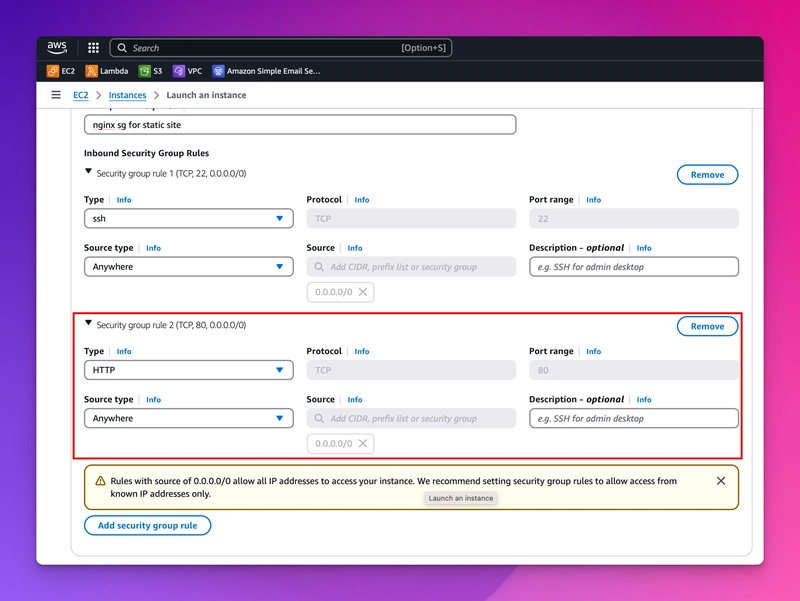
3. Set Network and Security
- Enable the following ports in the Security Group:
- SSH (port 22)
- HTTP (port 80)
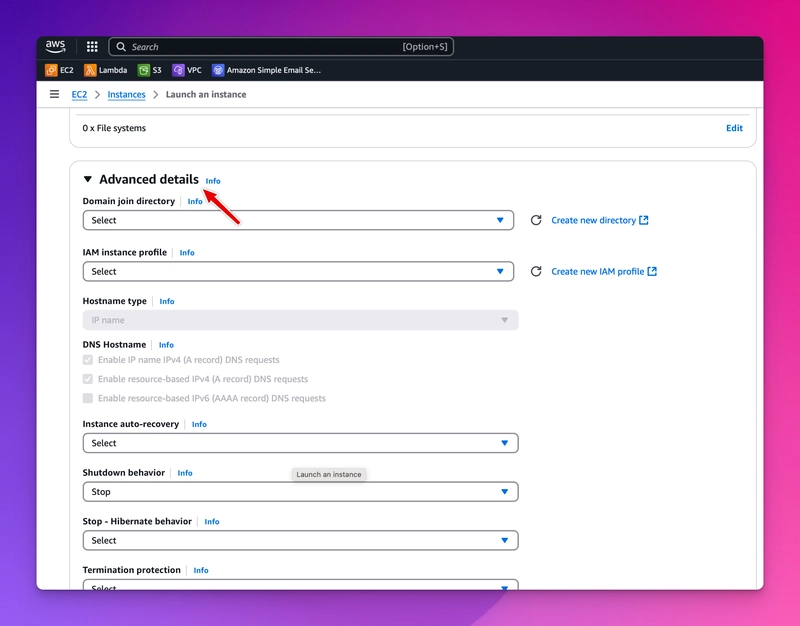
4. Add the User Data Script
Scroll to the Advanced Detail section and paste the following script:
#!/bin/bash
yum update -y
amazon-linux-extras install nginx1 -y
systemctl enable nginx
systemctl start nginx
echo "Hello from NGINX!
" > /usr/share/nginx/html/index.html
This script will:
- Update the OS
- Install NGINX
- Start and enable the NGINX service
- Replace the default welcome page with a custom HTML file
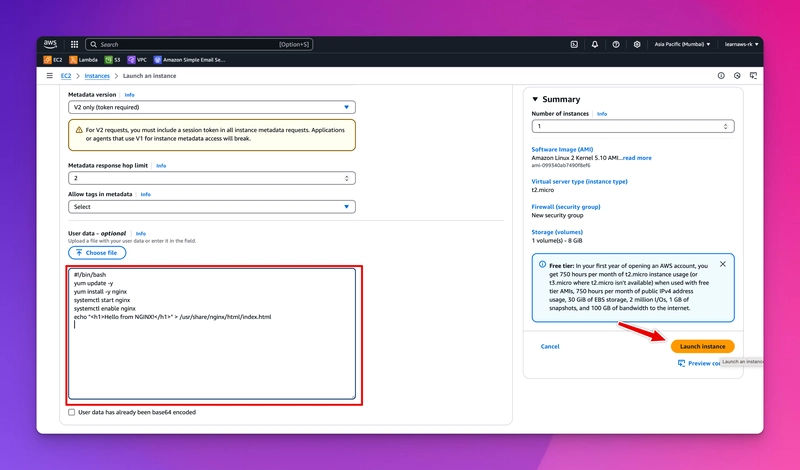
5. Launch the Instance
- Click Launch Instance
- Wait a few seconds for the instance to initialize
Verifying the Setup
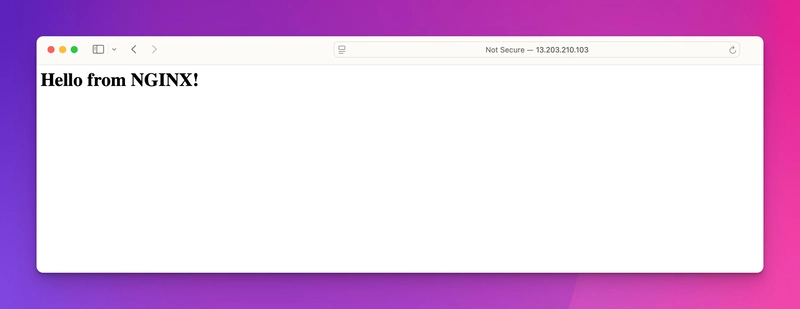
Method 1: Browser
- Copy the Public IPV4 address of the instance
- Open a web browser and go to
http:// - You should see the custom HTML page served by NGINX
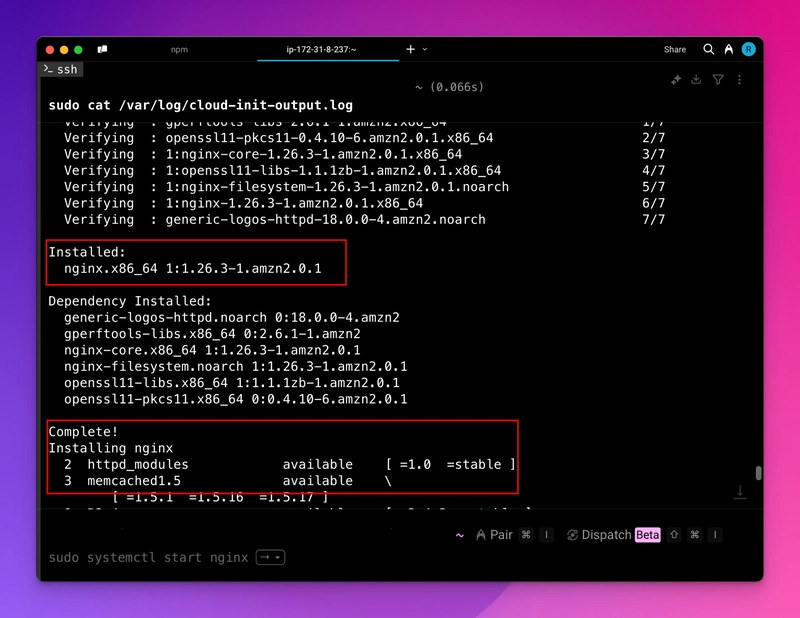
Method 2: SSH
- Open a terminal and SSH into your EC2 instance using the key pair you created:
ssh -i .pem ec2-user@
sudo cat /var/log/cloud-init-output.log
- This log will show you the output of the User Data script.
- Check for any errors or output to confirm everything is working correctly.
Advanced Use Cases for User Data
1. Automated Deployment
- User Data can be used to automate the deployment of applications.
- For example, you can use it to install and configure a web application.
2. Configuration Management
- User Data can be used to manage configuration files.
- For example, you can use it to update the configuration of a web server.
3. Security Best Practices
- User Data can be used to enforce security best practices.
- For example, you can use it to install security tools and configure them.
User Data Scripts can be extended to:
- Deploy a full website from a GitHub repository.
- Configure SSL certificates.
- Add firewall rules, monitoring, and logging.
If you are having full static website (including, html, css, js and so on), you can use the following script to install and configure NGINX:
#!/bin/bash
#!/bin/bash
yum update -y
amazon-linux-extras install nginx1 -y
yum install -y nginx git
cd /usr/share/nginx/html
rm -rf *
git clone https://github.com/your-repo/static-website.git .
systemctl enable nginx
systemctl start nginx
Summary
Using EC2 User Data and NGINX, you can automate the deployment of a static HTML site the moment your instance boots. It’s a clean and fast way to get up and running with a web server in minutes—perfect for prototyping, demos, or even hosting a simple landing page.
Whether you're automating infrastructure or deploying a portfolio site, this approach gives you flexibility and speed.
Happy deploying!
Got questions or want to explore more ways to use NGINX on EC2? Reach out to me on LinkedIn.
Read this blog on https://blog.python.rest

EC2 User Data for Beginners | Python & Rest
Launch an AWS EC2 instance and automatically serve a custom HTML page using User Data. This guide walks you through step-by-step setup with screenshots—no manual configuration needed!
 blog.python.rest