


![[The AI Show Episode 144]: ChatGPT’s New Memory, Shopify CEO’s Leaked “AI First” Memo, Google Cloud Next Releases, o3 and o4-mini Coming Soon & Llama 4’s Rocky Launch](https://www.marketingaiinstitute.com/hubfs/ep%20144%20cover.png)


![I'm researching how to architect a modern LLM-based conversational agent and would appreciate insights from the community [closed]](https://cdn.sstatic.net/Sites/softwareengineering/Img/apple-touch-icon@2.png?v=1ef7363febba)


![GrandChase tier list of the best characters available [April 2025]](https://media.pocketgamer.com/artwork/na-33057-1637756796/grandchase-ios-android-3rd-anniversary.jpg?#)


.png?width=1920&height=1920&fit=bounds&quality=70&format=jpg&auto=webp#)


![Apple M4 13-inch iPad Pro On Sale for $200 Off [Deal]](https://www.iclarified.com/images/news/97056/97056/97056-640.jpg)
![Apple Shares New 'Mac Does That' Ads for MacBook Pro [Video]](https://www.iclarified.com/images/news/97055/97055/97055-640.jpg)


![The Wheel of Time season 3 ending explained: who dies, who is [spoiler], will there be a season 4, and more questions answered](https://cdn.mos.cms.futurecdn.net/qq8MMqv8MTisstkx3phywA.jpg?#)


Creating a FSM (finite state machine) in js_
Why This Post? Building a JavaScript FSM for Real-World Parsing When I set out to create Terraformatic—a JavaScript library for parsing and validating Terraform HCL configurations—I hit a roadblock: finite state machines (FSMs). While FSMs power everything from regex engines to network protocols, I struggled to find a simple, configurable JavaScript implementation that could serve as the backbone for my lexical analyzer. Most solutions were either over-engineered for my needs or lacked the flexibility to model complex syntax rules. Frustrated by this gap, I built my own minimal FSM abstraction. In this post, I’ll share this implementation, explain why FSMs matter for parsing tasks like Terraform HCL, and demonstrate how you can use (or extend) it for your own projects. Whether you’re building a linter, a configuration validator, or just curious about computational models, this post is for you. What’s a Finite State Machine? A finite state machine (FSM) is a computational model that abstracts logic into states, transitions, and actions. Think of it like a flowchart: Here’s why FSMs shine for parsing tasks like Terraform HCL: Predictability: Each state defines exactly what inputs are valid. Error Handling: Invalid transitions can be caught immediately. Simplicity: Complex syntax rules (e.g., nested blocks, quoted strings) become manageable when broken into discrete states. What This Post Covers A minimal FSM implementation in JavaScript. How to configure states and transitions for real-world use cases. Lessons learned from applying FSMs to Terraform HCL parsing. By the end, you’ll have a reusable FSM abstraction and a template for solving similar problems. Let’s dive in! Implementation Details: Your Toolkit for Building State Machines The FSM class is designed to be simple but powerful—like a Swiss Army knife for modeling stateful logic. Whether you’re parsing syntax, designing game AI, or handling UI flows, here’s how it works under the hood: 1. The Constructor: Your FSM’s Blueprint To create a state machine, define its states and transitions upfront. Think of this as drawing a map for your FSM to follow: // Example: A traffic light FSM const trafficLight = new FSM({ entrySTATE: "RED", // Starts at RED states: { RED: { next: "GREEN", // Transitions to GREEN on input "next" accepts: true // Optional: Mark RED as an accepting state }, GREEN: { next: "YELLOW" }, YELLOW: { next: "RED" } } }); Key Configuration Options states: A dictionary where each key is a state name, and its value defines: Transitions: { input: "next_state", ... } (e.g., next: "GREEN"). Accepting States: Add accepts: true to mark states where the FSM can "halt" successfully. entrySTATE: The starting point (defaults to "STATE_A" if omitted). Default Behavior If you don’t provide options, you’ll get a toggle switch FSM: { states: { STATE_A: { 0: "STATE_B", 1: "STATE_A" }, // Toggles on 0, stays on 1 STATE_B: { 0: "STATE_A", 1: "STATE_B", accepts: true }, // STATE_B is accepting }, entrySTATE: "STATE_A" } 2. Core Methods: Navigating the State Maze transition(input) – Move Between States Feed inputs to your FSM, and watch it traverse its state map: trafficLight.transition("next"); // RED → GREEN trafficLight.transition("next"); // GREEN → YELLOW Why It Matters: Throws an error if the input isn’t valid for the current state (e.g., trying to pause a traffic light). Updates currentINPUT to log the last processed input (useful for debugging). isAccepting() – Check for Success Call this to see if the FSM is in a valid "end" state: console.log(trafficLight.isAccepting()); // true if in RED (our accepting state) reset() – Rewind to the Start Reset the FSM to its entrySTATE—like a time machine for your state machine: trafficLight.reset(); console.log(trafficLight.currentSTATE); // "RED" 3. Properties: The FSM’s Memory currentSTATE: The FSM’s "where am I?" tracker. entrySTATE: The "home base" it returns to on reset(). currentINPUT: A breadcrumb trail of the last input processed. STATES: The full state/transition configuration (for introspection). Real-World Example: A Light Switch Let’s model a light with ON/OFF states: const light = new FSM({ entrySTATE: "OFF", states: { OFF: { toggle: "ON" }, ON: { toggle: "OFF", accepts: true } // Optional: Treat "ON" as a valid end state } }); light.transition("toggle"); // OFF → ON light.transition("toggle"); // ON → OFF Error Handling: Your Safety Net The FSM throws descriptive errors if you try to break its rules: try { light.transition("break"); // "break" isn’t a valid input for OFF/ON } catch (e) { console.error(e.message); // "Invalid input br
Why This Post? Building a JavaScript FSM for Real-World Parsing
When I set out to create Terraformatic—a JavaScript library for parsing and validating Terraform HCL configurations—I hit a roadblock: finite state machines (FSMs). While FSMs power everything from regex engines to network protocols, I struggled to find a simple, configurable JavaScript implementation that could serve as the backbone for my lexical analyzer. Most solutions were either over-engineered for my needs or lacked the flexibility to model complex syntax rules.
Frustrated by this gap, I built my own minimal FSM abstraction. In this post, I’ll share this implementation, explain why FSMs matter for parsing tasks like Terraform HCL, and demonstrate how you can use (or extend) it for your own projects. Whether you’re building a linter, a configuration validator, or just curious about computational models, this post is for you.
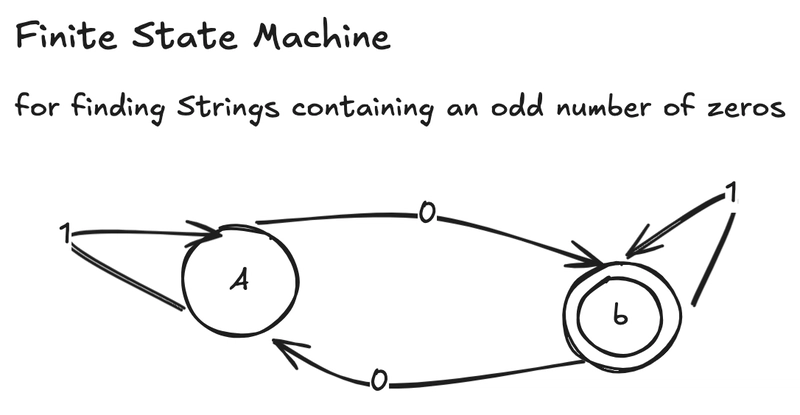
What’s a Finite State Machine?
A finite state machine (FSM) is a computational model that abstracts logic into states, transitions, and actions. Think of it like a flowchart:
Here’s why FSMs shine for parsing tasks like Terraform HCL:
- Predictability: Each state defines exactly what inputs are valid.
- Error Handling: Invalid transitions can be caught immediately.
- Simplicity: Complex syntax rules (e.g., nested blocks, quoted strings) become manageable when broken into discrete states.
What This Post Covers
- A minimal FSM implementation in JavaScript.
- How to configure states and transitions for real-world use cases.
- Lessons learned from applying FSMs to Terraform HCL parsing.
By the end, you’ll have a reusable FSM abstraction and a template for solving similar problems. Let’s dive in!
Implementation Details: Your Toolkit for Building State Machines
The FSM class is designed to be simple but powerful—like a Swiss Army knife for modeling stateful logic. Whether you’re parsing syntax, designing game AI, or handling UI flows, here’s how it works under the hood:
1. The Constructor: Your FSM’s Blueprint
To create a state machine, define its states and transitions upfront. Think of this as drawing a map for your FSM to follow:
// Example: A traffic light FSM
const trafficLight = new FSM({
  entrySTATE: "RED", // Starts at RED
  states: {
    RED: {
      next: "GREEN", // Transitions to GREEN on input "next"
      accepts: true  // Optional: Mark RED as an accepting state
    },
    GREEN: { next: "YELLOW" },
    YELLOW: { next: "RED" }
  }
});
Key Configuration Options
-
states: A dictionary where each key is a state name, and its value defines:-
Transitions:
{ input: "next_state", ... }(e.g.,next: "GREEN"). -
Accepting States: Add
accepts: trueto mark states where the FSM can "halt" successfully.
-
Transitions:
-
entrySTATE: The starting point (defaults to"STATE_A"if omitted).
Default Behavior
If you don’t provide options, you’ll get a toggle switch FSM:
{
  states: {
    STATE_A: { 0: "STATE_B", 1: "STATE_A" }, // Toggles on 0, stays on 1
    STATE_B: { 0: "STATE_A", 1: "STATE_B", accepts: true }, // STATE_B is accepting
  },
  entrySTATE: "STATE_A"
}
2. Core Methods: Navigating the State Maze
transition(input) – Move Between States
Feed inputs to your FSM, and watch it traverse its state map:
trafficLight.transition("next"); // RED → GREEN
trafficLight.transition("next"); // GREEN → YELLOW
-
Why It Matters:
- Throws an error if the input isn’t valid for the current state (e.g., trying to
pausea traffic light). - Updates
currentINPUTto log the last processed input (useful for debugging).
- Throws an error if the input isn’t valid for the current state (e.g., trying to
isAccepting() – Check for Success
Call this to see if the FSM is in a valid "end" state:
console.log(trafficLight.isAccepting()); // true if in RED (our accepting state)
reset() – Rewind to the Start
Reset the FSM to its entrySTATE—like a time machine for your state machine:
trafficLight.reset();
console.log(trafficLight.currentSTATE); // "RED"
3. Properties: The FSM’s Memory
-
currentSTATE: The FSM’s "where am I?" tracker. -
entrySTATE: The "home base" it returns to onreset(). -
currentINPUT: A breadcrumb trail of the last input processed. -
STATES: The full state/transition configuration (for introspection).
Real-World Example: A Light Switch
Let’s model a light with ON/OFF states:
const light = new FSM({
  entrySTATE: "OFF",
  states: {
    OFF: { toggle: "ON" },
    ON: { toggle: "OFF", accepts: true } // Optional: Treat "ON" as a valid end state
  }
});

light.transition("toggle"); // OFF → ON
light.transition("toggle"); // ON → OFF
Error Handling: Your Safety Net
The FSM throws descriptive errors if you try to break its rules:
try {
  light.transition("break"); // "break" isn’t a valid input for OFF/ON
} catch (e) {
  console.error(e.message); // "Invalid input break: or state does not exist: OFF"
}
Pro Tips
-
Coercion: Inputs are coerced to strings (e.g.,
0becomes"0"). Use consistent input types! -
Accepting States: Not just for "success"—use them to flag specific states (e.g.,
ERROR). -
Extend It: Add hooks for
onEnter/onExitcallbacks to supercharge your FSM.
Go Build Something!
With this abstraction, you can model:
- Lexers: Tokenize Terraform HCL (like I did!).
- UI Flows: Handle multi-step forms or wizards.
- Game Logic: Control enemy AI or dialogue trees.
Got questions? Found a cool use case? Drop a GitHub issue—I’d love to hear how you’re using this!
This implementation balances simplicity with just enough power to handle real-world problems. Now go turn those state diagrams into code!