Chart an Extensible Course with Helm
Clicks, copies, and pasting. That's an approach to deploying your applications in Kubernetes. Anyone who's worked with Kubernetes for more than 5 minutes knows that this is not a recipe for repeatability and confidence in your setup. Good news is, you've got options when tackling this problem. The option I'm going to present below is using Helm. Helm describes itself as: The package manager for Kubernetes -- https://helm.sh But what exactly does that mean for the developer or administrator of a Kubernetes cluster? And how does one package an API into common Kubernetes resources like Services, Deployments, ReplicaSets, and others? The example project below will explore some of the answers to these questions and give a great starting point for taking it further. What Problem Does this Solve? Going back to deploying an API application into a cluster, there are a number of different resources needed to make this happen. For a simple use case, I'd need the following: Service ReplicaSet ConfigMap Deployment Those four resources would give me a starting point to extend from but at a minimum, I'd have my service running and serving traffic. I could of course hard code all of my values directly into my resource definitions. Again, that's an approach. But the minute that I need to have another environment, such as QA, I'm going to end up duplicating my work and having 2 copies of my full resources. This introduces waste and opportunities for errors. What Helm allows me to do is define templates that I then can supply values into. Meaning that I will have values files per environment but only one copy of the actual set of resources that I'm going to need. Less waste. Less room for error. And one version of truth. Coding Example Consider this an introduction to Helm with a specific project. I'm by no means trying to show everything about Helm or dig into specifics about the 4 resources I'm going to work with. My goal is for you to have some exposure to this approach to building Kubernetes resources and feel a little more comfortable to try Helm in your own projects. Application Code As always, there will be a link to the GitHub Repository at the end of this article and I've published this Docker Image into my AWS ECR Public Repository if you'd like to run things as well. The implementation of what's behind that repository is a Rust program that is running an Axum server listening to serve two routes. / and /second use axum::{routing::get, Router}; async fn root_handler() -> &'static str { tracing::info!("Hello, Axum!"); "Hello, Axum!" } async fn second_handler() -> &'static str { tracing::info!("Second handler"); "Second handler" } #[tokio::main] async fn main() { let bind_address = std::env::var("BIND_ADDRESS").expect("BIND_ADDRESS is required"); let app = Router::new() .route("/", get(root_handler)) .route("/second", get(second_handler)); let listener = tokio::net::TcpListener::bind(bind_address.clone()) .await .unwrap(); tracing::info!("Up and running ... listening on {}", bind_address); axum::serve(listener, app).await.unwrap(); } Tour of Helm I've written before about my preference for Minikube to run my clusters locally and I'm going to do the same thing here. I love running AWS Elastic Kubernetes Service but the cost of the cluster and the nodes just doesn't lend itself to what I wanted to do with this example. If you've never run Minikube before, read that article first, and then jump back over here when you are ready. The first step in the process here is to install Helm. Depending upon your system, there are plenty of options to make the happen. With that step out of the way, it's time to talk Charts. Chart Helm orients itself around the concept of a Chart. Think of this as your application definition. Whatever is defined in your project, it happens under the umbrella of a chart. When creating a chart with helm create my-chart, you'll be treated to a structure that looks like this: my-chart/ Chart.yaml values.yaml charts/ The Chart.yaml file that gets created is below. apiVersion: v2 name: chart description: A Helm chart for Kubernetes # A chart can be either an 'application' or a 'library' chart. # # Application charts are a collection of templates that can be packaged into versioned archives # to be deployed. # # Library charts provide useful utilities or functions for the chart developer. They're included as # a dependency of application charts to inject those utilities and functions into the rendering # pipeline. Library charts do not define any templates and therefore cannot be deployed. type: application # This is the chart version. This version number should be incremented each time you make changes # to the chart and its templates, including the app version. # Versions are expected to follow Semantic Ve
Clicks, copies, and pasting. That's an approach to deploying your applications in Kubernetes. Anyone who's worked with Kubernetes for more than 5 minutes knows that this is not a recipe for repeatability and confidence in your setup. Good news is, you've got options when tackling this problem. The option I'm going to present below is using Helm.
Helm describes itself as:
The package manager for Kubernetes -- https://helm.sh
But what exactly does that mean for the developer or administrator of a Kubernetes cluster? And how does one package an API into common Kubernetes resources like Services, Deployments, ReplicaSets, and others? The example project below will explore some of the answers to these questions and give a great starting point for taking it further.
What Problem Does this Solve?
Going back to deploying an API application into a cluster, there are a number of different resources needed to make this happen. For a simple use case, I'd need the following:
- Service
- ReplicaSet
- ConfigMap
- Deployment
Those four resources would give me a starting point to extend from but at a minimum, I'd have my service running and serving traffic. I could of course hard code all of my values directly into my resource definitions. Again, that's an approach. But the minute that I need to have another environment, such as QA, I'm going to end up duplicating my work and having 2 copies of my full resources. This introduces waste and opportunities for errors.
What Helm allows me to do is define templates that I then can supply values into. Meaning that I will have values files per environment but only one copy of the actual set of resources that I'm going to need. Less waste. Less room for error. And one version of truth.
Coding Example
Consider this an introduction to Helm with a specific project. I'm by no means trying to show everything about Helm or dig into specifics about the 4 resources I'm going to work with. My goal is for you to have some exposure to this approach to building Kubernetes resources and feel a little more comfortable to try Helm in your own projects.
Application Code
As always, there will be a link to the GitHub Repository at the end of this article and I've published this Docker Image into my AWS ECR Public Repository if you'd like to run things as well. The implementation of what's behind that repository is a Rust program that is running an Axum server listening to serve two routes. / and /second
use axum::{routing::get, Router};

async fn root_handler() -> &'static str {
    tracing::info!("Hello, Axum!");
    "Hello, Axum!"
}
async fn second_handler() -> &'static str {
    tracing::info!("Second handler");
    "Second handler"
}

#[tokio::main]
async fn main() {
    let bind_address = std::env::var("BIND_ADDRESS").expect("BIND_ADDRESS is required");
    let app = Router::new()
        .route("/", get(root_handler))
        .route("/second", get(second_handler));
    let listener = tokio::net::TcpListener::bind(bind_address.clone())
        .await
        .unwrap();
    tracing::info!("Up and running ... listening on {}", bind_address);
    axum::serve(listener, app).await.unwrap();
}
Tour of Helm
I've written before about my preference for Minikube to run my clusters locally and I'm going to do the same thing here. I love running AWS Elastic Kubernetes Service but the cost of the cluster and the nodes just doesn't lend itself to what I wanted to do with this example. If you've never run Minikube before, read that article first, and then jump back over here when you are ready.
The first step in the process here is to install Helm. Depending upon your system, there are plenty of options to make the happen. With that step out of the way, it's time to talk Charts.
Chart
Helm orients itself around the concept of a Chart. Think of this as your application definition. Whatever is defined in your project, it happens under the umbrella of a chart. When creating a chart with helm create my-chart, you'll be treated to a structure that looks like this:
my-chart/
  Chart.yaml
  values.yaml
  charts/
The Chart.yaml file that gets created is below.
apiVersion: v2
name: chart
description: A Helm chart for Kubernetes

# A chart can be either an 'application' or a 'library' chart.
#
# Application charts are a collection of templates that can be packaged into versioned archives
# to be deployed.
#
# Library charts provide useful utilities or functions for the chart developer. They're included as
# a dependency of application charts to inject those utilities and functions into the rendering
# pipeline. Library charts do not define any templates and therefore cannot be deployed.
type: application

# This is the chart version. This version number should be incremented each time you make changes
# to the chart and its templates, including the app version.
# Versions are expected to follow Semantic Versioning (https://semver.org/)
version: 0.1.0

# This is the version number of the application being deployed. This version number should be
# incremented each time you make changes to the application. Versions are not expected to
# follow Semantic Versioning. They should reflect the version the application is using.
# It is recommended to use it with quotes.
appVersion: "1.16.0"
Templates
Templates are at the center of what I'm planning on building. Think of the templates as the Kubernetes resource because that's what they are. But instead of having values filled in, I'm going to use the Go Template Language to put placeholders that will be filled in from the values file that I'll show below.
Take this ConfigMap file. I've got the double curly braces {{ }} which tells Helm that this is where a value needs to be inserted. And then I'm taking advantage of built-in Helm objects such as Release and Values. Built-in Objects are how you'll work with filling in values in your templates.
apiVersion: v1
kind: ConfigMap
metadata:
  name: {{ .Release.Name }}-configmap
data:
  BIND_ADDRESS: {{ .Values.container.environmentVariables.bindAddress | quote }}
  RUST_LOG: {{ .Values.container.environmentVariables.rustLog | quote }}
Notice as well that I'm using a | after my .Values and sending it to the quote function. Helm supports piping which can chain outputs together to make the file value that I'm looking for. And in this case, I'm piping my value to the quote function which will put " " around my output.
Exploring the Deployment resource shows a little more of the power of what I can fill in with templates.
apiVersion: apps/v1
kind: Deployment
metadata:
  name: {{ .Release.Name}}-deployment
  labels:
    app: rust-service-1
spec:
  replicas: {{ .Values.replicas }}
  selector:
    matchLabels:
      app: rust-service-1
  template:
    metadata:
      labels:
        app: rust-service-1
    spec:
      containers:
        - name: web-api
          image: {{ .Values.container.image.path }}
          ports:
            - containerPort: {{ .Values.container.containerPorts.targetPort }}
              name: web-port
              protocol: {{ .Values.container.containerPorts.protocol }}
          envFrom:
            - configMapRef:
                name: {{ .Release.Name }}-configmap
The templating language is extremely powerful. The above is just a basic example, but I could interject loops and conditionals to alter the flow of what is generated. Having the ability to package my deployments like this makes having multiple environments a piece of cake.
Values
If Templates are the blueprint for our resources, then values fill in those blueprints with concrete implementations. Values are also YAML resources which have a hierarchy of application. Every project should have a default values.yaml file. This values file can be overridden by a supplied values file and then that file can be override by command line set arguments. The most common way is to create a values file per environment or per version that you are looking to maintain.
In this example, I'm not showing an override file, but if you want to play around with the code, just copy the values.yaml and name the new file second-values.yaml and when you go to run the chart, helm install your-release ./chart -f second-values.yaml and you'll see how you can have 2 deployments managed by different releases with different values.
The values file can have the structure that you choose. Think of it a little like the API you are giving the template builders to fill in what they need when setting up resources. The file can be nested or flattened or a bit of both. I tend to favor a nested approach, but only 3 levels deep. This is really just my preference, so feel free to explore here.
In my values.yaml file, you'll notice the fields I've used in my templates to fill in what matters.
replicas: 2
container:
  containerPorts:
    port: 80
    protocol: TCP
    targetPort: 3000
  image:
    path: public.ecr.aws/f8u4w2p3/rust/rust-service-1:latest
  environmentVariables:
    bindAddress: 0.0.0.0:3000
    rustLog: "INFO"
Again, simple example, but you can take this much further to build out some very extensible resource definitions.
Installing the Chart
Helm charts are either installed, upgraded, or deleted. The CLI is plenty powerful, but these are the 3 commands that I want to explore here.
Install
Installing my chart takes this shape from the terminal.
helm install first-release ./chart
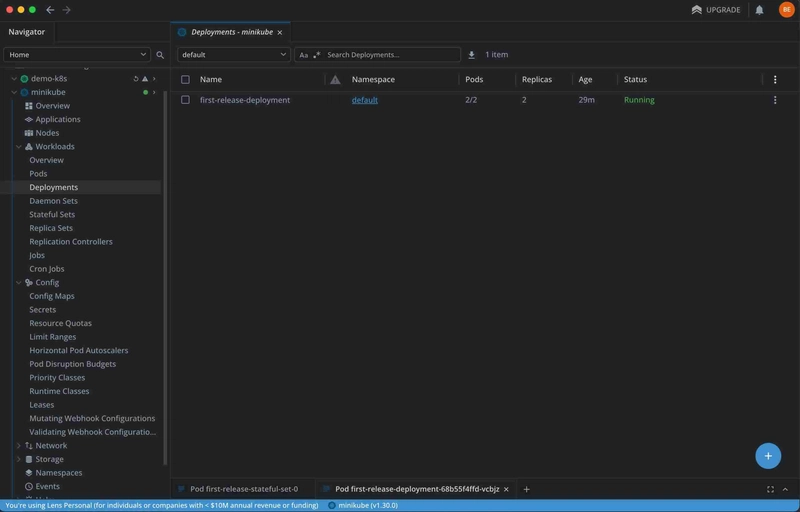
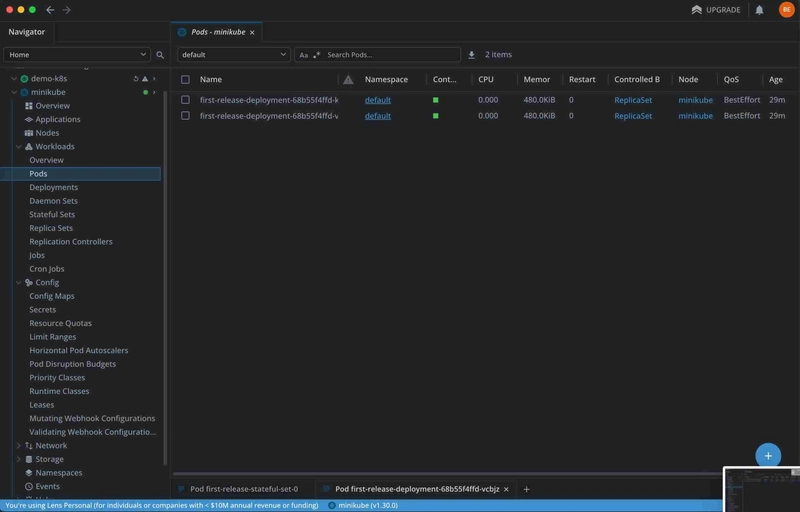
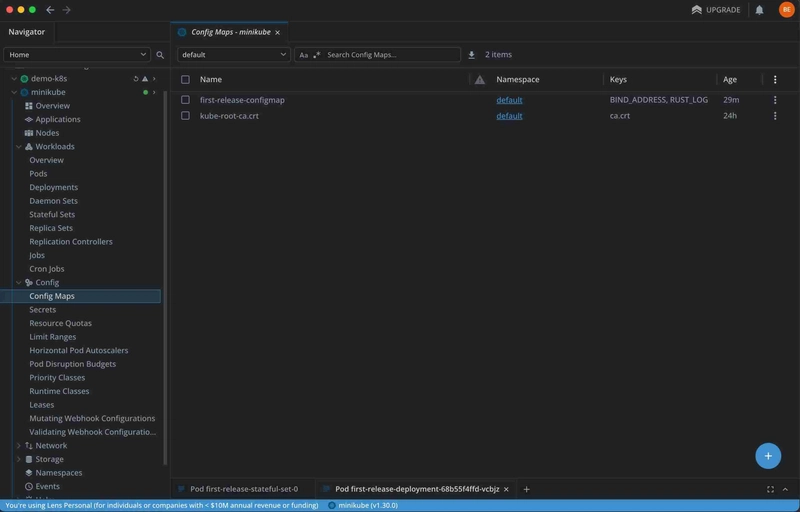
The first-release is the way Helm manages the resources by release. Again, I could have many releases or I could use just one. The flexibility here provides a great deal of power. When I run that command, all 3 of the templates I have which define resources are created.
ConfigMap
Deployment
Pods
Upgrade
I've got a chart now with resources deployed, but how do I modify it? If I changed some values in my values.yaml file, I can modify the release by running upgrade.
helm upgrade first-release ./chart
Delete
And when you are all done, just run delete.
helm delete first-release
Wrapping Up
I feel like I barely scratched the Helm surface here but hopefully it was just enough to show you the power and customization that can be had when using Helm for your Kubernetes resources. I've used the popular Kustomize in other projects and while I do like that approach, Helm just feels like I have more control and I write less code. I put my resources together once and then let Helm fill in my values.
If you are interested in trying out the example above, here is the GitHub Repository that has a full working solution. Clone it and adjust it to your needs to see how Helm works. Happy Charting!
Thanks for reading and happy building!


![[The AI Show Episode 142]: ChatGPT’s New Image Generator, Studio Ghibli Craze and Backlash, Gemini 2.5, OpenAI Academy, 4o Updates, Vibe Marketing & xAI Acquires X](https://www.marketingaiinstitute.com/hubfs/ep%20142%20cover.png)





![[FREE EBOOKS] The Kubernetes Bible, The Ultimate Linux Shell Scripting Guide & Four More Best Selling Titles](https://www.javacodegeeks.com/wp-content/uploads/2012/12/jcg-logo.jpg)


![From drop-out to software architect with Jason Lengstorf [Podcast #167]](https://cdn.hashnode.com/res/hashnode/image/upload/v1743796461357/f3d19cd7-e6f5-4d7c-8bfc-eb974bc8da68.png?#)




.png?#)


.jpg?#)


_Christophe_Coat_Alamy.jpg?#)
 (1).webp?#)




![Rapidus in Talks With Apple as It Accelerates Toward 2nm Chip Production [Report]](https://www.iclarified.com/images/news/96937/96937/96937-640.jpg)


