Building Custom Kendra Connectors and Managing Data Sources with IaC
In today's AI-driven business landscape, chatbots have become the primary interface between companies and their customers. The effectiveness of these AI assistants hinges on one critical factor: the quality and accessibility of the data they're trained on. Amazon Kendra offers a powerful solution - a fully managed service that intelligently indexes and retrieves information from multiple data sources, enabling your chatbot to respond with expert-level precision. But what happens when you need to connect Kendra to specialized or custom data sources? That's where custom connectors and Infrastructure as Code (IaC) become invaluable tools in your AI implementation toolkit. Prerequisites This blog post will walk you through provisioning the necessary AWS resources using Terraform. To follow along successfully, you'll need: Terraform installed on your local machine - we used v1.11.2 A code editor such as VS Code Access to an AWS account (preferably with admin permissions) Access to a Jira project for indexing Access to this Github repository NOTE: Amazon Kendra can be expensive, so it's recommended to tear down all resources after completion and to index reasonably sized data sources. Why IaC? If you’ve used Infrastructure as Code (IaC) before, you’re already familiar with its benefits. Feel free to skip ahead to the next section. IaC allows you to manage infrastructure - such as servers, cloud resources, and databases - using code. It enables version control, collaboration, and efficient provisioning and deprovisioning of resources. Without IaC, infrastructure management often relies on manual configurations, which can lead to inconsistencies, human errors, and difficulty in scaling environments. Changes may not be documented properly, making it harder to track modifications and troubleshoot issues. Additionally, manually managing infrastructure can be time-consuming and inefficient, slowing down development cycles and increasing operational risks. In this article, we’ll use Terraform to provision AWS resources, including Amazon Kendra and AWS Lambda. If you’re new to Terraform, don’t worry - the article will guide you through everything you need to follow along. Amazon Kendra Amazon Kendra is, by definition, an intelligent enterprise search engine. It allows you to index multiple data sources and do a natural language search on the indexed data. Using the indexed data, Amazon Kendra is often used in Retrieval Augmented Generation (RAG) architectures for AI chatbot systems. Being a fully managed service, all you need to do is decide which data sources to use, check if there is a connector provided by Amazon, and follow the step-by-step configuration instructions to set it up. After that, you can sync (index) the data source and perform natural language retrieval using the Kendra API, or if you just want to play around with it, using the AWS console. Understanding Retrieval-Augmented Generation (RAG) Source - https://aws.amazon.com/what-is/retrieval-augmented-generation/ Retrieval-Augmented Generation is an AI technique that enhances language models by connecting them to external knowledge sources. Unlike standard LLMs that rely solely on their training data, RAG systems can retrieve relevant information from databases or document collections before generating responses. The process works in two simple steps: Retrieve: The system searches through indexed documents to find information relevant to the user's query Generate: The language model creates a response using both its built-in knowledge and the specifically retrieved information Key benefits include more accurate answers, access to up-to-date information, reduced AI hallucinations, and the ability to leverage organization-specific knowledge. Amazon Kendra serves as an ideal retrieval component in RAG architectures, providing intelligent search capabilities that understand the semantic meaning of queries and return contextually appropriate results. Custom Connectors: When and Why While AWS provides connectors for many common data sources, there are compelling reasons to create your own custom connectors: Missing Official Support: AWS may not yet provide a connector for your specific data source. Enhanced Control: Custom connectors give you granular control over how data is processed before being indexed into Kendra. Feature Gaps: As of writing, some AWS-provided connectors have limitations. For example, the Jira connector doesn't support incremental indexing (despite documentation suggesting otherwise), which can significantly impact efficiency and cost when dealing with large datasets. Unconventional Data Sources: If you're working with non-standard data formats or collections (like mixed CSVs and PDFs), a custom connector can handle the specific extraction and loading requirements. Follow Along Example In this hands-on section, we'll build a custom Kendra conn
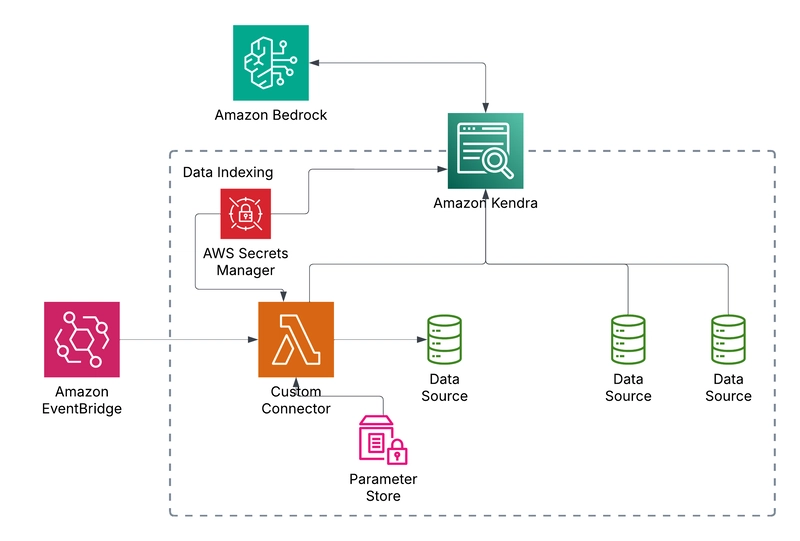
In today's AI-driven business landscape, chatbots have become the primary interface between companies and their customers. The effectiveness of these AI assistants hinges on one critical factor: the quality and accessibility of the data they're trained on. Amazon Kendra offers a powerful solution - a fully managed service that intelligently indexes and retrieves information from multiple data sources, enabling your chatbot to respond with expert-level precision.
But what happens when you need to connect Kendra to specialized or custom data sources? That's where custom connectors and Infrastructure as Code (IaC) become invaluable tools in your AI implementation toolkit.
Prerequisites
This blog post will walk you through provisioning the necessary AWS resources using Terraform. To follow along successfully, you'll need:
- Terraform installed on your local machine - we used v1.11.2
- A code editor such as VS Code
- Access to an AWS account (preferably with admin permissions)
- Access to a Jira project for indexing
- Access to this Github repository
NOTE: Amazon Kendra can be expensive, so it's recommended to tear down all resources after completion and to index reasonably sized data sources.
Why IaC?
If you’ve used Infrastructure as Code (IaC) before, you’re already familiar with its benefits. Feel free to skip ahead to the next section.
IaC allows you to manage infrastructure - such as servers, cloud resources, and databases - using code. It enables version control, collaboration, and efficient provisioning and deprovisioning of resources.
Without IaC, infrastructure management often relies on manual configurations, which can lead to inconsistencies, human errors, and difficulty in scaling environments. Changes may not be documented properly, making it harder to track modifications and troubleshoot issues. Additionally, manually managing infrastructure can be time-consuming and inefficient, slowing down development cycles and increasing operational risks.
In this article, we’ll use Terraform to provision AWS resources, including Amazon Kendra and AWS Lambda. If you’re new to Terraform, don’t worry - the article will guide you through everything you need to follow along.
Amazon Kendra
Amazon Kendra is, by definition, an intelligent enterprise search engine. It allows you to index multiple data sources and do a natural language search on the indexed data. Using the indexed data, Amazon Kendra is often used in Retrieval Augmented Generation (RAG) architectures for AI chatbot systems. Being a fully managed service, all you need to do is decide which data sources to use, check if there is a connector provided by Amazon, and follow the step-by-step configuration instructions to set it up. After that, you can sync (index) the data source and perform natural language retrieval using the Kendra API, or if you just want to play around with it, using the AWS console.
Understanding Retrieval-Augmented Generation (RAG)
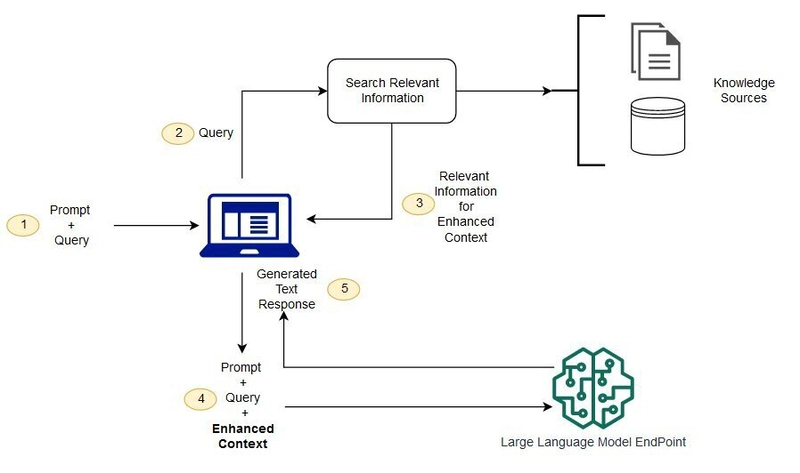
Source - https://aws.amazon.com/what-is/retrieval-augmented-generation/
Retrieval-Augmented Generation is an AI technique that enhances language models by connecting them to external knowledge sources. Unlike standard LLMs that rely solely on their training data, RAG systems can retrieve relevant information from databases or document collections before generating responses.
The process works in two simple steps:
- Retrieve: The system searches through indexed documents to find information relevant to the user's query
- Generate: The language model creates a response using both its built-in knowledge and the specifically retrieved information
Key benefits include more accurate answers, access to up-to-date information, reduced AI hallucinations, and the ability to leverage organization-specific knowledge. Amazon Kendra serves as an ideal retrieval component in RAG architectures, providing intelligent search capabilities that understand the semantic meaning of queries and return contextually appropriate results.
Custom Connectors: When and Why
While AWS provides connectors for many common data sources, there are compelling reasons to create your own custom connectors:
- Missing Official Support: AWS may not yet provide a connector for your specific data source.
- Enhanced Control: Custom connectors give you granular control over how data is processed before being indexed into Kendra.
- Feature Gaps: As of writing, some AWS-provided connectors have limitations. For example, the Jira connector doesn't support incremental indexing (despite documentation suggesting otherwise), which can significantly impact efficiency and cost when dealing with large datasets.
- Unconventional Data Sources: If you're working with non-standard data formats or collections (like mixed CSVs and PDFs), a custom connector can handle the specific extraction and loading requirements.
Follow Along Example
In this hands-on section, we'll build a custom Kendra connector for Jira that supports incremental indexing—a feature not available in the standard AWS connector. We'll provision all necessary resources using Terraform, following best practices like separation of concerns across multiple .tf files.
By the end of this tutorial, you'll have a fully functional custom connector that automatically indexes your Jira projects on a schedule and makes that information available to your AI applications through Kendra's powerful search capabilities.
Initial Kendra Setup
Before you begin, make sure you have your AWS credentials set up. It is recommended to do so using AWS IAM Identity Center credentials, but you could also set the credential values as environment variables in the working terminal.
You can either clone the github repository shared in the prerequisites section and follow along by navigating through the code, or start from scratch. If you are starting from scratch, create a new directory, open your favorite code editor, and let's get coding!
NOTE: Some parts of the code have been omitted from this article. Please reference the github repository for the full context.
Project initialization
To get started, run terraform init at the root of your project.
terraform.tf
terraform {
  required_providers {
    aws = {
      source = "hashicorp/aws"
      version = "5.88.0"
    }
  }
}
We are specifying the version for the terraform provider for AWS. At the time of writing, version 5.88.0 is the latest version provided by terraform. Please use this version to ensure consistency.
provider.tf
provider "aws" {
  region = "us-west-2"
  default_tags {
    tags = {
      "caylent:owner" = "kevin.nha@caylent.com"
    }
  }
}

data "aws_caller_identity" "current" {}

data "aws_region" "current" {}
In this bit of terraform code, we are setting the AWS configurations for region and default tags to add to all the resources created by Terraform. Tags are useful for cost tracking, resource management, and analytics. There are also data blocks that will be used for dynamically getting the AWS account id and region for more fine grained permissions in later steps.
locals.tf
Here, reusable values can be defined to be used within the terraform project.
locals {
  account_id                 = data.aws_caller_identity.current.account_id
  region                     = data.aws_region.current.name
  lambda_invoke_event_source = "/kendra/custom_connector_self_invoke"
}
variables.tf
This file contains all the input variables required for terraform to provision the resources. Some of these variables are marked as sensitive so the values are not output or shown in the state files. These variables can be defined in a terraform.tfvars file. The variables defined here will be loaded when terraform apply is run at a later step.
kendra.tf
The initial part of kendra.tf (not shown here) is to create the necessary role for Kendra to assume to perform its actions. Notably, we add the permissions to add metrics and logs, so we have visibility into Kendra’s actions.
resource "aws_kendra_index" "this" {
  name        = "rag-chatbot-index"
  description = "Kendra index for RAG chatbot"
  edition     = "DEVELOPER_EDITION"
  role_arn    = aws_iam_role.kendra_role.arn
}

resource "aws_kendra_data_source" "custom_jira" {
  index_id    = aws_kendra_index.this.id
  name        = "custom-jira"
  description = "Custom Kendra connector for Jira integration"
  type        = "CUSTOM"
}
For the Kendra index, the DEVELOPER_EDITION will be used. The data source resource is quite simple as it’s a CUSTOM type and all the indexing logic will be handled by the lambda function.
parameter_store.tf
resource "aws_ssm_parameter" "jira_last_crawled" {
  name  = "/kendra/last_crawled/jira"
  type  = "String"
  value = "1"
  lifecycle {
    ignore_changes = [value]
  }
}
Parameter store is used to keep track of the last crawled time to support incremental updates for the custom connector. The stored value will be an epoch timestamp. Upon resource creation, we set the value to 1 and this value will not be overwritten when we run terraform apply since we specify the lifecycle block to ignore changes.
secrets.tf
Some data sources are protected by some form of credentials. Unless the data source is a public website or stored in another AWS resource such as Amazon S3, Kendra or your custom data source will need credentials to fetch data. In either case, AWS Secrets Manager can be used to securely manage your credentials.
resource "aws_secretsmanager_secret" "jira_secret" {
  name = "jira-secret"
  recovery_window_in_days = 0
}

resource "aws_secretsmanager_secret_version" "jira_secret_version" {
  secret_id = aws_secretsmanager_secret.jira_secret.id
  secret_string = jsonencode({
    jiraId         = var.jira_user,
    jiraCredential = var.jira_token
  })
}

data "aws_kms_key" "secrets_manager" {
  key_id = "alias/aws/secretsmanager"
}
Data Source
Jira API Token
There are many data source connectors already provided by Kendra. However, as mentioned above, you may want to add additional functionality (such as incremental updates) and have more control on how your data is indexed.
For this blog, a Jira project will be indexed. It would be ideal to use a Jira project that already exists - if not, please create a Jira project and add some dummy issues/tasks to it.
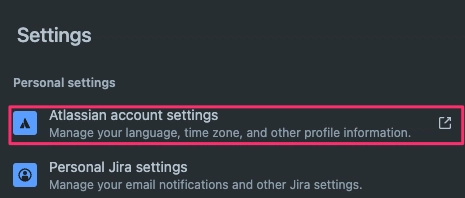
To allow the custom connector to programmatically read from the Jira instance, an API token is required. To create the token, follow these steps:
In the top navbar of Jira or Atlassian, click the gear setting to open up the settings and click Atlassian account settings
Navigate to the security tab and under API tokens, click create and manage API tokens.
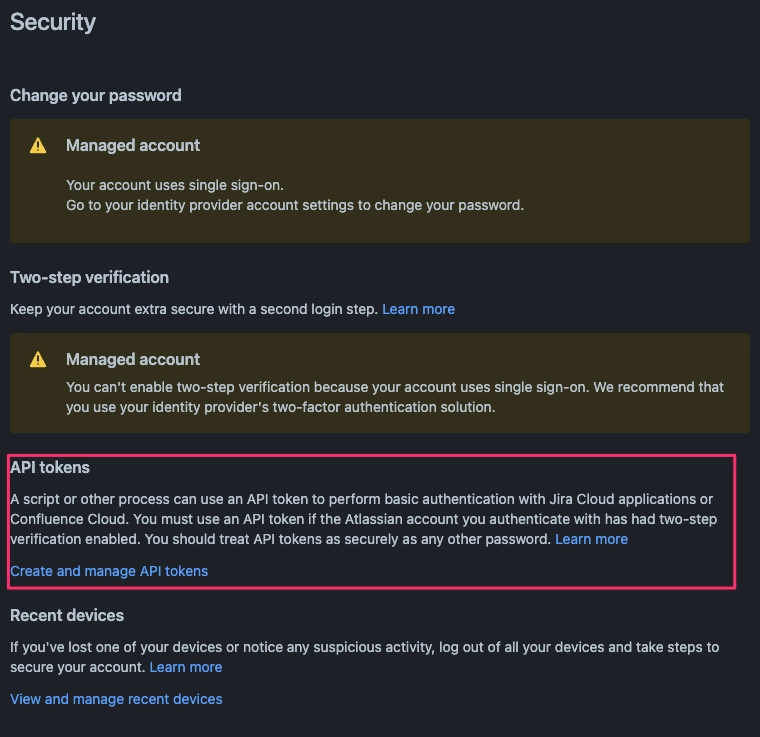
Create an API token and make sure you save the API token
NOTE - If the above UI screens differ, please follow the steps provided by Atlasian’s documentation
Custom Connector IaC
AWS Lambda will be used with Python 3.12 to interact with the Jira APIs. But before we dive into the code, there are a few key functionalities to understand.
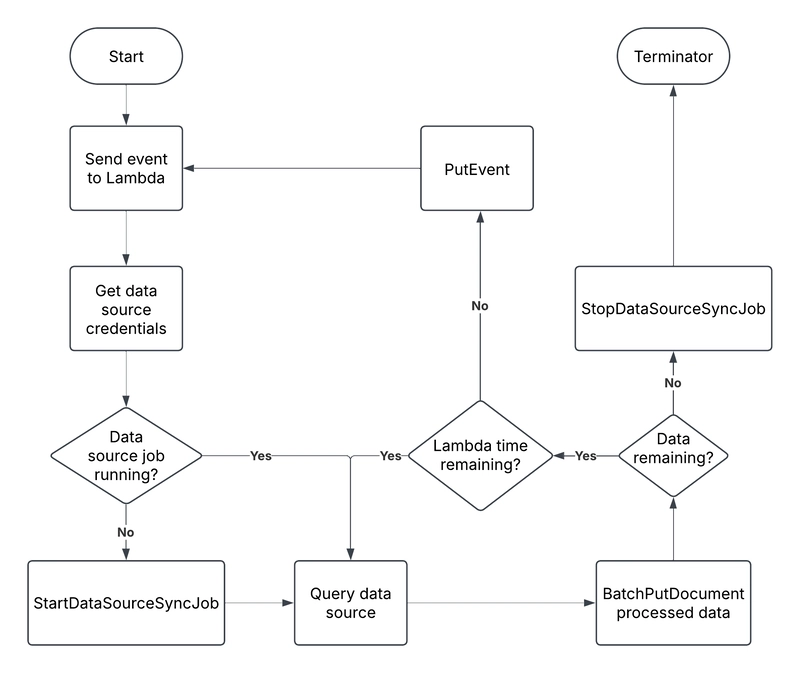
AWS EventBridge is used to invoke the Lambda to begin processing and syncing the Kendra index. This can be set on a CRON schedule (ex. Everyday at 5AM) to invoke the lambda periodically. When the lambda is first invoked, the StartDataSourceSyncJob starts the Kendra index sync job, putting the data source into sync status. It then queries the data source and ingests the data into Kendra
If the data source has a lot of data, ingestion may not be completed with one lambda invocation. This is because Lambda has a hard maximum timeout limit of 15 minutes. If there is data remaining and the lambda timeout is close to running out, the lambda will put an event (likely with a pagination token) to continue the data ingestion.
Once all the data has been ingested, the StopDataSourceSyncJob will be called to terminate the sync job and the lambda will exit successfully without invoking itself again.
custom_connector.tf
As it was done for the Kendra resource, the appropriate permissions must be provided (not shown here).
locals {
  custom_connector_lambda_source_path     = "./custom_connector/src"
  custom_connector_lambda_output_zip_path = "${path.module}/custom_connector_lambda_package.zip"
}

data "archive_file" "custom_connector_lambda_zip" {
  type        = "zip"
  source_dir  = local.custom_connector_lambda_source_path
  output_path = local.custom_connector_lambda_output_zip_path
}

resource "aws_lambda_function" "custom_connector_lambda" {
  function_name    = "custom-connector-lambda"
  handler          = "main.lambda_handler"
  runtime          = "python3.12"
  role             = aws_iam_role.iam_for_custom_connector_lambda.arn
  filename         = data.archive_file.custom_connector_lambda_zip.output_path
  source_code_hash = data.archive_file.custom_connector_lambda_zip.output_base64sha256
  timeout          = 600
  memory_size      = 1024
  environment {
    variables = {
      CUSTOM_CONNECTOR_SELF_INVOKE_EVENT_SOURCE = local.lambda_invoke_event_source
      LAST_CRAWLED_SSM_NAME                     = aws_ssm_parameter.jira_last_crawled.name
      JIRA_SECRET_NAME                          = aws_secretsmanager_secret.jira_secret.name
      JIRA_URL                                  = var.jira_url
      JIRA_PROJECTS                             = join(",", var.jira_projects)
    }
  }
}

resource "aws_lambda_function_event_invoke_config" "custom_connector_invoke_config" {
  function_name          = aws_lambda_function.custom_connector_lambda.function_name
  maximum_retry_attempts = 0
}
This defines the AWS Lambda resource. Its runtime environment will be python 3.12 and the timeout is set to 600 seconds. This means that once the data ingestion nears ten minutes and is not complete yet, the lambda must be reinvoked to continue the syncing process.
There are a few key environment variables defined as well:
- CUSTOM_CONNECTOR_SELF_INVOKE_EVENT_SOURCE - for reinvoking the lambda
- LAST_CRAWLED_SSM_NAME - the parameter store name for keeping track of the last crawled time
- JIRA_SECRET_NAME - the secret name used to store the jira credentials in secret manager
The JIRA_URL and JIRA_PROJECTS are used during the data fetching process, and are included in the variables listed in variables.tf.
eventbridge.tf
Again, the first bit of this file (now shown here) contains permissions required for AWS EventBridge. The only permission required is for EventBridge to invoke AWS Lambda.
resource "aws_scheduler_schedule" "jira_schedule" {
  name                = "jira"
  description         = "Sync schedule for Jira - runs at 12 AM PT every weekday"
  schedule_expression = "cron(0 8 ? * MON-FRI *)" # 8 AM UTC corresponds to 12 AM PT
  flexible_time_window {
    mode                      = "FLEXIBLE"
    maximum_window_in_minutes = 15
  }
  target {
    arn      = aws_lambda_function.custom_connector_lambda.arn
    role_arn = aws_iam_role.iam_for_custom_connector_scheduler.arn
    input = jsonencode({
      detail = {
        data_source_name = "jira"
        data_source_id   = "${aws_kendra_data_source.custom_jira.data_source_id}"
        index_id         = "${aws_kendra_index.this.id}"
      }
    })
    retry_policy {
      maximum_retry_attempts = 0
    }
  }
}

resource "aws_cloudwatch_event_rule" "custom_connector_self_invoke_rule" {
  name        = "custom-connector-self-invoke-rule"
  description = "Rule to re-trigger the same Lambda function"
  event_pattern = jsonencode({
    source = ["${local.lambda_invoke_event_source}"]
  })
}

resource "aws_cloudwatch_event_target" "self_invoke_target" {
  rule = aws_cloudwatch_event_rule.custom_connector_self_invoke_rule.name
  arn  = aws_lambda_function.custom_connector_lambda.arn
  retry_policy {
    maximum_retry_attempts       = 0
    maximum_event_age_in_seconds = 60
  }
}
Here, the AWS Eventbridge scheduler is defined - this will invoke the lambda periodically which in this case is at 8AM UTC from Monday to Friday. There is also an event target, which is used by the Lambda function to reinvoke itself.
Custom Connector Lambda
CustomConnector.py
The CustomConnector class is an abstract class used to extend different implementations of custom connectors. It has two abstract functions you must implement:
    @abstractmethod
    def get_documents(self, next_page=None):
        pass

    @abstractmethod
    def _get_secrets(self):
        pass
The get_documents function should return a list of documents to be ingested by Kebdra.
The class also has some important shared functions:
   def start_sync(self):
        if self._kendra_job_execution_id is not None:
            self.logger.info(f"Continuing syncing kendra_job_execution_id {self._kendra_job_execution_id}")
            return

        self.logger.info(f"Starting data source sync job for data source {self.data_source_id} and index {self.index_id}")
        retry = 0
        while True:
            try:
                result = self.kendra_client.start_data_source_sync_job(Id=self.data_source_id, IndexId=self.index_id)
                break
            except Exception as e:
                self.logger.info(f"Error starting data source sync job: {e}. Retrying...")
                if (retry > 5): raise(e)
                time.sleep(3^retry)
                retry += 1

        self.logger.info(result)
        self._kendra_job_execution_id = result["ExecutionId"]
        self.logger.info(f"Job execution ID: {self._kendra_job_execution_id}")
This function is used to start the Kendra syncing process. It returns a job execution ID which is used during the self-invocation process.
   def stop_sync(self):
        if self._kendra_job_execution_id:
            self.logger.info(f"Stopping data source sync job")
            result = self.kendra_client.stop_data_source_sync_job(Id=self.data_source_id, IndexId=self.index_id)
            self.logger.info(result)
        else:
            self.logger.info("No active data source sync job to stop")
Once all the data has been crawled and ingested, the syncing process must be terminated.
   def batch_put_document(self, documents):
        if not documents:
            self.logger.info("No documents to put")
            return

        for i in range(0, len(documents), 10):
            batch = documents[i : i + 10]
            self.kendra_client.batch_put_document(IndexId=self.index_id, Documents=batch)
This is the key function to put documents into Kendra. There is a hard limit of 10 documents per batch.
   def retrieve_last_crawled_timestamp(self):
        try:
            response = self.ssm_client.get_parameter(Name=self.ssm_name)
            return float(response["Parameter"]["Value"])
        except self.ssm_client.exceptions.ParameterNotFound:
            return 1.0
        except Exception as e:
            raise Exception(f"Error retrieving last crawled timestamp: {e} from {self.ssm_name}")

   def update_last_crawled_timestamp(self):
        self.ssm_client.put_parameter(Name=self.ssm_name, Value=str(time.time()), Type="String", Overwrite=True)
These two functions retrieve and update the last indexed time, respectively, used for incremental updates.
   def put_event_bridge_event(self, index_id, data_source_name, data_source_id, next_page_token):
        self.eventbridge_client.put_events(Entries=[
            {
                "Source": CUSTOM_CONNECTOR_SELF_INVOKE_EVENT_SOURCE,
                "DetailType": "SelfInvocation",
                "Detail": json.dumps({
                    "index_id": index_id,
                    "data_source_name": data_source_name,
                    "data_source_id": data_source_id,
                    "next_page_token": next_page_token,
                    "kendra_job_execution_id": self.get_execution_id()
                })
            }
        ])
This function handles the self-invocation process.
JiraConnector.py
JiraConnector is the implementation of the CustomConnector class. We won’t go into the implementation details here, but it queries the Jira API to get Jira issue details. We filter by projects so you would need to define a list of project keys to query in the terraform.tfvars file.
main.py
When an event is sent, either by the scheduler or self-invoked to continue the data ingestion process, the lambda handler will process the event.
def handler(event):
    start_time = time.time()
    logger.info(f"Received Event: {event}")

    event_bridge_event_details = event.get("detail")

    index_id = event_bridge_event_details.get("index_id")
    data_source_name = event_bridge_event_details.get("data_source_name").lower()
    data_source_id = event_bridge_event_details.get("data_source_id")
    next_page_token = event_bridge_event_details.get("next_page_token", None)
    kendra_job_execution_id = event_bridge_event_details.get("kendra_job_execution_id", None)
The event details will contain the kendra index ID, the data source name (this is useful if you have multiple custom connectors), and the kendra data source ID. When the lambda is self-invoked, it also passes along the next_page_token and the kendra execution ID, which is used for continuing on the data extraction and syncing process.
def handler(event):
   ...
   if data_source_name == "jira":
        custom_connector = JiraConnector(
            data_source_id=data_source_id,
            index_id=index_id,
            kendra_job_execution_id=kendra_job_execution_id,
            ssm_name=f"{LAST_CRAWLED_SSM_NAME}",
            clients=boto3_clients,
        )
    else:
        raise Exception(f"Invalid data source selected: {data_source_name}")
Using the data source name, a new CustomConnector object can be created. For our case, we only have the jira connector, but more connectors can be defined.
def handler(event):
   ...
   custom_connector.start_sync()
    try:
        next_page = next_page_token
        while time.time() - start_time < 480:
            documents, next_page_token = custom_connector.get_documents(next_page)
            custom_connector.batch_put_document(documents)
            next_page = next_page_token

            if custom_connector.get_is_sync_done():
                custom_connector.update_last_crawled_timestamp()
                break
    except Exception as e:
        custom_connector.stop_sync()

   if custom_connector.get_is_sync_done():
        custom_connector.stop_sync()
   else:
        try:
            response = custom_connector.put_event_bridge_event(index_id, data_source_name, data_source_id, next_page)
            logger.info(f"Lambda is continuing with next page token: {next_page} - EventBridge response: {response}")
            return {
                "statusCode": 200,
                "body": f"Lambda is continuing with response. Response from event_bridge: {response}",
                "headers": {"Content-Type": "application/json"},
            }
        except Exception as e:
            raise Exception(f"Error invoking lambda again: {e}")
Once the syncing starts, we run a while loop until it hits eight minutes. If you recall, the Lambda function has been configured with a timeout of ten minutes. That means once we hit eight minutes and the syncing is not done, it will send an event to continue on the indexing process.
Test Execution
Resource Creation
Now that we have all the code in place, it’s time to apply these configurations. In your IDE terminal (again, with the AWS credentials configured), run the following commands:
terraform init # if you have not yet done so
terraform plan # outputs the state plan
terraform apply
When prompted with this:
Plan: 20 to add, 0 to change, 0 to destroy.
Do you want to perform these actions?
Terraform will perform the actions described above.
Only 'yes' will be accepted to approve.
Enter a value:
Enter yes. After, you will see all the resources being created.
NOTE - the kendra index and secrets will take longer to be created.
Now, login to your AWS console and go to Amazon Kendra. Make sure you are in the right region (the demo uses us-west-2). You will see that an index has been created.
Click into the Kendra index and note the Index ID under Index settings.
Then go to data sources on the left tab, you will see the custom-jia data source.
Click into the data source and note the Data source ID under the Data source details.
Lambda Test Event
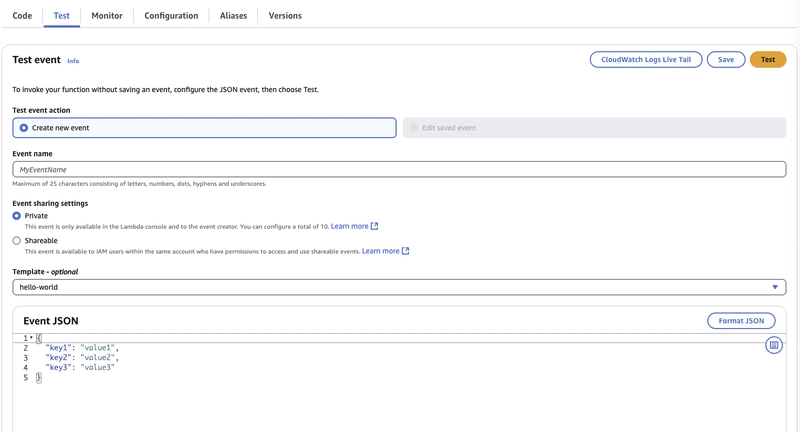
To test that that custom connector is functional, we can wait until the Eventbridge schedule, or we can send a test event on AWS Lambda.
Navigate to AWS Lambda and click into the custom-connector-lambda.
Go to the test tab.
Under Event JSON, use the following event, using the Kendra index ID and Jira data source ID noted from above:
{
  "detail": {
    "index_id": "INSERT_YOUR_KENDRA_INDEX_ID",
    "data_source_id": "INSERT_YOUR_JIRA_DATA_SOURCE_ID",
    "data_source_name": "jira"
  }
}
Click Test. If you have a large Jira project, it may take a while to process.
Now if you navigate back to your index, you will see that the document count has been updated.
The data source will also show a sync history.
However, it does not show how many items were added. To view that, click the gear icon in the sync history, and toggle Added to be on (and any other attributes).
Search Indexed Content
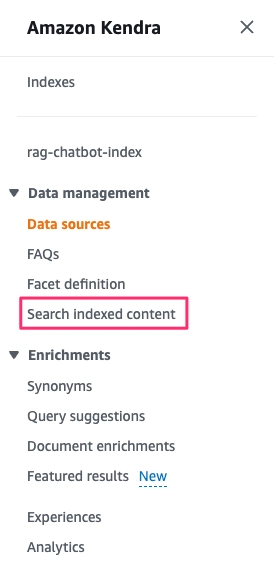
Once your data sources have been indexed, you can query the indexed data. Go to Search indexed content in the left navigation pane.
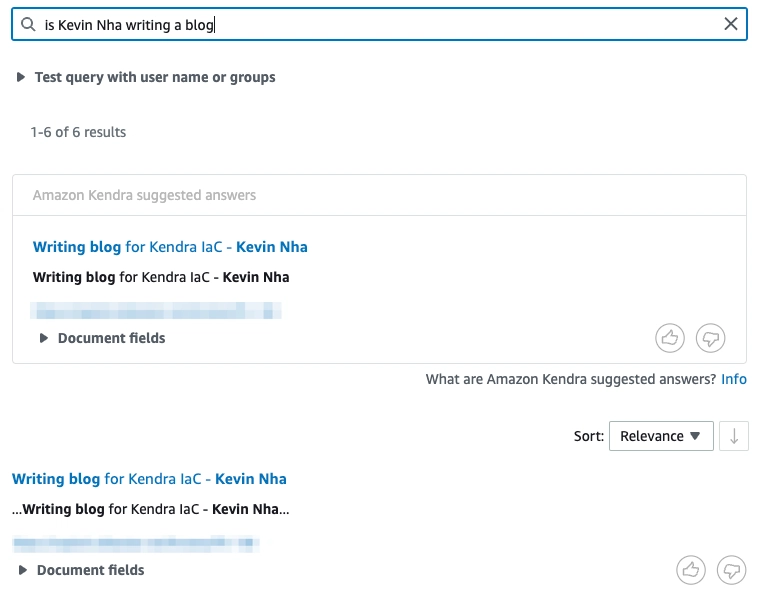
You can then use a natural language query to search the indexed content.
Cleanup
As mentioned in the beginning, Kendra can be an expensive service to maintain. If this index will not be used, it is best to clean up all your resources. With Terraform, this is done very simply.
In your terminal:
terraform destroy # when prompted, enter yes
This will clean up all the resources created by Terraform. If you created other resources manually through the console, you will need to remove those manually as well.
Conclusion
By implementing custom Kendra connectors with Infrastructure as Code, you've gained the ability to:
- Index data from virtually any source, regardless of whether AWS provides an official connector
- Implement advanced features like incremental indexing to optimize costs and performance
- Maintain complete control over your data processing pipeline
- Deploy and replicate your solution consistently across environments
This approach not only enhances the capabilities of your AI-powered applications but also adheres to modern DevOps practices by treating your infrastructure as versioned, reproducible code.
As you continue to expand your RAG-enabled chatbots and AI solutions, custom connectors will become an increasingly valuable tool in your arsenal, allowing you to incorporate specialized knowledge bases and data sources that give your AI applications a true competitive edge.
For more information on Amazon Kendra and advanced RAG implementations, visit Caylent and our team of AWS experts can help.


![[The AI Show Episode 142]: ChatGPT’s New Image Generator, Studio Ghibli Craze and Backlash, Gemini 2.5, OpenAI Academy, 4o Updates, Vibe Marketing & xAI Acquires X](https://www.marketingaiinstitute.com/hubfs/ep%20142%20cover.png)







![[DEALS] The Premium Learn to Code Certification Bundle (97% off) & Other Deals Up To 98% Off – Offers End Soon!](https://www.javacodegeeks.com/wp-content/uploads/2012/12/jcg-logo.jpg)


![From drop-out to software architect with Jason Lengstorf [Podcast #167]](https://cdn.hashnode.com/res/hashnode/image/upload/v1743796461357/f3d19cd7-e6f5-4d7c-8bfc-eb974bc8da68.png?#)


.png?#)


.jpg?#)


_Christophe_Coat_Alamy.jpg?#)
 (1).webp?#)










![Rapidus in Talks With Apple as It Accelerates Toward 2nm Chip Production [Report]](https://www.iclarified.com/images/news/96937/96937/96937-640.jpg)


