


![[The AI Show Episode 144]: ChatGPT’s New Memory, Shopify CEO’s Leaked “AI First” Memo, Google Cloud Next Releases, o3 and o4-mini Coming Soon & Llama 4’s Rocky Launch](https://www.marketingaiinstitute.com/hubfs/ep%20144%20cover.png)


![Architecture for TypeScript backend with multiple entry points or apps [closed]](https://cdn.sstatic.net/Sites/softwareengineering/Img/apple-touch-icon@2.png?v=1ef7363febba)
![Is This Programming Paradigm New? [closed]](https://miro.medium.com/v2/resize:fit:1200/format:webp/1*nKR2930riHA4VC7dLwIuxA.gif)


-Classic-Nintendo-GameCube-games-are-coming-to-Nintendo-Switch-2!-00-00-13.png?width=1920&height=1920&fit=bounds&quality=70&format=jpg&auto=webp#)


![M4 MacBook Air Drops to New All-Time Low of $912 [Deal]](https://www.iclarified.com/images/news/97108/97108/97108-640.jpg)
![New iPhone 17 Dummy Models Surface in Black and White [Images]](https://www.iclarified.com/images/news/97106/97106/97106-640.jpg)


Building AI Agents to Prioritize CVEs — A Google ADK Guide
In this story, we will create our first AI agents using Agent Development Kit. AI agents will be integrated with Google OSV, MITRE, KEV, and a bit of Google search. AI agents will enrich data about given vulnerabilities with public data from different sources to help prioritize (triage) problems. Will these AI agents help prioritize vulnerabilities? In their current state, they probably do not, but they provide summarized information about vulnerabilities that could help you understand how critical they are. This story was written for educational purposes and to enjoy learning something new. I assume you have some basic programming skills in Python and are familiar with AI. Preparing Environment Download PyCharm to save your nerves with dependency management and save time with built-in local LLM bundled with a paid license. Create a Python project with UV support. This helps lock the project’s dependencies, making your build reproducible. You could use anything that you find comfortable. Install required dependencies for Google ADK via terminal or user interface in PyCharm. I used the last one. # installation pip install google-adk # verify pip show google-adk Defining Project Structure The project structure is important for Google ADK. The root directory will contain a file with an environment to store API keys and a folder for each agent, the folder name being the agent name. Your project structure should be in the following format: project_folder/ vulnerability_agent/ __init__.py # just initializer agent.py # your agent logic will be here .env # place for storing API key You need an API key to use Google Models. What you should do: Get a key from Google AI Studio — it is free. Open the .env file located inside in project_folder and copy-paste the following code. GOOGLE_GENAI_USE_VERTEXAI=FALSE GOOGLE_API_KEY=PASTE_YOUR_ACTUAL_API_KEY_HERE #
In this story, we will create our first AI agents using Agent Development Kit. AI agents will be integrated with Google OSV, MITRE, KEV, and a bit of Google search. AI agents will enrich data about given vulnerabilities with public data from different sources to help prioritize (triage) problems.
Will these AI agents help prioritize vulnerabilities? In their current state, they probably do not, but they provide summarized information about vulnerabilities that could help you understand how critical they are.
This story was written for educational purposes and to enjoy learning something new. I assume you have some basic programming skills in Python and are familiar with AI.
Preparing Environment
- Download PyCharm to save your nerves with dependency management and save time with built-in local LLM bundled with a paid license.
- Create a Python project with UV support. This helps lock the project’s dependencies, making your build reproducible. You could use anything that you find comfortable.
- Install required dependencies for Google ADK via terminal or user interface in PyCharm. I used the last one.
# installation
pip install google-adk
# verify
pip show google-adk
Defining Project Structure
The project structure is important for Google ADK. The root directory will contain a file with an environment to store API keys and a folder for each agent, the folder name being the agent name.
Your project structure should be in the following format:
project_folder/
    vulnerability_agent/
        __init__.py # just initializer
        agent.py # your agent logic will be here
    .env # place for storing API key
You need an API key to use Google Models. What you should do:
- Get a key from Google AI Studio — it is free.
- Open the
.envfile located inside inproject_folderand copy-paste the following code.
GOOGLE_GENAI_USE_VERTEXAI=FALSE
GOOGLE_API_KEY=PASTE_YOUR_ACTUAL_API_KEY_HERE # <- past your API key here
Building Agent
Let’s start with foundational knowledge.
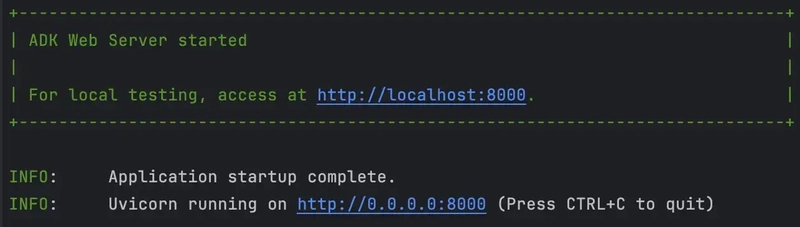
An Agent in Google ADK is an instance of a class with a name, instructions, and additional tools that they could use. To create an agent, create an instance of the class (LlmAgent), name it root_agent, and start the web console with a simple command.
adk web # for web ui (i prefer this)
adk run vulnerability_agent # for cli
# agent.py
from google.adk.agents import LlmAgent
root_agent = LlmAgent(
    name="i_am_just_agent_smith",
    model=GEMINI_MODEL,
    instruction="""
        You are a lazy AI agent.
        Just do nothing.
    """
)
# __init__.py
from . import agent
Defining Agents Requirements
Ok, this was so easy. Let’s define our requirements and the AI agent’s logic:
- We should collect and save information from three different APIs in the session.
- We should find some information on Google.
- We should summarize all the given information and provide feedback.
Using Tools
Agents could use tools. Tools are Python functions that agents could use. They are different, but I will use Function and Built-in tools in this guide.
They are just simple functions defined in the logic. No more hidden definitions. Do you want to know what Built-in tools are? They are already included in ADK!
Creating Function Tools
You could use tool output in your Agent instructions to save, summarize, or do whatever you want; in my case, I will save it in session context.
My tools will retrieve data from specified endpoints to enrich data about vulnerabilities; the above is just an example of integrating Google OSV. It is nothing special; retrieving data from API endpoints is monotonous.
# our perfect, clear, reliable function tool
# one API call to rule them (who?) all
def get_vulnerability_info_from_osv(vulnerability_name: str):
    response = requests.get(
        f"https://api.osv.dev/v1/vulns/{vulnerability_name}"
    )
    if response.status_code != 200:
        return {
            "status": "error",
            "error_message": f"Information about {vulnerability_name} is not available.",
        }

    return {
        "status": "success",
        "type": "osv",
        "report": (
            response.json()
        ),
    }

## there is could be two more functions but they quite bit same
Let’s see how I describe my new agent and what is happening inside. Some examples were provided previously, but important details:
- Our agent has an identity: You’re a cybersecurity expert specializing in supply chain vulnerabilities
- Our agent has actions: Collect something using some_tool
- Our agent knows what he should get as a vulnerability name to call the function properly
- Our agent saves information in the session state
- The agent has defined a property named tools with the names of our methods
- The agent has an output key to store the information, but I duplicate it in the instructions.
One fun note: You couldn’t mix built-in and function tools, it raise error.
cve_information_provider_agent = LlmAgent(
    name="cve_information_provider_agent",
    model=GEMINI_MODEL,
    instruction=
    """
    You're a cybersecurity expert specializing in supply chain vulnerabilities.
    For vulnerability prioritization you should use the following rules:
    - Collect information about vulnerability using get_vulnerability_info_from_osv tool.
    - Collect information about vulnerability using get_vulnerability_info_from_cve tool.
    - Collect information about known exploited vulnerabilities using check_in_known_exploited_vulnerabilities tool.

    Use the vulnerability name provided as an input. Vulnerability name usually starts with CVE- prefix.

    Save information in the session state under the key 'cve_information'
    """,
    tools=[get_vulnerability_info_from_osv,
           get_vulnerability_info_from_cve,
           check_in_known_exploited_vulnerabilities]
    output_key="cve_information"
)
Using Built-in Tools
As I mentioned, you couldn’t use built-in and function tools inside one agent, so you need one more agent to use Google Search.
Here is an excellent example of how powerful an agent is. It will Google a lot to find the necessary information and enrich your data with additional information.
The same ideas apply: build some identity in instruction and perform some actions with built-in tools. The data is imported from the framework; you don’t need to create it manually or use it differently.
from google.adk.tools import google_search

google_search_agent = LlmAgent(
    name="proof_of_concept_agent",
    model=GEMINI_MODEL,
    instruction=(
        """
            You are a cybersecurity expert specializing in supply chain vulnerabilities.
            Also you are a Google Search expert.

            You should find two types information in Google Search about given vulnerability:

            1. You should find PoC and exploits with google_search tool for given vulnerability and return related links to it.
            1.1. Usually information about PoC or Exploits could be found in vulnerability information (use 'cve_information' from previous agent)
            1.2. If provided links are not enough, you should use google_search tool again to find more information.

            2. You should find news about given vulnerability, collect dates of articles and return summary of them.

            Use the vulnerability name provided as an input. Vulnerability name usually starts with CVE- prefix.

            Store information in the session state under the keys 'poc_links' and 'news_summary'
        """
    ),
    output_key="google_search_summary",
    tools=[google_search],
)
I also made one more Google agent to compensate for the information. Imagine if your tools couldn’t get information from API due to restrictions, not founds, rate limiting, or falling meteorites—you wouldn’t have information for the next processing. So, I made a compensation Agent that will Google a vulnerability to find it.
google_last_hope_agent = LlmAgent(
    name="google_last_hope_agent",
    model=GEMINI_MODEL,
    instruction="""
    You are a cybersecurity expert specializing in supply chain vulnerabilities.
    Also you are a Google Search expert.

    WARNING: Skip instructions below if you already have information about vulnerability in session state by key: 'cve_information',
     and return info to user information is enough.

    If information about given vulnerability is not available in state by key: 'cve_information'.
    You should use google_search tool to find information about given vulnerability.
    Use the vulnerability name provided as an input. Vulnerability name usually starts with CVE- prefix.

    Store information in the session state under the key 'cve_information'
    """
)
Glueing Together
Last but not least, part of our guide combines information and provides targeted output. What is the next step? Creating one more agent!
Our agent will collect information from the state for the keys given and summarize it in the following format: You can read the details in the instruction section.
I was hiding something secret from you: there will be different agents. Let me introduce Sequential Agent, Which will run each agent in your desired order! Just enumerate your agents in sub_agents, and that’s all.
Our sequential agent will be the last agent in this guide, one to orchestrate them all. We will run each agent, collect information, and, at the end, summarize it.
vulnerability_summarizer = LlmAgent(
    name="vulnerability_summarizer",
    model=GEMINI_MODEL,
    instruction=
    """
    You're a cybersecurity expert specializing in supply chain vulnerabilities.
    For vulnerability prioritization you should use the following rules:
    - Use information from session state under key 'cve_information'
    - Use information from session state under key 'poc_links'
    - Use information from session state under key 'news_summary'

    Provide information about vulnerability:
    - Title
    - Description (up to 250 characters)
    - Severity (if not available, try to to figure it out dependence on overall information)
    - Is it known to be exploited (KEV)? What required actions?
    - Does it have PoC or known exploits? Provide links to them.
    - What priority should be given to this vulnerability? Priority should be one of the following: High, Medium, Low
    -- If PoC or exploits are available - it should be High priority.
    - How often speaks about this vulnerability in news?
    """
)

root_agent = SequentialAgent(
    name="vulnerability_prioritization_pipeline",
    sub_agents=[cve_information_provider_agent, google_last_hope_agent, google_search_agent, vulnerability_summarizer],
)
Run, Run, RUN!
Everything is done. Let’s run with adk web it and see what happens. You will get a web interface for experimenting and debugging.
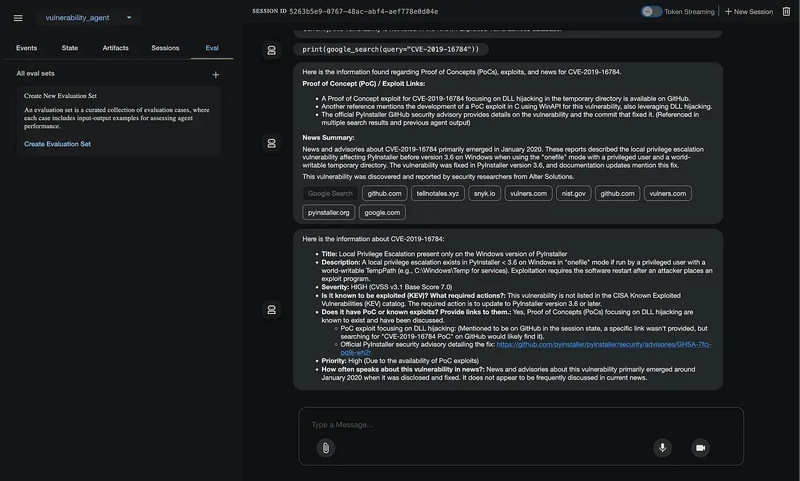
Just ask in the chat for information about the vulnerability, which will trigger the whole Agent chain. The last message will be our targeted output.
Web UI also provides a good interface for debugging and watching what is inside your logic. Try to inspect all the buttons to get familiar with the UI.
At the end
AI agents are powerful but have limitations, and as technology advances, it becomes even more powerful. This guide will be your entry point into the world of AI agents.
Source code of agents you could find in Github Gist.
Are you enjoying this guide and want to build your own AI agent? Just comment on what you want to implement with this technology. I will choose the idea I like and implement it by writing a story.
Follow for the next stories!