Building a Compact, Responsive Multi-Image Uploader for Next.js
I’ve always had a thing for building small, efficient, and responsive components—especially when it comes to image uploaders. I wanted something compact that could handle multiple images, integrate smoothly with Zod and React Hook Form for validation, show previews, and upload files to cloud storage like S3 or R2. Sounds simple, right? Well, I searched high and low for a resource or component that ticked all these boxes, but I came up empty-handed. So, I rolled up my sleeves and built one myself: the nextjs-multi-image-upload component. Here’s the story behind it and how you can use it in your own projects. Why I Built This I needed a solution that was: Compact: No bloated UI—just the essentials. Responsive: Works seamlessly across mobile and desktop. Validated: Leverages Zod and React Hook Form for type-safe, robust form handling. Functional: Previews images, tracks upload progress, and deletes files with a cool animation. Cloud-Ready: Uploads to S3, R2, or any service with signed URLs. After failing to find an existing tool that fit, I decided to create my own. The result is a lightweight, reusable component that’s now available on GitHub for anyone to use. Key Features Here’s what makes this uploader stand out: Multi-Image Support: Upload up to 5 images (configurable) with a clean flex layout. Real-Time Previews: See your images as they upload, with progress overlays. Deletion Feedback: A glowing animation kicks in while an image is being deleted. Type-Safe Validation: Works with React Hook Form and Zod out of the box. Cloud Integration: Uploads files to S3 or R2 via signed URLs (server-side routes included). Responsive Design: Adapts to any screen size without breaking a sweat. How to Use It Getting started is easy. Here’s the quick rundown: Grab the Files: Clone the repo: git clone https://github.com/jacksonkasi0/nextjs-multi-image-upload.git Or copy these key files into your Next.js project: src/components/multi-image-upload.tsx src/api/upload-api.ts src/app/api/upload/signed-url/route.ts src/app/api/upload/delete/route.ts Install Dependencies: bun add react-hook-form @hookform/resolvers/zod zod lucide-react bun add -D tailwindcss tailwindcss-animate postcss autoprefixer @types/react @types/node typescript npx shadcn-ui@latest add button form label Set Up Tailwind: Add the glow animation to your tailwind.config.ts: module.exports = { theme: { extend: { animation: { "glow-effect": "glow-effect 1.5s infinite ease-in-out", }, keyframes: { "glow-effect": { "0%, 100%": { boxShadow: "0 0 10px var(--muted-foreground), 0 0 20px var(--muted)", opacity: "1", }, "50%": { boxShadow: "0 0 20px var(--primary), 0 0 40px var(--primary-foreground)", opacity: "0.5", }, }, }, }, }, plugins: [require("tailwindcss-animate")], }; Plug It Into Your Form: Here’s a simple example: "use client"; import { useForm } from "react-hook-form"; import { zodResolver } from "@hookform/resolvers/zod"; import * as z from "zod"; import { Button } from "@/components/ui/button"; import { Form, FormControl, FormField, FormItem, FormLabel, FormMessage } from "@/components/ui/form"; import { MultiImageUpload } from "@/components/multi-image-upload"; const schema = z.object({ images: z.array(z.string().url()).min(1).max(5), }); export default function Page() { const form = useForm({ resolver: zodResolver(schema), defaultValues: { images: [] } }); const onSubmit = (data) => console.log(data); return ( ( Images )} /> Upload ); } Configure Your Backend: Update upload-api.ts and the API routes to point to your S3/R2 bucket or custom storage solution. Set up environment variables in .env NODE_ENV="production" # S3 AWS_ACCESS_KEY_ID="xxxxx" # your access key AWS_SECRET_ACCESS_KEY="xxxxxxx" # your secret key AWS_REGION="xxxxxx" # example: ap-south-1, us-east-1 AWS_BUCKET_NAME="xxxxx" # your bucket name That’s it! You’ve got a fully functional image uploader ready to go. Wrap-Up Building this component scratched an itch I couldn’t find a solution for elsewhere. It’s small, powerful, and fits right into modern Next.js workflows. If you find it useful, I’d love for you to check out the repo, give it a star, drop a comment, or reach out to me with feedback. You can find it here: github.com/jacksonkasi0/nextjs-multi-image-upload. Happy coding, and let me know how it works for you!

I’ve always had a thing for building small, efficient, and responsive components—especially when it comes to image uploaders. I wanted something compact that could handle multiple images, integrate smoothly with Zod and React Hook Form for validation, show previews, and upload files to cloud storage like S3 or R2. Sounds simple, right? Well, I searched high and low for a resource or component that ticked all these boxes, but I came up empty-handed.
So, I rolled up my sleeves and built one myself: the nextjs-multi-image-upload component. Here’s the story behind it and how you can use it in your own projects.
Why I Built This
I needed a solution that was:
- Compact: No bloated UI—just the essentials.
- Responsive: Works seamlessly across mobile and desktop.
- Validated: Leverages Zod and React Hook Form for type-safe, robust form handling.
- Functional: Previews images, tracks upload progress, and deletes files with a cool animation.
- Cloud-Ready: Uploads to S3, R2, or any service with signed URLs.
After failing to find an existing tool that fit, I decided to create my own. The result is a lightweight, reusable component that’s now available on GitHub for anyone to use.
Key Features
Here’s what makes this uploader stand out:
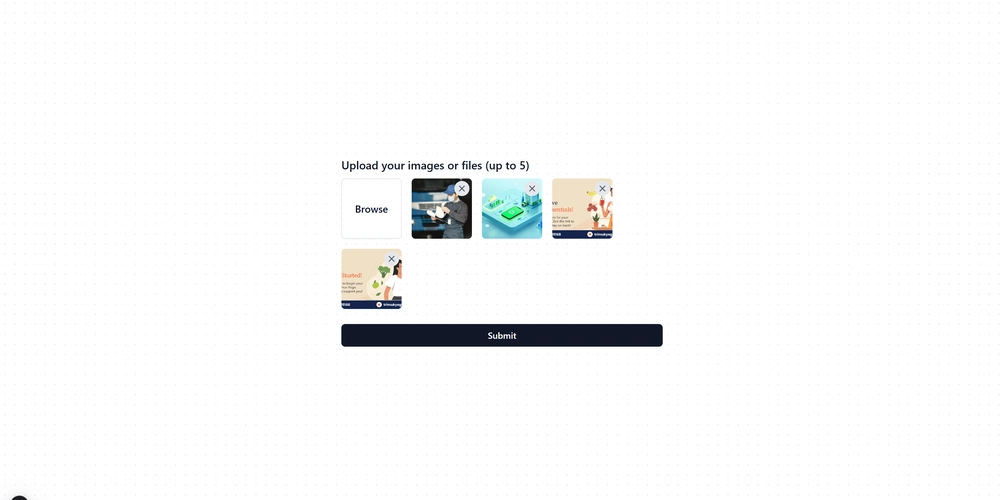
- Multi-Image Support: Upload up to 5 images (configurable) with a clean flex layout.
- Real-Time Previews: See your images as they upload, with progress overlays.
- Deletion Feedback: A glowing animation kicks in while an image is being deleted.
- Type-Safe Validation: Works with React Hook Form and Zod out of the box.
- Cloud Integration: Uploads files to S3 or R2 via signed URLs (server-side routes included).
- Responsive Design: Adapts to any screen size without breaking a sweat.
How to Use It
Getting started is easy. Here’s the quick rundown:
-
Grab the Files:
- Clone the repo:
git clone https://github.com/jacksonkasi0/nextjs-multi-image-upload.git - Or copy these key files into your Next.js project:
src/components/multi-image-upload.tsxsrc/api/upload-api.tssrc/app/api/upload/signed-url/route.tssrc/app/api/upload/delete/route.ts
- Clone the repo:
Install Dependencies:
   bun add react-hook-form @hookform/resolvers/zod zod lucide-react
   bun add -D tailwindcss tailwindcss-animate postcss autoprefixer @types/react @types/node typescript
   npx shadcn-ui@latest add button form label
-
Set Up Tailwind:
Add the glow animation to your
tailwind.config.ts:
   module.exports = {
     theme: {
       extend: {
         animation: {
           "glow-effect": "glow-effect 1.5s infinite ease-in-out",
         },
         keyframes: {
           "glow-effect": {
             "0%, 100%": {
               boxShadow: "0 0 10px var(--muted-foreground), 0 0 20px var(--muted)",
               opacity: "1",
             },
             "50%": {
               boxShadow: "0 0 20px var(--primary), 0 0 40px var(--primary-foreground)",
               opacity: "0.5",
             },
           },
         },
       },
     },
     plugins: [require("tailwindcss-animate")],
   };
- Plug It Into Your Form: Here’s a simple example:
   "use client";

   import { useForm } from "react-hook-form";
   import { zodResolver } from "@hookform/resolvers/zod";
   import * as z from "zod";
   import { Button } from "@/components/ui/button";
   import { Form, FormControl, FormField, FormItem, FormLabel, FormMessage } from "@/components/ui/form";
   import { MultiImageUpload } from "@/components/multi-image-upload";

   const schema = z.object({
     images: z.array(z.string().url()).min(1).max(5),
   });

   export default function Page() {
     const form = useForm({ resolver: zodResolver(schema), defaultValues: { images: [] } });
     const onSubmit = (data) => console.log(data);

     return (
       <Form {...form}>
         <form onSubmit={form.handleSubmit(onSubmit)} className="space-y-6">
           <FormField
             control={form.control}
             name="images"
             render={({ field }) => (
               <FormItem>
                 <FormLabel>ImagesFormLabel>
                 <FormControl>
                   <MultiImageUpload value={field.value} onChange={field.onChange} maxImages={5} />
                 FormControl>
                 <FormMessage />
               FormItem>
             )}
           />
           <Button type="submit">UploadButton>
         form>
       Form>
     );
   }
-
Configure Your Backend:
- Update
upload-api.tsand the API routes to point to your S3/R2 bucket or custom storage solution. - Set up environment variables in
.env
- Update
   NODE_ENV="production"

   # S3
   AWS_ACCESS_KEY_ID="xxxxx" # your access key
   AWS_SECRET_ACCESS_KEY="xxxxxxx" # your secret key
   AWS_REGION="xxxxxx" # example: ap-south-1, us-east-1
   AWS_BUCKET_NAME="xxxxx" # your bucket name
That’s it! You’ve got a fully functional image uploader ready to go.
Wrap-Up
Building this component scratched an itch I couldn’t find a solution for elsewhere. It’s small, powerful, and fits right into modern Next.js workflows. If you find it useful, I’d love for you to check out the repo, give it a star, drop a comment, or reach out to me with feedback. You can find it here: github.com/jacksonkasi0/nextjs-multi-image-upload.
Happy coding, and let me know how it works for you!


![[The AI Show Episode 142]: ChatGPT’s New Image Generator, Studio Ghibli Craze and Backlash, Gemini 2.5, OpenAI Academy, 4o Updates, Vibe Marketing & xAI Acquires X](https://www.marketingaiinstitute.com/hubfs/ep%20142%20cover.png)


![[FREE EBOOKS] The Kubernetes Bible, The Ultimate Linux Shell Scripting Guide & Four More Best Selling Titles](https://www.javacodegeeks.com/wp-content/uploads/2012/12/jcg-logo.jpg)


![From drop-out to software architect with Jason Lengstorf [Podcast #167]](https://cdn.hashnode.com/res/hashnode/image/upload/v1743796461357/f3d19cd7-e6f5-4d7c-8bfc-eb974bc8da68.png?#)


.png?#)


.jpg?#)


_Christophe_Coat_Alamy.jpg?#)


![Rapidus in Talks With Apple as It Accelerates Toward 2nm Chip Production [Report]](https://www.iclarified.com/images/news/96937/96937/96937-640.jpg)


