


![[The AI Show Episode 144]: ChatGPT’s New Memory, Shopify CEO’s Leaked “AI First” Memo, Google Cloud Next Releases, o3 and o4-mini Coming Soon & Llama 4’s Rocky Launch](https://www.marketingaiinstitute.com/hubfs/ep%20144%20cover.png)


-All-will-be-revealed-00-35-05.png?width=1920&height=1920&fit=bounds&quality=70&format=jpg&auto=webp#)


![What iPhone 17 model are you most excited to see? [Poll]](https://9to5mac.com/wp-content/uploads/sites/6/2025/04/iphone-17-pro-sky-blue.jpg?quality=82&strip=all&w=290&h=145&crop=1)


![Hands-On With 'iPhone 17 Air' Dummy Reveals 'Scary Thin' Design [Video]](https://www.iclarified.com/images/news/97100/97100/97100-640.jpg)
![Mike Rockwell is Overhauling Siri's Leadership Team [Report]](https://www.iclarified.com/images/news/97096/97096/97096-640.jpg)
![Instagram Releases 'Edits' Video Creation App [Download]](https://www.iclarified.com/images/news/97097/97097/97097-640.jpg)
![Inside Netflix's Rebuild of the Amsterdam Apple Store for 'iHostage' [Video]](https://www.iclarified.com/images/news/97095/97095/97095-640.jpg)


Build Your Own Authenticator: TOTP vs HOTP Explained
Table of Contents Table of Contents Introduction Under The Hood TOTP or HOTP Little Practice Introduction First of all, it is important to understand the difference between authorization and authentication Authentication - who are you? Enter your login and password please Authorization - what are you allowed to do? Oh, you're admin, so you can view this page but others don't Globally, authentication types can be categorized into: What you know - password, PIN What you have - smartphone, token, smart card What you are - fingerprint, face, voice (biometrics) (Sometimes a 4th type is distinguished: “where you are” - geolocation, IP address) In this article, we’ll dive deep into One-Time Password (OTP) authentication, a method that falls under the "something you have" type. Let’s start by looking at how OTP works from the user’s perspective - chances are, you’ve already encountered it in practice. To begin, you download an authenticator app that generates codes locally (without internet) on your device. A common choice is Google Authenticator, though there are many alternatives - you can even build your own. Functionally, they all work the same way. The authenticator app doesn’t need internet access. It generates one-time passwords for logging into websites and apps. Here’s how the setup process typically works: When enabling 2FA on a website, it shows you a QR code that contains a secret key. You scan this QR code with your authenticator app (or enter the secret manually). After linking, the app displays the service name (which you can customize) and starts generating one-time passcodes. These codes change: Either at regular time intervals (typically every 30 seconds), Or immediately after being used. When you log into the service, it asks you for the current code from your app - this acts as another layer of verification. But how exactly does it all work behind the scenes? Under The Hood The service (say, Facebook) generates a secret key. You add this key to your authenticator app, usually by scanning a QR code. From that point, both the server and the app can independently generate the same one-time passwords using that shared secret. There are two main types of OTP generation: HOTP (counter-based): uses a number that increases each time a code is generated. TOTP (time-based): uses the current time (typically in 30-second intervals) to create a new code. Today, TOTP is the standard, since it doesn’t require syncing counters - just the secret key and system time. When you enter a code, the service generates its own and compares it. If they match, you’re authenticated. TOTP or HOTP Now that we’ve looked at how OTP works, let’s explore the algorithms behind it HOTP (HMAC-based One-Time Password) HOTP is an algorithm for generating one-time passwords based on HMAC and counter. It is defined in the official specification RFC 4226 and is the basis for the later TOTP (temporary OTP) Input data: Secret key Counter - 8-byte value incremented at each generation Example: SECRET = "JBSWY3DPEE======" COUNTER = 5 1. Convert counter to bytes: COUNTER_BYTES = [00 00 00 00 00 00 00 05] 3. Calculate HMAC-SHA1: HMAC_RESULT = HMAC_SHA1(SECRET, COUNTER_BYTES) -> [1a f9 15 68 c8 7c 7a 61 37 99 7f 25 b0 dc 76 b3 c0 80 ee d2] 4. Take the last byte of HMAC: LAST_BYTE = 0xD2 5. Calculate offset: OFFSET = 0xD2 & 0x0F = 0x03 (3 in decimal) 6. Extract 4 bytes starting with offset (3): HMAC_SLICE = [15 68 c8 7c] 7. Convert to 31-bit number: BINARY = 0x1568c87c & 0x7FFFFFFFFF = 0x1568C87C (359,186,844 in decimal) 8. Take the last 6 digits: TOTP = 186844 Output data (6-digit code): Code: 186844 TOTP (Time-based One-Time Password) TOTP is a time-based one-time password generation algorithm that extends HOTP. It uses the current time instead of a counter, which makes it more user-friendly. The TOTP specification is described in RFC 6238. The main differences from HOTP are: A timestamp (usually Unix time in seconds) is used instead of a counter Password changes at a fixed interval (most commonly 30 seconds) Does not require synchronization of the counter between client and server (synchronized time is sufficient). Input data Secret key Current time in unix format Time interval in seconds Example: SECRET = "JBSWY3DPEE======" CURRENT_TIME = 1712589000 (UNIX timestamp 2024-04-08 12:10:00 UTC) TIME_STEP = 30 (seconds) 1. Convert time to a time step T = floor(CURRENT_TIME / TIME_STEP) 2. Convert T to an 8-byte array T_BYTES = [00 00 00 00 03 68 F3 DC] 3. Compute HMAC-SHA1 with secret and T_BYTES HMAC_RESULT = HMAC_SHA1(SECRET, T_BYTES) -> [1f 86 98 98 69 0e 02 ca 16 61 85 50 ef 7f 19 da 8e 94 5b 55] 4. Determine offset (last 4 bits of the last byte): LAST_BYTE = 0x55 OFFSET = 0x55 & 0x0F = 0x05 (5 in decimal) 5. Extract the 4 bytes starting at
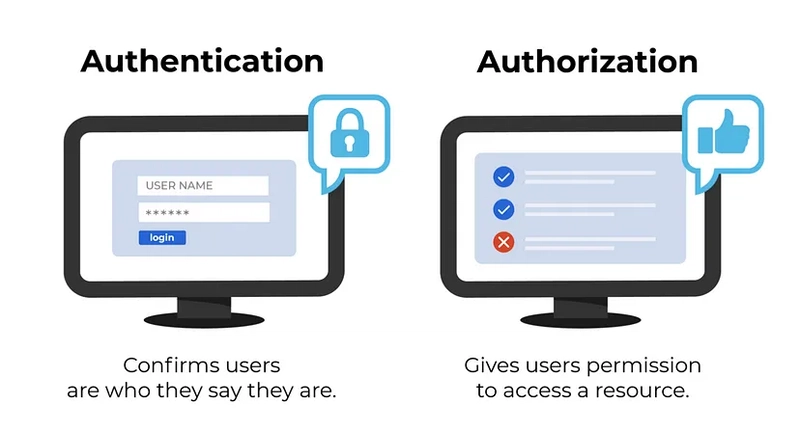
Table of Contents
- Table of Contents
- Introduction
- Under The Hood
- TOTP or HOTP
- Little Practice
Introduction
First of all, it is important to understand the difference between authorization and authentication
- Authentication - who are you? Enter your login and password please
- Authorization - what are you allowed to do? Oh, you're admin, so you can view this page but others don't
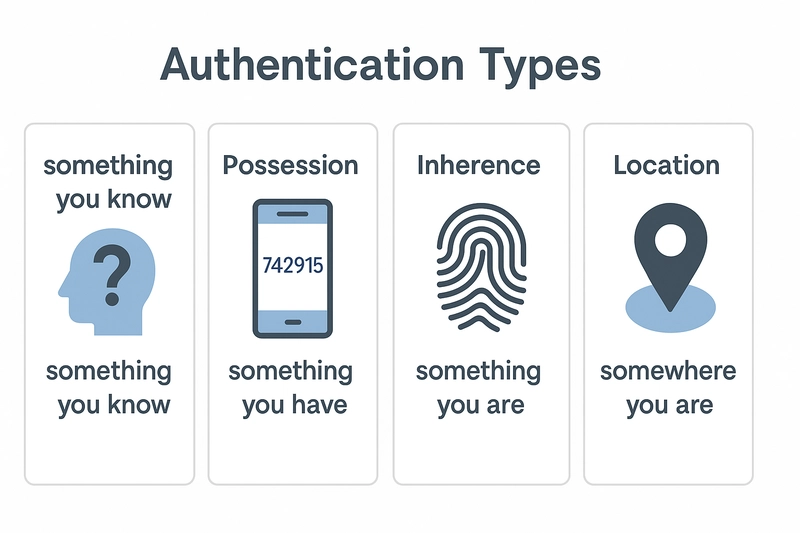
Globally, authentication types can be categorized into:
- What you know - password, PIN
- What you have - smartphone, token, smart card
- What you are - fingerprint, face, voice (biometrics)
- (Sometimes a 4th type is distinguished: “where you are” - geolocation, IP address)
In this article, we’ll dive deep into One-Time Password (OTP) authentication, a method that falls under the "something you have" type.
Let’s start by looking at how OTP works from the user’s perspective - chances are, you’ve already encountered it in practice.

To begin, you download an authenticator app that generates codes locally (without internet) on your device. A common choice is Google Authenticator, though there are many alternatives - you can even build your own. Functionally, they all work the same way.
The authenticator app doesn’t need internet access. It generates one-time passwords for logging into websites and apps. Here’s how the setup process typically works:
- When enabling 2FA on a website, it shows you a QR code that contains a secret key.
- You scan this QR code with your authenticator app (or enter the secret manually).
- After linking, the app displays the service name (which you can customize) and starts generating one-time passcodes.
- These codes change:
- Either at regular time intervals (typically every 30 seconds),
- Or immediately after being used.
When you log into the service, it asks you for the current code from your app - this acts as another layer of verification. But how exactly does it all work behind the scenes?
Under The Hood
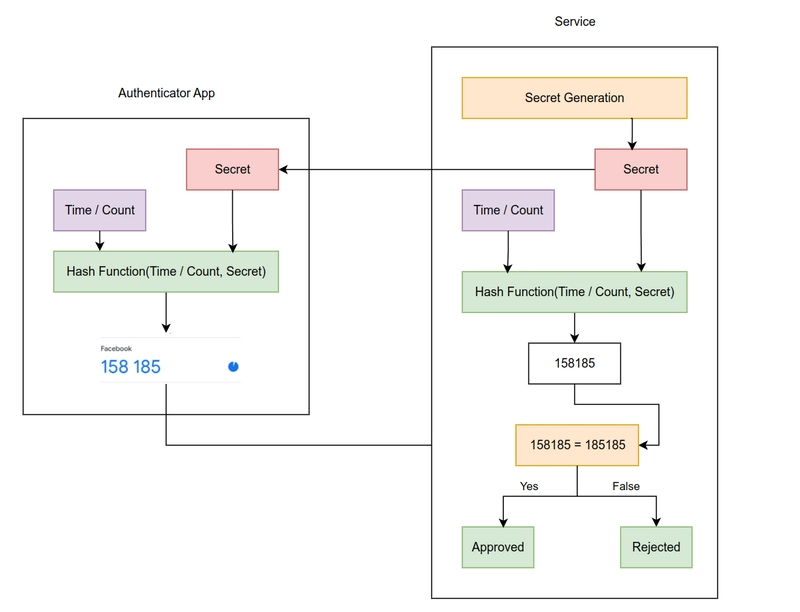
The service (say, Facebook) generates a secret key. You add this key to your authenticator app, usually by scanning a QR code.
From that point, both the server and the app can independently generate the same one-time passwords using that shared secret.
There are two main types of OTP generation:
- HOTP (counter-based): uses a number that increases each time a code is generated.
- TOTP (time-based): uses the current time (typically in 30-second intervals) to create a new code.
Today, TOTP is the standard, since it doesn’t require syncing counters - just the secret key and system time. When you enter a code, the service generates its own and compares it. If they match, you’re authenticated.
TOTP or HOTP
Now that we’ve looked at how OTP works, let’s explore the algorithms behind it
HOTP (HMAC-based One-Time Password)
HOTP is an algorithm for generating one-time passwords based on HMAC and counter. It is defined in the official specification RFC 4226 and is the basis for the later TOTP (temporary OTP)
Input data:
- Secret key
- Counter - 8-byte value incremented at each generation
Example:
SECRET = "JBSWY3DPEE======"
COUNTER = 5

1. Convert counter to bytes:
   COUNTER_BYTES = [00 00 00 00 00 00 00 05]

3. Calculate HMAC-SHA1:
   HMAC_RESULT = HMAC_SHA1(SECRET, COUNTER_BYTES)
   -> [1a f9 15 68 c8 7c 7a 61 37 99 7f 25 b0 dc 76 b3 c0 80 ee d2]

4. Take the last byte of HMAC:
   LAST_BYTE = 0xD2

5. Calculate offset:
   OFFSET = 0xD2 & 0x0F = 0x03 (3 in decimal)

6. Extract 4 bytes starting with offset (3):
   HMAC_SLICE = [15 68 c8 7c]

7. Convert to 31-bit number:
   BINARY = 0x1568c87c & 0x7FFFFFFFFF = 0x1568C87C (359,186,844 in decimal)

8. Take the last 6 digits:
   TOTP = 186844
Output data (6-digit code):
Code: 186844
TOTP (Time-based One-Time Password)
TOTP is a time-based one-time password generation algorithm that extends HOTP. It uses the current time instead of a counter, which makes it more user-friendly. The TOTP specification is described in RFC 6238.
The main differences from HOTP are:
- A timestamp (usually Unix time in seconds) is used instead of a counter
- Password changes at a fixed interval (most commonly 30 seconds)
- Does not require synchronization of the counter between client and server (synchronized time is sufficient).
Input data
- Secret key
- Current time in unix format
- Time interval in seconds
Example:
SECRET = "JBSWY3DPEE======"
CURRENT_TIME = 1712589000 (UNIX timestamp 2024-04-08 12:10:00 UTC)
TIME_STEP = 30 (seconds)

1. Convert time to a time step
   T = floor(CURRENT_TIME / TIME_STEP)

2. Convert T to an 8-byte array
   T_BYTES = [00 00 00 00 03 68 F3 DC]

3. Compute HMAC-SHA1 with secret and T_BYTES
   HMAC_RESULT = HMAC_SHA1(SECRET, T_BYTES)
   -> [1f 86 98 98 69 0e 02 ca 16 61 85 50 ef 7f 19 da 8e 94 5b 55]

4. Determine offset (last 4 bits of the last byte):
   LAST_BYTE = 0x55
   OFFSET = 0x55 & 0x0F = 0x05 (5 in decimal)

5. Extract the 4 bytes starting at offset
   HMAC_RESULT[5:9] = [0e 02 ca 16]

6. Convert to 31-bit number (ignore high bit)
   0x0e02ca16 & 0x7FFFFFFFFF
   = 00001110 00000010 11001010 00010110 (binary)
   & 01111111 11111111 11111111 11111111 11111111 11111111
   = 00001110 00000010 11001010 00010110
   = 0x0e02ca16 (234,999,318 in decimal)

7. Take the last 6 digits
   TOTP = 999,318 % 1,000,000 = 999318
Output data (6-digit code):
Code: 999318
Little Practice
With a little help from AI I wrote a simple Command-Line Interface (CLI) with adding secret keys and generating OTP. Google Authenticator operates in a similar manner
#!/usr/bin/env node

// Import required modules
const readline = require("readline"); // For reading user input
const { authenticator } = require("otplib"); // For OTP generation

// Object to store secret keys with their labels
const secrets = {};

// Create interface for reading from stdin and writing to stdout
const rl = readline.createInterface({
   input: process.stdin,
   output: process.stdout,
});

// Main menu function that displays options and handles user choice
function menu() {
   console.log("\n=== Authenticator Menu ===");
   console.log("1. Add new secret");
   console.log("2. Show current tokens");
   console.log("3. List saved entries");
   console.log("4. Exit\n");

   // Prompt user for their choice
   rl.question("Choose an option: ", (answer) => {
      switch (answer.trim()) {
         case "1":
            addSecret(); // Add new secret key
            break;
         case "2":
            showTokens(); // Generate and display current OTP tokens
            break;
         case "3":
            listSecrets(); // List all saved secret labels
            break;
         case "4":
            rl.close(); // Exit the program
            break;
         default:
            console.log("Invalid option. Try again.");
            menu(); // Show menu again on invalid input
      }
   });
}

// Function to add a new secret key with a label
function addSecret() {
   rl.question("Enter label (e.g. email/service name): ", (label) => {
      rl.question("Enter secret (base32 format): ", (secret) => {
         // Store the secret with its label
         secrets[label] = secret.trim();
         console.log(`✅ Secret for "${label}" saved.`);
         menu(); // Return to main menu
      });
   });
}

// Function to generate and display current OTP tokens for all stored secrets
function showTokens() {
   console.log("\n--- Current OTP Codes ---");
   // Iterate through all stored secrets and generate tokens
   for (const [label, secret] of Object.entries(secrets)) {
      const token = authenticator.generate(secret);
      console.log(`${label}: ${token}`);
   }
   console.log("--------------------------\n");
   menu(); // Return to main menu
}

// Function to list all stored secret labels
function listSecrets() {
   console.log("\n--- Saved Labels ---");
   // Display all labels with numbering
   Object.keys(secrets).forEach((label, i) => {
      console.log(`${i + 1}. ${label}`);
   });
   console.log("---------------------\n");
   menu(); // Return to main menu
}

// Clear console and display welcome message
console.clear();
console.log("Welcome to CLI Authenticator!");
// Start with the main menu
menu();
You can clone it from GitHub as well - https://github.com/dmitit/authit
Outroduction
This method of authentication is quite simple for both developers and users. However, if an attacker gets your secret key, it will be no problem for him to log into your account. So storing your secret key offline on your devices saves the situation.
I never memorize passwords. I memorize the algorithms that generate them