


![[The AI Show Episode 142]: ChatGPT’s New Image Generator, Studio Ghibli Craze and Backlash, Gemini 2.5, OpenAI Academy, 4o Updates, Vibe Marketing & xAI Acquires X](https://www.marketingaiinstitute.com/hubfs/ep%20142%20cover.png)


![From drop-out to software architect with Jason Lengstorf [Podcast #167]](https://cdn.hashnode.com/res/hashnode/image/upload/v1743796461357/f3d19cd7-e6f5-4d7c-8bfc-eb974bc8da68.png?#)


.png?#)


(1).jpg?width=1920&height=1920&fit=bounds&quality=80&format=jpg&auto=webp#)


_Christophe_Coat_Alamy.jpg?#)
.webp?#)
.webp?#)


![Apple Considers Delaying Smart Home Hub Until 2026 [Gurman]](https://www.iclarified.com/images/news/96946/96946/96946-640.jpg)
![iPhone 17 Pro Won't Feature Two-Toned Back [Gurman]](https://www.iclarified.com/images/news/96944/96944/96944-640.jpg)
![Tariffs Threaten Apple's $999 iPhone Price Point in the U.S. [Gurman]](https://www.iclarified.com/images/news/96943/96943/96943-640.jpg)


Azure Applied Skills: Creating a VM Image and Azure Compute Gallery
Introduction In this guide, we will walk through the process of creating a VM image and publishing it to the Azure Compute Gallery. This allows for efficient management and deployment of standardized VM images across multiple Azure regions. Prerequisites Before starting, ensure you have: An active Azure subscription Access to the Azure Portal A Virtual Machine (VM) to capture an image from What is Azure compute gallery Azure Compute Gallery is a centralized service for managing and sharing VM images across multiple regions. It enables versioning, replication, and controlled access to ensure fast, consistent, and scalable VM deployments. Key Benefits: Versioning & Replication – Maintain multiple image versions and distribute them globally. Faster Deployments – Pre-configured images speed up provisioning. Consistency & Scalability – Ensure uniform VM configurations across deployments. Cost Efficiency – Reduce storage costs with shared image replicas. Step 1: Prepare the VM for Image Capture Before capturing a VM image, ensure the VM is in a generalized state Deprovision the VM (Windows/Linux): Windows: Open PowerShell and run: sysprep.exe /generalize /shutdown Linux: Open a terminal and run: sudo waagent -deprovision+user sudo shutdown -h now Ensure the VM status is stopped (deallocated) in the Azure Portal. Step 2: Create the new image Select Capture. Select image Select Resource group Select Yes, share it to a gallery as a VM image version Select Create New under Target Azure compute gallery, enter a name and click OK For Operating system state, we will select Specialized Click create new under Target VM image definition Name the Image definition Click ok in the side pannel Click Review + create Click create Wait for the deployment Click go to resource Step 3: Confirm Image Notice that you can create both a new VM and VMSS based on this image Following these steps, you have now created and stored a VM Image that you can now use to create more VMs or a VMSS!
Introduction
In this guide, we will walk through the process of creating a VM image and publishing it to the Azure Compute Gallery. This allows for efficient management and deployment of standardized VM images across multiple Azure regions.
Prerequisites
Before starting, ensure you have:
An active Azure subscription
Access to the Azure Portal
A Virtual Machine (VM) to capture an image from
What is Azure compute gallery
Azure Compute Gallery is a centralized service for managing and sharing VM images across multiple regions. It enables versioning, replication, and controlled access to ensure fast, consistent, and scalable VM deployments.
Key Benefits:
Versioning & Replication – Maintain multiple image versions and distribute them globally.
Faster Deployments – Pre-configured images speed up provisioning.
Consistency & Scalability – Ensure uniform VM configurations across deployments.
Cost Efficiency – Reduce storage costs with shared image replicas.
Step 1: Prepare the VM for Image Capture
Before capturing a VM image, ensure the VM is in a generalized state
Deprovision the VM (Windows/Linux):
- Windows: Open PowerShell and run:
sysprep.exe /generalize /shutdown
- Linux: Open a terminal and run:
sudo waagent -deprovision+user
sudo shutdown -h now
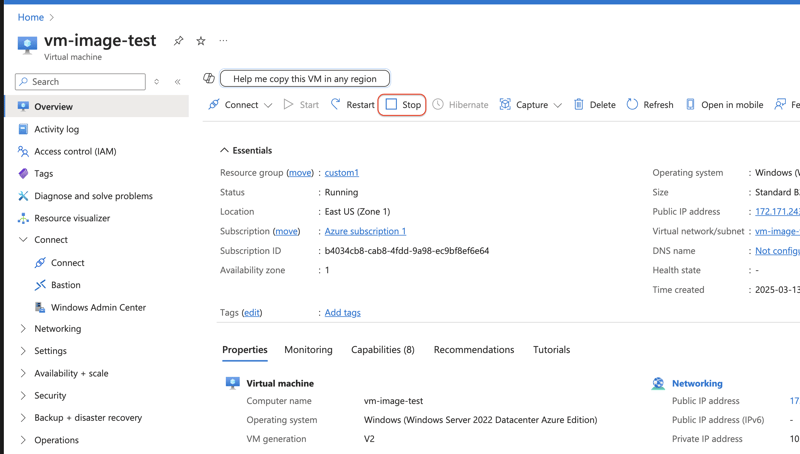
- Ensure the VM status is stopped (deallocated) in the Azure Portal.
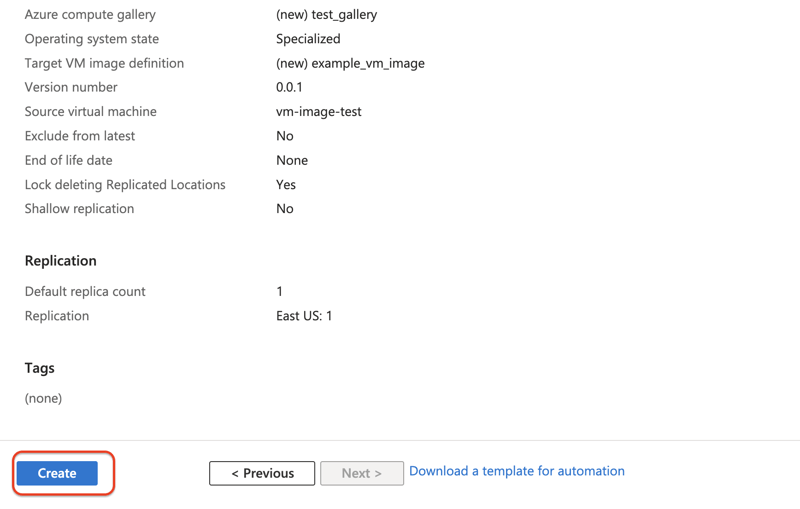
Step 2: Create the new image
Select Capture. Select image
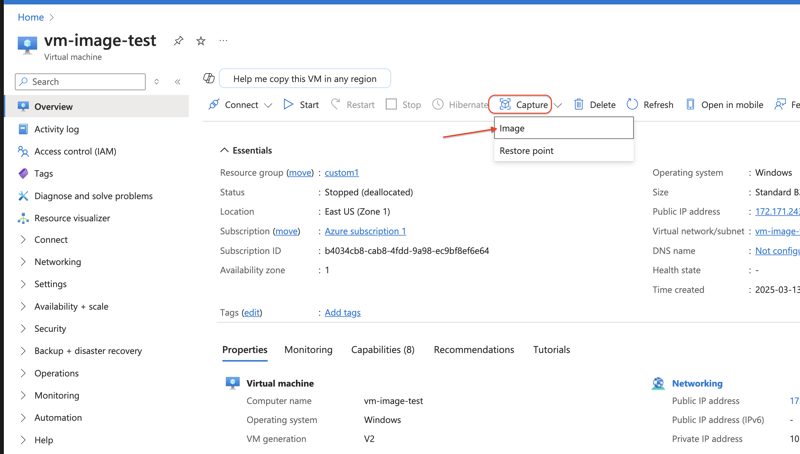
Select Resource group
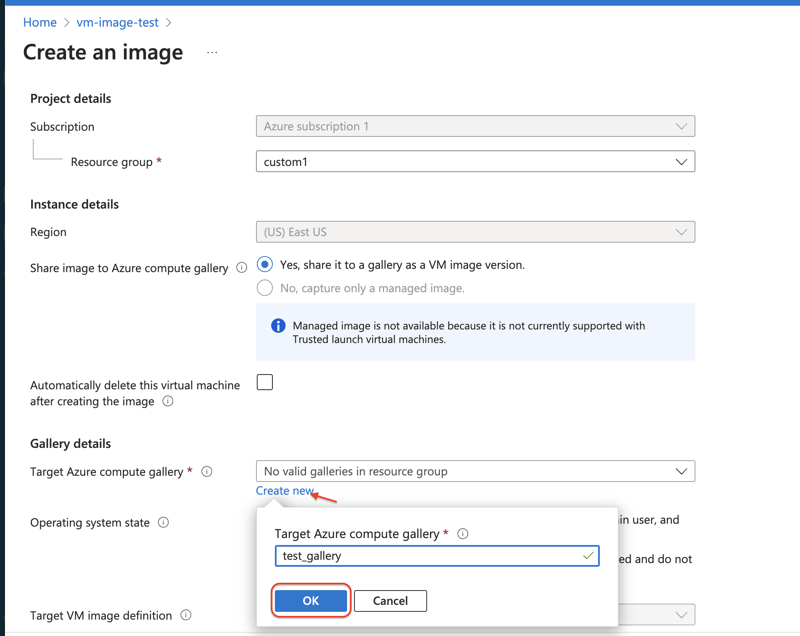
Select
Yes, share it to a gallery as a VM image versionSelect Create New under Target Azure compute gallery, enter a name and click OK
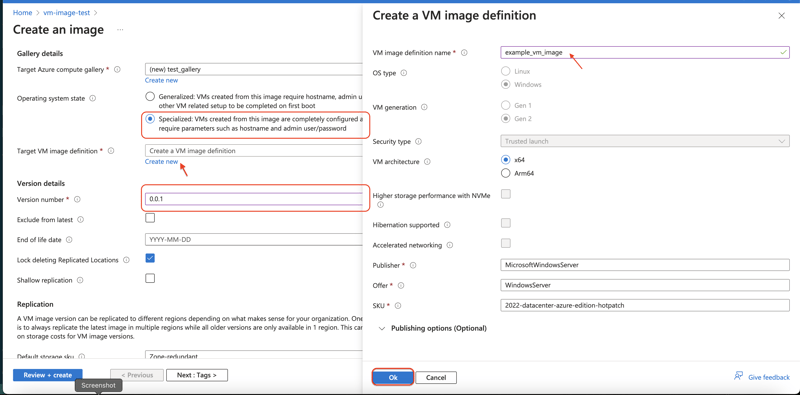
For Operating system state, we will select Specialized
Click create new under Target VM image definition
Name the Image definition
Click ok in the side pannel
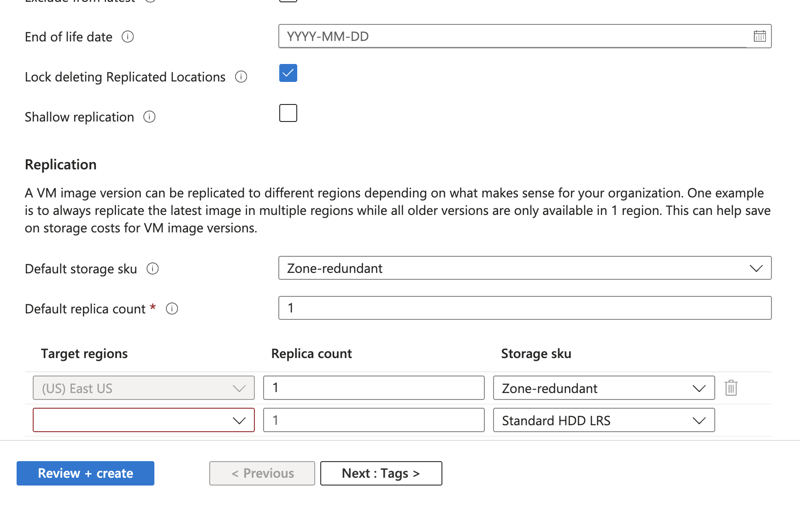
Click Review + create
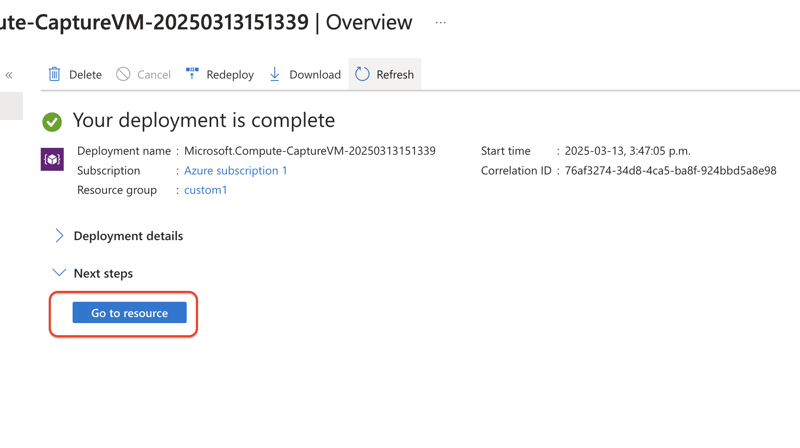
Click create

Wait for the deployment
Click go to resource
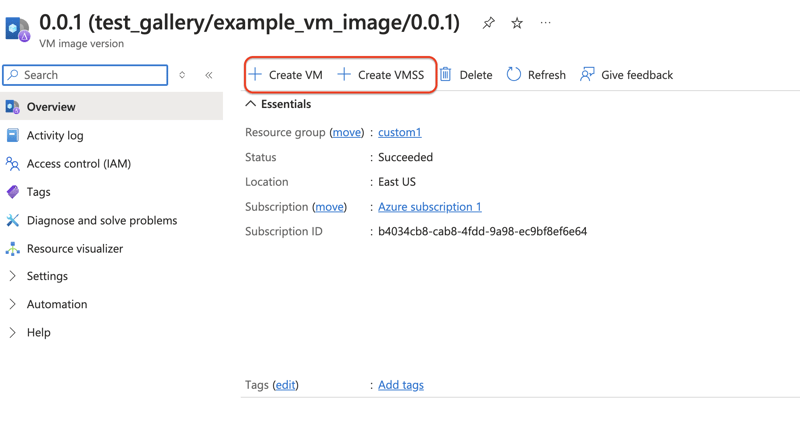
Step 3: Confirm Image
- Notice that you can create both a new VM and VMSS based on this image
Following these steps, you have now created and stored a VM Image that you can now use to create more VMs or a VMSS!